Creating a Professional MSI or EXE Package
The following article uses options that are available starting with the Professional edition and project type.
This tutorial will guide you step by step into the creation and customization of an installer, whether it is an MSI, MSIX or EXE, through an Advanced Installer Professional project. It is addressed to those who have completed the Simple Installation tutorial.
- 1. Create project
- 2. Enter product details
- 3. Set install parameters
- 4. Add files and folders to your project
- 5. Add registry keys and values to your package
- 6. Set launch conditions
- 6.1 Video tutorial
- 7. Add Prerequisites
- 8. Create new file extensions and make file associations
- 9. Build and Install your Customized Package
- 10. Organize your application into features
- 11. Set dialogs to guide the user during install
- 12. Set package name and some more build options
- 13. Add environment variables to your project
- 14. Add custom actions to your installation package
- 15. Install and control services
- 16. Set the UI appearance of your custom installation package
- 17. Installer Analytics
- 18. See also
1. Create project
Let's suppose you want to create a package for a text editor you have created. We will use a sample editor application built by us. This editor has some characteristics:
- For the editor to function properly some registry keys must be present on the target system.
- Suppose this editor is developed using Visual Basic. In order to work, it needs Visual Basic 6 Runtime to be installed on the target machine.
- It has a type of file that it associated to, called, say, EDI file.
After launching Advanced Installer, you will be presented with a dialog where you can choose the type of the project you want to create.

Select Professional and press the Create Project button. The new project has been created and from now on you will edit it.
![]() Save the project and give it an appropriate name - let's say "Tutorial" for
this example.
Save the project and give it an appropriate name - let's say "Tutorial" for
this example.
English is the default project language, but you can change it to any of the languages known by Advanced Installer.
2. Enter product details
Now you can see the main view split into two panes. In the left pane, you can see all the options you have to edit in your current project, grouped in categories.
![]() Switch to “Product
Details” page to set the information seen by the user for your installation
package. Fill the fields in the right pane with the corresponding data.
Switch to “Product
Details” page to set the information seen by the user for your installation
package. Fill the fields in the right pane with the corresponding data.
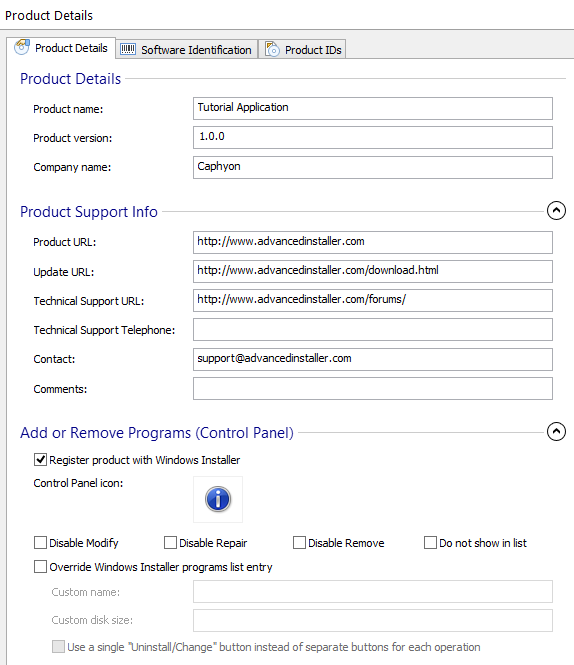
For further information about this page please see Product Details Tab.
3. Set install parameters
You now have the general information on the Product Details page filled in.
![]() Go to the Install Parameters page
(click the Install Parameters option).
Go to the Install Parameters page
(click the Install Parameters option).
Set the default installation paths for the "Application Folder" and "Application Shortcut Folder" by using the combo boxes or the button. You can edit these fields, but the values from the combo boxes are the most common ones.
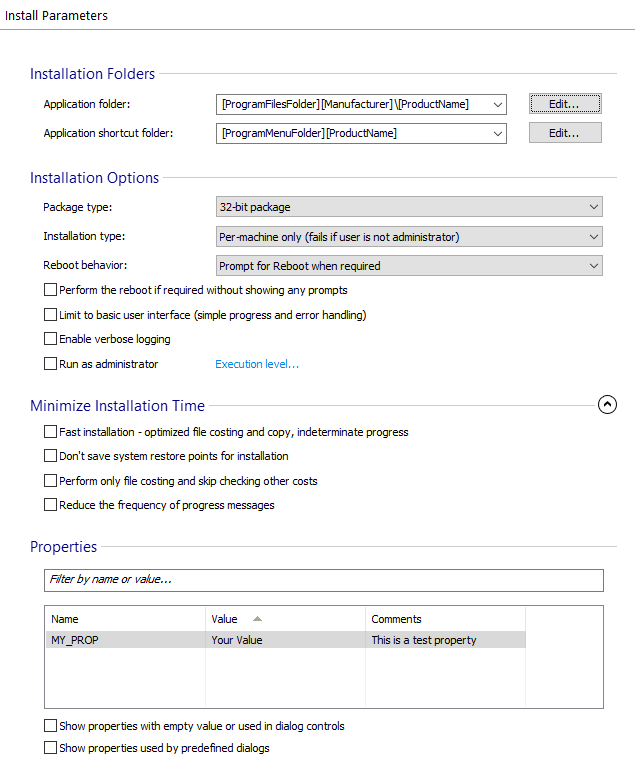
For more information about these paths please see the Install Parameters page.
4. Add files and folders to your project
The next step is to add to the project the files and/or folders that compose your application. You will need an EDI file to test the editor's file associations. Since it is a custom type of file, you will have to create it. Use any text editor to create a "foo.txt". Then rename it "foo.edi".
![]() Select “Files and Folders” from the
“Resources” menu on the left pane.
Select “Files and Folders” from the
“Resources” menu on the left pane.
![]() Click on the toolbar button and select the files
of your application, use our Sample Application.
Repeat this step to include the Foo.edi file you have created.
Click on the toolbar button and select the files
of your application, use our Sample Application.
Repeat this step to include the Foo.edi file you have created.

Once the files are added, their names will appear in a list in the right-side pane of the view.
Now, let's make a shortcut to the Sample.exe file you just added. Right-click on this file and choose “New Shortcut To -> Installed File”. In the newly appeared dialog choose a name for your shortcut and a location - like in the following screenshot. Press the OK button and the shortcut will appear listed in the application shortcut folder.
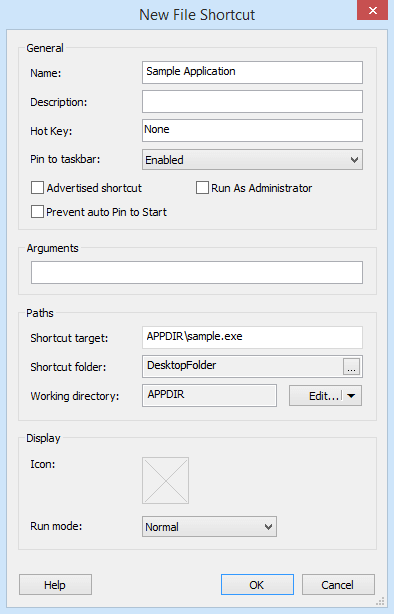
For more information please see the Files and Folders
page.
5. Add registry keys and values to your package
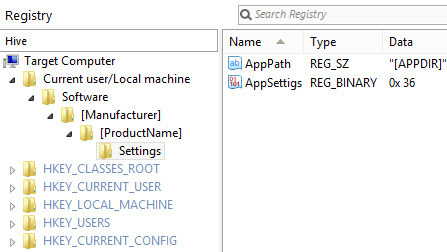
Let's suppose that your application needs two registry entries. These are located in the "Software\[Manufacturer]\[ProductName]\Settings" key.
- One registry value is named "AppPath" and stores the path where your application is installed.
- The other one is named "AppSettings" and contains a value that shows the current settings of the application. On install, it has the value "36".
![]() Select the “Registry”
page.
Select the “Registry”
page.
In the tree, select the "Software\[Manufacturer]\[ProductName]" key.
![]() Click on the toolbar button to create a key. Edit the
key name to "Settings".
Click on the toolbar button to create a key. Edit the
key name to "Settings".
![]() Add a value for it using the toolbar
button.
Add a value for it using the toolbar
button.
In the "Name" text field enter the name of your first key: "AppPath".
Press the button and select "Application Folder". Since "Data" is a Formatted Type text field the value that it contains will be expanded at install time into the full path to your application's location.
Use the same steps to create the "AppSettings" value. This time when creating the new key select "Binary" and type in the "Data" field the number "36".
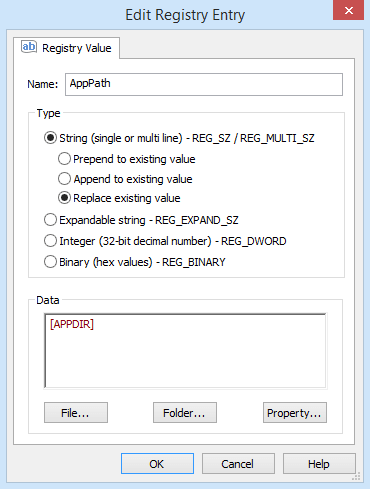
Once the registry keys and values are added, you can see them in the right-side pane of the view.
For more information please see the Registry page.
6. Set launch conditions
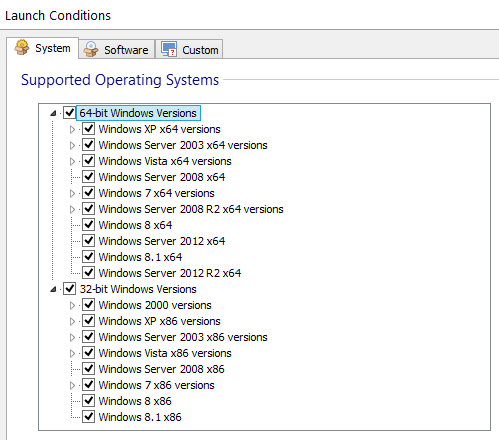
![]() Go to the "System" tab of the "Launch Conditions" page. If you wish that your application should be installed
only on a particular set of operating systems make sure that the rest of the operating
systems are not ticked in the view.
Go to the "System" tab of the "Launch Conditions" page. If you wish that your application should be installed
only on a particular set of operating systems make sure that the rest of the operating
systems are not ticked in the view.
Create a custom launch condition which will make sure that the package will not be installed if the file "example.txt" does not exist on the partition on which Windows is installed. For this you can follow these steps:
- Create a File search in the Search page
- Set the file name to example.txt
- Rename the search to FILE
- Use the context menu to add a folder as the location of the search
- Set this folder to [WindowsVolume] (this is resolved to the partition on which Windows was installed)
- Use the "Test Search" button on the toolbar to test the search
- Go to the Custom tab in the "Launch Conditions" page
- Press the button to add this launch condition:
Condition: FILE
Description: This application cannot be installed because of the file
"C:\example.txt" does not exist.
7. Add Prerequisites
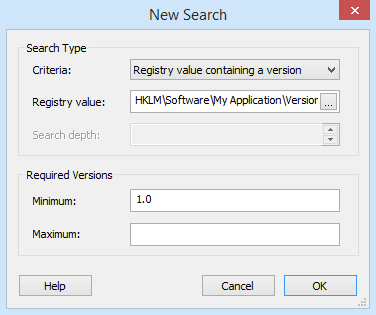
Let's suppose that your application requires the "My Application.exe" installation package to be installed. This package will install an application and it will create the registry entry HKEY_LOCAL_MACHINE\Software\My Application\Version with the value 1.0. If this application is not already present on the target machine, your package will have to install it before deploying your application. For this, you can use the "Prerequisite" feature.
![]() Go to the "Prerequisites" page.
Go to the "Prerequisites" page.
Select "New Package Prerequisite" from the context menu. Then select "My Application.exe" installation package from disk.
You can also set the location of the prerequisite as a URL from where the file can be
downloaded, by selecting "New URL prerequisite" from the context menu. Or, you can use the
"New Prerequisite Wizard" option from the toolbar to guide you through defining your
prerequisite. Advanced Installer comes with a list of commonly used prerequisites, for which
all the settings are already defined.
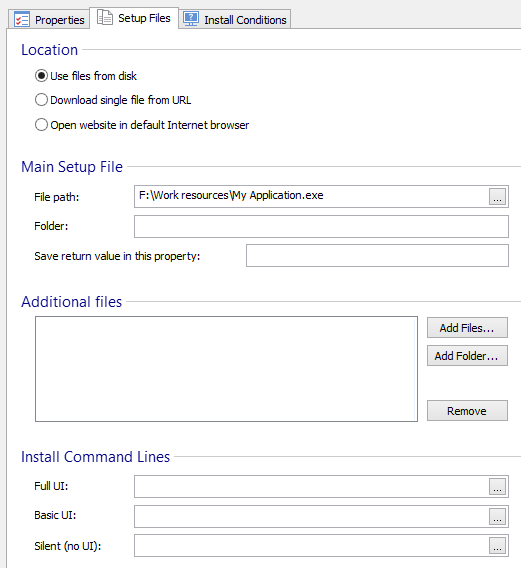
After the properties of the prerequisite have been set, you need to set the detection criteria by using the Install Conditions tab.
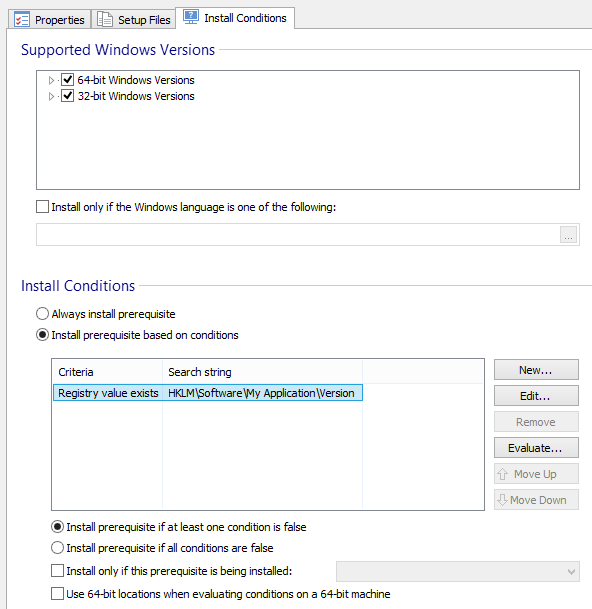
Presuming that the prerequisite application creates a registry entry, you can select "Install prerequisite based on conditions" and define a detection criteria in the Searches section by setting the registry as a target for the new search.
For more information please see the Prerequisites
page.
8. Create new file extensions and make file associations
Your application uses files with a particular extension (in our example that is "edi"). You may want to associate that type of files to be opened or edited with your application. Advanced Installer helps you do this in a very simple way.
![]() Choose “File Association” in the left
pane.
Choose “File Association” in the left
pane.
![]() Use the toolbar button to create a new
extension: "edi". Enter a description of this extension in the appropriate field in the
right-side pane. You may choose an icon to be displayed for all the files with the extension
you created.
Use the toolbar button to create a new
extension: "edi". Enter a description of this extension in the appropriate field in the
right-side pane. You may choose an icon to be displayed for all the files with the extension
you created.
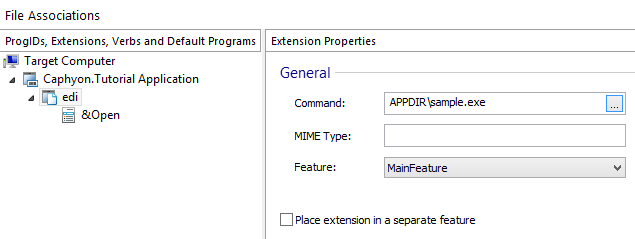
For every extension contained in your application, you need to add at least one verb. The name of the verb will be seen in the context menu that appears when you right-click on a file of "edi" type in Windows Explorer.
In this example, you should leave the defaults settings. The effect is that when you double click a file or you choose the "Open" action from a context menu of an "edi" file, the application is automatically launched with the command line argument specifying the absolute path of the chosen file.

For more information please see the File Associations
page.
9. Build and Install your Customized Package
You are now ready to test your program. Build and install your program as described in the Simple Installation tutorial.
To test if the file associations are working properly, look in the folder where you have installed the program and double-click the EDI file. This should open using Sample.exe that you have installed. Also, you can verify the value written in the registry for AppPath using Regedit.exe.
10. Organize your application into features
Giving the user the possibility to install only some part of your application can be done easily with Advanced Installer. To do this you must organize your application into several features.
![]() To see the structure of your application select the Organization page on the left pane.
To see the structure of your application select the Organization page on the left pane.
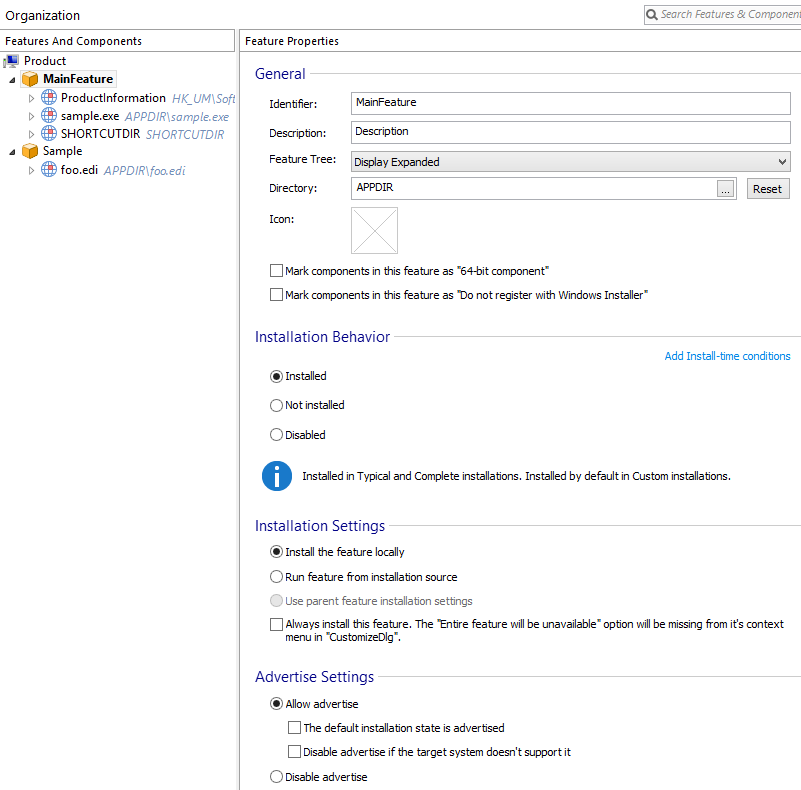
At this moment, all your files are included into a single feature, called "MainFeature". Create a new feature that contains the "foo.edi" example file. In the "MainFeature" only the "Sample.exe" component will be present.
![]() Select "Product" in the tree and click the "New Feature" toolbar
button.
Select "Product" in the tree and click the "New Feature" toolbar
button.
Drag and drop the "foo.edi" component in the newly created feature. To make this feature optional (i.e. to be installed only on Custom or Full types of installation) select in the "Not installed" option.
For more details about features and components see the Organization page.
11. Set dialogs to guide the user during install
![]() Go to the Dialogs page.
Go to the Dialogs page.
Here you can select the dialogs that appear during install. In our example, you will add two more dialogs:
- A dialog in which the user to choose the type of installation (Typical, Complete, Custom).
- A dialog for displaying a license agreement text. This will allow the user to choose to view the ReadMe file or to launch the application at the end of the installation.
Setup type dialog:
- Right-click the Welcome dialog from the left-side pane.
- Choose “Add Dialog” from the context menu.
- Select the “SetupTypeDlg” dialog.
License agreement dialog:
- Repeat the previous procedure but select the “LicenseAgreementDlg” dialog from the “Add Dialog” window.
- Click on the [ Browse ] button from the right-side pane to select from your machine the Rich Text Format file containing the license agreement.
- Add to your package the ReadMe file for your application (use the “Files and Folders” options page).
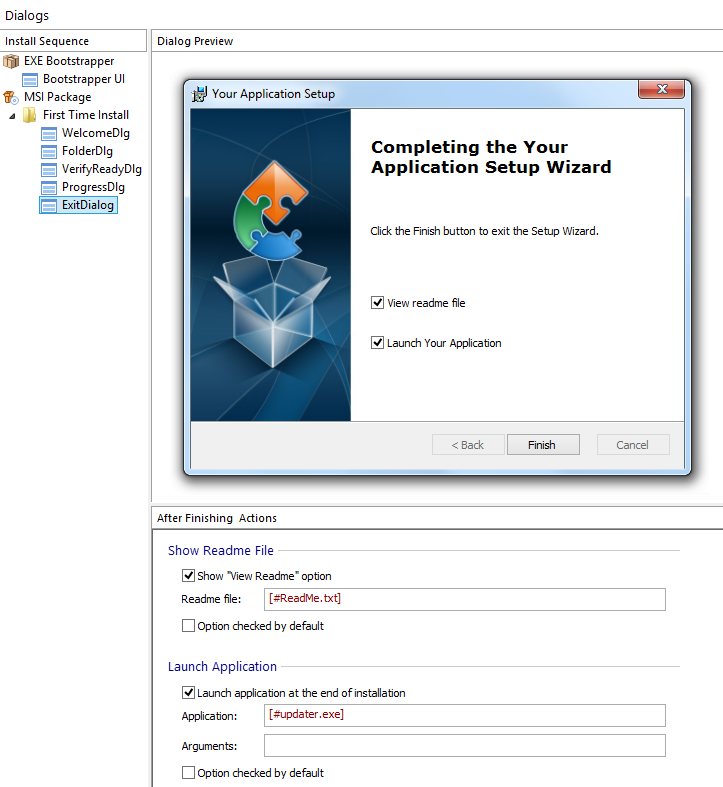
- Select the “ExitDialog” dialog from left-side pane. In the right-side pane, check the “Show "View ReadMe" option” checkbox; you will be prompted to choose the ReadMe file.
- Choose the file you just added to your package.
- Check the “Launch Application at the end of installation” checkbox and select from your package the application that will be launched at the end of the installation.
Note that the user can choose not to see the ReadMe file or to launch this application.
For more information please see the Dialog Editor
page.
Build and test the package again.
12. Set package name and some more build options
![]() Select
the “Builds” page from the left-side pane and navigate to the Configuration Settings Tab. Set "MyPackageName" in the "MSI name" text field. If you
let this field empty, the name of the package will be the same as the name of your project.
Select
the “Builds” page from the left-side pane and navigate to the Configuration Settings Tab. Set "MyPackageName" in the "MSI name" text field. If you
let this field empty, the name of the package will be the same as the name of your project.
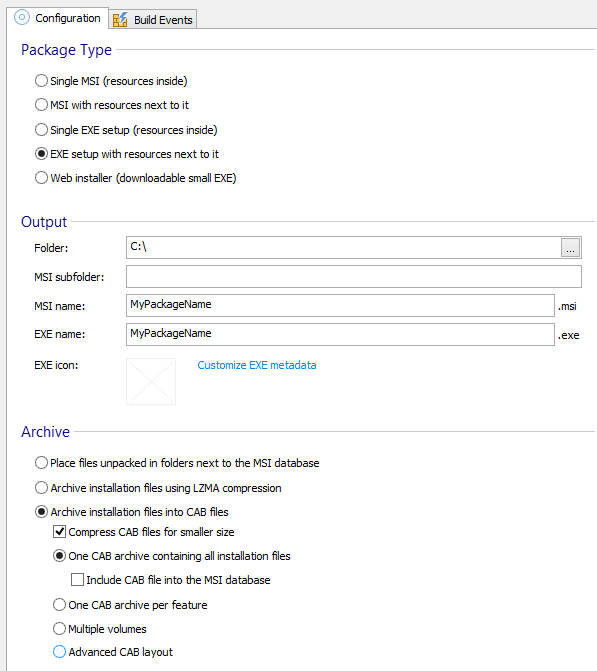
For more details about the available options please see the Builds page.
13. Add environment variables to your project
Let's suppose your application needs some information stored in an environment variable. In our example, we will add a variable - "SAMPLE_PATH" - that will contain the path to the folder in which your application will be deployed.
![]() Select “Environment” in the left pane.
Select “Environment” in the left pane.
![]() Click on the toolbar button and fill
the fields of the newly appeared dialog.
Click on the toolbar button and fill
the fields of the newly appeared dialog.
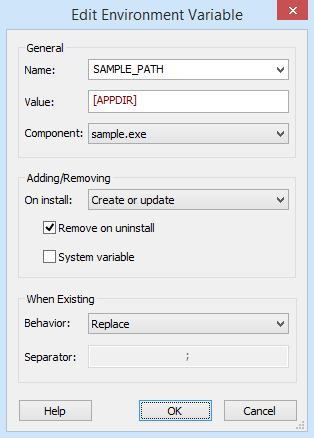
For more information please see the Environment Variables
page.
14. Add custom actions to your installation package
Custom actions are useful when you need to perform a specific action during installation and there is no other way to do it. The custom action is entirely defined by you; in Advanced Installer you only specify the file that contains it, and some parameters for its execution. You can add custom actions contained in EXE files, DLL files, VBScript files or JavaScript files.
![]() Select “Custom Actions” in the left pane in order to add a
Custom Action.
Select “Custom Actions” in the left pane in order to add a
Custom Action.
Select the "Install Execution Stage" -> "Add Resources" action group in the left-side pane. Choose from the toolbar “Launch installed file”.
Select from the FilePicker dialog the "Sample.exe" file (you included this earlier in your project).
In the command line field pass the string "foofile". The effect is that Sample will try to open this file. If "foofile" doesn't exist on the target machine, Sample will ask the user whether it should create a new one. This is how the command line arguments behave.
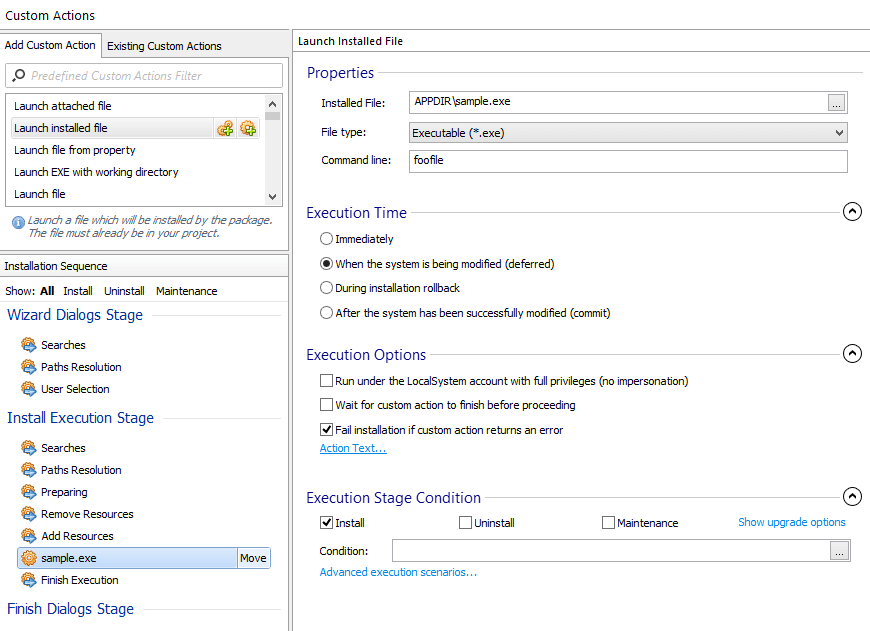
For more information please see the Custom Actions
page.
15. Install and control services
In this step, we will define the services to be installed with your application. You can only install services that are part of your package.
![]() First, use the “Files and Folders” option to add the
service file (a native Windows service) to your project.
First, use the “Files and Folders” option to add the
service file (a native Windows service) to your project.
![]() Go to the “Services” page in the left pane.
Go to the “Services” page in the left pane.
![]() Click on the toolbar button. Select the
service file from the dialog that appears and fill the service properties fields as in the
screenshot below.
Click on the toolbar button. Select the
service file from the dialog that appears and fill the service properties fields as in the
screenshot below.
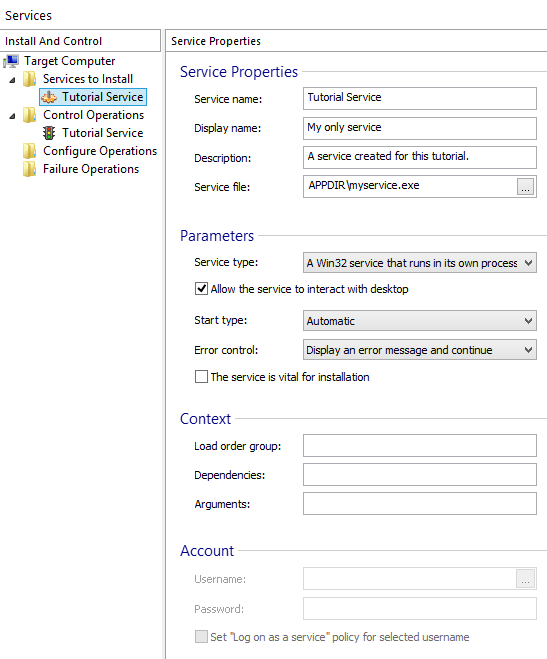
You can control your service or any other service installed on the target machine during installation. The above operations installed both the service and the service control. The following screenshot shows you exactly the control service operation parameters.
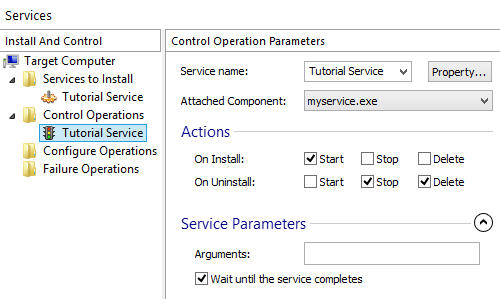
For more information about this please see the Services
page and the Java Service Installation tutorial.
16. Set the UI appearance of your custom installation package
Go to the "Themes" page in the left pane.
In the"Preview" tab you can change the banner showed on the dialogs and the background from the first and the last dialog.
Choose one of the Advanced Installer predefined images or you can use one of your own by expanding “More options” and double-clicking “DialogBitmap” or “BannerBitmap”.
For more information please see the Themes
page.
17. Installer Analytics
In the Analytics Page, you can enable and configure automatic tracking of your application's installs. You get detailed information about which versions are installed more often, what is your upgrade rate, exceptions occurred during installation, OS environment details, the geographic distribution of your users base and much more.

Each distributed package will send out data to Advanced Installer's Analytics servers enabling you to view reports and installation statistics from all your clients.
Using the exclusive Installer Analytics, information regarding installation are available in real time. Installer Analytics will provide with really great insights on how customers use the product. It will help to improve the overall user experience and conversion rates.
18. See also
Enhance user experience during installation with exclusive features from the Enterprise edition. For details, check the Advanced Installer Enterprise tutorial.