Deploying non-MSIX prerequisites
The following article uses options that are available starting with the Professional edition and project type.
1. Introduction
The common practice to handle MSIX package prerequisites is to use the Dependencies feature but this solution is limited to MSIX prerequisites. For more information regarding MSIX dependencies please take a look on our article: MSIX Applications: Handle Prerequisites by Declaring Dependencies in MSIX.
There are also situations when it is required to deploy some non-MSIX prerequisites along with your MSIX package. This can be implemented in Advanced Installer through a Suite Installation that will bundle the non-MSIX prerequisites with your MSIX package.
The following steps will explain the method to implement this scenario in Advanced Installer.
Advanced Installer does not support prerequisites in the MSIX-EXE bundle thus the method presented in this
article is the most recommended for deploying non-MSIX prerequisites for MSIX
packages.
2. Create your application's MSIX package
In this step you will create a new Advanced Installer Project for your application configured to build an MSIX.
Just launch Advanced Installer and choose the MSIX package template to create a new project.
For a complete guide on how to create and configure an MSIX package using Advanced Installer please take a look on our dedicated article : Create an MSIX package
After you've finished the configuration, save .AIP project and build the MSIX.
3. Create the wrapper package
This will be the main package of your installation and it will install the all the prerequisites and your application's MSIX package.
This wrapper package will be implemented using a Suite Installation.
Create a new Advanced Installer project, this time configured to be a Suite Installation. This article explains in detail how to create and configure a Suite Installation : Creating Suite Installations
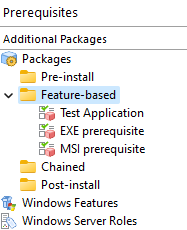
Configure this suite installation to install the MSIX package of your application and your non-MSIX prerequisites as Feature-based prerequisites:

4. Use Advanced Installer Solution support to manage both projects
Advanced Installer Solution Support comes in handy in our situation offering a convenient way of working with multiple projects in Advanced Installer, connecting both .AIP project generated in step 2 and step 3 of this tutorial.
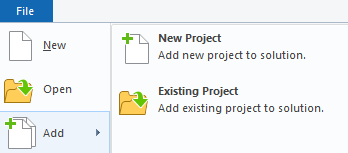
To create a Solution, just open any of the two Advanced Installer projects created in this tutorial and go to "File > Add > Existing Project" menu and pick the other .AIP project

The Solution will be automatically created its project displayed in a list in the Advanced Installer Ribbon.

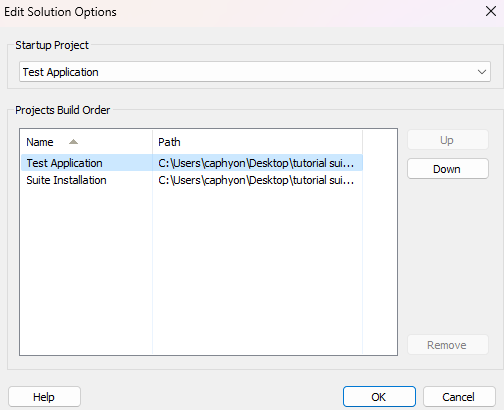
Click on Options toolbar button in Solution Ribbon to open Edit Solution Options Dialog

Then, select the MSIX project and use [UP] button to place it first in the project build order. In this way, when you will build the solution, the MSIX will be created first and then it will be included in the Suite Installation.
5. Conclusion
As we are currently in a transition period from MSI/EXE era to the new MSIX, we could encounter packaging scenarios that can't be handled by the MSIX dependencies mechanism, when non-MSIX packages must be used as prerequisites for an MSIX.
The method presented in this article is a good workaround for this issue, more so now thanks to the new Solution support feature of Advanced Installer that offers a powerful way to connect and easily manage multiple .AIP projects into a single Advanced Installer solution.