How to Use Advanced Updater to Configure Auto-Updates for Your Application
Once you reach the milestone of releasing a software application, it's time to plan future improvements and updates.
This means we need to release new versions and implement an auto-update functionality in our application package.
Here's where Advanced Installer can help.
In this article, I’m going to walk you through the process of configuring the application auto updater functionality, using the Advanced Updater.
What is the Advanced Updater?
The Advanced Updater is an executable tool (part of the Advanced Installer suite) that checks for updates, notifies the user when there's an update, and prompts users to download and install new updates.
Although the update functionality is an elegant way to notify your users that a new
version of your software is available to download directly (instead of having to go to the
website)-- you can configure an auto-updater to run in the background and perform a silent
update, without any user interaction. A great feature if you ask me!
After launching the Updater, it checks if a newer version of the application exists by using a predefined rule.
If you choose the "automatic updates" capability on your application, a copy of the Updater (with the name you specified) and the INI configuration file will be inserted into the install package.
When you create your application package installer, from the Updater page, make sure to tick the “Check for updates using Advanced Updater” box to enable the Advanced Updater.

The Advanced Updater feature is available starting with the Advanced Installer
Professional Edition. See our Advanced
Updater step-by-step tutorial page.
1. How does the Advanced Updater work?
There are 4 main components in the update process: Application V1, Application V2, Updater.exe, and the UpdateConfigFile.txt (represented in the image below).
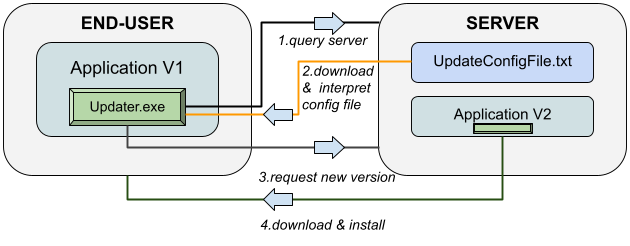
- Application V1 is the base application which has the version 1.0.0.
- Application V2 is the upgraded version.
- Updater.exe is the executable that checks for updates -- it is generated within the application project when the “Check for updates using Advanced Updater” option is enabled.
- UpdateConfigFile.txt is the configuration file generated by the Updater which contains all the update information.
So, you have the Application V1 with the Updater.exe incorporated in the application package installed on the end-user machine and also you have the Application V2 and the UpdateConfigFile.txt placed on your server.
The "Server" refers to the location where you store the Application, it can also be a
Dropbox or GoogleDrive address.
When the updater is triggered from the end-user machine, the following events occur:
- Advanced Updater communicates with the server and requests the UpdateConfigFile.txt.
- UpdateConfigFile.txt is downloaded on the end-user machine and interpreted by the Advanced Updater.
- The Advanced Updater detects based on the UpdateConfigFile.txt that there is a newer version of the application (Application V2) and requests to download it.
- The Application V2 is downloaded and the install process starts on the end-user's machine.
Depending on how the Upgrade within the package is configured, the previous version can
be removed or the new version can be installed side by side.
2. Configuring Application Auto-Updates in Advanced Installer
As mentioned in the beginning of this article, the first step we should take is to enable the Updater in our installation package. Since we want our application to automatically check for updates instead of manually clicking on the updater.exe, we first need to make some adjustments and configurations inside of the installer.
From the same Updater page, we need to go to the “Updater Execution” section and choose "Automatic using a Windows scheduled task".
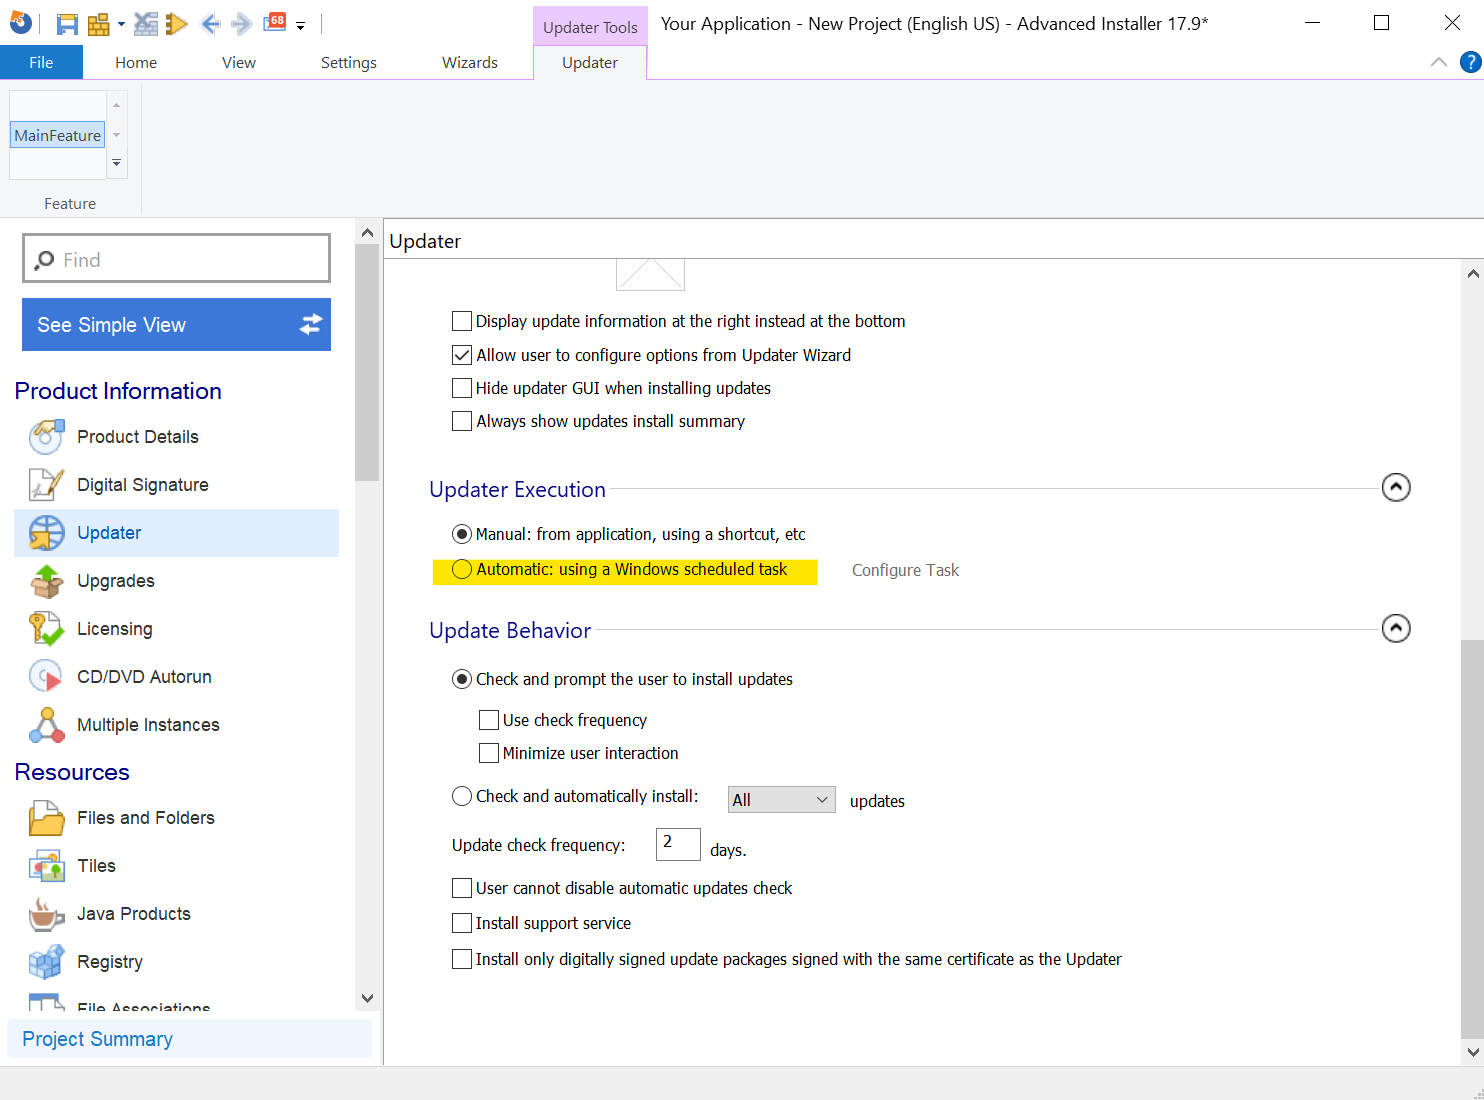
Now, the Task Properties window will open and we need to configure it according to our needs.
In the Task tab -> Command line field, add these parameters: /silentall -nofreqcheck
/silentall : The Updater will search silently for updates and automatically install all updates; this has the same effect as the /silent option if the user selected the "Check and automatically install all updates" option in the configuration dialog. If the check frequency has not passed or there are no updates available, the Updater will close immediately.
-nofreqcheck : The frequency check is skipped. It can be used with the /silentall and /silentcritical command line options.
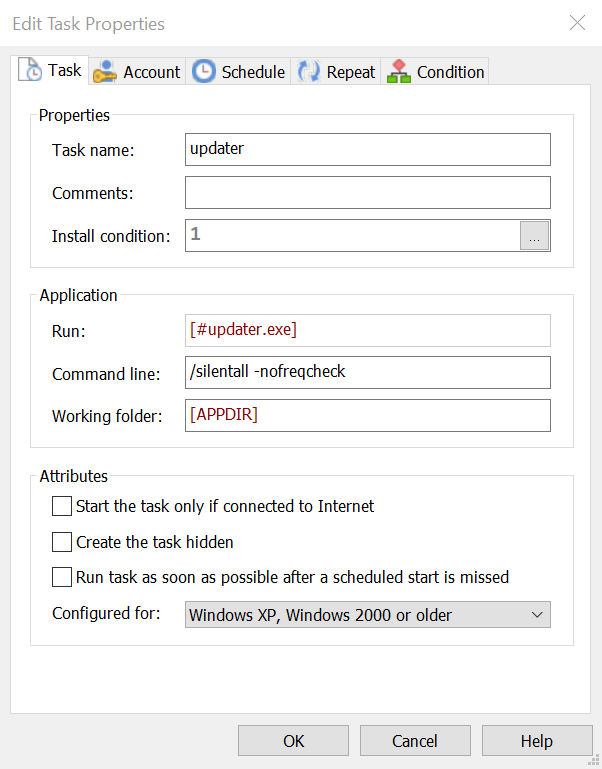
Find the complete list of the updater command line parameters here.
Additionally, you can enable the “Start the task only if connected to Internet” attribute since the updater has to communicate with the “server”.
Moving to the Account tab, delete any entry from the User field. This will make the task run under the system account so you would not encounter any issues.
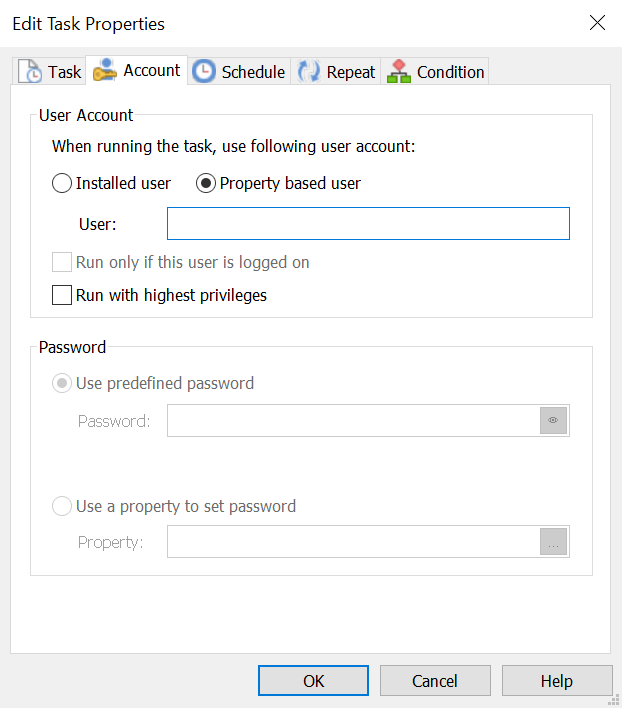
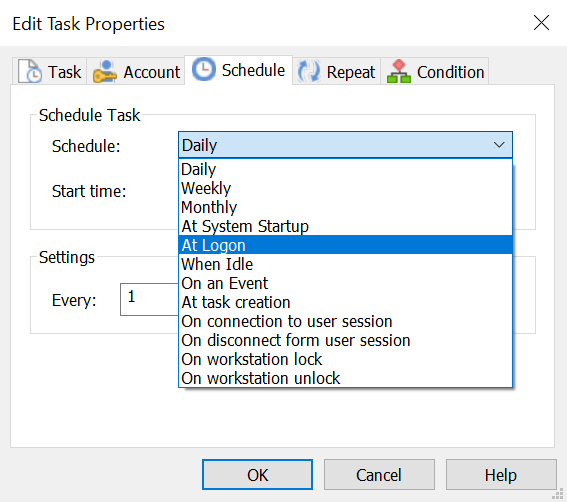
Last but not least, we need to configure the Schedule. This setting will tell our updater when to check for updates.
Select your preferred method from the dropdown Schedule list. We recommend using the “At Logon” option -- so that every time a user logs in, the application checks for updates.
If you want to have a competitive product that stands out from the rest -- you should constantly improve and deliver application updates to the end-users.
This practice ensures a smoother user experience and heightens the security and overall well-being of the application.