Overcoming Challenges in Intune Deployment: A Guide to .intunewin File Conversion
In the fast-paced world of modern IT management, Microsoft Intune stands as a powerful solution for deploying and managing applications across various devices.
However, the journey from a vendor package to an .intunewin file for Intune deployment can be strewn with challenges.
In this article, we will delve into the typical challenges faced during conversion of a vendor package to an .intunewin file that will be used for deployment.
Initial Steps with the Vendor Package
Whether you are an IT administrator, a system integrator, or an enterprise decision-maker, understanding and addressing these challenges will contribute to a seamless and successful Intune deployment for your organization.
Although Intune allows EXE deployment, as long as the related EXE supports silent switches, the MSI is the preferred way of doing it.
Also, the IntuneWinAppUtil.exe is more user-friendly with the MSI input.
The application that will be packaged into an intunewin file is called: KnowledgeLakeDesktopApplication_3.9.1.0.exe.
Setting Up for Success: Testing in Windows Sandbox
It’s a good practice to check the vendor installer and see how the application looks, and more than that to see if it will work as expected in a clean environment, to see if any runtimes are required or if the setup will install the required runtimes.
Check the Repackaging Best Practices for more information.
At this step, we’ll set up Windows Sandbox for testing the installation. Read more about Windows Sandbox here: How to repackage your application in Windows Sandbox VM.
In our particular example, the KnowledgeLakeDesktopApplication_3.9.1.0.exe only creates an icon in the System Tray.
![]()
Start the Repackaging Process
Since we’ve found out that the application installs correctly in a clean environment, we can start the Repackaging process.
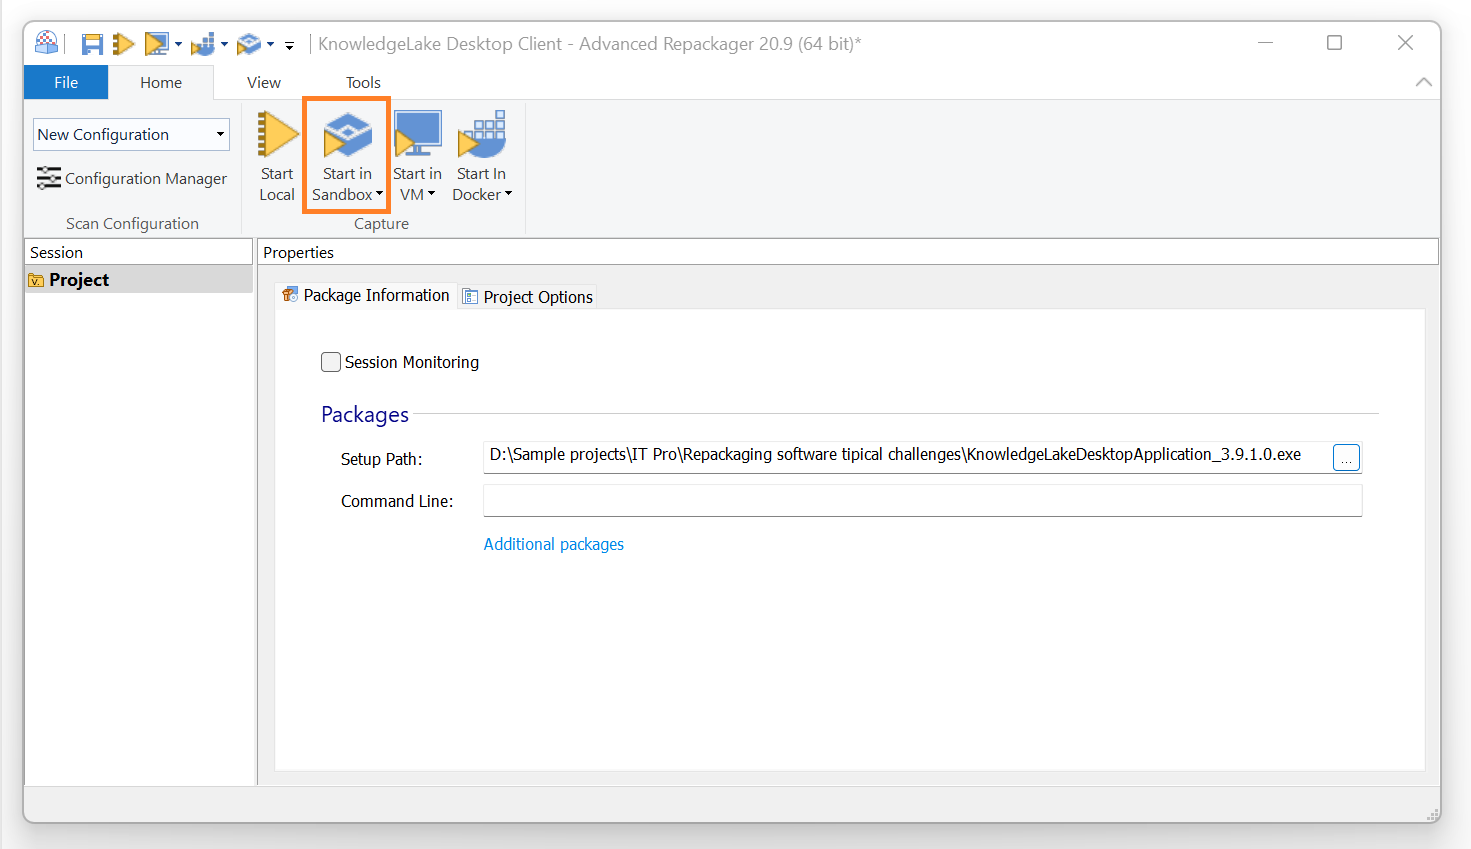
Repackaging becomes essential for EXE packages lacking silent switches, rendering them incompatible with encapsulation within an .intunewin file.
Another compelling reason to opt for Repackaging with EXE packages is to avoid complications during the Uninstall phase. Certain EXE packages because they lack Windows Installer support, instead depend on an Uninstall.exe that is invoked during the uninstallation process. The absence of uninstall.exe can lead to a dysfunctional uninstallation.
Once the repackaging process is finished, we can review the captured files and generate the initial MSI for testing.
Generate and Test the MSI Package
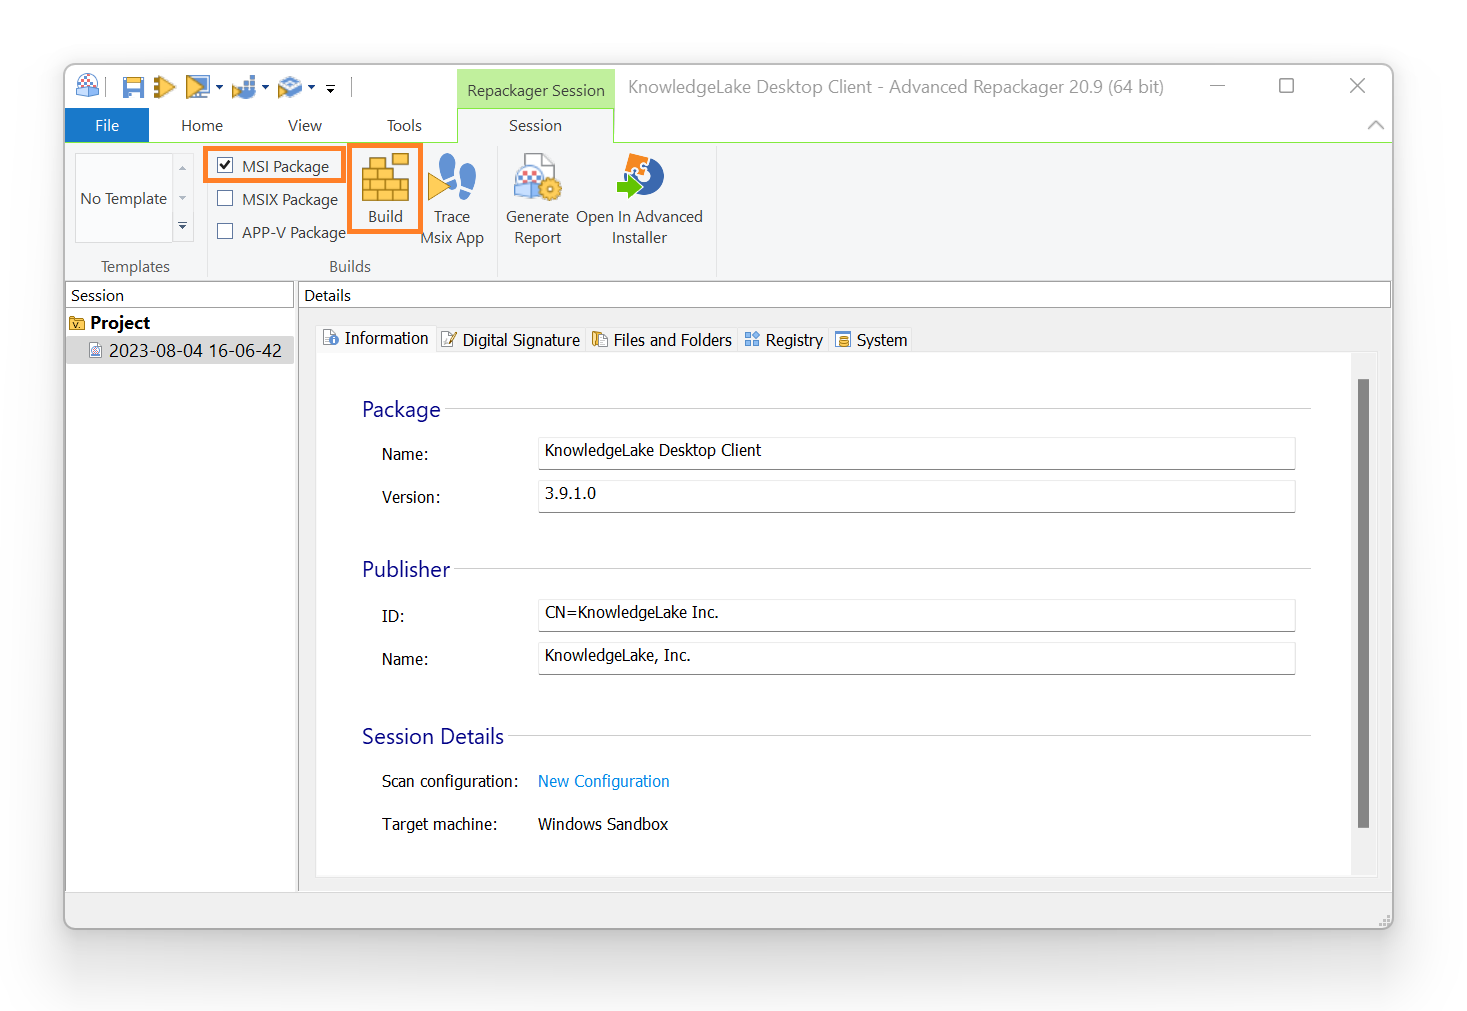

Start the Windows Sandbox and copy the MSI for testing its installation.The installation appears to be somewhat successful.
Immediate things that arise:
1. Application is listed twice in the Control Panel:

2. One entry in the Control Panel does not have its icon
3. Automatically launch app after installation
Since the application is an utility app, we should consider launching it right away after installation, automatically.
Enhance the MSI Package
Let’s tackle each problem methodically:
1. Address the issue regarding the application appearing twice in the Control Panel.
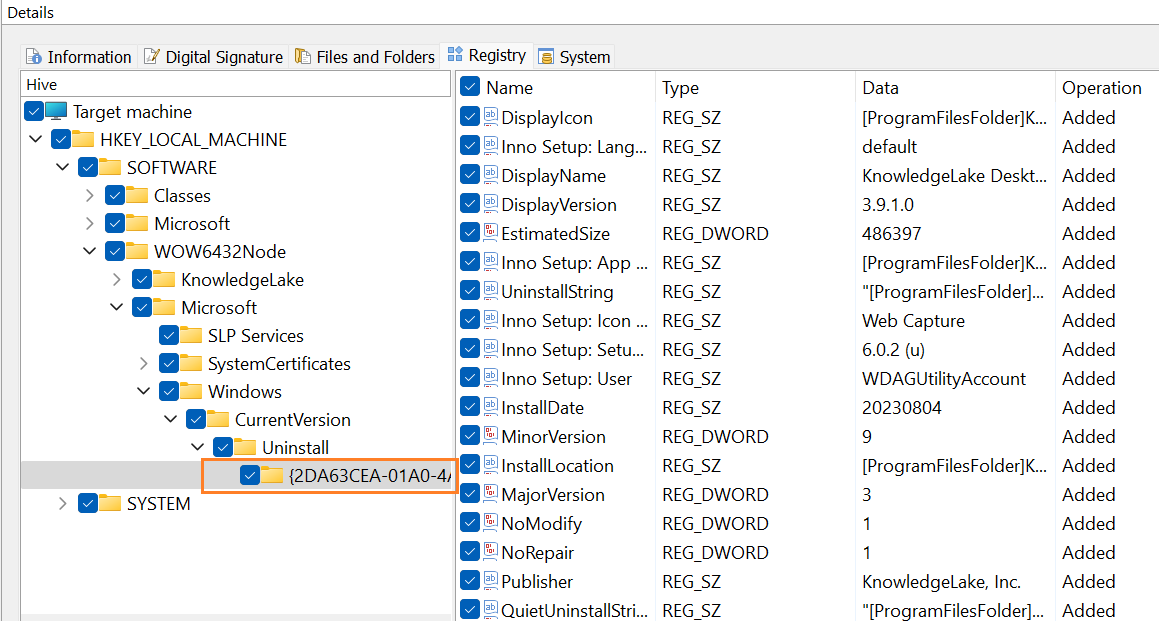
At a closer inspection of the Registry tab from the Repackager project, we’ll notice the following entry:
The Software -> Microsoft -> Windows -> Current -> Uninstall registry hive is being used to store the information that is further used to populate the Control Panel entries.
The problem is that the registry entry is made by our EXE setup that we’ve repackaged and since we’ve generated a standard MSI file, we no longer have to create the above registry, the registry for our setup will be created by the Windows Installer.
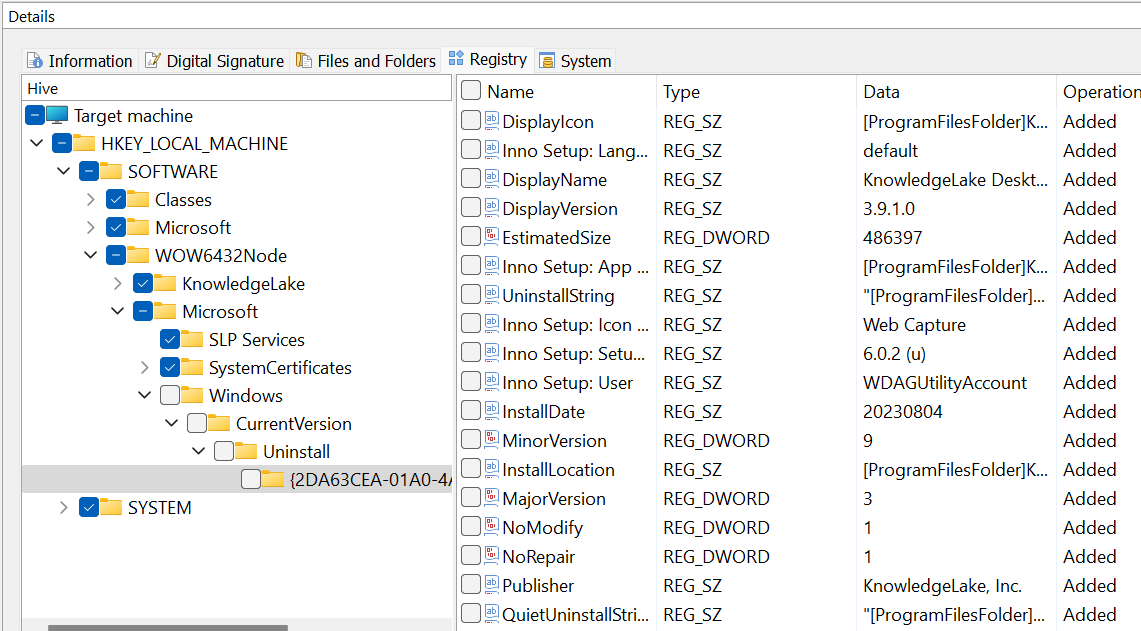
The solution is to uncheck the registry so they won’t be included in the resulted MSI package:
2. Fix icon for the Control Panel
For this, we need to load our project in Advanced Installer using the Open in Advanced Installer toolbar button:
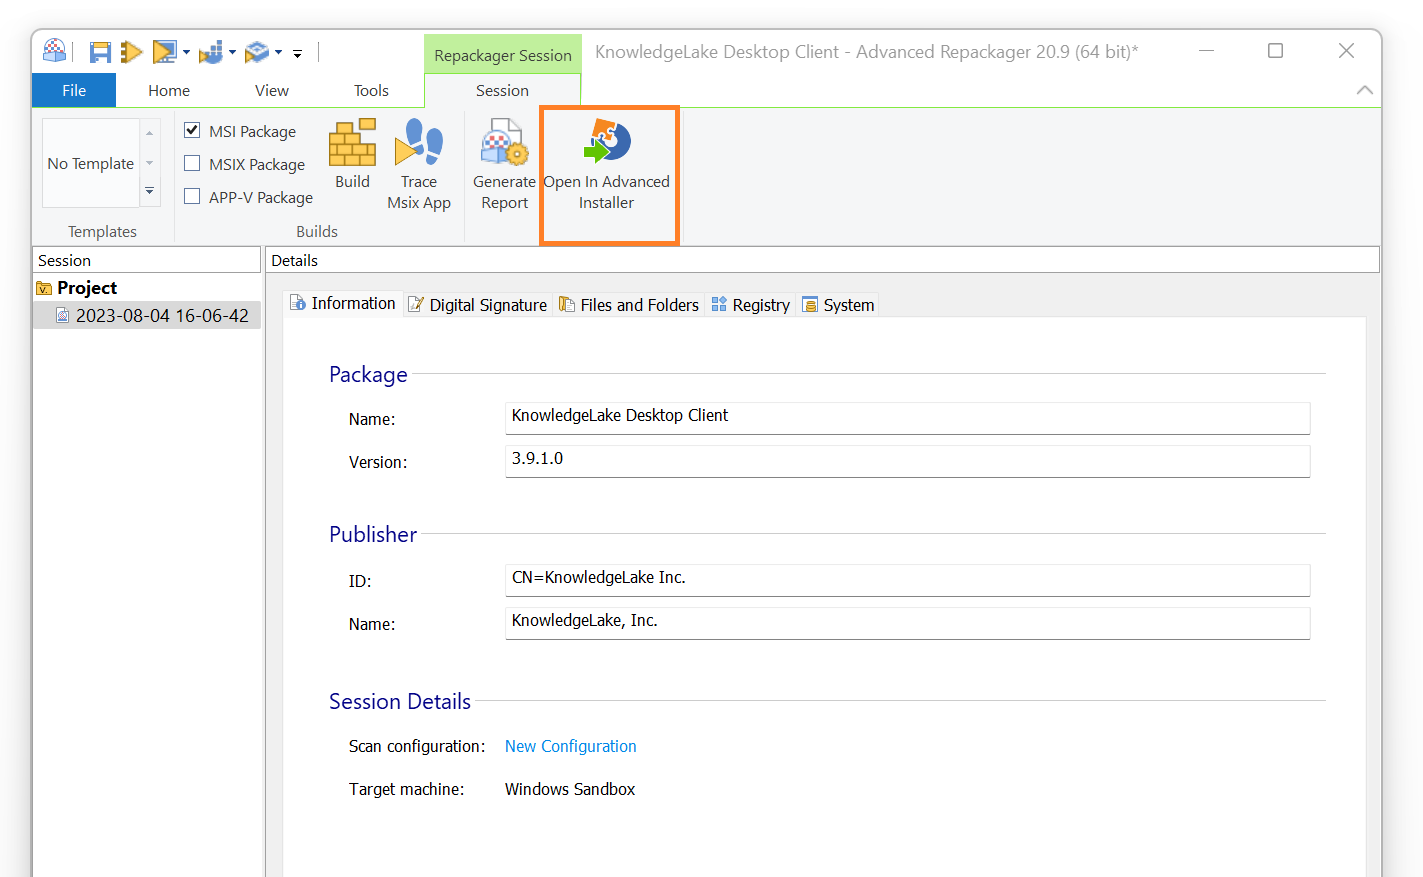
The previous project is an intermediary project that will be loaded in Advanced Installer and it will give us access to the application resources files. WHere we can add new files, remove files, and so on.
Then, just navigate to the Product Details view and select an .ico that will be used by the package:
![]()
Advanced Installer can extract the .ico from any .EXE or DLL file.
3. Launch app automatically after installation
Because it’s a utility app, we want to automatically launch the app after installation. This is an easy task with Advanced Installer. Just navigate to the Custom Actions view and add the predefined Launch File custom action that allows to launch the app during installation.
Configure the custom action as below:
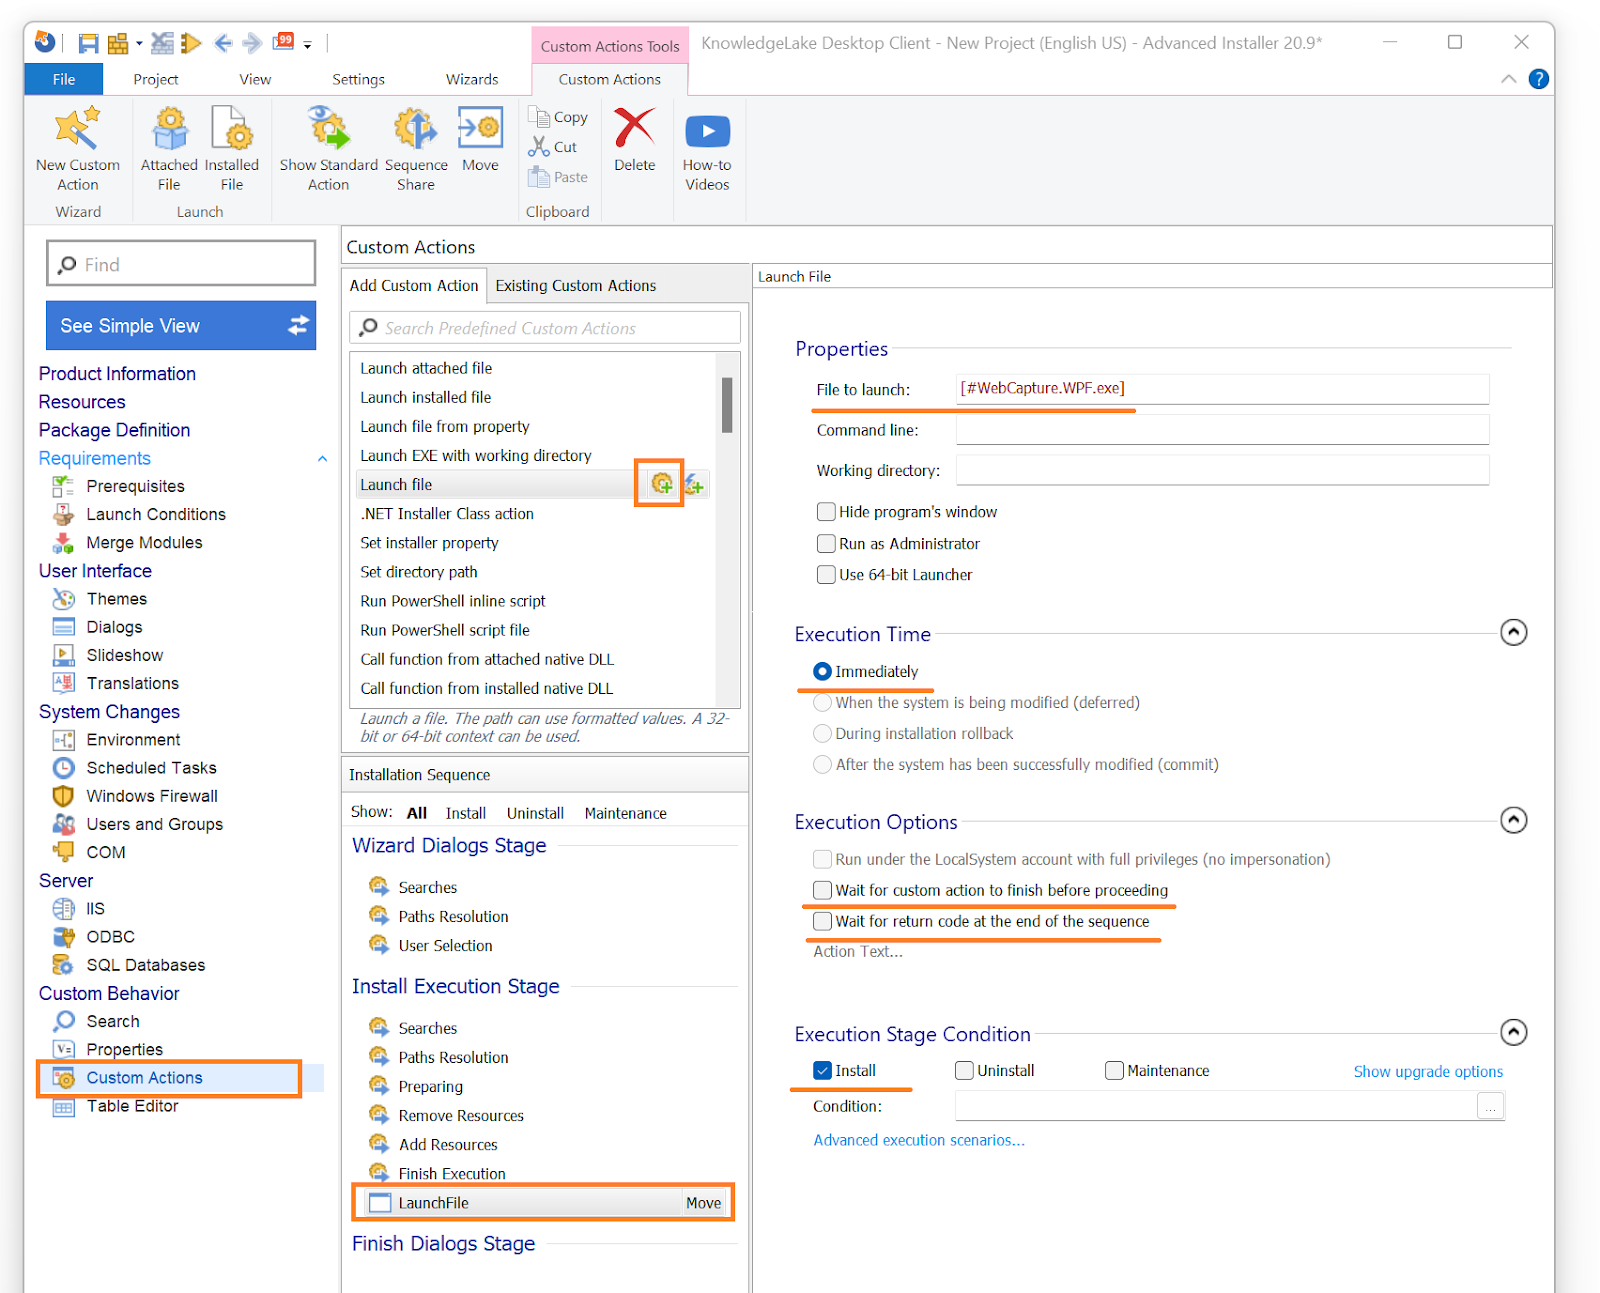
Time to test the enhanced MSI package!
Remove unnecessary files from the MSI:
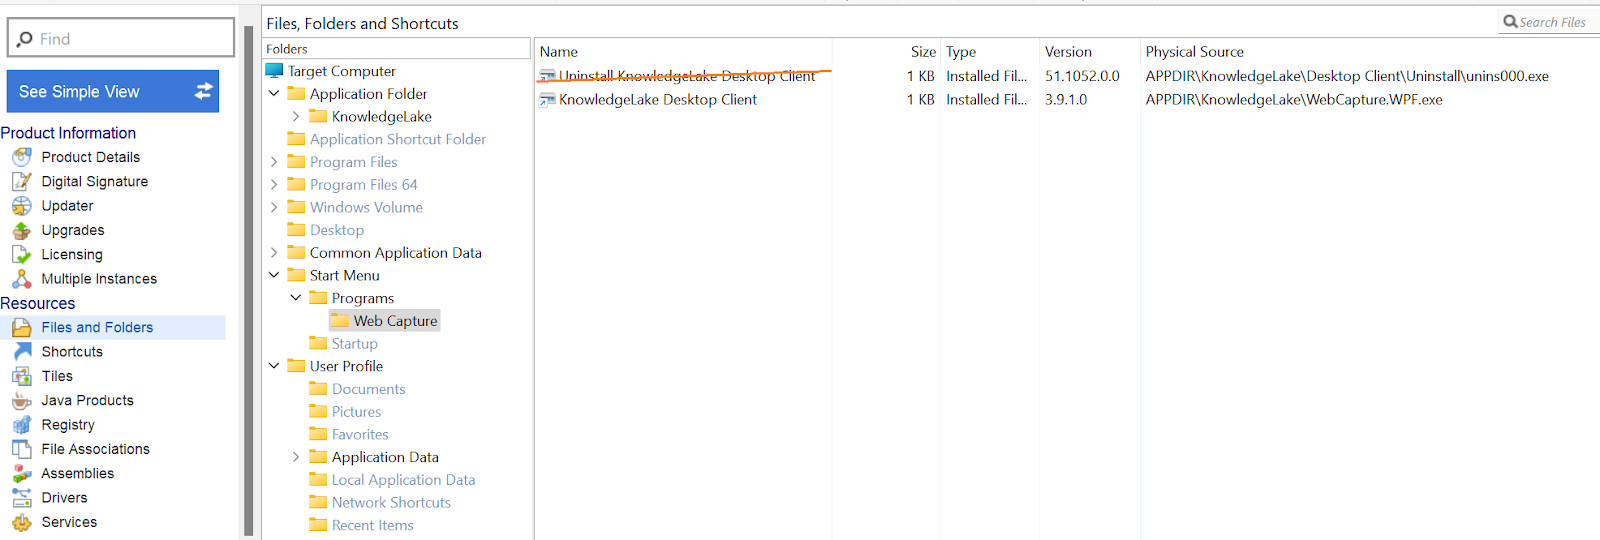
The Repackager captured the Uninstall shortcut that is pointing to the uninstall.exe of the original EXE package.
Both this shortcut and the uninstall.exe are no longer required since the Windows Installer will handle the uninstall phase. You can remove them from the project so they won’t be included in the resulting MSI.
Build new MSI package:
For this, we’ll build the MSI directly from the Advanced Installer IDE:

Click on the Open Output Folder toolbar button or on the hyperlink to open the location where the new MSI was build:

Let’s copy the new MSI in the Windows Sandbox and let’s install it.
We can notice that the app is launched at the end of the installation and the Control Panel has a single entry with the proper icon displayed:

Gret!
We’ve covered first time installation, so it’s time to test the Uninstall phase:
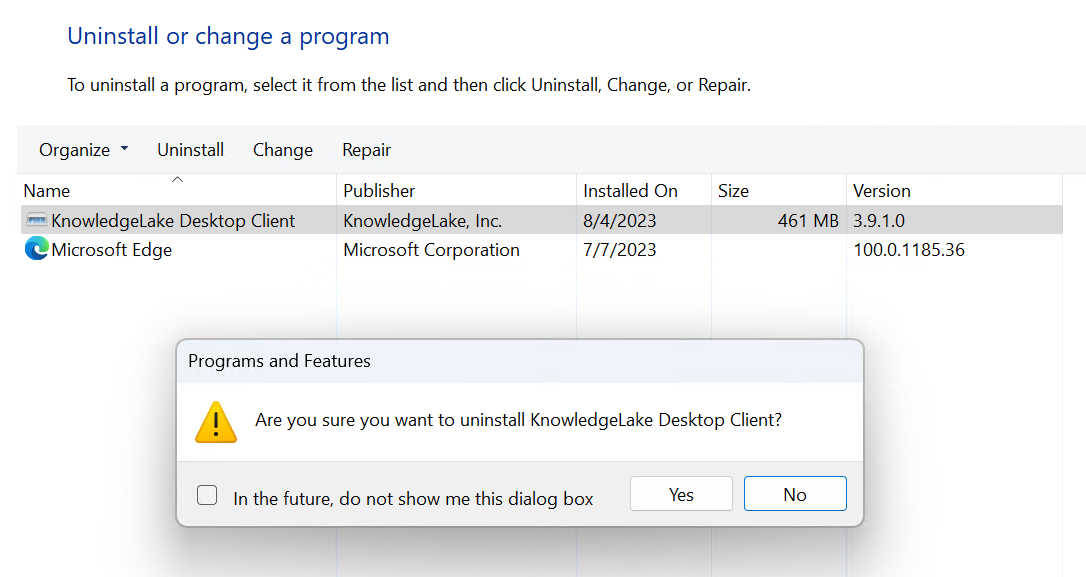
BUT, we’ll get the below prompt saying that the application is running:
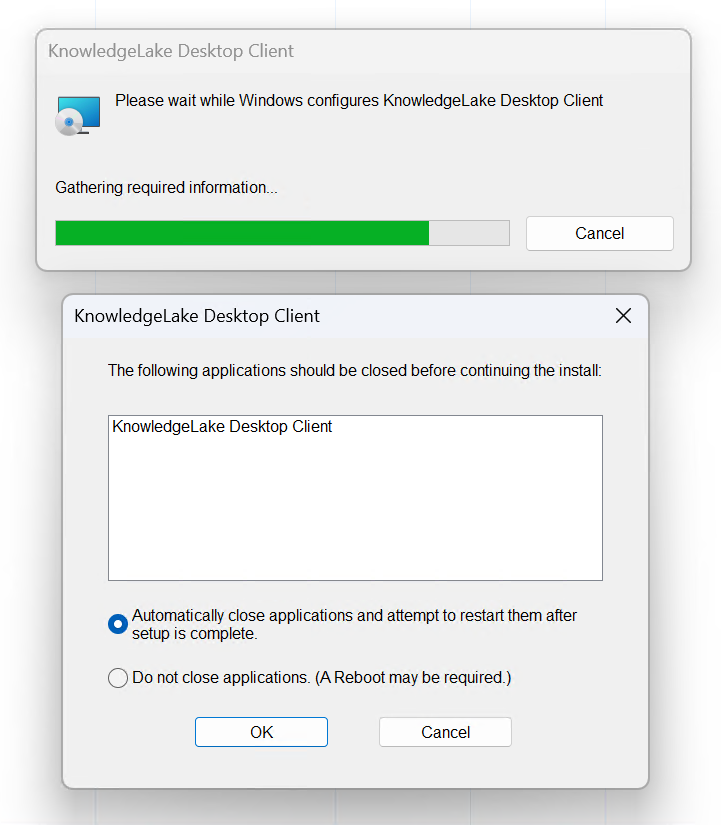
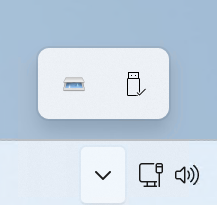
And if we think about it, that’s correct as our application is still running in the System Tray:
The good news is that the fix is trivial, Advanced Installer comes with a predefined custom action for closing a process.
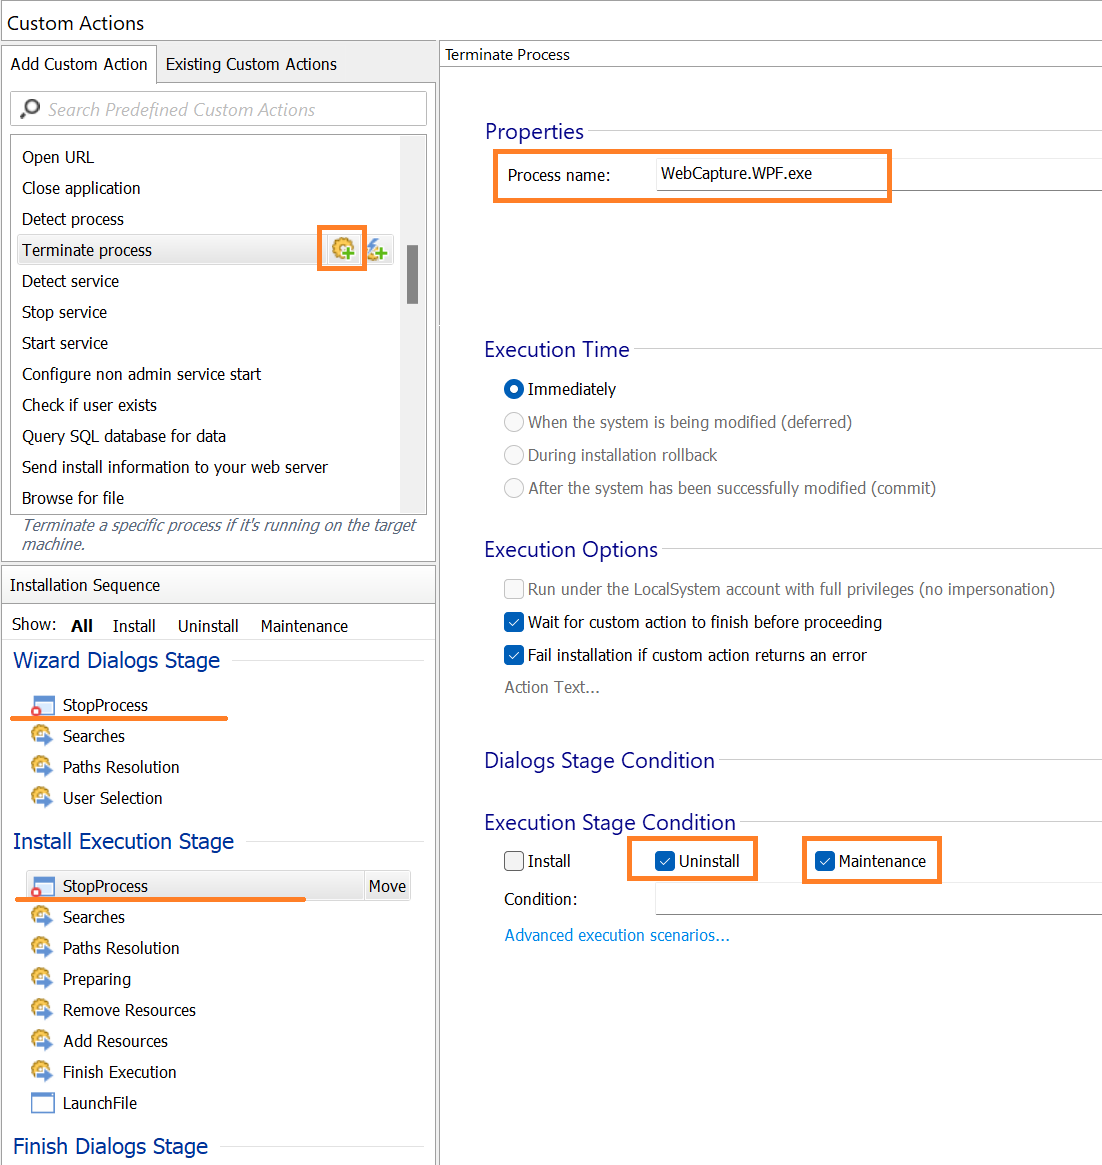
Since it is a utility app that will not impact the user that much if it won’t be available, we can close it without any prompt. Otherwise, we should take into consideration an approach to inform user that the app will be closed e.g. we can use a Display MessageBox custom action.
Furthermore, you can either:
- conditionally close the process based on user reply;
- or abort the installation.
Now we are ready to test the new MSI. Let’s build the new MSI and test its uninstall phase.
Hooray! Everything worked perfectly fine during both the installation and uninstallation phases.
Testing the silent MSI deployment
Although the MSI created with Advanced Installer support silent deployment, just to make sure everything is working properly, we should test the deployment silently:

Awesome, everything seems to be working just fine. After ensuring that the MSI can be installed and uninstalled silently, we can move forward and generate the .intunewin file.
Generate the .intunewin file
Since we’ve tested the installation and uninstall and everything worked as expected, we can move forward.
The .intunewin file generation should be the last process after successfully testing the MSI install and uninstall phase.
To generate the .intunewin file we’ll use the IntuneWinAppUtil.exe
If the tool crashes during .intunewin file generation, we recommend launching the IntuneWinAppUtil.exe from an elevated CMD and then passing each command at a time:
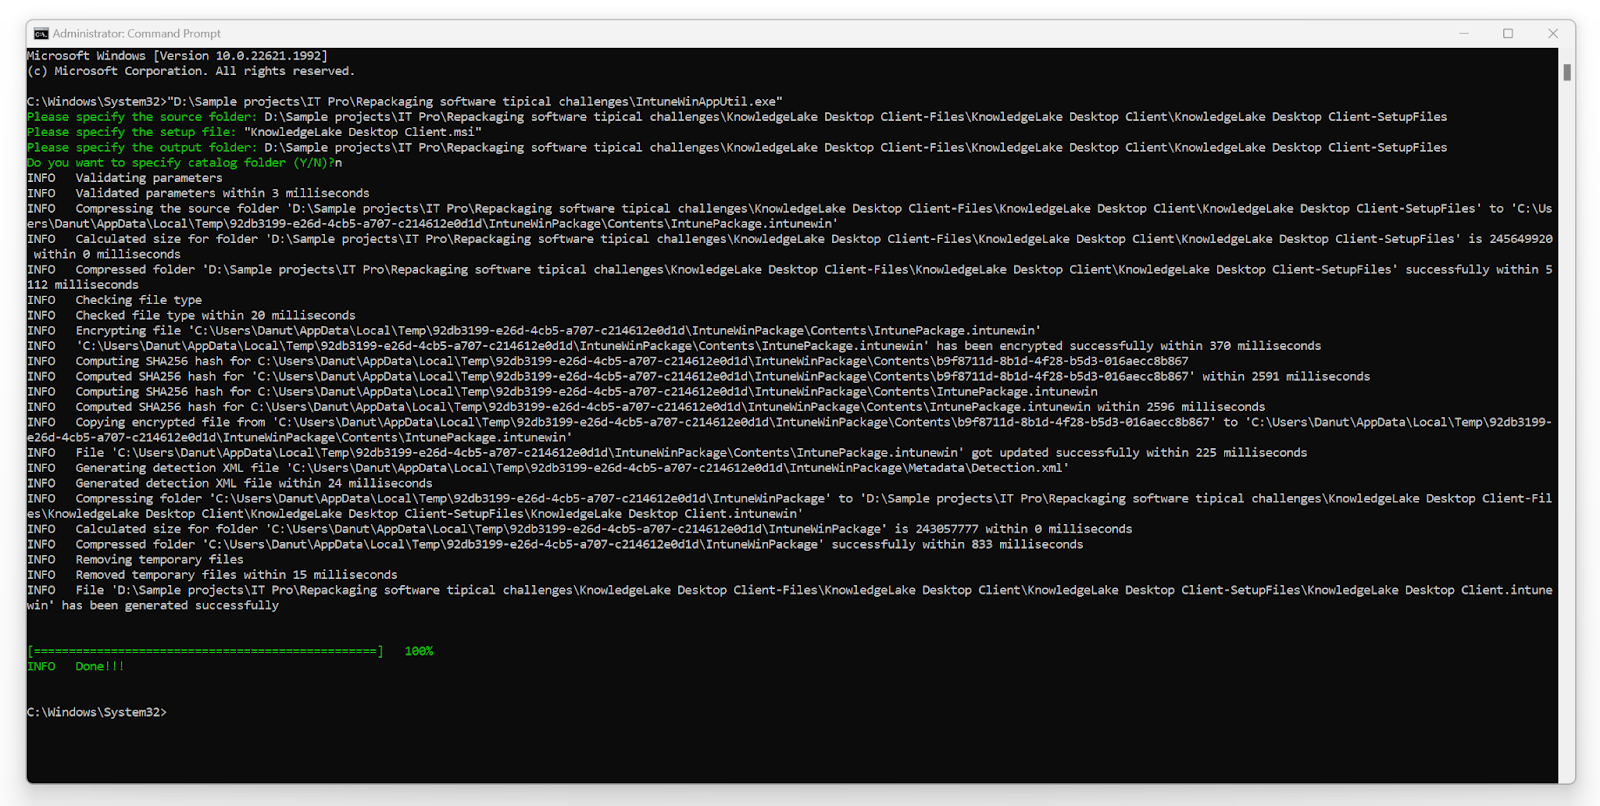
There's nothing better than successfully converting a new project with Advanced Installer!

Summarizing the Journey
- Test vendor package in a clean environment
- Check for runtime dependencies in a clean environment (e.g. C++ Runtime, .Net etc).
- Start repackaging process for conversion process
- To speed up the repackaging process, you can use from Windows Sandbox to VMware or HyperV, both local or remote virtual machines.
- Generate initial MSI and start testing it
- We want to see if the captured MSI contains all the information required by our application to work correctly
- Cleanup the captured noise and fix any missing functionality from original setup
- It’s time to make sure the generated MSI has 1-1 compatibility with original vendor package
- Test final MSI installation
- Time to see if everything goes well.
During testing, it is recommended to always revert the vm to its clean state. - Test MSI uninstall
- We need to ensure that both install and uninstall are working correctly, guaranteeing a seamless user experience when uninstalling the application.
- Generate .intunewin file
- The final step in your deployment puzzle.