Create, open and edit an MST file for MSI
The following article uses options that are available starting with the Architect edition and project type.
This tutorial will guide you step by step through the creation and editing of a simple transform file for 7-zip File Manager It is addressed to those who have no previous experience in using the Advanced Installer to create and edit MST files (MSI transforms).
So what is an MST file and what is it used for?
MST, which stands for Windows Installer Setup Transform, is a settings file that Windows Installer uses and that contains program configuration choices to enable customized installations of an original MSI package. As it is not recommended to change the original MSI’s database, MST files are used to transform the content of an MSI package. The MSI and the MST files come together as a complete solution for application distribution.
Back to our example, let's say you need to install 7-zip File Manager with a desktop shortcut. Since this is not included in the package the only way to install it for all the machines on which you will deploy the package is to create a transform, starting from the original MSI.
A transform file is a set of installation data which can be added or replaced into a setup
package only at install time. It can be applied to an MSI installation package by setting from
command line the TRANSFORMS property.
1. Create transform
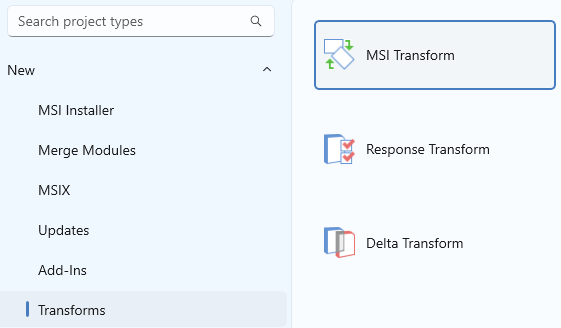
If Advanced Installer is not currently running, start it by double-clicking on the desktop icon or by selecting it from the “Start > All Programs > Advanced Installer” menu. When the application starts, you will be presented a dialog where you can choose the type of the project you want to create.

- Select the “MSI Transform” template from “Transform” project type.
- Press the button.
- Select the 7-zip File Manager MSI file you just downloaded.
The MSI is now loaded and you can start making the changes that you want to be saved in the MST file
2. Add the shortcut
![]() Switch to the “Files and Folders” page by selecting it in
the left-side panel, then select “Desktop” folder from the list of predefined
ones.
Switch to the “Files and Folders” page by selecting it in
the left-side panel, then select “Desktop” folder from the list of predefined
ones.
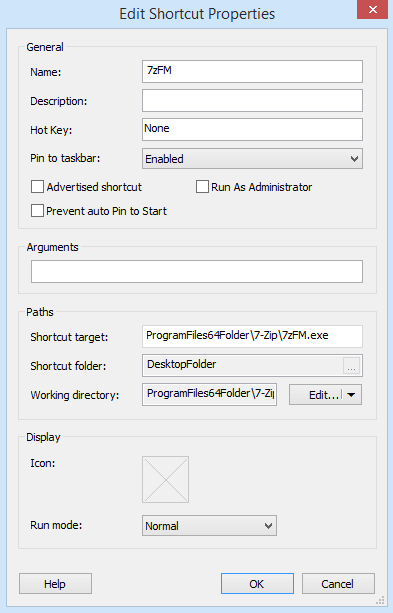
In Desktop folder you can add the new shortcut to 7-zip File Manager. Right click in the right-side pane after you selected “Desktop” folder and select “New Shortcut To -> Installed File” from the context menu. From the “Select Installed File” dialog browse to Program Files 64\7-Zip folder and select the file “7zFM.exe”. In the newly appeared dialog choose a name for your shortcut - like in the following screen-shot. Press the button and the shortcut will appear listed in the “Desktop” folder.

3. Save the transform
Now that you have added the shortcut to your project let's save the MST file.
![]() Click on the toolbar button and a “Build
Project” dialog will appear showing you the build evolution. It is a build
operation even if you pressed “Save”, because the way of a transform file
is created.
Click on the toolbar button and a “Build
Project” dialog will appear showing you the build evolution. It is a build
operation even if you pressed “Save”, because the way of a transform file
is created.
![]() Once the save is complete, click on the toolbar
button. You will see the installation wizard running normally, but with the transform
applied, so you should get the shortcut installed on your Desktop.
Once the save is complete, click on the toolbar
button. You will see the installation wizard running normally, but with the transform
applied, so you should get the shortcut installed on your Desktop.
Congratulations! You have created your first Advanced Installer MST file. You can find the MST file next to the MSI, if you have not changed the output path.
4. Open and Edit existing MST file
To edit a transform file just double click on it and Advanced Installer will launch. First it will ask for the MSI on which the transform applies, this is the only way to load it, please select the original MSI of “7-Zip File Manager”. You cannot load and edit the transform if you do not have the original MSI on which it applies to.
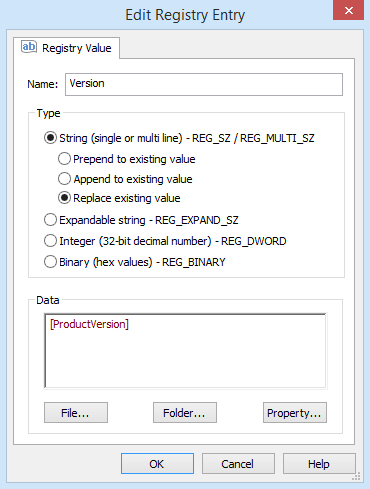
In this example we will add a new registry value under HKCU hive, called “Version”, to store the version of the installed product, by going to Registry page, under HKEY_CURRENT_USER\Software\7-Zip. As you can see in the image below.

Now you can save and run the MSI with the new transform applied as you did at step 3 from above.