Windows Installer Custom Actions
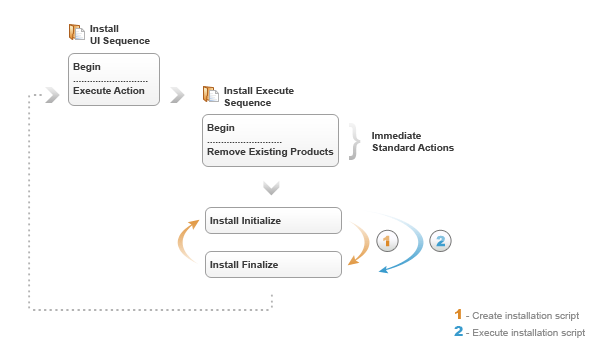
Custom actions are actions entirely defined by the user. They can be executable files, dynamic linked libraries, Visual Basic scripts or JavaScript files. They can be scheduled at any time during the installation. An installation process consists of two sequences: Installation User Interface Sequence and Installation Execute Sequence.

In the User Interface Sequence only immediate custom actions can be used. It contains a list of Standard Actions starting with Begin and ending with ExecuteAction. ExecuteAction is the one that triggers the execute sequence. At the end of the installation process, the installer returns from the execute sequence in the UI Sequence. It does that in order to execute the actions that may be specified after ExecuteAction. The installation process ends with the ExitDialog.
The Execute Sequence contains a list of Standard Actions that starts with Begin and ends with InstallFinalize. It also can contain all types of custom actions: immediate, deferred, rollback and commit actions.
In the sequence that starts with Begin and ends with RemoveExistingProducts only immediate actions can be used. The sequence that starts with the InstallInitialize standard action and ends with InstallFinalize will be gone through twice. The first time the installer scans all the actions contained by the Execute Sequence and it creates the installation script used for the actual install.
The second time, based on the installation script, the installer executes all the actions contained by the package only if their conditions were true when the script was built. For example, it will start/stop services, it will write/modify registries, create shortcuts and it will install the files on the target machine.
When the installation script execution is done, the installer returns to the User Interface Sequence in order to display the exit dialog and/or execute any custom actions that may be placed after the ExecuteAction standard action.
As mentioned above, there are four types of actions:
- immediate actions
- deferred actions
- rollback actions
- commit actions
The immediate actions can be used anywhere in the Install UI Sequence and in the Execute Sequence, but for the second one there is a phase where immediate actions can no longer be used. This happens when the installation script is triggered. The immediate actions should not modify the target machine since those changes cannot be rolled back.
The deferred actions, can run only during the installation script execution. The deferred actions should be the only ones that makes changes on the local machine. This is why each deferred action must have a rollback action so that the changes it makes can be undone if the setup fails or is canceled.
The rollback actions are used when the application is installed, but something went wrong and the installation must be rolled back. While the installation script is executed, the installer builds a rollback script. After every standard action is executed, the installer adds a rollback command to the rollback script.
The commit actions are the opposite of the rollback actions. The commit script is executed after the InstallFinalize standard action when everything ended successfully. Its purpose is to delete the backup files created by the rollback script.
For each of the deferred, rollback and commit actions you have an additional option: With no impersonation. This is related to the current user's rights set by the User Account Control (only for Windows Vista or above) when running the package. A normal user can run a custom action that requires administrator rights only if the “With no impersonation” option is set for it.
You can create and schedule Custom Actions in Advanced Installer in the Custom Actions page.