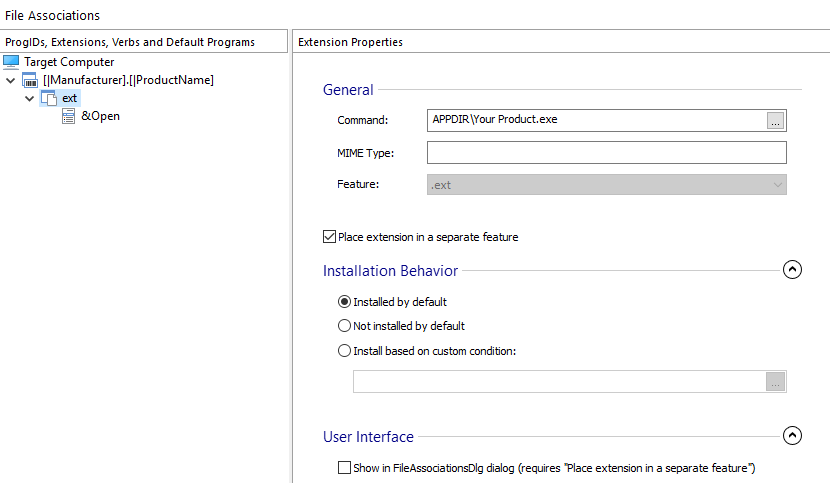
File Associations Page
You can associate a file extension with an application from your package so that the selected program can perform certain operations (verbs) on the files with the specified extension. You can create file associations in this page. First, a ProgID is defined, which can have any number of extensions associated and each extension can define any number of verbs.
The information presented in this article can be applied in a similar fashion to
File Associations Page from Merge Module
Project.
The left-side pane contains a tree with all the ProgIDs you defined on the first level. Under each ProgID you will see all the associated extensions containing all the verbs defined for it. In the right-side pane will appear the properties of a ProgID, extension or verb, depending on your selection in the left-side pane.

Creating a new file association using a wizard
![]() Use the toolbar
button, to quickly and easily set up a new file association, following step-by-step
directions.
Use the toolbar
button, to quickly and easily set up a new file association, following step-by-step
directions.
Creating new ProgIDs
![]() Use the toolbar button, the “New
ProgID” tree context menu item or press the * key while the
“ProgID, Extensions and Verbs” panel is focused. This action will create
a ProgID that can be associated with either an extension or a COM in the COM page. This field is of PseudoFormatted Type.
Use the toolbar button, the “New
ProgID” tree context menu item or press the * key while the
“ProgID, Extensions and Verbs” panel is focused. This action will create
a ProgID that can be associated with either an extension or a COM in the COM page. This field is of PseudoFormatted Type.
A ProgID will not be created at install time unless it is associated with an
extension or a COM.
Only one extension should be associated with each ProgID.
Creating new extensions
![]() Use the toolbar button, the “New
Extension” tree context menu item or press the Insert key while
the “ProgID, Extensions and Verbs” panel is focused. This action will also
create a ProgID and an extension with default properties. To create an extension under an
existing ProgID make sure the ProgID (or one of its children) is selected before doing a
.
Use the toolbar button, the “New
Extension” tree context menu item or press the Insert key while
the “ProgID, Extensions and Verbs” panel is focused. This action will also
create a ProgID and an extension with default properties. To create an extension under an
existing ProgID make sure the ProgID (or one of its children) is selected before doing a
.
Creating new verbs
![]() Use the toolbar button, the “New Verb” tree context
menu item or press the + key while the “ProgID, Extensions and
Verbs” panel is focused. This action will create a verb with default properties
for the selected extension.
Use the toolbar button, the “New Verb” tree context
menu item or press the + key while the “ProgID, Extensions and
Verbs” panel is focused. This action will create a verb with default properties
for the selected extension.
Creating new default programs
![]() Use the toolbar button, the “New
Default Program” tree context menu item or press the - key
while the “ProgID, Extensions, Verbs and Default Programs” panel is
focused. This action will create a default program with default properties for the selected
extension.
Use the toolbar button, the “New
Default Program” tree context menu item or press the - key
while the “ProgID, Extensions, Verbs and Default Programs” panel is
focused. This action will create a default program with default properties for the selected
extension.
Creating new shell context menu
![]() Use the toolbar button, the “New
Shell Context Menu” tree context menu item. Then select which type of context menu
you want to create : Files Context Menu, Directory Context Menu, Background Context Menu,
Drive Context Menu or a subentry for the currently selected shell context menu.
Use the toolbar button, the “New
Shell Context Menu” tree context menu item. Then select which type of context menu
you want to create : Files Context Menu, Directory Context Menu, Background Context Menu,
Drive Context Menu or a subentry for the currently selected shell context menu.
The Drive Context Menu option is not supported by the new Windows 11 Context
Menu.
Renaming ProgIDs, extensions,verbs, default programs and context menus
Use the “Rename” tree context menu item or press the F2 key while an element from the left-side panel is selected.
Locating the attached component for an extension
Use the “Go To Component” tree context menu item or press the F8 key while an element from the “ProgID, Extensions and Verbs” panel is selected. This command will activate the Organization page with the appropriate component selected in the left tree control.
Removing ProgIDs, extensions, verbs, default programs and context menus
![]() Use
the toolbar button, the “Delete” tree context menu item
or press the Delete key while an element from the “ProgID,
Extensions and Verbs” panel is selected.
Use
the toolbar button, the “Delete” tree context menu item
or press the Delete key while an element from the “ProgID,
Extensions and Verbs” panel is selected.
Topics
- Default Programs
Specify the default programs for a file type. - Context Menu Properties
Configure Windows Explorer context menu items for your packaged application. - ProgID Properties
Setting a ProgID's properties in Advanced Installer. - Extension Properties
Setting an Extension's properties in Advanced Installer. - Verb Properties
Setting a Verb's properties in Advanced Installer.