Windows Mobile/CE Installations
The following article uses options that are available starting
with the Professional edition and project
type.
This tutorial will guide you step by step in using the Windows Mobile/CE features provided by Advanced Installer. You will learn how to create a Windows Mobile CAB project for your mobile application, customize it according to your requirements and eventually build an MSI package that will install the resultant CABs through desktop ActiveSync on a cradled device.
For the rest of this tutorial we shall assume that you have developed a mobile application for one of the oldest and most popular board games, chess. Your chess application features several characteristics:
- It is designed for Windows Mobile Pocket PC devices starting from Pocket PC 2003 Second Edition, being screen orientation-aware.
- The animation and board graphics require a third-party ActiveX control, basically a self-registering DLL module.
- Some registry entries must be made on the target device, providing default game settings.
- You want to associate the ".pgn" extension (Portable Game Notation) with your chess application such that accessing files with this extension through File Explorer on a target device launches the recorded chess game in simulation mode.
- 1. Create project
- 2. Enter application details
- 3. Add files and folders to your project
- 4. Add registry keys and values
- 5. CAB package settings and target platforms specification
- 6. Create file associations
- 7. Build and test the CAB package
- 8. Create and maintain multiple configurations
- 9. Digitally sign CAB packages and included files
- 10. Create desktop ActiveSync installer
- 11. Add mobile application prerequisites to ActiveSync installer
1. Create project
If Advanced Installer is not currently running, launch it by double-clicking a desktop icon or selecting it from the “Start” menu. When the application starts, you will see a dialog where you can choose the type of the project you want to create.
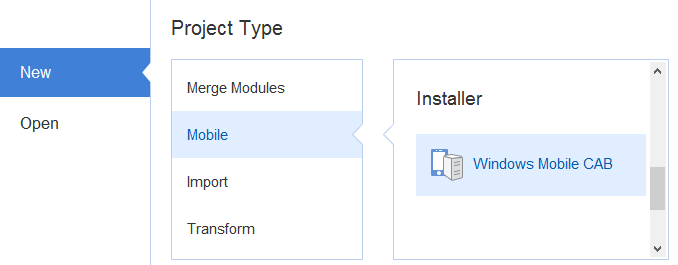
Select “Windows Mobile CAB” and press the Create Project button. The new project has been created and from now on you will edit it.
![]() Save the project and give it an
appropriate name - let's say "MobileChess" for this example.
Save the project and give it an
appropriate name - let's say "MobileChess" for this example.
2. Enter application details
![]() You can specify general
details regarding your mobile application in the Product Details page,
which should be the active view upon the creation of a new project. Fill
the fields in the right pane with the corresponding data, for instance:
You can specify general
details regarding your mobile application in the Product Details page,
which should be the active view upon the creation of a new project. Fill
the fields in the right pane with the corresponding data, for instance:
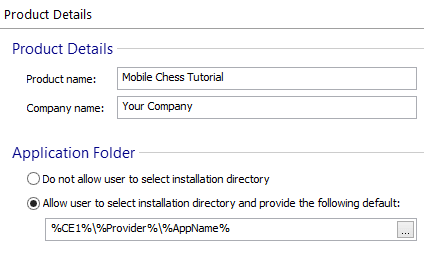
In this page you can also specify whether the user will be allowed to choose the installation volume when installing the CAB package on a target device. By default, an application can be installed to main storage memory. However, if secondary storage (such as a storage card) is available, the user can then choose the volume that has adequate free space.
For more information about this page please see Product Details.
3. Add files and folders to your project
The next step is to add to the project the files and/or folders that compose your application. For this tutorial we shall assume that the application consists of the following files:
- the main executable file "Chess.exe" (compiled for the StrongARM processor)
- a self-registering COM module "SelfRegister.dll", compiled for the same processor type
- 2 text files (with a ".pgn" extension) containing notable recorded chess games in PGN format
![]() Switch to the
“Files and Folders” page and select the
“Install Directory” item in the tree from the left
pane of the view.
Switch to the
“Files and Folders” page and select the
“Install Directory” item in the tree from the left
pane of the view.
![]() Click on the toolbar button and select the files of your
application. You can also drag & drop files from Explorer in the
right list control. After performing this operation, you should obtain
something similar to the following:
Click on the toolbar button and select the files of your
application. You can also drag & drop files from Explorer in the
right list control. After performing this operation, you should obtain
something similar to the following:

Once the files are added, their name will appear in the list control from the right-side pane of the view. Double-clicking a particular file or selecting “Properties...” from its context-menu will open the “Edit File” dialog. In the “Properties” tab of this dialog you can change the file name or the source path, as well as set the desired file system attributes on a target device. In the “Options” tab you can set several installation options for a file.
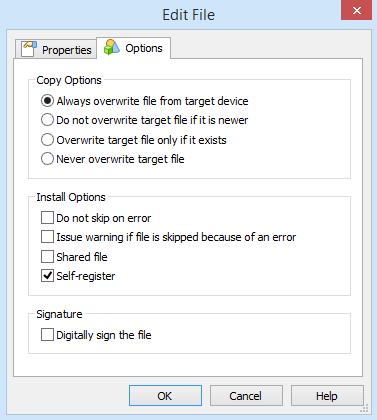
Now double-click on "SelfRegister.dll" or select “Properties...” from its context-menu in order to open the “Edit File” dialog. In the “Options” tab select the “Self-register” checkbox under the “Install Options” group. Press the “OK” button once finished.
Now we shall create a shortcut to the main game executable under the following directory showed in the left tree control: "\Windows\Start Menu\Programs\Games". This directory has the %CE14% associated macro.
For more details about Windows CE directory macros, please see %CEn% Directory Macros
article.
In order to create the shortcut follow the steps below:
- Select the above mentioned folder in the left tree control.
- Click the “New Shortcut” toolbar button - this will open the “Choose Installation File” dialog.
- Select "Chess.exe" in this dialog and then click “OK”.
- This will open the “New Shortcut” dialog.
- Change the shortcut name to Chess Tutorial.lnk and then press the “OK” button.
Make sure you specify the ".lnk" extension for all shortcuts
that you create. Otherwise the shortcut may not function properly when
accessed on a target device.
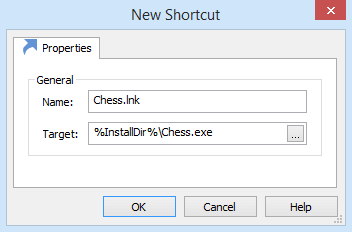
For more information about this page please see Files and Folders.
4. Add registry keys and values
We shall assume that the following registry values must be created on a target device:
- The first registry value named "Installation Directory" stores the application folder you have defined previously in the Product Details page. This value will be resolved at install-time to the corresponding folder on a target device.
- 2 REG_DWORD registry values, "Difficulty" and "Game mode" - providing default game settings.
![]() Switch to the
“Registry” page and select the following registry
path in the tree control:
"HKEY_LOCAL_MACHINE\Software\%Provider%
%AppName%"
Switch to the
“Registry” page and select the following registry
path in the tree control:
"HKEY_LOCAL_MACHINE\Software\%Provider%
%AppName%"
![]() Click on the toolbar button to create a registry key. Edit the key
name to "Settings".
Click on the toolbar button to create a registry key. Edit the key
name to "Settings".
As you probably noticed, registry key names can include the macros
%AppName% and %Provider%
which will be resolved at build-time to the product name and company
name you have specified in the Product Details page.
![]() Add a value under this new key
using the toolbar button. Clicking this
button will open the “New Registry Value”
dialog.
Add a value under this new key
using the toolbar button. Clicking this
button will open the “New Registry Value”
dialog.
In the "Name" text field enter "Installation Directory", the name of your first registry value. In the "Data" field enter "%InstallDir%". Leave the other settings to their default values.
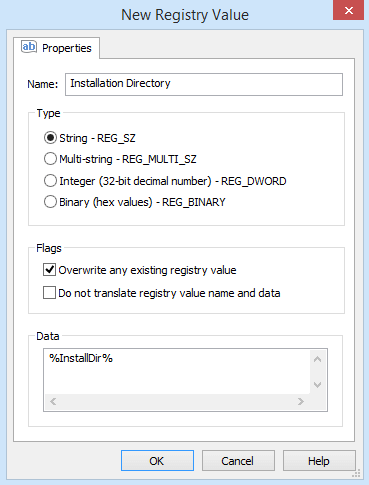
Use the same steps in order to create the other 2 registry values, making sure that you set their type correctly to REG_DWORD. Once all the registry values have been added, you should obtain something similar to the following:
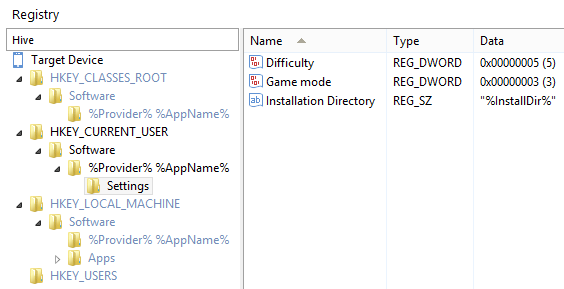
For more information about this page please see Registry.
5. CAB package settings and target platforms specification
This section will serve as an introduction for the multiple configurations concept and will focus especially on basic tasks. A subsequent section will expand on the information presented herein, thus showing how more complex requirements can be satisfied.
Suppose that your chess game has these requirements:
- It can be installed only on devices with a StrongARM processor, since all binaries are compiled for this CPU type.
- It is designed for Pocket PC devices starting from Windows Mobile 2003 Second Edition, but it does not run on the SmartPhone platform. You do plan to support the SmartPhone platform in the future - if so, a subsequent section in the tutorial will show you how to maintain and handle multiple configurations.
- Because your application is designed for Windows Mobile 2003 Second Edition and later devices and it is screen orientation-aware, you want to prevent a common installation warning (in order to gain your users' trust).
- Some custom code needs to be executed at install time and thus you have developed a custom setup DLL for this purpose.
![]() We shall focus on each
of these requirements one at a time, but in order to do so, you first
need to select the “Configurations” page in the left
menu.
We shall focus on each
of these requirements one at a time, but in order to do so, you first
need to select the “Configurations” page in the left
menu.
The left tree control from this view contains all the configurations
defined within your project. Each configuration will have as output a
distinct CAB package. This enables you to target different Windows CE platforms and device types and
also specify which resources belong to each
configuration.
In this section you will work only with the default configuration which is created at the same time the project itself is created. You can change its name in the tree control to something more meaningful if you wish, but you are not required to.
For more information about this page please see Configurations.
![]() In the
“Build” tab you can specify the output directory and
file name for the CAB package, as well as the full path to the custom setup DLL you have
developed (the last requirement mentioned above). After performing these
steps, you may obtain something similar to the following:
In the
“Build” tab you can specify the output directory and
file name for the CAB package, as well as the full path to the custom setup DLL you have
developed (the last requirement mentioned above). After performing these
steps, you may obtain something similar to the following:
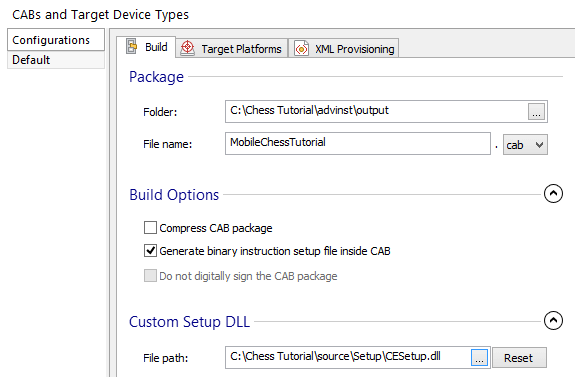
For more information about the settings from this tab please see
Build.
![]() Now switch to the “Target Platforms” tab and
select the options showed below:
Now switch to the “Target Platforms” tab and
select the options showed below:
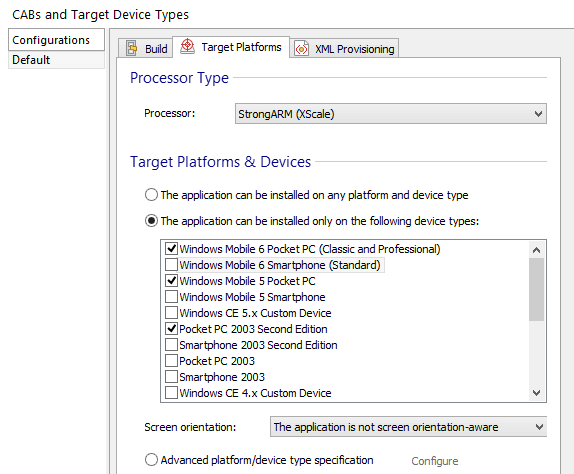
These settings should be self explanatory as they all fulfil each of our first three requirements, in the order we have introduced them initially.
If you want to read more about the settings available in this tab
please see Target
Platforms.
XML provisioning for
target devices is outside the scope of this tutorial, but you can
accomplish this through the corresponding tab if this is a
requirement.
The Configuration
Content tab will show you the resources (files, shortcuts etc)
included in the current configuration (the one selected in the left tree
control).
6. Create file associations
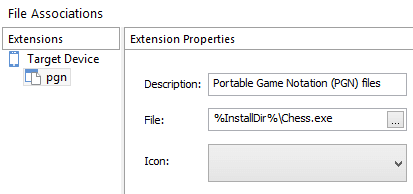
As stated in the beginning of the tutorial, a requirement would be to associate the ".pgn" extension (Portable Game Notation) with your chess game. You can either do this directly by creating the required registry entries in the Registry page or you can use the specialized view provided by Advanced Installer, which greatly simplifies the task.
![]() Switch to the
“File Associations” page and follow the steps below:
Switch to the
“File Associations” page and follow the steps below:
- Click the “New Extension” toolbar button - this will open the “Choose Installation File” dialog.
- Select "Chess.exe" in this dialog and then click “OK”.
- This will add a new extension item in the left tree control - edit the extension text to pgn.
- In the right pane you can enter a description for files of this type and also change the executable that is launched when such a file is accessed through File Explorer on a target device.
After performing these steps you should obtain something similar to the following:
For more information about this page please see File Associations.
7. Build and test the CAB package
You are now ready to build the CAB package.
![]() Click on the
toolbar button - the “Build
Project” dialog that appears will show you the overall build
progress.
Click on the
toolbar button - the “Build
Project” dialog that appears will show you the overall build
progress.
Now you can transfer the resulted CAB package to a real Pocket PC device
or emulator, in order to test the installation.
8. Create and maintain multiple configurations
This section will describe more advanced topics related to configuration handling: targeting multiple platforms and device types using a single project, as well as per-configuration resource management.
When creating a new configuration, by default it contains all project resources and has the default project settings. In order to customize it you have the option to exclude various resources from it. You can exclude the following from a configuration:
- Files
- Shortcuts
- Registry values
- File associations
Additionally, for files you have the possibility to specify
different source paths per configuration. This feature will be described
later on in this section.
For now, let us assume the following:
- Since the first version of your chess game has been a real success on the Pocket PC platform, many SmartPhone users have requested a version that will run on their devices. As a result, you have ported your chess application to the SmartPhone platform. This of course will require a distinct CAB package installer, because there are different game binaries for the Pocket PC and SmartPhone platforms.
- Secondly, you have also created 2 distinct versions of your game for the Pocket PC platform: one that is intended for the older Pocket PC 2003 Second Edition devices and the other intended for newer devices such as Windows Mobile 5 Pocket PCs. The reason for this change might be your interest in newer technologies such as DirectX and Direct3D Mobile, which are supported only by the latest devices, not by Windows Mobile 2003 Second Edition (who knows only about GAPI - Game API).
- The binaries that compose your chess game are "Chess.exe" and "SelfRegister.dll", as discussed in a previous section.
In conclusion, considering the above assumptions, there will be 3 versions of these binaries: one for Pocket PC 2003 Second Edition devices, one for Windows Mobile 5 Pocket PCs and one for SmartPhone devices. Hence 2 questions may arise at this point:
- Is it possible to target multiple platforms and device types using the same project - that is, create several CAB packages with distinct settings from a single project?
- And if so, since there are different binaries (files), is it even possible to specify this within the project?
And from what has been discussed thus far, you probably anticipate that both tasks can be achieved. Do read on in order to find out how.
The first task, targeting multiple platforms and device types with a single project is possible through multiple configurations - in our case there will be a total of 3 configurations, each one intended for a platform and/or device type mentioned above.
Since each configuration has its own distinct settings, you could use
them to target devices with different processor types, for instance
StrongARM and MIPS.
![]() Now switch to the
“Configurations” page, “Media” tab
and follow the steps below:
Now switch to the
“Configurations” page, “Media” tab
and follow the steps below:
- Rename the "Default" configuration to something more meaningful, say "PPC2003SE". The CAB package corresponding to this configuration is intended for Pocket PC 2003 Second Edition devices.
- For consistency, we want to store the output of each configuration in a distinct folder on disk, so please change the output folder for the "PPC2003SE" configuration to: "C:\ChessTutorial\advinst\output\ppc2003se", for instance. Refer to the first screenshot from this former section for more details about the settings from this tab.
- Now switch to the “Target Platforms” tab and make sure that only the option "Pocket PC 2003 Second Edition" is selected in the list of device types, as per the above comments. Refer to the second screenshot in the above mentioned section for details.
- Now we shall create a new configuration for Windows Mobile 5 Pocket PCs. There
are 2 ways to achieve this:
- You can either create a new configuration using the corresponding toolbar button.
- Or you can duplicate the existing one, by selecting the “Duplicate” context-menu option (you need Advanced Installer 7.3 or newer in order to use this feature).
- Either way, set the options for the new configuration in a similar
way as before:
- Name: WM5PPC (for instance)
- Output folder: "C:\ChessTutorial\advinst\output\wm5ppc"
- Processor and Screen Orientation Options: (same as for the initial configuration)
- Target Device Types: "Windows Mobile 5 Pocket PC" and "Windows Mobile 6 Pocket PC (Classic and Professional)"
The next step of course is to create the last configuration, the one targeting the SmartPhone platform. Please refer to the following screenshots for details about this:
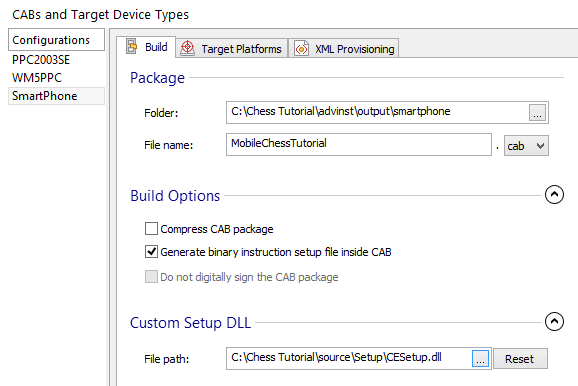
You may notice some changes in the “Build Options”
group for this configuration - this is because SmartPhones support CAB
compression and are able to install only XML-based CAB packages (meaning
that not generating the binary instruction setup file - which is not
used anyway - will reduce the overall size of the CAB package).
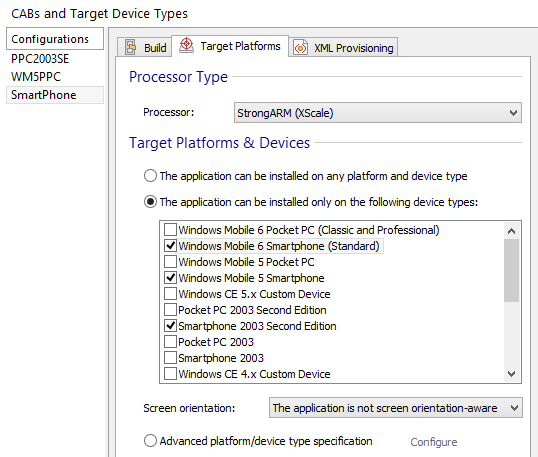
The “Target Platforms” tab for the "SmartPhone" configuration should look as follows:
The second task, specifying different source file paths per configuration can be achieved fairly easy.
![]() Switch to the
“Files and Folders” page and follow the steps given
below:
Switch to the
“Files and Folders” page and follow the steps given
below:
- Double-click on "Chess.exe" or select “Properties” from its context-menu in order to open the “Edit File” dialog.
- Select the “Configurations” tab in this dialog. Note that this tab is visible only when there is more than one configuration defined within your project.
- Select the option “Include file only in the selected configurations” - this will enable the configurations list underneath.
- When selecting a row in this list control, an ellipsis button will appear at the right list margin.
- Clicking the button will allow you to browse for a file on your hard-drive. In this way you can change the per-configuration source path for any file included in the project.
- After performing the necessary modifications for "Chess.exe", you should obtain something like the following:
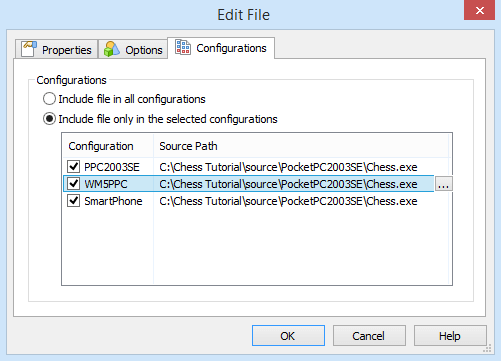
Besides specifying different source paths per configuration, it is
also possible to exclude a file from one or more configurations, by
unthicking the corresponding checkboxes. This is also supported for the
other resource types in a Windows Mobile CAB project: shortcuts, registry values,
file associations.
Performing the appropriate changes for "SelfRegister.dll" (in a similar way) is left as an exercise for the interested reader.
![]() At this point you may build
the project and test the resulted CAB packages on the device types
mentioned throughout this section.
At this point you may build
the project and test the resulted CAB packages on the device types
mentioned throughout this section.
9. Digitally sign CAB packages and included files
Advanced Installer offers great flexibility in working with a digital certificate within a Windows Mobile CAB project:
- You can effortlessly sign all the generated CAB packages.
- Each executable code file (EXE, DLL, OCX etc) can be signed individually.
- You can choose which CAB package(s) must not be signed (on a per-configuration basis).
The latter option exists because not all devices are able to
install digitally signed CABinets. This applies especially to some older
platforms/device types, such as the Pocket PC 2003 Second
Edition.
![]() Switch to the
“Digital Signature” page, specify a software
publisher certificate and enter the necessary details in the
corresponding fields.
Switch to the
“Digital Signature” page, specify a software
publisher certificate and enter the necessary details in the
corresponding fields.
After specifying a digital certificate to be used for signing, you need to select the “Sign the package” option. This will ensure that all CAB packages will be signed, except for those configurations for which the signing has been explicitly disabled. The following screenshot shows an example:
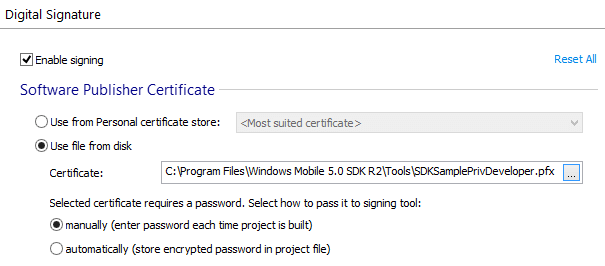
For more information about this page please see Digital Signature.
Signing one or more executable code files from the project is fairly easy. Switch to the “Files and Folders” page, select the file(s) that need to be signed in the right list control and then choose “Properties...” from their context menu. In the “Edit File” dialog select “Digitally sign the file” from the “Options” tab.
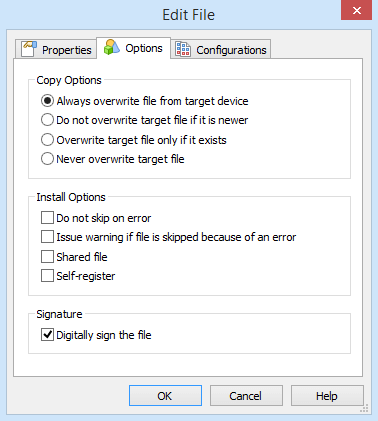
You can disable signing on a per-configuration basis. Considering the above observation, let us specify that the CAB package intended for the Pocket PC 2003 Second Edition platform should not be signed, as showed below:
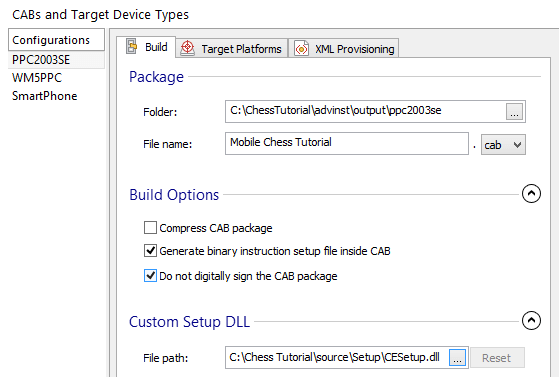
10. Create desktop ActiveSync installer
Desktop ActiveSync installations represent the most common delivery mechanism for Windows Mobile/CE CAB packages. Advanced Installer provides a dedicated view which allows you to specify the mobile applications that should be registered with the Windows CE Application Manager.
This is performed automatically when the MSI package is installed. You can specify the order in which the corresponding CAB packages are installed as well as how they are grouped together, in order to achieve the smallest possible number of prompts from the Application Manager (if this is a requirement).
Create a new non-Simple MSI project through the “Start Menu”(select from the main menu “File -> New”). At least a Professional project type is required in order to use the ActiveSync feature.
![]() Save the project and give it an
appropriate name - let's say "MobileChessDesktop" for this
example.
Save the project and give it an
appropriate name - let's say "MobileChessDesktop" for this
example.
![]() Switch to the
“Files and Folders” page and add to the project the
CAB packages resulted from the 3 configurations we have defined in a
previous
section.
Switch to the
“Files and Folders” page and add to the project the
CAB packages resulted from the 3 configurations we have defined in a
previous
section.
In our case, we shall add the 3 output subdirectories ("ppc2003se", "smartphone" and "wm5ppc") under the “Application Folder” tree item. You can drag & drop these directories from Explorer, for instance. Each of these directories contains one "MobileChessTutorial.cab" file intended for a distinct platform and/or device type.
After adding the CAB packages, you should obtain something similar to the following:

![]() Now switch to the
“ActiveSync” page.
Now switch to the
“ActiveSync” page.
![]() Click on the toolbar button - this will open the
“Choose Installation File” dialog. Select one of the
CAB files you have added previously in the Files and Folders
page.
Click on the toolbar button - this will open the
“Choose Installation File” dialog. Select one of the
CAB files you have added previously in the Files and Folders
page.
The CAB packages targeting the other platforms can be added subsequently to the “CAB Files” list by clicking the button. Their order can also be changed easily using the / buttons.
The following screenshot shows an example of how you may specify the settings for your mobile application:
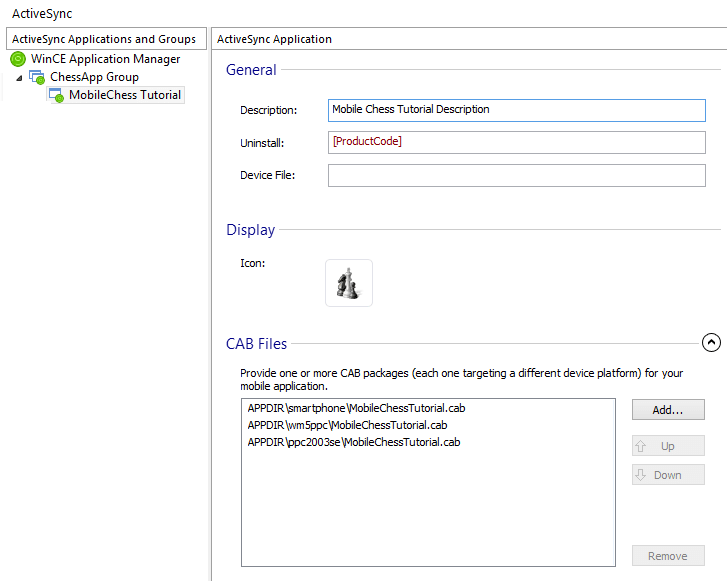
An ActiveSync Application represents a mobile application, but is not
necessarily limited to a single CAB package. You can add multiple CAB
packages, each one targeting a different platform or device type.
For more information about this page please see ActiveSync Application.
It is possible to condition the installation of mobile applications defined within a group and/or activate the debugging dialogs in the Application Manager (for troubleshooting purposes). The default settings are showed below:

Application Groups are used to collect one or more related mobile
applications and to register them with the Windows CE Application Manager in
one single step (this means there will be only one prompt asking whether
to allow the installation on a cradled device).
For more information about this page please see ActiveSync Application Group.
Furthermore, by selecting the root “WinCE Application Manager” node, you can alter the global conditions that control if and when the Application Manager executable runs. The default settings are showed in the following screenshot:

For more information about this page please see ActiveSync Global Settings.
![]() You can now build the MSI
package and install it. If a device is already connected through ActiveSync,
the correct CAB package should be downloaded and installed on it.
Otherwise, the mobile application will be transferred during the next
device connection.
You can now build the MSI
package and install it. If a device is already connected through ActiveSync,
the correct CAB package should be downloaded and installed on it.
Otherwise, the mobile application will be transferred during the next
device connection.
11. Add mobile application prerequisites to ActiveSync installer
Deploying mobile application prerequisites (.NET Compact Framework, SQL Server Compact etc.) through ActiveSync, can be done in a similar way. The prerequisite software is usually installed on a cradled device before the application itself.
Follow the steps below for each of your prerequisites:
- Add the CAB packages for the mobile application prerequisites in the Files and Folders page.
- Create the required ActiveSync applications and groups in the ActiveSync page.
- Change their installation order and how they are grouped together by using drag & drop in the tree control from the ActiveSync page.
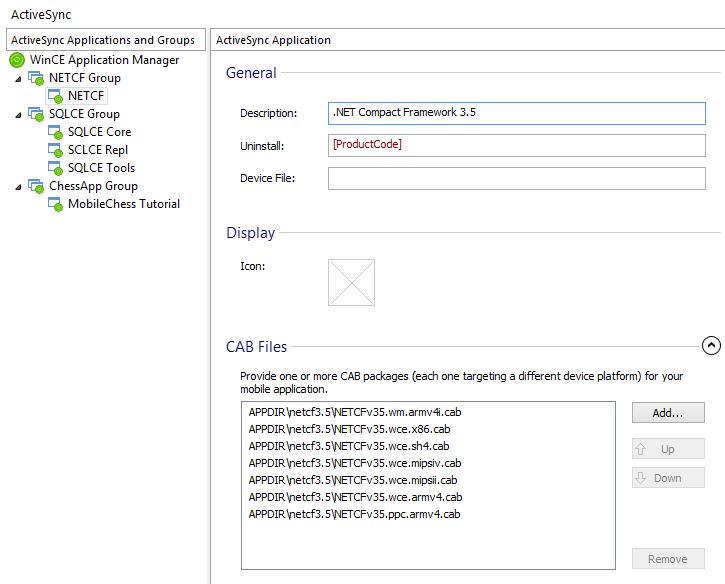
The following is an example of how your project could look like in case you needed to deploy both .NET Compact Framework 3.5 and SQL Server Compact 3.5 together with your application. The order in the tree control, from top to bottom, shows the actual order of installation on a cradled device.
