Creating an XML Search
The following article uses options that are available starting
with the Enterprise edition and project
type.
This tutorial will guide you step by step in the process of creating a valid and working XML custom search. This type of search operation can be useful during the installation, upgrade or removal process in order to copy or delete certain files or features based on the content of an XML file.
- 1. Create an XML file for the tutorial
- 2. Create an XML Search
- 3. Create the first XML locator
- 4. Create XML locators for the rest of the elements
- 5. Add two XML locators for the same element
- 6. Add your files to the project and organize them
- 7. Build the project
- 8. Video tutorial
We will start by creating a simple XML file which we are going to use throughout this tutorial to understand how XML Search operations work. In a real case scenario this will not be needed as the search operations will be defined using real XML files.
1. Create an XML file for the tutorial
First thing we will do is to create a new file, using a regular editor like Notepad and save this file as TutorialXMLfile.xml. In this example we will put it directly in C:\ but it can be moved to any folder you want. In this file we will paste the following code and save the file:
<?xml version="1.0" encoding="UTF-8" standalone="yes"?>
<element1 value1="1">
  This is the tutorial text for element1
  <element2 value2="2">
    This is the tutorial text for element2
  </element2>
  <element3 value3="3">
    This is the tutorial text for element3
    <element4 value4="4">
      This is the tutorial text for element4
      <element5 value5="5">
       This is the tutorial text for element5
      </element5>
    </element4>
  </element3>
</element1>
2. Create an XML Search
![]() Go to the Search Page
page and create a new XML Search by using the toolbar button or the
context menu.
Go to the Search Page
page and create a new XML Search by using the toolbar button or the
context menu.
In the "Path" field from the XML Search Properties panel write [WindowsVolume]TutorialXMLfile.xml. In the XML Search elements panel rename the RootElement to element1.
In this panel add four more elements, rename them and position them like in the image below:

3. Create the first XML locator
In this section we are going to define and test an XML Search locator for element1.
3.1 Element 1
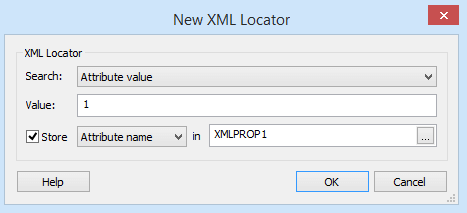
Select element1 from the XML Search elements panel. In the XML Search locators panel add a new XML locator using the button. The New XML locator dialog will appear.
In this dialog set the following options:
- Search field - Attribute value
- Value field - 1
- Enable Store checkbox and from the combobox select Attribute name as the result type
- Write the property or click on the ... button to define the XMLPROP1 property and select it

![]() With the
element1 still selected, test the new XML
search by pressing the toolbar
button.
With the
element1 still selected, test the new XML
search by pressing the toolbar
button.
The test window will appear and in this case the Search Result is value1 which is the exact name of the attribute containing the value 1 from element1 node in our XML file.
4. Create XML locators for the rest of the elements
In this section we are going to define four more XML search locators for four elements in order to better understand their use.
4.1 Element 2
Select element2 from the XML Search elements panel and add a new XML locator, like before with the following options:
- Search field - Element text
- Value field - This is the tutorial text for element2
- Enable Store checkbox and from the combobox select Exists element as the result type
- Write the property or click on the ... button to define the XMLPROP2 property, set its value to none and select it.
Test the new XML Search.
The Search Result should display element2.
4.2 Element 3
Select element3 from the XML Search elements panel and add a new XML locator with the following options:
- Search field - Element has index in parent
- Value field - 1
- Enable Store checkbox and from the combobox select Element text as the result type
- Write the property or click on the ... button to define the XMLPROP3 property, set its value to none and select it.
Test the new XML Search.
The Search Result is This is the tutorial text for element3 which is the exact element with the index number 1.
4.3 Element 4
Select element4 from the XML Search elements panel and add a new XML locator, like before with the following options:
- Search field - Attribute name
- Value field - value4
- Enable Store checkbox and from the combobox select Attribute value as the result type
- Write the property or click on the ... button to define the XMLPROP4 property, set its value to none and select it.
Test the new XML Search.
The Search Result should display 4.
4.4 Element 5
Select element5 from the XML Search elements panel and add a new XML locator, like before with the following options:
- Search field - Attribute name
- Value field - value5
- Enable Store checkbox and from the combobox select Element text as the result type
- Write the property or click on the ... button to define the XMLPROP5 property, set its value to none and select it.
Test the new XML Search.
The Search Result should display This is the tutorial text for element5 which is the text assigned to attribute value5.
5. Add two XML locators for the same element
In this section we are going to add another XML Search locator for element4 in order to understand how multiple search operations assigned to a single element are performed.
Select element4 from the XML Search elements panel and add a new locator with the following options:
- Search field - Attribute name
- Value field - different_value
- Enable Store checkbox and from the combobox select Attribute value as the result type
- Write the property or click on the ... button to define the XMLPROP6 property, set its value to none and select it.
Test the new XML Search.
In this case the properties assigned to both the first and the second search operations aren't set (their value is the default none).
This is because the attribute
different_value doesn't exist in our XML file, so
the search will fail making all the other search operations assigned to
element4 and all its child nodes to
also fail.
In our example the properties XMLPROP4, XMLPROP5, XMLPROP6 will have the default value none.
6. Add your files to the project and organize them
In this tutorial we will add five txt files to the project, namely: file1.txt; file2.txt; file3.txt; file4.txt; file5.txt and we will put each file inside its own component.
![]() Add your files
to the project using the Files and Folders Page - Installer Project.
Add your files
to the project using the Files and Folders Page - Installer Project.
![]() Organize them into
features and components in the Organization Page.
Organize them into
features and components in the Organization Page.
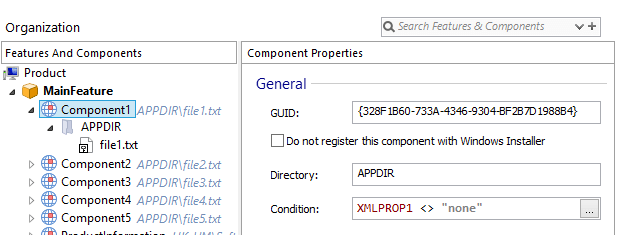
On every component we will set the following install conditions:
- Component1:
XMLPROP1<>"none"
- Component2:
XMLPROP2<>"none"
- Component3:
XMLPROP3<>"none"
- Component4:
XMLPROP4<>"none" AND XMLPROP6<>"none"
- Component5:
XMLPROP5<>"none"

7. Build the project
![]() Build the
project and run it.
Build the
project and run it.
If you followed this tutorial step by step, upon installing the package you will see that only file1.txt; file2.txt; file3.txt are present in the installation folder. This is normal, as described above in Add two XML locators for the same element section. The files file4.txt, file5.txt will not be installed since the search operations associated with the parent node, element4, failed.
You can download a sample project from here (Advanced Installer Enterprise Edition is needed). Also, you can
watch the example from the video tutorial:
Topics
- XML Consecutive Locators Search
Step by step tutorial describing how to create an XML consecutive locators search in Advanced Installer.