How to create a .NET Custom Action
The following article uses options that are available starting with the Professional edition and project type.
Custom actions allow developers to control the software installation according to specific requirements or criteria. These actions can be included within a DLL, PowerShell or JavaScript files.
A custom action written in C# will generate a dynamic linked library file (DLL). The installer can call a specific function within that DLL to execute the custom action during the installation process. Below you will find guidance on creating a .NET custom action using Visual Studio and the VS extension from Advanced Installer.
The custom action created in this guide works only in installer packages built with
Advanced Installer.
Install the Advanced Installer extension for Visual Studio
In order to create the C# Custom Action, you need the Advanced Installer extension for Visual Studio. Once installed, it will add the templates required to create a C# custom action from Microsoft Visual Studio.
The extension is available in the Visual Studio Marketplace. If you haven’t installed it yet, follow these steps:
- Open Visual Studio and navigate to Extensions → Manage Extensions.
- In the Online section, search for Advanced Installer for Visual Studio

- Download the extension. Then, close Visual Studio IDE and reopen it to install the extension.
Create the .Net Custom Action project
Once the extension is installed, follow the next steps to create a C# custom action:
- In Visual Studio navigate to File → New Project
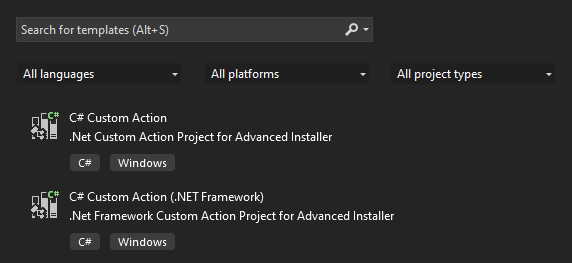
- From the list of templates, select the C# Custom Action template or the C# Custom Action (.NET Framework) template, depending on your needs

By default, the project will generate the following code for the custom action:
      using System;

namespace MyCustomAction
{
    public class CustomActions
    {
        public static int CustomAction1(string aMsiHandle)
        {
            MsiSession session = new MsiSession(aMsiHandle);

            // Log data passed as action data
            string infoMessage = string.Format("User data: \"{0}\"", session.CustomActionData);
            session.Log(infoMessage, MsiSession.InstallMessage.INFO);

            // Get property value
            string myProperty = "MY_PROPERTY";
            string myPropertyValue = session.GetProperty(myProperty);

            // Log property MY_PROPERTY value
            infoMessage = string.Format("Property \"{0}\" has value: \"{1}\"", myProperty, myPropertyValue);
            session.Log(infoMessage, MsiSession.InstallMessage.INFO);

            string mySecondProperty = "MY_SECOND_PROPERTY";
            string mySecondPropertyValue = string.IsNullOrEmpty(myPropertyValue)
                                                                     ? "Advanced"
                                                                     : "Installer";

            // Set property value
            session.SetProperty(mySecondProperty, mySecondPropertyValue);

            // Log property MY_SECOND_PROPERTY value update
            infoMessage = string.Format("Property \"{0}\" was set as \"{1}\"", mySecondProperty, mySecondPropertyValue);
            session.Log(infoMessage, MsiSession.InstallMessage.INFO);

            return 0;
        }
    }
}
Besides the default code, apply the following code to show a message during the installation, specifically displaying the product code:
MessageBox.Show("This is the product code: " + session.GetProperty("ProductCode"));Generate the custom action
Once you’ve made all the necessary modifications, it’s time to generate the custom action:
- Navigate to the Build option from the menu bar and choose Build Solution.
- Upon successful build, a DLL file will be created. To locate the file, navigate to your project folder, then go to bin followed by either Debug or Release, depending on your build configuration.
Integrate the custom action in Advanced Installer
Now, to integrate the C# custom action into your installer project, first, set up a Professional project or higher in Advanced Installer. Once you’re prepared, follow these steps:
1. Add the DLL to your AI project as a temporary file.
- Go to the Files and Folders tab in Advanced Installer
- Right-click on the Application Folder → Add Temporary files
- In the opened dialog, select your DLL
2. Configure the Custom action.
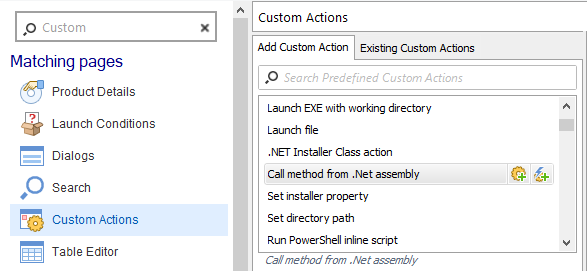
- Navigate to the Custom Actions page
- Select the Add Custom Action tab and add the Call method from .Net assembly custom action

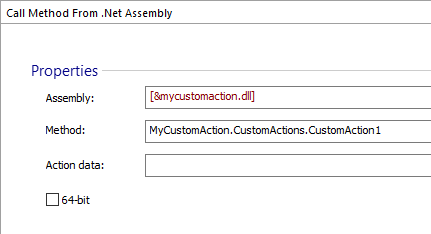
- With the custom action (CallDotNetMethod) selected, go to the Properties
view:
-Use the formatted reference from the Assembly field to select your assembly from the Temporary folder.
-In the method field, input your method name following the schema below: <namespace>.<class>.<method>.

- Ensure the execution stage is set according to your specifications → Install/Uninstall/Maintenance
Build and install
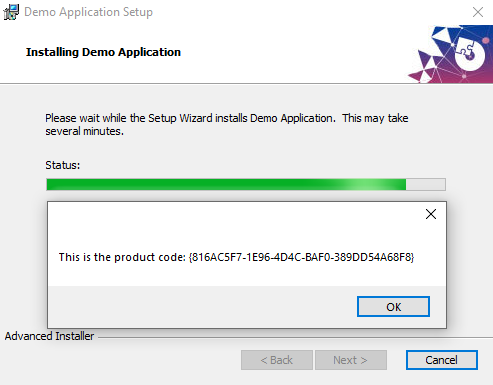
Once you finish customizing your installer, build it and run it. You should see a prompt with the product code during installation.

Debug
Add some code for displaying a message box at the beginning of your custom action:
      public static int CustomAction1 (aMsiHandle)
{
     MsiSession session = new MsiSession(aMsiHandle);

     //display message to allow attaching the debugger
     MessageBox.Show (“Please attach a debugger to rundll32.exe.”, “Attach”);

     //sending message to installation log
     session.Log(“Begin CustomAction1”);
     .
     .
     .
- Since you will use MessageBox, make sure you have a reference to System.Windows.Forms.dll
- Add a breakpoint on the next line of code, after your message box code
- Rebuild your custom action project with Visual Studio
- Rebuild your Advanced Installer project
- Run the installation using "Run and Log" from Advanced Installer
- When the message box displays, go to Visual Studio project > Tools > Attach to Process…
- From the Available Processes list select the process with the name "rundll32.exe" and title "Attach"
- Click Ok on the message box in your installation
- The breakpoint you set earlier should now be activated in VS While debugging the custom action after implementing the above steps, you can observe the property changes in the Log pane of Advanced Installer.
Conclusions
Creating the .Net custom actions, whether .Net core or .Net Framework, is simplified with the addition of the new templates in Visual Studio through the Advanced Installer extension. The integration with the installer is a streamlined process that enhances the software deployment efficiency. Now, it’s simpler than ever to craft a custom action and integrate it with your installer package created with Advanced Installer.