Create VSIX Installers
The following article uses options that are available starting
with the Professional edition and project
type.
This tutorial will guide you in creating a project for a Visual Studio Extension installer (VSIX). Let's suppose you have a Visual Studio Extension which requires at least .NET Framework 3.0 in order to work and for which you want to create an installer.
1. Start a VSIX Project
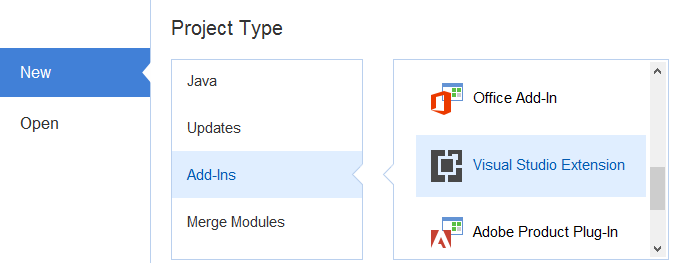
If Advanced Installer is not currently running, it can be launched from its desktop icon or by selecting it from the "Start" menu. When the application starts, from the Start Page navigate to the "Add-Ins" tab and select the "Visual Studio Extension" template.

Press the button to create the project.
2. Add information about your extension
Using the Product Details Page - Visual Studio Extension Project add all the necessary information for your Visual Studio Extension, like Product Name, Author, Version or Info - User Guide URLs
The ID value in "Product Details" section can be left
unchanged.
Optionally, you can select the "Install for all users" option if you want the VSIX package to be installed for all the users using the computer. If this option is not enabled the VSIX package will be installed only for the user launching the installation.
3. Add the extension files and set the prerequisites
![]() Go to the Files and Folders Page - Windows Store App Projects add the files that make your extension
by using the "Add Files..." context menu option or toolbar
button.
Go to the Files and Folders Page - Windows Store App Projects add the files that make your extension
by using the "Add Files..." context menu option or toolbar
button.
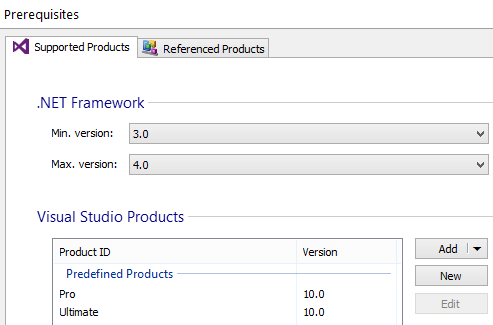
![]() Go to the Prerequisites Page - Visual Studio Extension Project. In the “Supported
Products” tab set the minimum and maximum .NET Framework
requirements. Since our extension requires .Net Framework 3.0 to work
set the Min. Version to
3.0 and leave the Max.
Version unchanged
Go to the Prerequisites Page - Visual Studio Extension Project. In the “Supported
Products” tab set the minimum and maximum .NET Framework
requirements. Since our extension requires .Net Framework 3.0 to work
set the Min. Version to
3.0 and leave the Max.
Version unchanged
Optionally, in the "Visual Studio Products" section add the Visual Studio Edition on which the extension will run and the "Visual Studio Isolated Shells".

4. Set the output location and name of the VSIX package
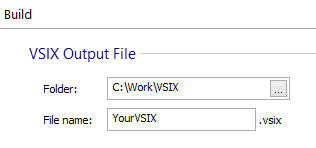
![]() Go to the Build Page - Visual Studio Extension Project. In the "Folder" field write the location where you want to save the
VSIX package. In the "File Name" field write the name of the VSIX
package. For example: MyVSIX.
Go to the Build Page - Visual Studio Extension Project. In the "Folder" field write the location where you want to save the
VSIX package. In the "File Name" field write the name of the VSIX
package. For example: MyVSIX.
When writing the name of the VSIX package do not append
the .vsix extension. Advanced Installer will automatically do
it for you.
This step can be skipped. The VSIX package will be created in the
same location where the VSIX project is saved and bearing the same
name.

5. Add the License Agreement, Icon and Preview image
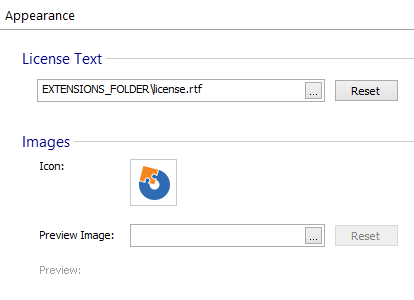
![]() Go to Appearance Page. Using the button from
the "License Text" field, select the file with the License Agreement.
The License file must be included in the Files and Folders Page - Windows Store App Projects along with the files that make your
Visual Studio extension.
Go to Appearance Page. Using the button from
the "License Text" field, select the file with the License Agreement.
The License file must be included in the Files and Folders Page - Windows Store App Projects along with the files that make your
Visual Studio extension.
Only .RTF and .TXT files can be used.
In the "Icon" field use the button to select the icon for your Visual Studio Extension. Like the License file, the icon file must be included in the "Files and Folders" Page. This icon will appear in Visual Studio Extension Manager for the entry of your extension. Only .ico files are supported.
In the "Preview Image" field use the button to select a image file for your Visual Studio Extension. The icon file must be included in the "Files and Folders" Page. The image will appear in Visual Studio Extension Manager for the entry of your extension. The supported file formats are: .bmp, .jpg, .jpeg, .png.

6. Build the package
![]() Build the project by using the "Build" toolbar
button. Test the resulted VSIX package and see if it installs correctly
in Visual Studio 2010.
Build the project by using the "Build" toolbar
button. Test the resulted VSIX package and see if it installs correctly
in Visual Studio 2010.
![]() Optionally, you can
digitally sign the package from the Digital Signature Page - Visual Studio Extension Project using a PKCS #12
certificate file.
Optionally, you can
digitally sign the package from the Digital Signature Page - Visual Studio Extension Project using a PKCS #12
certificate file.