Creating an XML Search with consecutive locators
The following article uses options that are available starting
with the Enterprise edition and project
type.
This tutorial will guide you step by step in the process of creating a valid and working XML custom search using consecutive locators. This type of search operation can be useful during the installation, upgrade or removal process in order to copy or delete certain files or features based on the content of an XML file with multiple identical attribute names.
We will start by creating an XML file which has multiple identical attribute names. We are going to use it throughout this tutorial to understand how XML Search operations work with consecutive locators. In a real case scenario this will not be needed as the search operations will be defined using real XML files.
1. Create an XML file for the tutorial
First thing we will do is to create a new file, using a regular editor like Notepad and save this file as TutorialXMLfile.xml. In this example we will put it directly in C:\ but it can be moved to any folder you want. In this file we will paste the following code and save the file:
<?xml version="1.0" encoding="UTF-8" standalone="yes"?>
<configuration>
  <appSettings>
    <add key="catalogServiceHost" value="catalog-server"/>
    <add key="catalogServicesPassword" value="p@ssw0rd"/>
    <add key="defaultDomainAddress" value="domain.local"/>
  </appSettings>
</configuration>
2. Create an XML Search
![]() Go to the Search Page
page and create a new XML Search by using the toolbar button or the
context menu.
Go to the Search Page
page and create a new XML Search by using the toolbar button or the
context menu.
In the "Path" field from the XML Search Properties panel write [WindowsVolume]TutorialXMLfile.xml. In the XML Search elements panel rename the RootElement to configuration.
In this panel add two more elements, rename them and position them like in the image below:

3. Create the XML locators
Let’s assume you want to get the value for the catalogServiceHost key, which in our case is catalog-server. As you can see from the example, you have multiple add elements in the XML, and each element has a key and value.
In order to get the desired value for a specific key we make use of consecutive locators. When you add multiple locators in your XML search, these have a “join” behavior, something like databases. The first thing we need to locate is the key with catalogServiceHost.
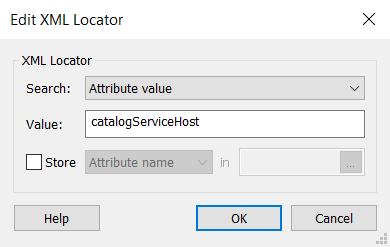
Select add from the XML Search elements panel. In the XML Search locators panel add a new XML locator using the button. The New XML locator dialog will appear.
In this dialog set the following options:
- Search field - Attribute value
- Value field - catalogServiceHost
- Disable Store checkbox

This places the locator in the key with catalogServiceHost, but in order to get the catalog-server value we need to create a new XML locator.
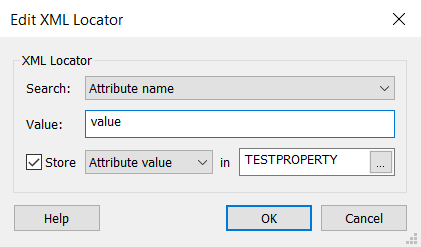
In the XML Search locators panel add a new XML locator using the button. The New XML locator dialog will appear.
In this dialog set the following options:
- Search field - Attribute name
- Value field - value
- Enable Store checkbox and from the combobox select Attribute value as the result type
- Write the property or click on the ... button to define the TESTPROPERTY property and select it

![]() With the
add element still selected, test the new XML
search by pressing the toolbar
button.
With the
add element still selected, test the new XML
search by pressing the toolbar
button.
The test window will appear and in this case the Search Result is catalog-server which is the exact value we desired.

The XML search narrowed the key to catalogServiceHost and the next locator received its value from the Attribute name value.