How to set a WiX Toolset custom action to run only on uninstall
When you create an installer using the WiX Toolset, there are instances where you may want to set a custom action to run under specific conditions, such as uninstalling an application, installing an application, or running a custom script.
In this article, we’ll see how you can set a custom action to run when uninstalling an application using WiX Toolset.
Understanding Custom Action conditions
Every event defined in the install sequences runs under more or less specific conditions.
These conditions can target more than one installer property. For this specific example, you may need to understand how the values of the “Installed”, and “REMOVE” properties are perceived by the installer's runs.
You can have a look at the table below:
Property Name | Install | Uninstall | Change | Repair | Upgrade |
|---|---|---|---|---|---|
Installed | False | True | True | True | True |
REINSTALL | False | False | False | True | False |
UPGRADINGPRODUCTCODE | False | False | False | False | True |
REMOVE | False | True | False | False | True |
Remember that property names are case sensitive.
How to Create a Custom Action and Link it to WiX Setup Project
1. Create a new “C# Custom Action Project for WiX v3” in your Visual Studio solution.
Here is a basic custom action snippet which will write “Hello World!” in the installation log.
using System;
using System.Collections.Generic;
using System.Text;
using Microsoft.Deployment.WindowsInstaller;
namespace CustomAction
{
    public class CustomActions
{
    [CustomAction]
    public static ActionResult CustomAction(Session session)
    {
    session.Log("Hello World!");
    return ActionResult.Success;
    }
}
}2. You can change the name of the function to a name that suits your function.
3. Then, you have to reference this custom action in your WiX setup project.
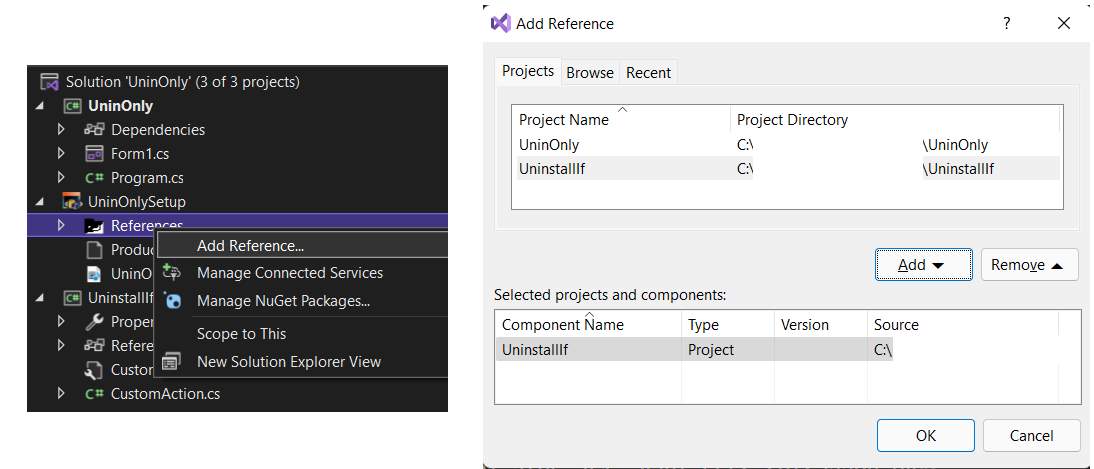
To do that, right click the “References” folder on your WiX setup project and choose “Add Reference…”
4. Following up, click on the “Projects” tab and choose your custom action project.

How to declare the WiX custom action
Now, we need to actually declare the custom action in the “Product.wxs” file. For that, you need to add the following code under the Product Tag:
<Binary Id="CustomActionBinary" SourceFile="$(var.CUSTOMACTIONSNAME.TargetDir)$(var.CUSTOMACTIONSNAME.TargetName).CA.dll" /> <CustomAction Id="CUSTOMACTIONAME" Impersonate="no" BinaryKey="CustomActionBinary" DllEntry="CUSTOMACTIONFUNCTION" Return="check" />
In order for it to work, you have to change the following names:
“CUSTOMACTIONSNAME” | The name of the custom action that was added in the references folder |
|---|---|
“CUSTOMACTIONNAME” | The name of your choice |
“CUSTOMACTIONFUNCTION” | Your custom action project's function name that you want to call |
Adding the custom action to the Install Execute Sequence
In order for your custom action to be called when the installer is running, you need to add it to the install sequence.
Insert the custom action into the Install Execute Sequence as follows:
<InstallExecuteSequence>
     <Custom Action='CustomAction1' After='InstallInitialize'>Installed AND REMOVE=”ALL”</Custom>
</InstallExecuteSequence>The Installed AND REMOVE=”ALL” condition will make sure that the custom action will run only when uninstalling the application.
How to set a custom action to run only on uninstall using Advanced Installer?
Using Advanced Installer, you can automatically set custom actions to run only on uninstall directly from its GUI - NO need to write any code.
Custom Actions are available for Professional, Enterprise and Architect project types in Advanced Installer. Have a look at how custom actions work in Advanced Installer through our 30-day full featured trial. (No credit card required)
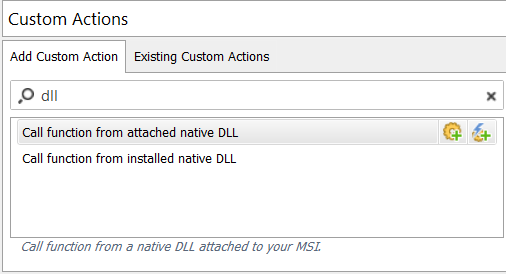
1. To add a new custom action, go to the Custom Actions page and add a new custom action to your project.
You can use the same custom action DLL as before by adding a “Call function from attached native DLL” custom action.

2. In the Properties section, under the Function field, select the function you want your custom action to call.

3. Now, in the Execution Stage Condition section, uncheck the Install and Maintenance checkboxes. That will make sure that your custom action will run only when you uninstall the application.

And that’s it! As you could see, setting a custom action through Advanced Installer intuitive GUI requires no code skills allowing you to be time efficient when configuring your application.
Conclusion
In this article, we presented two approaches for configuring a custom action to run on uninstall.As we’ve seen, WiX is not GUI-based and sometimes it can be challenging to achieve specific tasks, having to create custom scripts from scratch. On the other hand, the process of adding custom actions is much simpler and quicker using Advanced Installer which offers a dedicated GUI for adding and defining custom actions.
We hope you like it! For more topic suggestions, leave a comment below.
