How to create major upgrades for MSI packages using WiX Toolset
Deploying major upgrades for an MSI package created with WiX Toolset is simple. However, there are a few boxes you need to check to make sure you're doing it properly. We'll share them with you in this article!
What makes major upgrades different from patches?
Unlike patches, major upgrades require a complete reinstallation of the application. When the application is upgraded, the old version is completely removed from the system, and then the new version is installed.
Every major version of an application is treated as a separate application by the OS, and according to Windows Installer standards, its MSI must have a unique product code.
How to implement a major upgrade using WiX Toolset
To implement a major upgrade in WiX Toolset, you need to keep some things in mind.
1. In the Product element, the ID should remain a wildcard. This ensures that the MSI package will generate a different product code each time we build it.
2. The UpgradeCode should remain constant, in order to correctly link the different versions of the package.
Here is an example of a proper Product element:
<Product Id="*" Name="Sample Application" Language="1033" Version="1.0.0.0" Manufacturer="Caphyon" UpgradeCode="ca61b68b-a4ca-452f-9cd7-5ffcd2558b5d">
…………………………
</Product>
3. To handle changing any version of the product, you have to add the MajorUpgrade element in the Product element, as follows:
<MajorUpgrade AllowSameVersionUpgrades="yes" DowngradeErrorMessage="A newer version of [ProductName] is already installed." />
This addition ensures that even version 1.0.0.1 is going to be perceived as a major upgrade. Otherwise, you may see multiple side by side installations of your application in Programs and Features.
Using Advanced Installer Approach to Handle Major Upgrades
WiX toolset approach to perform a major upgrade to an MSI package requires adding new code to your XML file.
But, if you want to make this process smoother, Advanced Installer enables you to do that directly from its GUI without writing any code. Here's how you can achieve it:
Before getting started, make sure you have a backup copy of the project file before beginning to edit the.AIP project. This is known as the "old.AIP Project."
1. Increment the "Version" from the "Product Details" section by going to the "Product Details" page:

2. Customize the new version of your software by making the necessary changes to the Installer Project.
Keep in mind that the resources of the new version are all of your application's resources, not just those that are modified by this upgrade installation.
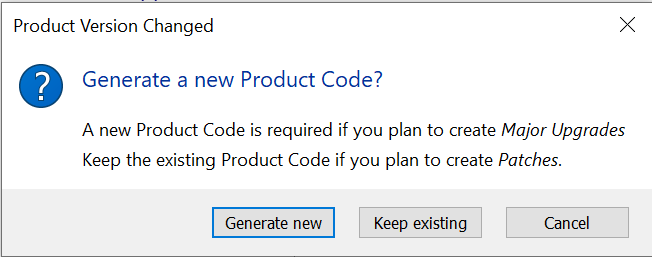
3. Generate a new Product Code by clicking “Generate new”

And you’re done.
Watch the video below to learn how you can complete this task more easily with Advanced Installer:
Conclusion
As you can see, WiX offers you the capability to handle major upgrades by using the MajorUpgrade element within the XML-based definition file. But that is error-prone.
If you need an easier and foolproof solution, then you can use Advanced Installer’s GUI.
Which one do you prefer? Let us know in the comments.
