How to pass CustomActionData to a CustomAction using WiX
Do you want to transfer CustomActionData to a CustomAction in WiX? We'll show you how in this article.
When adding CustomActions using WiX, there are two elements that you need to use:
- the CustomAction element;
- the Sequence element.
The CustomAction element specifies the custom action that will be added to the MSI CustomAction table.
On the other hand, the Sequence element is used to schedule the CustomAction within the corresponding table (AdminExecuteSequence, AdminUISequence, AdvertiseExecuteSequence, InstallExecuteSequence) and set any condition, if needed.
Each condition is evaluated separately, and the corresponding CustomAction is run only if the condition is set as True. Otherwise, the CustomAction gets skipped. If the condition syntax is invalid, then the sequence ends and returns iesBadActionData.
Get more details about WiX CustomActions from our How To Add Custom Actions in WiX Toolset article.
What is the challenge when you want to pass a property to a Deferred CustomAction?
A Deferred CustomAction doesn't have any information about the original session handle and property data (Session.Property([PROPERTY])). This is because the script generated for it is executed outside of the installation process. Instead, you will need to use CustomActionData (Session.Property("CustomActionData")) .
How to use CustomActions with WiX?
Let's suppose we need to add a script that takes the value of the SERVERPATH property as an input (passed to the installer via command line) and writes it into the registry. The CustomAction script should look like the one below:
First, we must define our CustomAction elements:
<CustomAction Id="SetServerPath" BinaryKey="SetServerPath.vbs" Execute="deferred" VBScriptCall='' Impersonate="no" Return="check"/>
<CustomAction Id="SetServerPathProperty" Property="SetServerPath" Value="[SERVERPATH]"/>
Let’s understand what SetServerPathProperty and SetServerPath CustomAction are:
- The SetServerPath CustomAction is the Deferred CustomAction and it references the VBScript defined above, which is stored in the Binary table.
- The SetServerPathProperty is the SetProperty CustomAction which is used to set the property of interest (SERVERPATH) property to a property with the same name as the Deferred CustomAction (SetServerPath).
We also need to define the Binary element because the VBScript referenced by the SetServerPath CustomAction is stored in the Binary table.
<Binary Id="SetServerPath.vbs" SourceFile="SetServerPath.vbs"/>
Once the CustomAction and Binary elements are defined, we can set the corresponding InstallExecuteSequence elements – one for each of the two CustomActions.
<InstallExecuteSequence>
     <Custom Action='SetServerPath' Before='InstallFinalize'>NOT Installed</Custom>
     <Custom Action='SetServerPathProperty' Before='SetServerPath'>NOT Installed</Custom>
</InstallExecuteSequence>When scheduling the two CustomAction in the InstallExecuteSequence table, the SetProperty CustomAction ('SetServerPathProperty) should be scheduled before the Deferred CustomAction (SetServerPath).
SetProperty CustomAction ('SetServerPathProperty) is used to set the property of interest to a property with the same name as the Deferred CustomAction.
The complete listing for the WiX source file (.wxs) should look like the one below:
<?xml version="1.0" encoding="UTF-8"?>
<Wix xmlns="http://schemas.microsoft.com/wix/2006/wi">
  <Product Id="{2D00166E-A14A-4F24-B94F-3D5E9ED21D65}" Name="MyApp" Language="1033" Version="1.0.0.0" Manufacturer="MyCompany" UpgradeCode="{8F800905-91E8-4234-AD80-A485F156FE1B}">
	<Package InstallerVersion="400" Compressed="yes" InstallScope="perMachine" />
	<Media Id='1' Cabinet='MyAppCAB.cab' EmbedCab='yes' />
	<Directory Id='TARGETDIR' Name='SourceDir'>
  	<Directory Id='ProgramFilesFolder'>
    	<Directory Id='MyCompany' Name='MyCompany'>
      	<Directory Id='INSTALLDIR' Name='MyApp'>
        	<Component Id='MyComponent' Guid='{2D00166E-AAAA-4F24-B94F-3D5E9ED21D65}'>
          	<File Id="Readme" Name="Readme.txt" DiskId="1" Source="Readme.txt"/>
		</Component>
      	</Directory>
    	</Directory>
  	</Directory>
	</Directory>
	<Feature Id='MyFeature' Title='My 1st Feature' Level='1'>
     	<ComponentRef Id='MyComponent' />
	</Feature>
	<Binary Id="SetServerPath.vbs" SourceFile="SetServerPath.vbs"/>
	<CustomAction Id="SetServerPath" BinaryKey="SetServerPath.vbs" Execute="deferred" VBScriptCall='' Impersonate="no" Return="check"/>
	<CustomAction Id="SetServerPathProperty" Property="SetServerPath" Value="[SERVERPATH]"/>
	<InstallExecuteSequence>
  	<Custom Action='SetServerPath' Before='InstallFinalize'>NOT Installed</Custom>
  	<Custom Action='SetServerPathProperty' Before='SetServerPath'>NOT Installed</Custom>
	</InstallExecuteSequence>
  </Product>
</Wix>Now, all we need to do is to:
- Pre-process and compile the WiX source file into a WiX object file.
- Process the WiX object file compiled previously and build the Windows Installer (MSI package).
How to configure CustomActions with Advanced Installer?
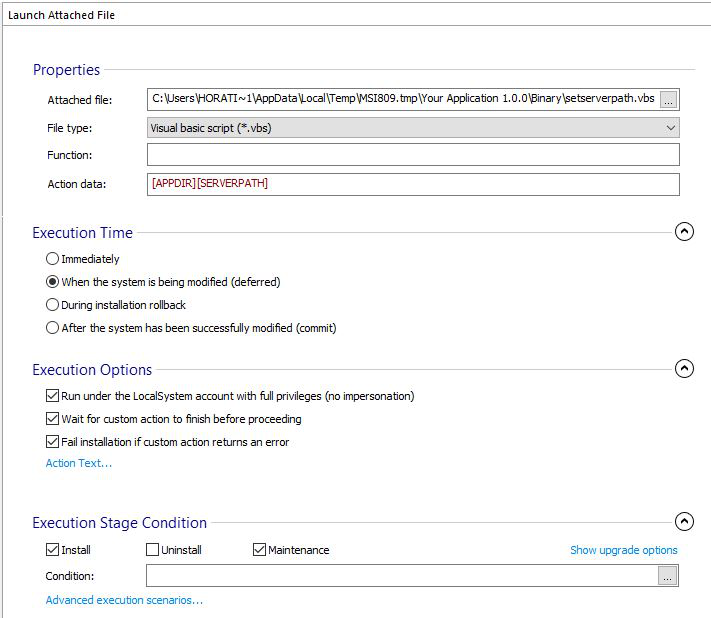
If you use Advanced Installer to build and create your MSI, there is no need for an extra CustomAction to set the property of interest with the same name as the Deferred CustomAction.
All you need to do is specify the value of the CustomActionData property within the “ActionData” and Advanced Installer does the rest for you.

Have a look at our How to Use CustomActionData to Access Windows Installer Properties in Deferred CustomActions article to find out more about:- Why do you need CustomActionData- When can Deferred CustomActions go wrong- How you can pass CustomActionData to a CustomAction using Advanced Installer
Conclusion
WiX does not have a GUI and it builds the Windows Installer packages based solely on the information defined within the WiX source file (wxs). This makes it difficult to use, especially for people who have little or no experience.
On the other hand, Advanced Installer comes with a dedicated GUI for adding a CustomAction and passing the CustomActionData property to it which makes the job a lot easier and very intuitive.
Try out Advanced Installer’s dedicated GUI for CustomAction through our 30-day full feature trial.
