How to create a WiX KeyPath attribute
One of the main benefits of using Windows Installer to build your software installer is the "self-repair" or "self-healing" capability. This option is particularly useful when keypaths are missing or broken.
How do you trigger the self-repair mechanism?
The most common way to trigger this feature is to launch an advertised shortcut. The way it works is that when this advertised shortcut is launched, Windows Installer checks the keypaths for all the components included within the same feature as the advertised shortcut. If any of them is missing or broken, it prompts the self-repair mechanism.
In this article we will go into how you can set a KeyPath in WiX.
How to create a WiX Keypath?
1. To get started, you must set the KeyPath attribute of the Component element to “yes”.
By doing this, the Directory of the Component is used as a keypath.
If you want to set a File or a Registry value as a keypath for the Component, then you must set the Keypath attribute of the File or Registry element to “yes”.
<Component Id='MyShortcutComponent' Guid='{2D00166E-AAAA-4F24-B94F-3D5E9ED21D65}'>
          		<File Id="Readme" Name="Readme.txt" DiskId="1" Source="Readme.txt"  KeyPath="yes">
			</File>
		</Component>
		<Component Id='MyRegComponent' Guid='*'>
			<RegistryValue Root="HKCU" Key="Software\MyCompany\MyApp" Type="string" Value="Installed" KeyPath="yes" />
</Component>2. Now, you must declare the shortcut element and ensure that it has the “Advertise” attribute set to “yes”.
<Shortcut Id="MyApp" Directory="ProgramMenuFolder" Name="MyApp" WorkingDirectory="INSTALLDIR" Advertise="yes" />
3. And that’s it. You have fully declared an advertised shortcut which triggers the self-repair mechanism when the component keypath is either missing or broken.
The complete listing for the WiX source file should look like the one below:
<?xml version="1.0" encoding="UTF-8"?>
<Wix xmlns="http://schemas.microsoft.com/wix/2006/wi">
  <Product Id="{2D00166E-A14A-4F24-B94F-3D5E9ED21D65}" Name="MyApp" Language="1033" Version="1.0.0.0" Manufacturer="MyCompany" UpgradeCode="{8F800905-91E8-4234-AD80-A485F156FE1B}">
	<Package InstallerVersion="400" Compressed="yes" InstallScope="perMachine" />
	<Media Id='1' Cabinet='MyAppCAB.cab' EmbedCab='yes' />
	<Directory Id='TARGETDIR' Name='SourceDir'>
	<Directory Id='ProgramMenuFolder'/>
  	<Directory Id='ProgramFilesFolder'>
    	<Directory Id='MyCompany' Name='MyCompany'>
      	<Directory Id='INSTALLDIR' Name='MyApp'>
        	<Component Id='MyShortcutComponent' Guid='*'>
          		<File Id="Readme" Name="Readme.txt" DiskId="1" Source="Readme.txt"  KeyPath="yes">
				 <Shortcut Id="MyApp" Directory="ProgramMenuFolder" Name="MyApp" WorkingDirectory="INSTALLDIR" Advertise="yes" />
			</File>
		</Component>
		<Component Id='MyRegComponent' Guid='*'>
			<RegistryValue Root="HKCU" Key="Software\MyCompany\MyApp" Type="string" Value="Installed" KeyPath="yes" />
		</Component>
      	</Directory>
    	</Directory>
  	</Directory>
	</Directory>
	<Feature Id='MyFeature' Title='My 1st Feature' Level='1'>
     	<ComponentRef Id='MyShortcutComponent' />
	<ComponentRef Id='MyRegComponent' />
	</Feature>
  </Product>
</Wix>At last, you can go and compile the WiX source file and process the resulting WiX object tile to build your MSI package.
How to Create a Keypath in Advanced Installer?
When you build and create your Windows Installer MSI package with Advanced Installer, you will see that the process is fairly straightforward and easy to follow.
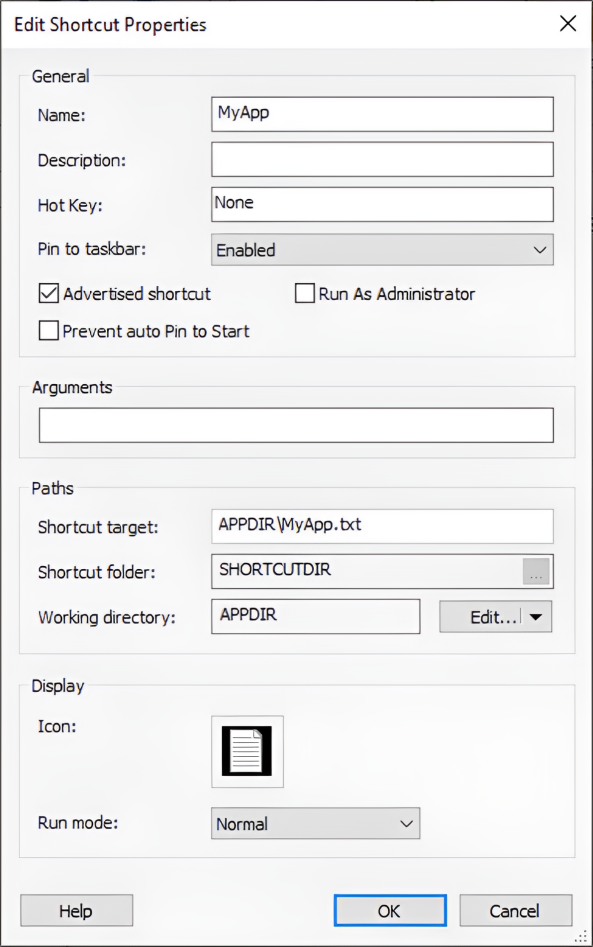
All you need to do is to ensure that the “Advertised shortcut” box is checked.

And that’s it! Advanced Installer follows Microsoft's best practices when it organizes your resources in features and components. It automatically sets keypaths for all the components.
If for any reason you need to reorganize your resources or change a keypath, then you can do that from the Organization page.
Do you want to create a WiX Keypath without writing code? Try Advanced Installer’s free 30-day full featured trial and do it in one-click.
Conclusion
Setting up keypaths for the components within your installer is mandatory if you want to take advantage of the “self-healing” feature.
If you are using Advanced Installer, that can be done very easily, with just a few clicks.
Hope you enjoyed this article! If you have any other questions on WiX, write them in the comments below.
