How to create an MSI installer with WiX
The MSI format is a widely recognized standard in the software industry for distributing software packages to Windows-based devices. MSI packages offer numerous advantages over alternative software installation methods, including enhanced reliability and improved performance.
WiX is an open-source toolset to build MSI packages. It enables developers to create a software installation by writing XML that describes components, registry entries, and other resources.
In this article, I’ll show you how to use WiX to create an MSI installer for a Windows Forms application. Let’s dive in!
Add the setup project to your application
Once you have created the Windows Forms application, the next step is to add the setup package to it.
- Right-click on the project solution → Add → New project.
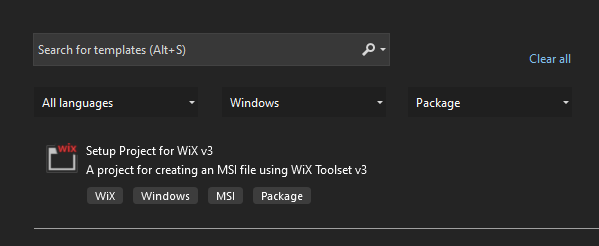
- From the project list, choose Setup Project for WiX. You will find this template only if you have the Wix Toolset Visual Studio Extension installed. Need help installing it? We've got you – check out this tutorial.
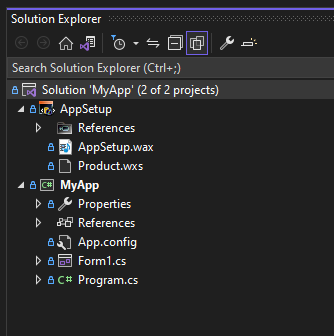
After creating the setup project, you should see it in Solution Explorer. The Product.wxs file is the one containing the setup project logic.
Add project output to your setup project
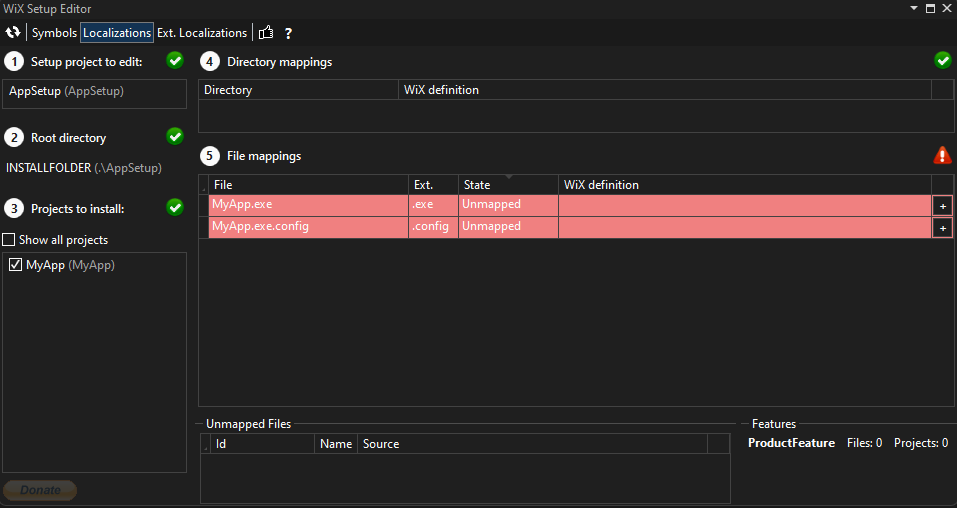
Next, we need to include the deployable files in the setup project. To achieve this, we can use the Wix Setup Editor.
Wix Setup Editor is an interactive GUI used to manage the setup files. It is available only if you have the Wax extension installed. If you want to see how to add the extension, you can also read this article.
To open the editor, go to Tools → WiX Setup Editor. Here we have to make some configurations:
- Select the setup project in the ‘Setup project to edit’ section. In our case, it is AppSetup.
- For the ‘Root directory’, select INSTALLFOLDER.
- In the ‘Projects to install section’, select your Window Forms application. We selected MyApp, as this is our application.
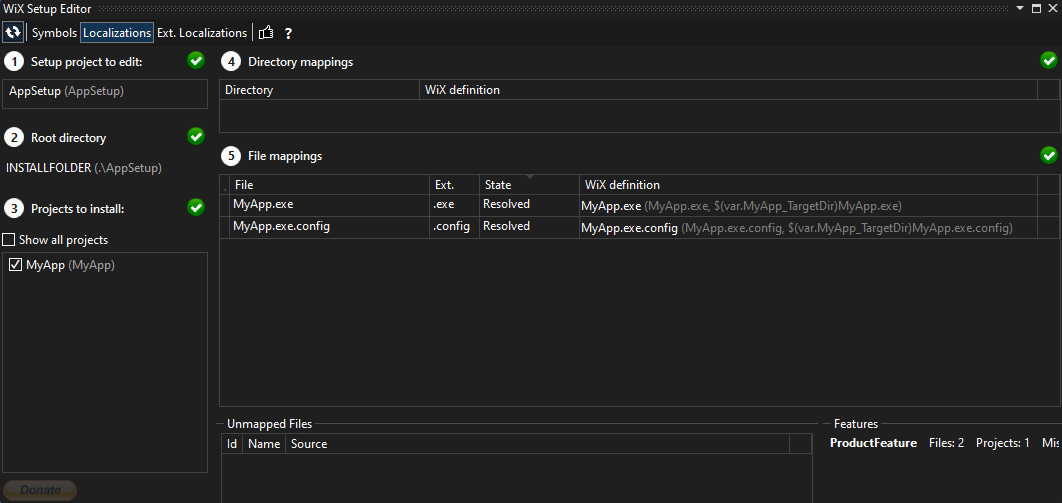
Make sure the files have the resolved state like in the image above. If they have the unmapped state as shown below, update it to resolved by pressing the ‘+’ button under the warning sign.
How to edit product details
To modify the product details, navigate to the Product.wxs file and make the necessary edits to the relevant fields. For example, we set the version to 1.2 and the manufacturer to Caphyon.
<Product Id="*" Name="My Application" Language="1033" Version="1.2" Manufacturer="Caphyon" UpgradeCode="be6d0f2f-6e81-4b75-a499-b5084d0e9a8f">
		<Package InstallerVersion="200" Compressed="yes" InstallScope="perMachine" />
		<MajorUpgrade DowngradeErrorMessage="A newer version of [ProductName] is already installed." />
		<MediaTemplate />
		<Feature Id="ProductFeature" Title="My Application" Level="1">
			<ComponentGroupRef Id="ProductComponents" />
		</Feature>
</Product>
How to create Shortcuts for your application?
In order to create a shortcut, we will need to make edits to the XML file since the Wix Setup Editor does not provide direct shortcut creation functionality.
Follow the next steps to add a shortcut on the Desktop and one in the Programs Menu:
1. Define the directory structures.
<Directory Id="TARGETDIR" Name="SourceDir">
			<Directory Id="ProgramFilesFolder">
				<Directory Id="INSTALLFOLDER" Name="My Application" />
			</Directory>
			<Directory Id="ProgramMenuFolder">
				<Directory Id="MyAppFolder" Name="My Application"/>
			</Directory>
			<Directory Id="DesktopFolder" Name="Desktop" />
</Directory>
2. Add the shortcuts to the installer package.
<DirectoryRef Id="MyAppFolder">
	<Component Id="ApplicationShortcut" Guid="e75a5c28-29d6-4d65-a5da-04363a176440">
		<Shortcut Id="ApplicationStartMenuShortcut"
						  Name="MyApp"
						  Description="MyApp"
						  Target="[INSTALLFOLDER]MyApp.exe"
						  WorkingDirectory="INSTALLFOLDER"/>
		<RemoveFolder Id="CleanUpShortCut" Directory="MyAppFolder" On="uninstall"/>
		<RegistryValue Root="HKCU" Key="Software\MyCompany\MyApp" Name="installed" Type="integer" Value="1" KeyPath="yes"/>
			</Component>
</DirectoryRef>
<DirectoryRef Id="DesktopFolder">
		<Component Id="ApplicationShortcutDesktop" Guid="cde1e030-eb64-49a5-b7b8-400b379c2d1a">
		<Shortcut Id="ApplicationDesktopShortcut"
						  Name="MyApp"
						  Description="MyApp"
						  Target="[INSTALLFOLDER]MyApp.exe"
						  WorkingDirectory="INSTALLFOLDER" />
		<RegistryValue Root="HKCU" Key="Software\MyCompany\MyApp" Name="installed" Type="integer" Value="1" KeyPath="yes" />
		</Component>
</DirectoryRef>
3. Tell Windows to install the shortcuts.
<Product Id="*" ….>
		<Feature Id="ProductFeature" Title="My Application" Level="1">
			….
			<ComponentRef Id="ApplicationShortcut" />
			<ComponentRef Id="ApplicationShortcutDesktop" />
		</Feature>
	</Product>
How to add installation dialogues?
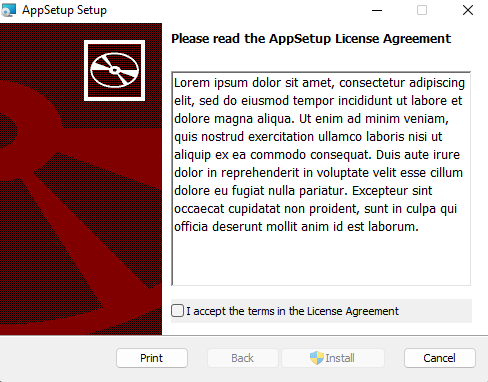
By default, when you create an installer package using WiX, it does not include a user interface (UI). However, if you wish to incorporate a minimal UI, you can follow the steps outlined below:
1. Right-click in the setup project → Add → References. In the Add Reference dialog, look in the bin folder of the Wix toolset and add WinUiExtension.dll.
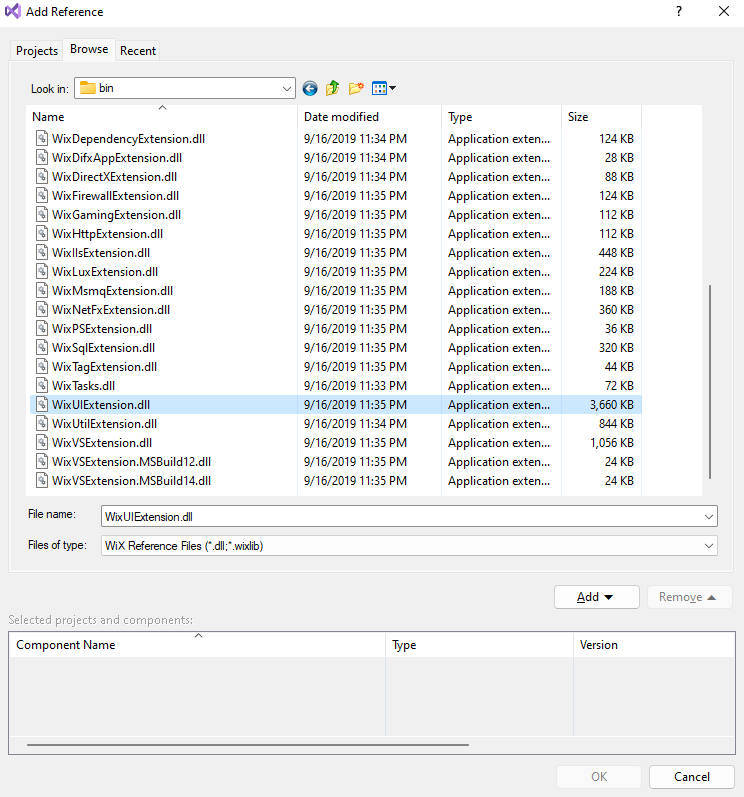
2. Go to the Product.wsx file and add the next line inside the <Product> element to reference the UI:
<UIRef Id="WixUI_Minimal" />
How to install your application?
Now, you can build the setup project.
- Go to the bin folder inside the setup project folder to find the MSI file.
- Run the file and install the application.
- After the installation, you should find the shortcuts on the Program Menu and Desktop.
Conclusion
WiX toolset is a flexible tool for creating installer packages but when it comes to more complex packaging scenarios, it may require additional time and effort. The WiX Setup Editor offers limited functionalities, and you will often need to manually edit the XML file to configure most settings.
Alternatively, you can explore a GUI-based tool like Advanced Installer to create and manage installation packages. It has a user-friendly interface and is much easier to use. It provides a range of pre-built templates which simplify the process of creating MSIs.
You can watch the tutorial below to see how easy it is to create an MSI with Advanced Installer.
