How to Remove Files on Uninstall Using WiX Toolset
When uninstalling an application, Windows Installer removes by default only the files that were created during the installation process. But, how about the files that are created after the installation?
In this article, we will see how to remove the files created after the installation using WiX Toolset.
How to remove files by adding a new component to an existing Component Group in WiX Toolset?
First, you need to add a new Component in an existing Component Group or create a new Component Group altogether – which will need to be referenced in one of the installer’s features.
Let’s imagine that you want to delete a file (sample.txt) that was created by the application in the Install Folder. To delete it, you have to add a new Component to the component group that manages the Install Folder.
<Component Id="DeleteSample" Guid="*">
	<RemoveFile Id="Sample File" On="uninstall" Name="sample.txt"/>
</Component>
For this code to work, you have to replace the wildcard from the Guid property with a brand new Guid.
Alternatively, you can replace both the name and the extension of the file, in the Name property, with wildcards, making the installer delete the following:
- only the files having a certain name, by replacing the extension with a wildcard
- only the files having a certain extension, by replacing the name with a wildcard
- all the files, by replacing both the name and the extension with wildcards
The RemoveFile element removes a file if the parent component is selected for removal.
How to remove files on uninstall using Advanced Installer?
Here is how you can remove the files created after the installation with Advanced Installer.
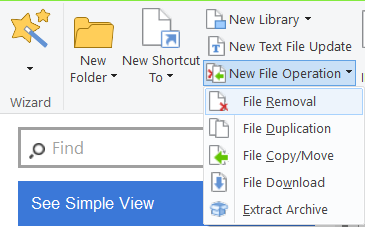
1. Go to the Files and Folders page, and add a new File Removal.

To use the File Operations feature in Advanced Installer, you need to have a Professional license or higher. Start with our 30-day full feature trial.
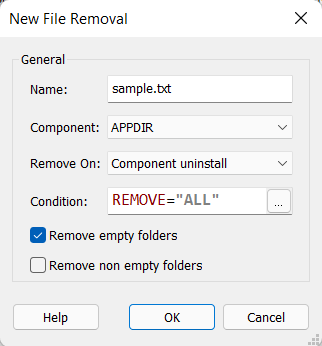
2. In the New File Removal Dialog, fill in the Name field with the name of the file you want to be deleted.
3. For the Component field, you can choose any component you want.
4. In the Remove On field, choose the Component uninstall option
5. And for the Condition field, use the REMOVE=”ALL” condition.

That’s it!
Conclusion
As you see, you can choose between two different approaches when it comes to deleting files during the uninstall process. It is up to you to decide.
If you prefer to configure your packages through the use of XML, you should go with the WiX Toolset. But if you want a fast and efficient solution, then the option of using the GUI that comes with Advanced Installer is for you.
