Contents
- Advanced Installer
- How to Create an Advanced Installer Project
- How to Add Files and Folders
- How to Add Registry
- How to Build and Install
- How to Remove an Installed MSI
- How to Edit Product and Company names
- How to Create Shortcuts
- How to Change the Product Version
- Wise Package Studio
- First Time Settings
- How to Create a Project
- How to Add Files
- How to Add a Registry
- How to Edit Product and Company Names
- How to Create Shortcuts
- How to Change the Product Version
- How to Build and Install

Advanced Installer
Advanced Installer is a powerful authoring tool designed to help software packagers and software developers.
It is GUI-based, and assists you to complete complex tasks in just a few clicks. As software developers/packagers, you can focus on what you do best, without having to worry much about the MSI structure, or specific rules, etc.
What I like most about Advanced Installer technology is that it comes embedded with best industry practices in accordance with ICE Validation Standards and best behavior gathered from the tens of thousands of software engineers that have used it in the last 16 years.
It performs validation work automatically in the background for you to release top quality packages.
How to Create an Advanced Installer Project
Creating a project is simple, and here’s a quick walkthrough of the process. Let’s say you want to create a package to install a simple text file (i.e. a story you wrote).
- Choose an already existing text file on your local disk or create one.
- Name the file story.txt,
- Open it in your favorite text editor,
- Type a couple of lines to give it some content.
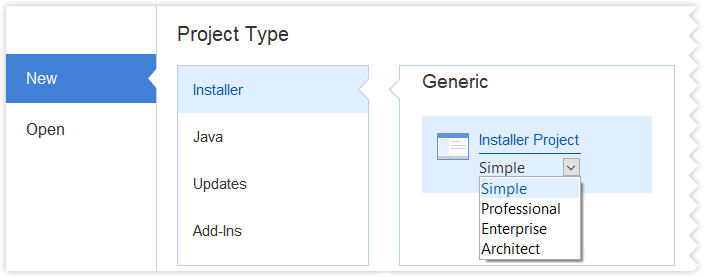
Then, launch Advanced Installer. You will be presented with a dialog window where you will be able to choose the type of project you want to create.

Advanced Installer Project Type Window - Select the “Simple” type.
- Uncheck the “Use wizard...” option.
- Press the [ Create Project ] button.
- The new project will be created and you will be able to edit it.
Save the project by using the [ Save ] toolbar button and choose the file name and the destination folder.
Note: This folder will also be where your MSI package will be created. Give it an appropriate name, like story.aip, for example.
When using Advanced Installer, avoid creating a project, copying it, and then using the copy as a base for a new project. Otherwise you will have a duplicate ProductCode and UpgradeCode.
Review this article on Product Identification to see why this is not the way to go -- you can find the reasons in the “Copying your project files” section.
How to Add Files and Folders
The most important step when creating an MSI package is adding a file or folder.
Switch to the “Files and Folders” page by selecting it in the left-side panel. The folders that interest you most are “Application Folder” and “Application Shortcut Folder”.
In the Application Folder, you can add the files and folders used by your application (this folder represents the installation folder). In the Application Shortcut Folder, you can add shortcuts to your application pointing to a help file or to a URL. This folder represents a folder in the “Start > All Programs” menu of the Windows taskbar.
Note: You can read more about these folders in the Install Parameters page.
Next, click on the [ Add Files... ] toolbar button, browse to find your project’s folder and select the story.txt file you previously created.

How to Add Registry
You can add registry keys and values to the install package in the Registry page. The keys and values you can add to any of the hives are listed in the left pane:
HKEY_CLASSES_ROOT, HKEY_CURRENT_USER, HKEY_LOCAL_MACHINE, HKEY_USERS
To create a new registry key, use the [New Key] toolbar button, the “New Key” tree/list context menu item, or press the Insert key while the “Hive” panel is focused. The new key will be added under the selected key in the left pane.
When it comes to creating new registry values, you can use the [New Value] toolbar button, the “New Value...” tree/list context menu item or press the Insert key while the “Values” panel is focused. The Registry Value Dialog will pop up, where you can set the value’s name, its type and content.
To add registry keys, use the [Add Key] toolbar button, the “Add Key...” tree/list context menu item or press the * key while the “Values” panel is focused. You will be prompted to choose a registry key from your computer’s registry using the Registry Key Picker Dialog. All of the selected key’s subkeys and values will be added.
To add registry values, use the [Add Values] toolbar button, the “Add Values...” tree/list context menu item or press the + key while the “Values” panel is focused. You will be prompted to choose registry values from your computer’s registry using the Registry Picker Dialog.
To import registry entries from a Registration File (.reg), use the [Import REG file] toolbar button to import registry entries from a Windows Registration File (.reg). Only files created with Windows 2000 or higher are supported.
How to Build and Install
To build the MSI package:
- Click on the [ Build ] toolbar button
- A “Build Project” dialog will appear showing you the build evolution.
- Once the build is complete, click on the [ Run ] toolbar button.
- A setup wizard will appear that will guide you through the install process of the “story.txt” file.
Congratulations! You have created your first Advanced Installer MSI package.
By default, the story.txt file will be installed in C:\Program Files (x86)\Your Company\Your Application.
Browse to that folder in Windows Explorer to check it out.
How to Remove an Installed MSI
You can remove an installed MSI either by going to the “Programs and Features” in the Control Panel or by using the Advanced Installer application. Simply press the [ Run ] button again without modifying anything and the Setup wizard will appear. Select [ Remove ] in the second screen and wait until the uninstall process is complete.
If you change anything in the project, pressing [ Run ] will generate a different package. The only way to uninstall the old one will then be from the “Programs and Features” in the Control Panel.
How to Edit Product and Company names
Now it’s time to name your story, and we recommend you choose an attractive name. “Your Company” or “Your Application” may not be the best suited names for the story you are distributing. Let’s change them.
Switch to the “Product Details” page by selecting it in the left-side panel and edit them to better values.

Build and Run the package again to check the results. Don’t forget to uninstall it afterwards.
How to Create Shortcuts
We need to create shortcuts to the installed files after Installing in Programs Files(x86) to make sure they’re easily accessible. For this scenario, we will create two: one in the “Start” menu and another one on the desktop.
- Switch back to the “Files and Folders” page.
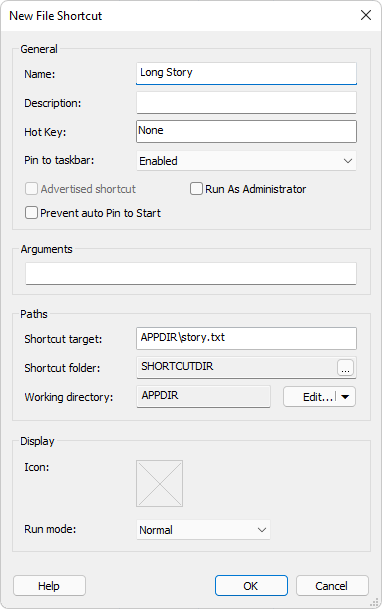
- Click on the story.txt file, and then, click on the [New
Shortcut] toolbar button. The “New Shortcut” dialog will appear, allowing you to customize the
new shortcut.

Shortcut Properties View - Change the shortcut name to “Long Story” and click [ OK ]. The new shortcut will be added to the Application Shortcut Folder. That means that this shortcut will be installed in the “Start > All Programs > Product Name” menu of the Target Computer.
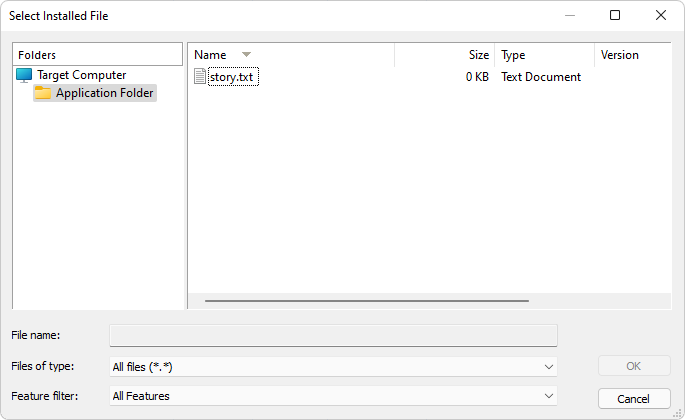
- To create a shortcut that will be installed on the Target
Computer’s desktop, select the Desktop folder in the “Folders” tree and click the [ New
Shortcut ] button. A file picker dialog will pop up, allowing you to select the target file of
this new shortcut.

File Selector - Select story.txt and press [ OK ]. After you change the shortcut name to “Long Story”, click [ OK ] again in the “New Shortcut” dialog. The new shortcut will be added to the “Desktop” folder.
Build and Run again to check the results, and uninstall when you’re done.
How to Change the Product Version
In the future, you may want to release a new version of this story. Or fix some issues discovered in the first release. This is super easy to do with Advanced Installer.
- Open the story.txt file using your favorite text editor and add a couple of lines to it, so that we have an actual file change.
- Then, switch to the “Product Details” page by selecting it
from the left-side panel. Now, edit the “Product Version” field to “2.0.0”.

- When building, saving or selecting another page, you will be asked to generate a new Product Code. Answer “Generate new” if you want the new package to automatically upgrade the previous version of the story (if found on the target computer). If you answer “Keep existing”, the two versions will be prevented from being installed simultaneously on the same computer.