How to publish your MSIX package to the Microsoft Store?
You've finished building your MSIX application, and it's time to share it with the rest of
the world.
Now, we know there are many platforms to consider when publishing your application, but Microsoft Store is definitely one of the best ones. Why? Well, there are various benefits that come from publishing your MSIX app in the Microsoft Store, let's go through some of them:
- Automatic Digital Signing - MSIX requires digital signing and, by publishing it to Microsoft Store, your app gets signed automatically. Therefore, you don’t need to buy a third-party CA (certification authority), and your app will have the credibility of being secure in case you use your own certification.
- Microsoft Store is a marketplace - You don’t need to create an e-commerce website to sell the app. A simple website where you present your product does the trick.
- Great Exposure - Microsoft Store has notoriety and already has a great amount of users which can be helpful in getting exposure. Also, you can advertise your published app to get more downloads and sales.
Taking those into account, if you want to know exactly how to move forward, , we will guide you on how to successfully publish an MSIX application using our own app as an example: Hover.
Hover is a free tool developed by the Advanced
Installer’s team that allows you to run natively installed applications
inside an MSIX/App-V container.It's available to
download here.
1. Get registered
To publish your app to the store, you need to have a developer account. Go to Microsoft Partner Center and sign up.
A normal Microsoft account is required to create the developer
account. The log-in will be made using the same email address.
There is a one-time registration fee, and it depends on what type of account you are creating:
- 19$ for an individual account
- 99$ for a company account
For more information related to account differences and exact prices based on location, check out this link.

The sign-up process is straight-forward:
- Select Account country/region
- Choose Account type
- Enter your Publisher display name (Company Name)
- Fill in your Contact info
- Proceed to payment, review and finalize the sign-up process
2. Create your app (name reservation)
Now that you have your accounts created, it is time to log-in to Partner Center and navigate to Dashboard.

Once in the Overview section, you can click on "Create a new app".
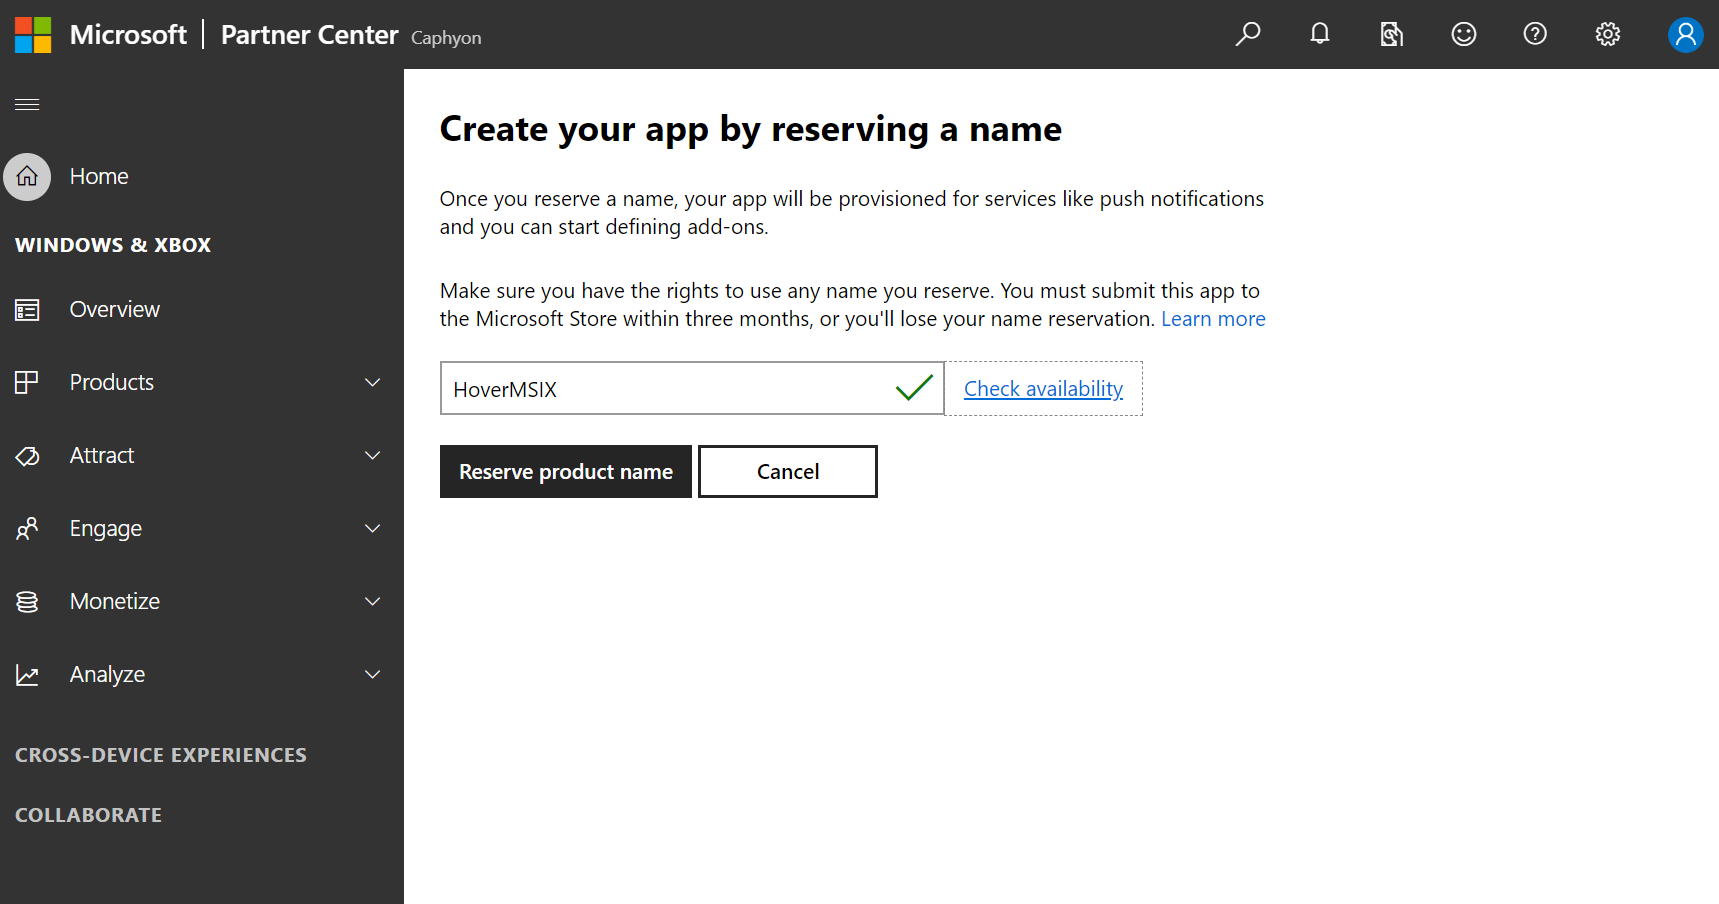
"Create your app by reserving a name" is the step where you choose your application name. From the moment you reserve the product name, you have three months to submit your app to the Microsoft Store. Otherwise, you lose your name reservation.
3. Application overview
Once your application name is validated, you can see it by navigating to Overview from the left panel menu.
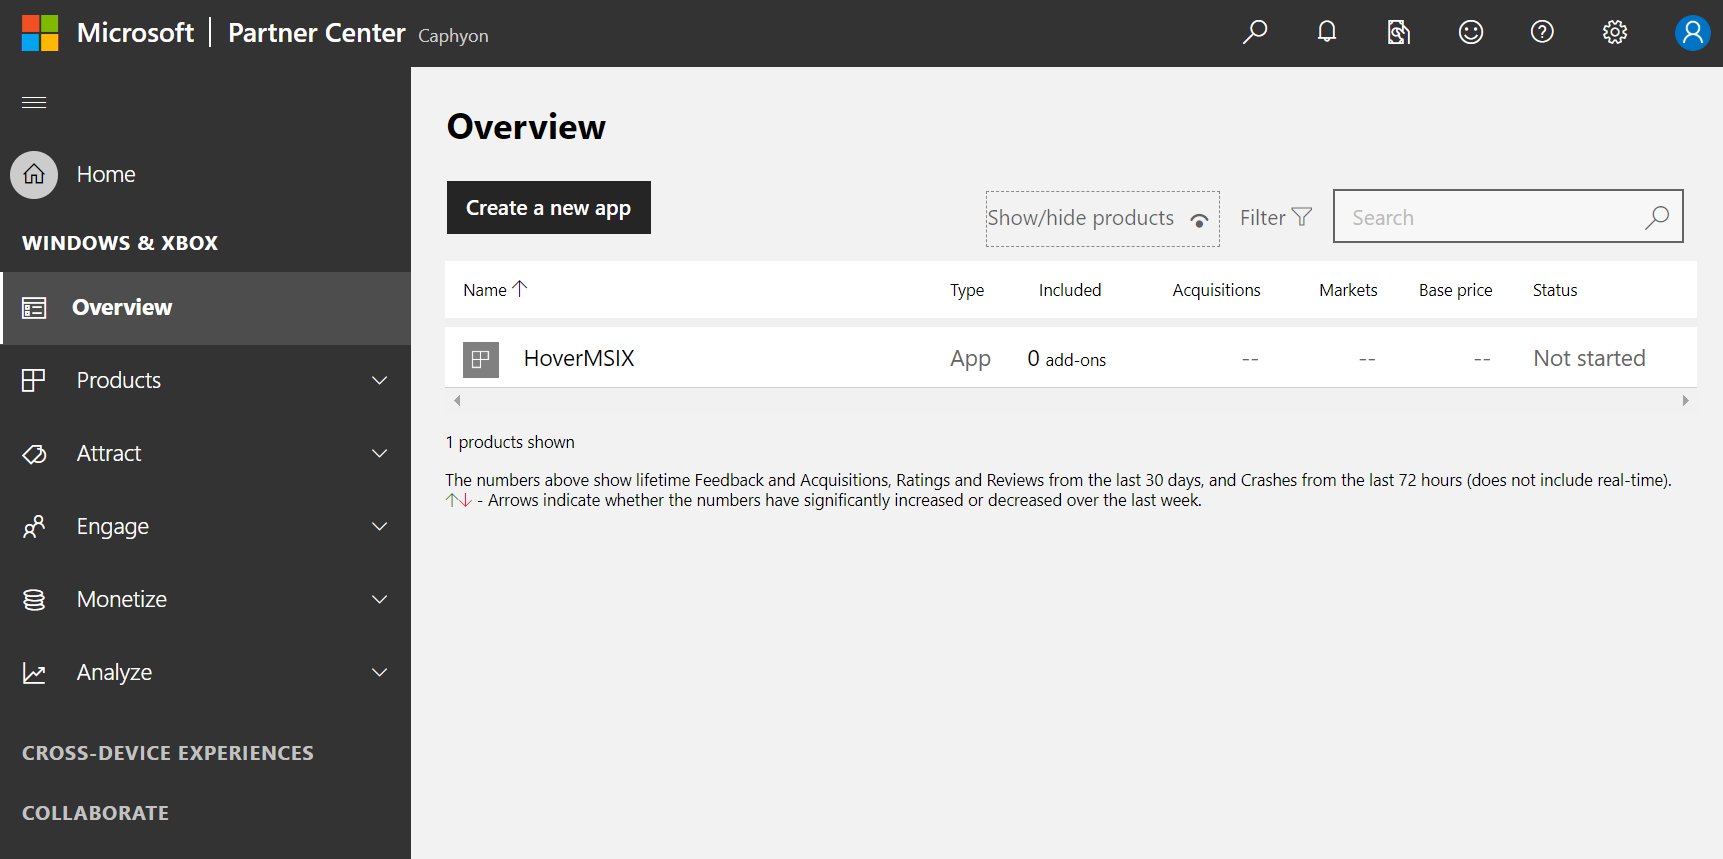
By clicking on the app name, you will enter the Application overview page.
Once there, you have many options to manage your application and additional features such as Add-ons, Analytics, Product Management, and Services.
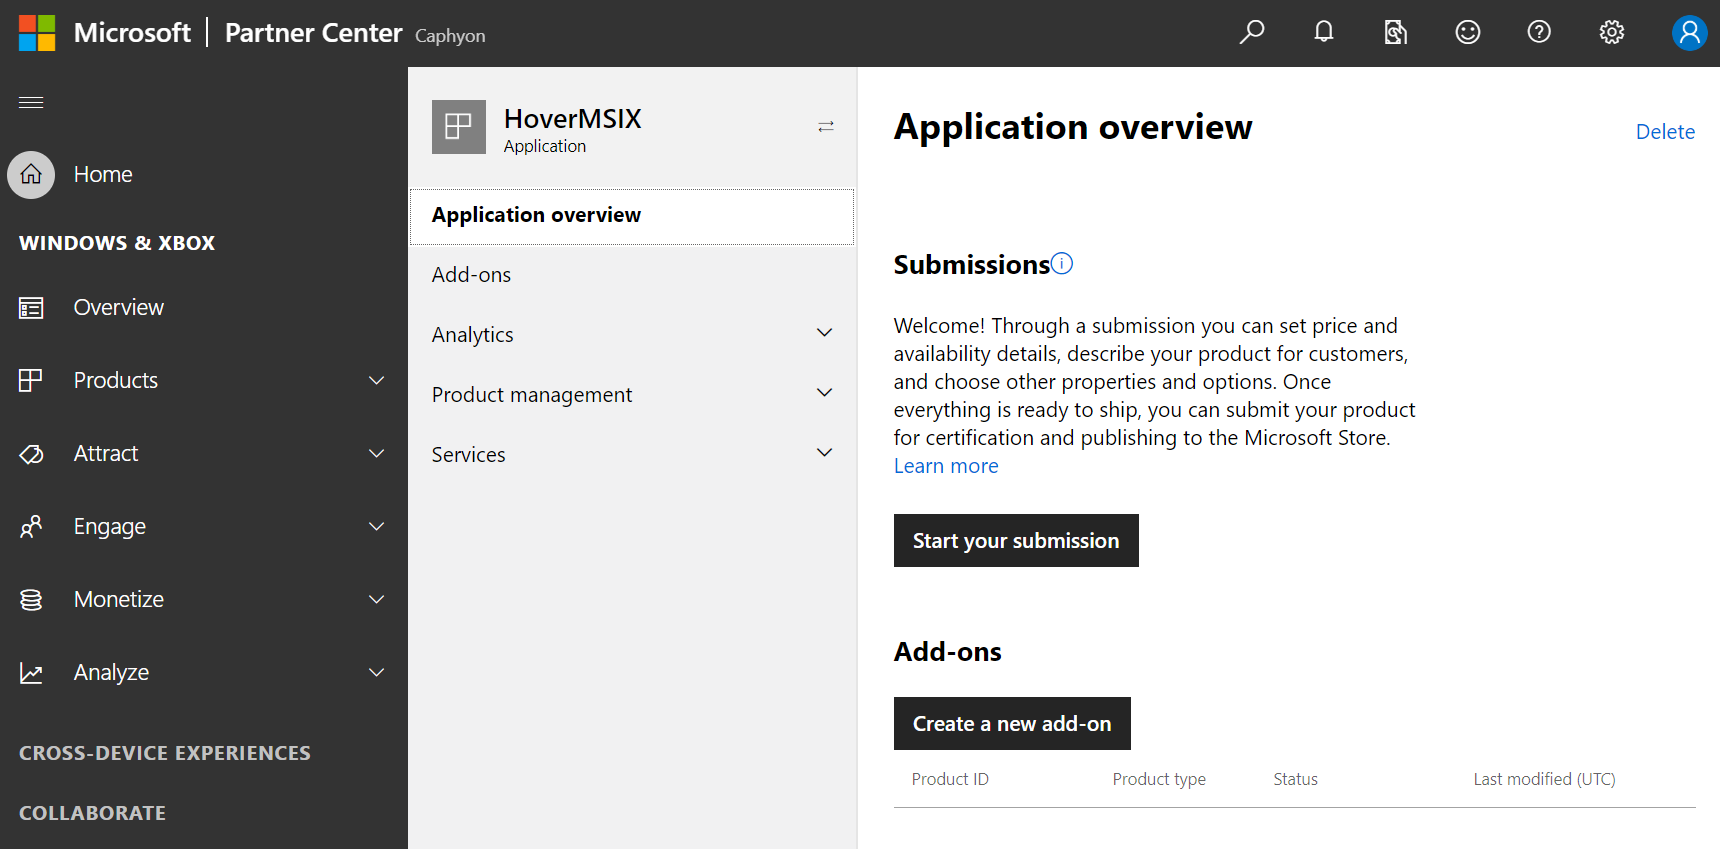
What we are interested in doing right now is going to "Start your submission".
4. Submit
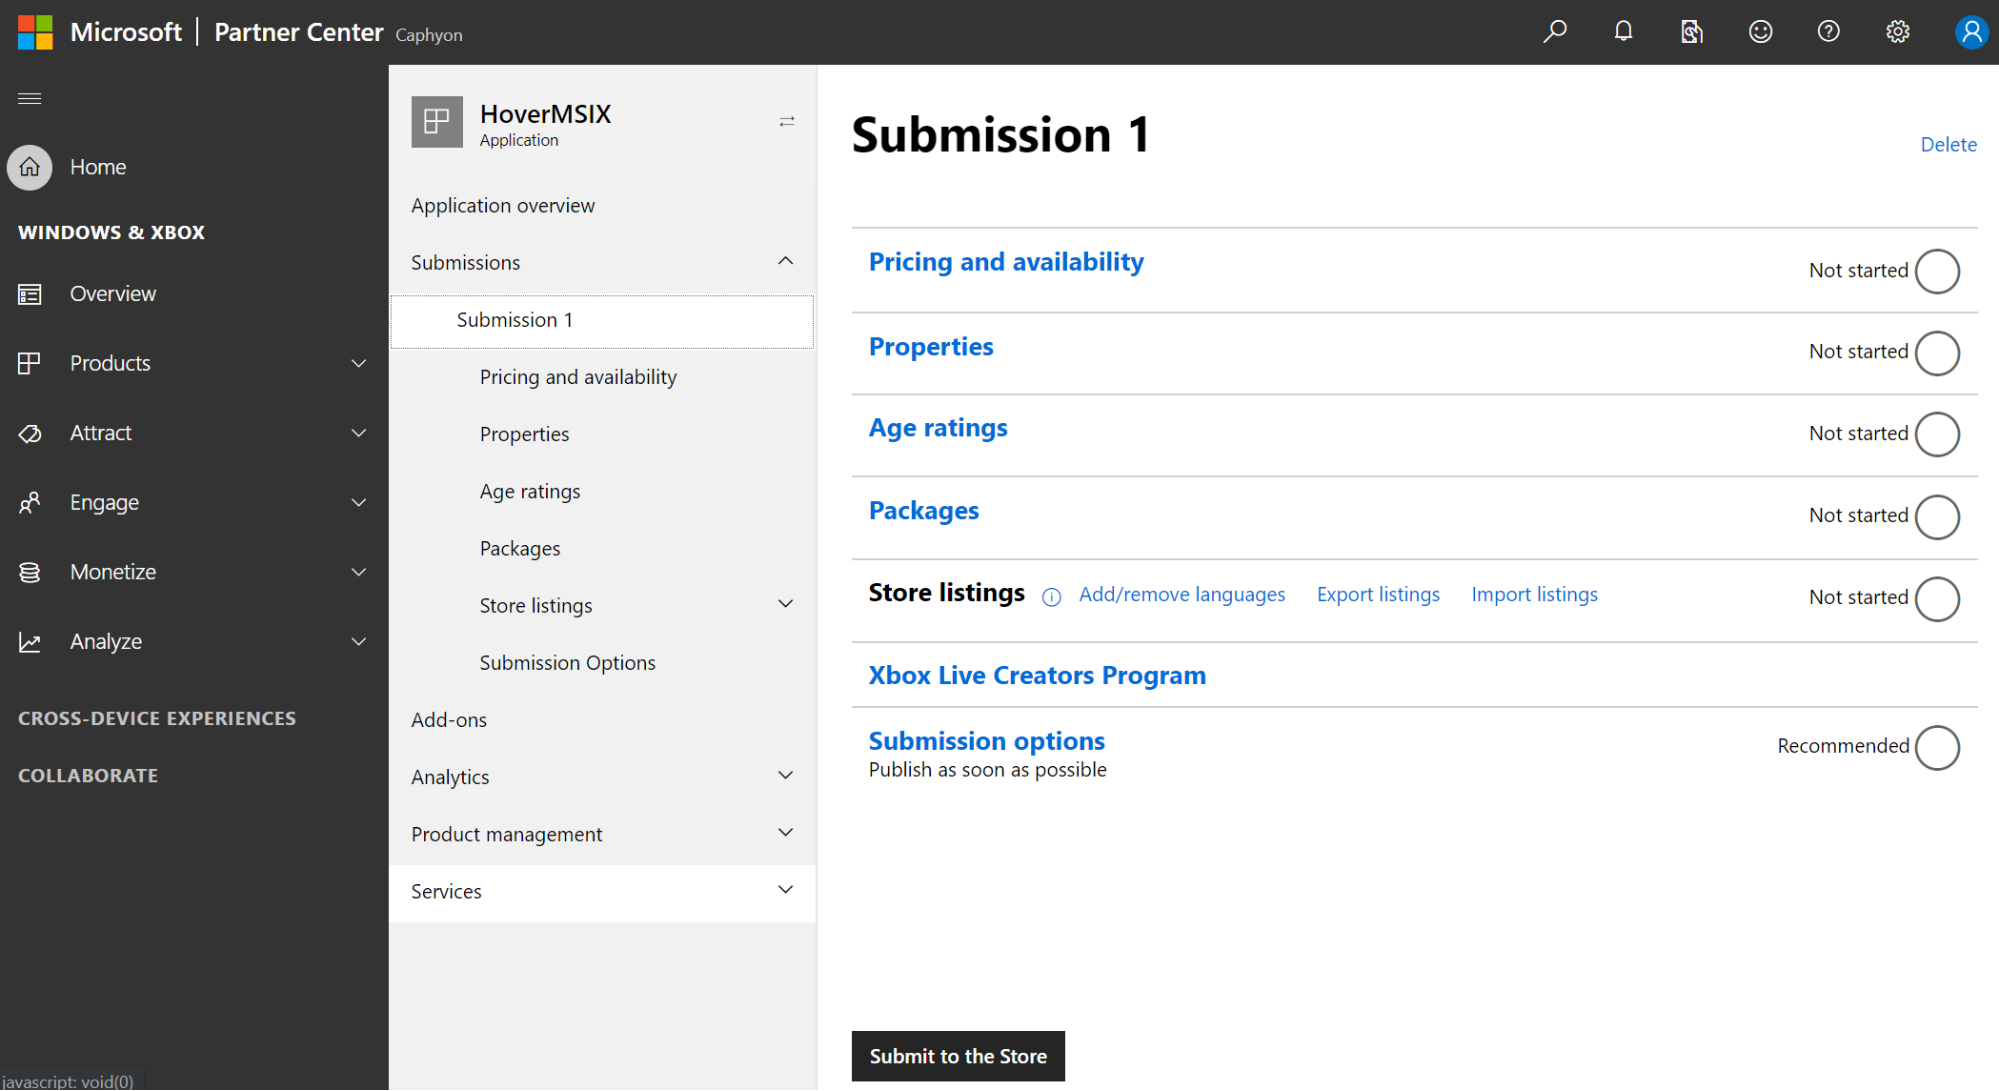
When you press the "Start your submission", a submission page is generated. Here are some subsections that you need to go through before you can actually hit the "Submit to the Store" button.
4.1 Pricing and availability
As the title suggests, this is the page where we set up how much the application will cost, how the release is handled and other available options.
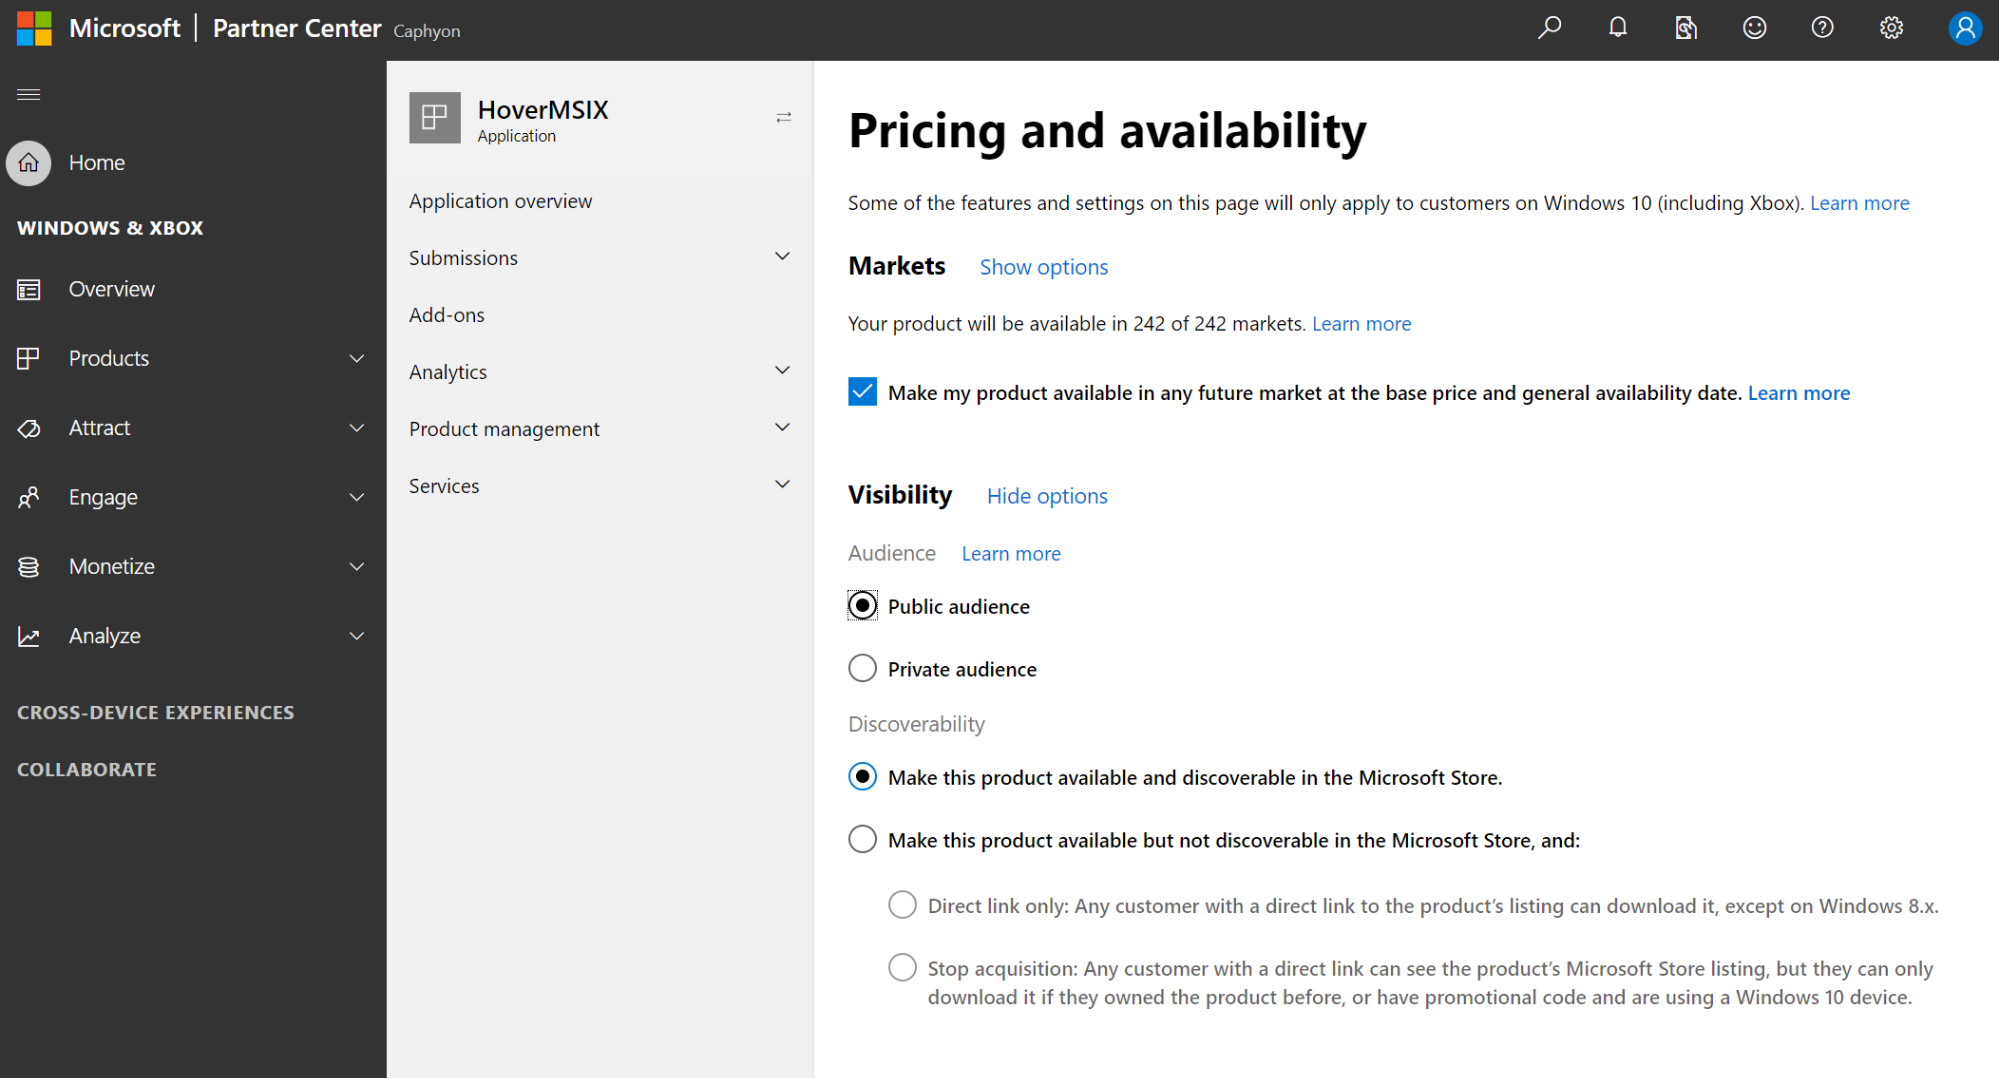
Markets, Visibility, and Schedule are left as default.
As for the Pricing of our app, we have set it to Free. There are other options that you can tweak when a price is fixed. Some of them include: Free trial, Sale pricing and Organizational licensing.
4.2 Properties
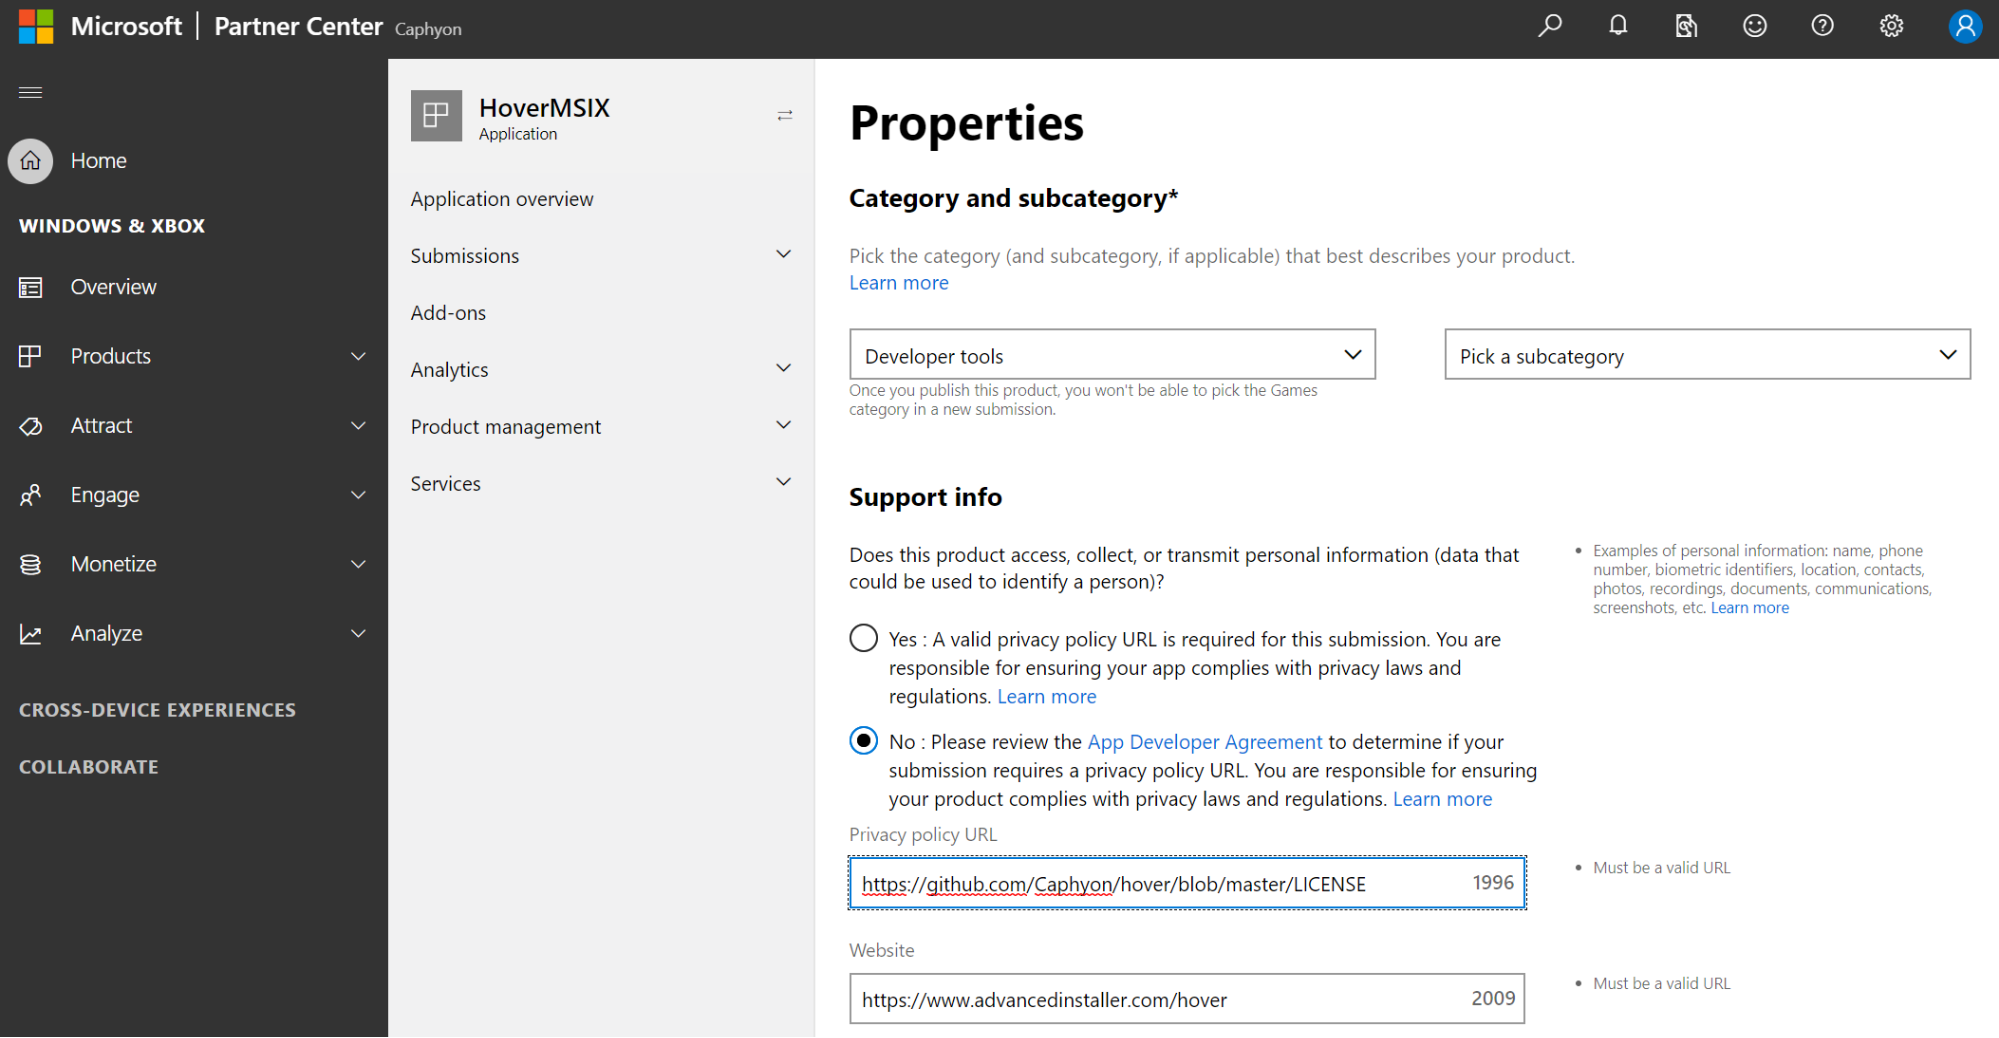
The Properties configuration page contains the following subsections:
- Category and subcategory: We have set it as Developer tools with no subcategory
- Support info:Our company information
- Display mode>:This is optional, based on your app
- Product declaration>:we only have 2 check declarations. This can vary on each app.
- System requirements>:This being a simple non-demanding app, we only marked Keyboard and Mouse.Feel free to fill out any other requirements that you need for your appy.
4.3 Age rating
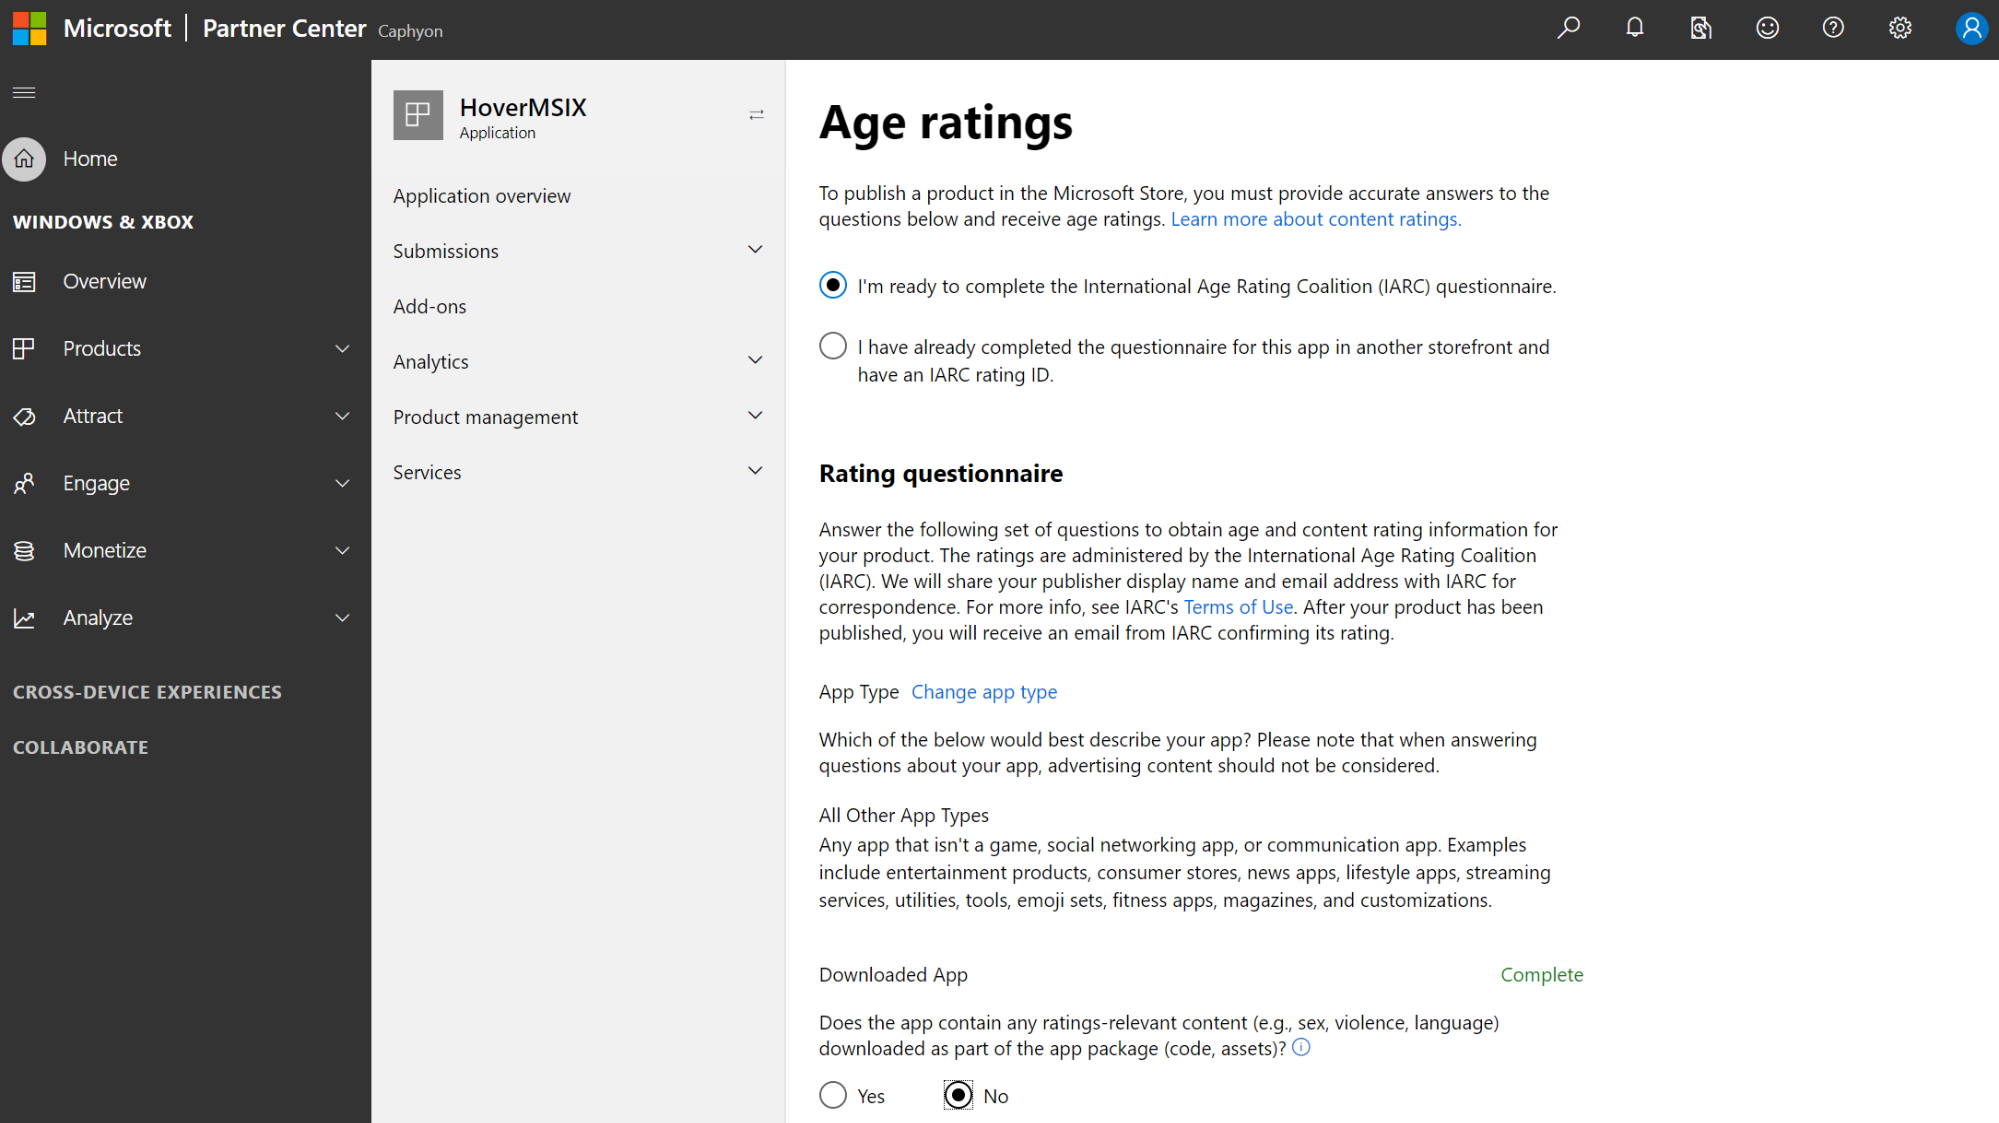
This page requires you to complete a questionnaire on IARC (International Age Rating Coalition). Since our application is not within the Game, Social, or Communication categories, we chose All Other App Types category for the Rating questionnaire.
4.4 Packages
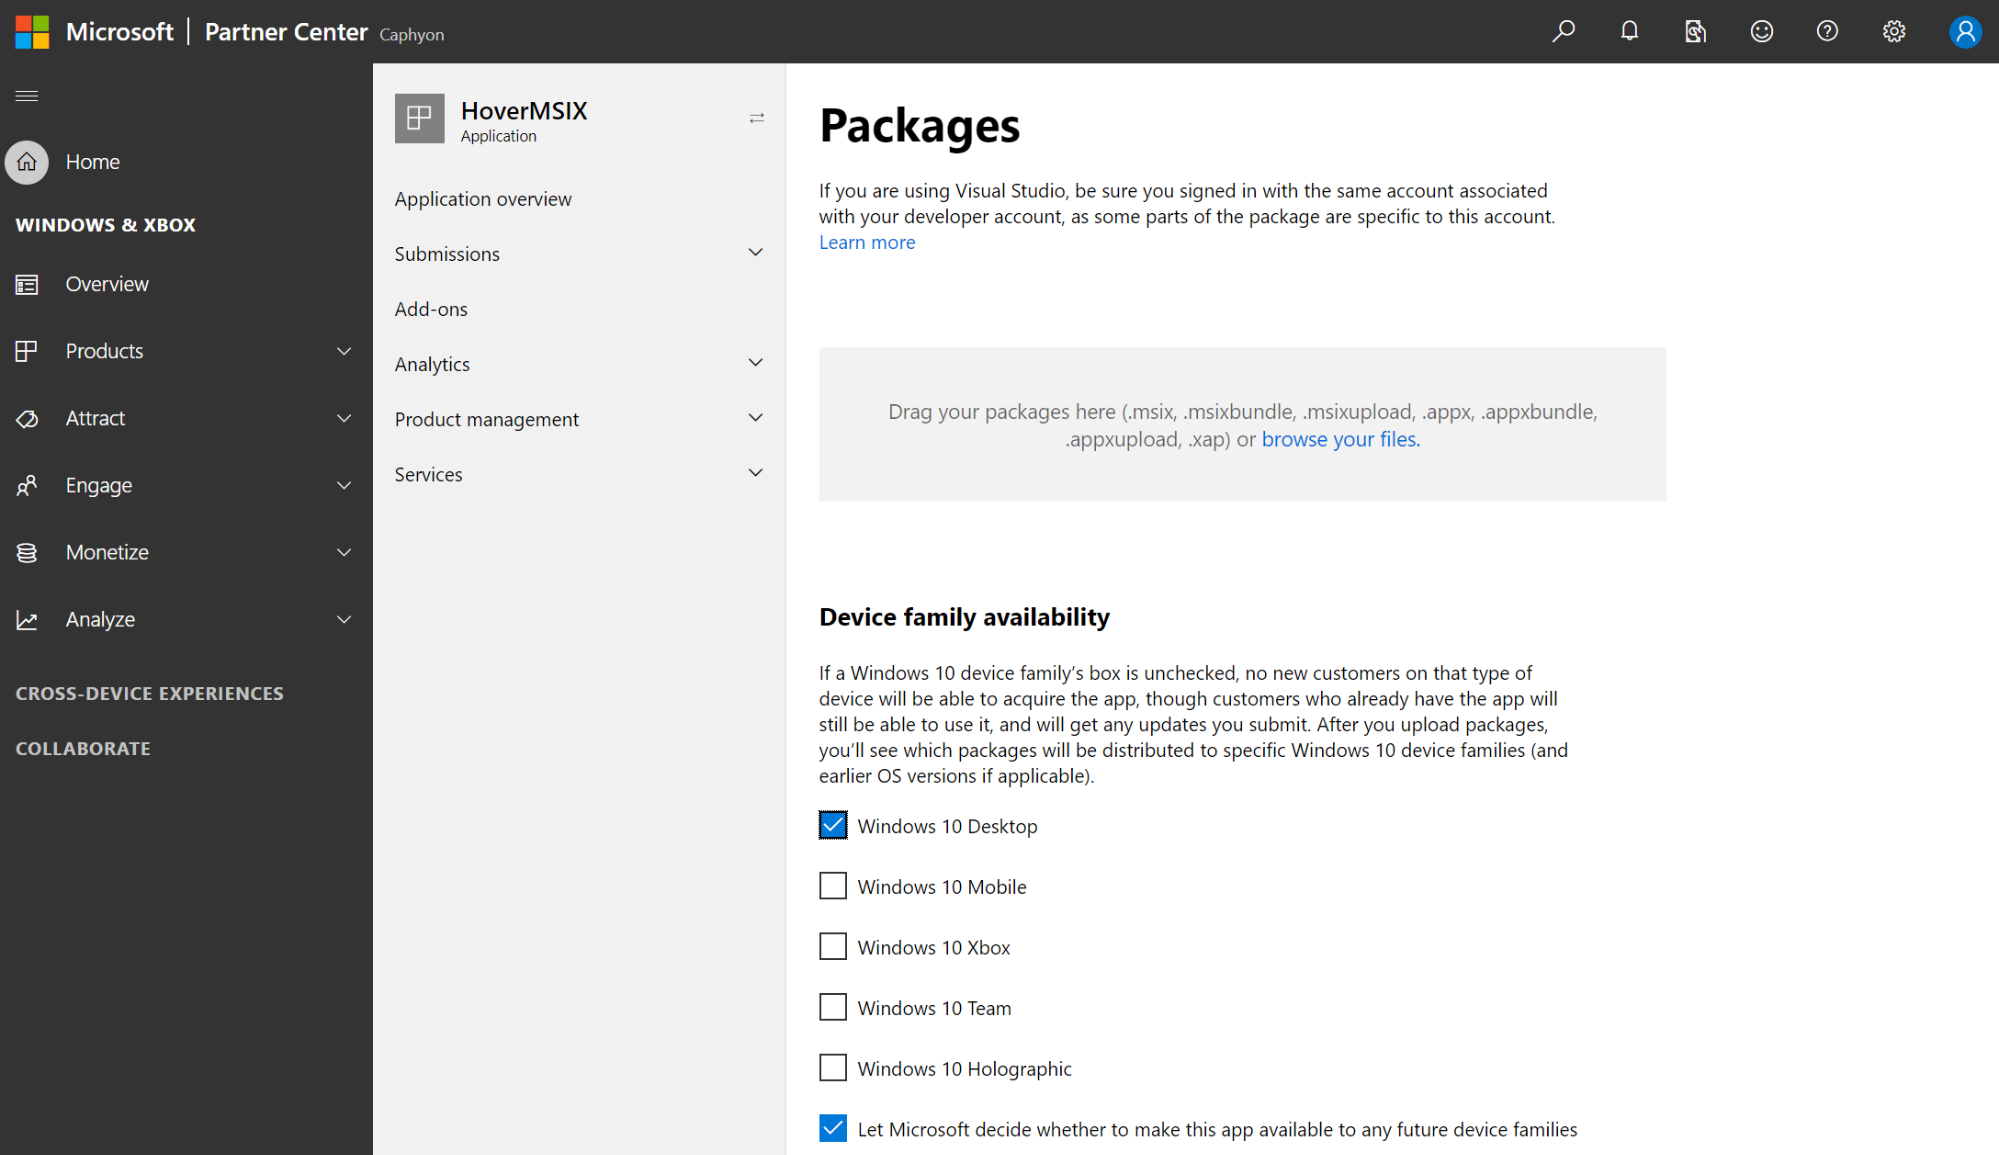
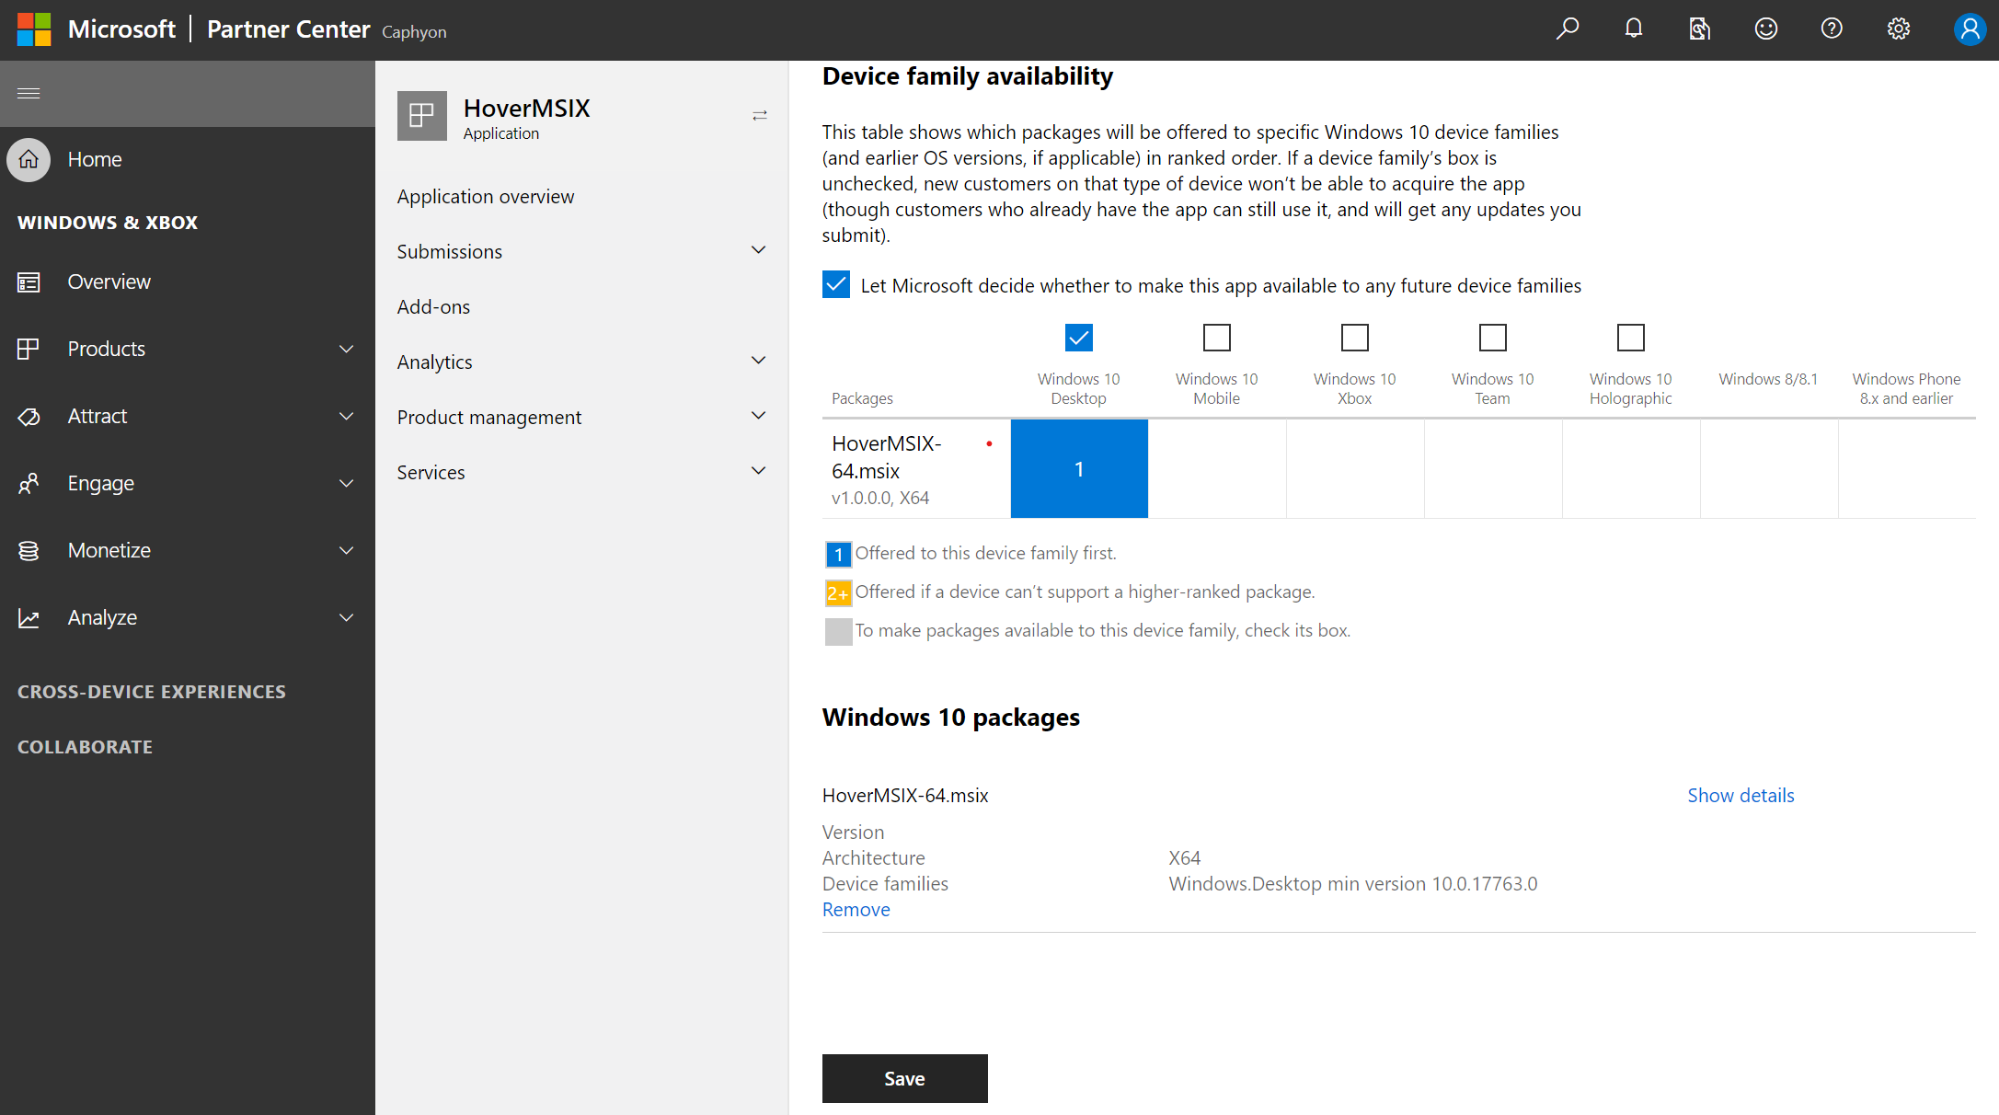
The Package section is the place where you upload the application, and you set the "Device family availability". In our example, we targeted Windows 10 Desktop, and we left the default mark "Let Microsoft decide...".
When you create a new app in Microsoft Store, unique app identity
details are generated. This information can be found under
Product management -> Product Identity

Before you upload your package, make sure to include the above information in the app manifest. If the information from the Microsoft Store does not correspond to the one in your package, you will receive a validation error.
However, if you build the package using Microsoft Visual Studio and you are signed in with the same Microsoft account that has been associated previously, the identity information is included automatically.
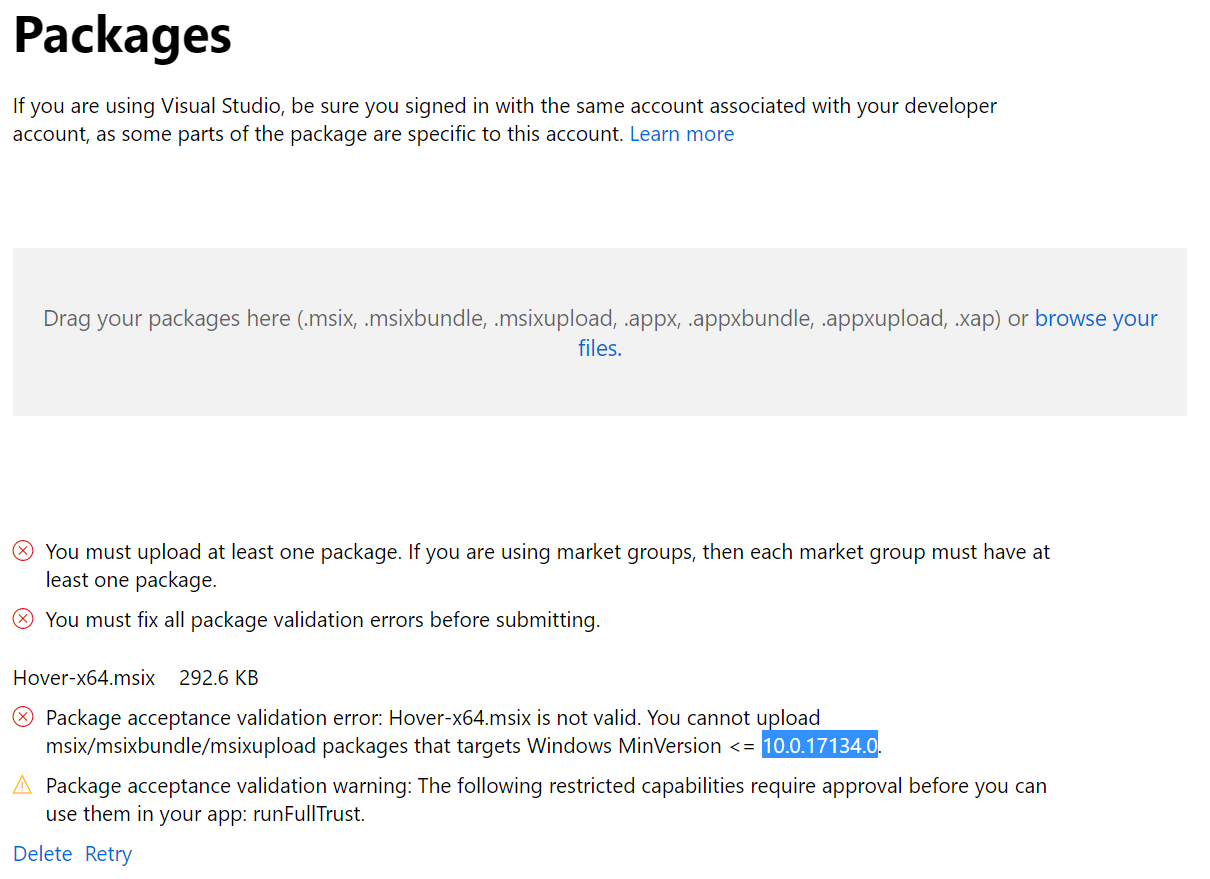
On our first upload, we found a little acceptance error while the application was verified.
"Package acceptance validation error: Hover-x64.msix is not valid. You cannot upload msix/msixbundle/msixupload packages that targets Windows MinVersion <= 10.0.17134.0 "
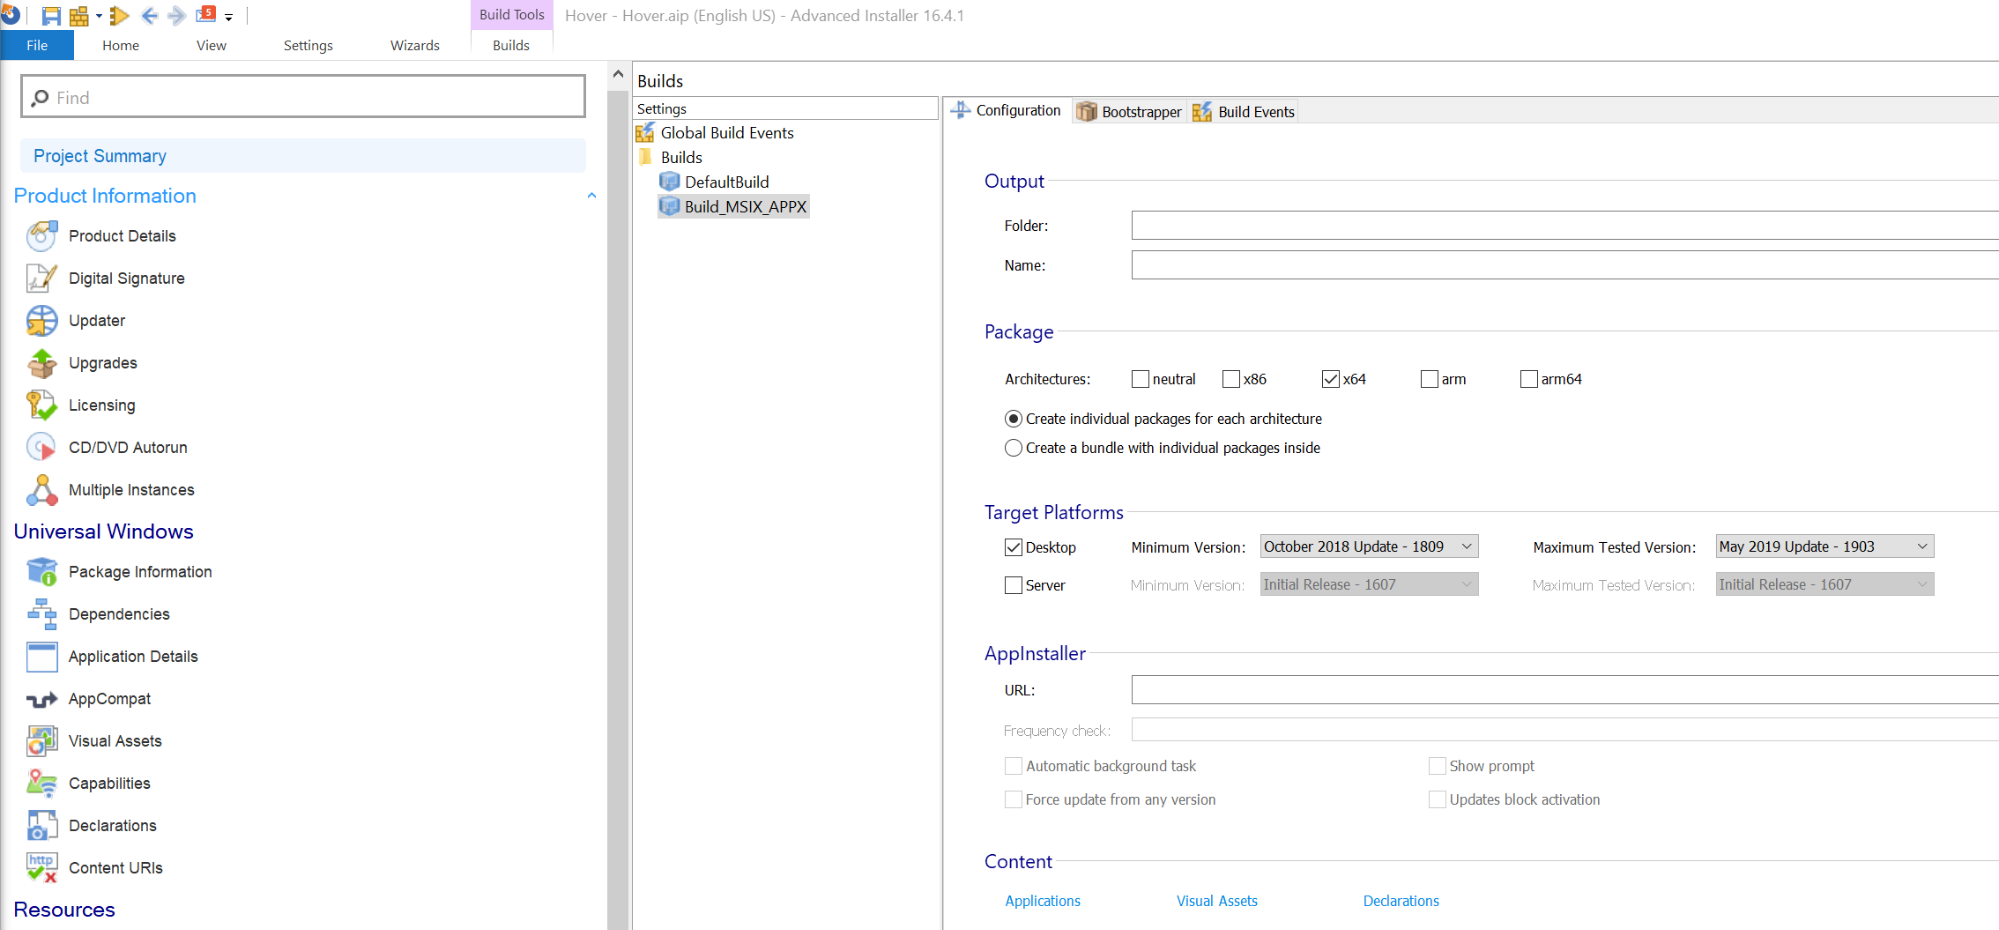
To fix this error, we used Advanced Installer. We edited the project and limited the OS minimum requirement from our application project by going to Package Definition -> Builds.
When the app passes the validation, you should see the following screen:
4.5 Store listings.Manage Store listing languages
The first subsection in Store listing is "Languages supported in packages". After you upload your application to the store, during validation, the AppxManifest.xml file is checked for the supported language entries.

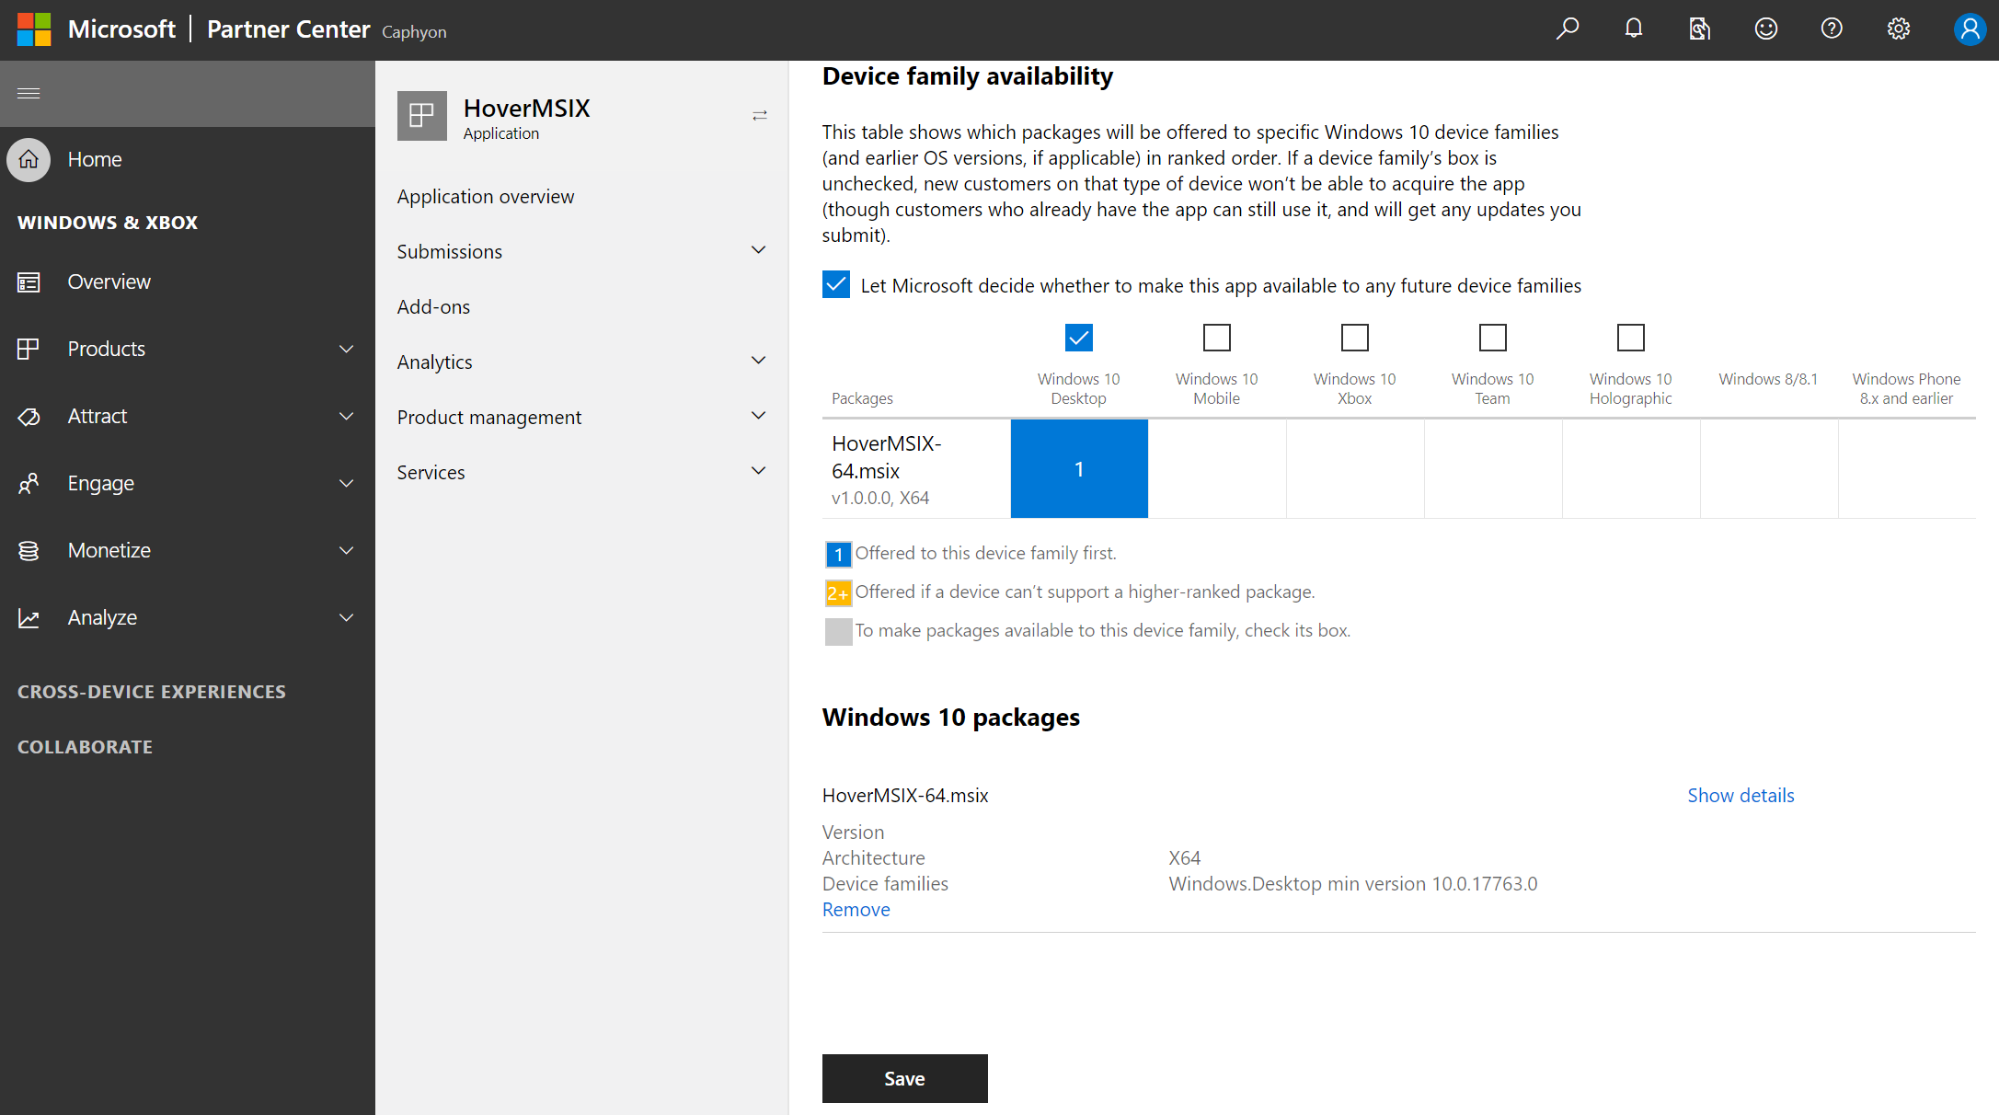
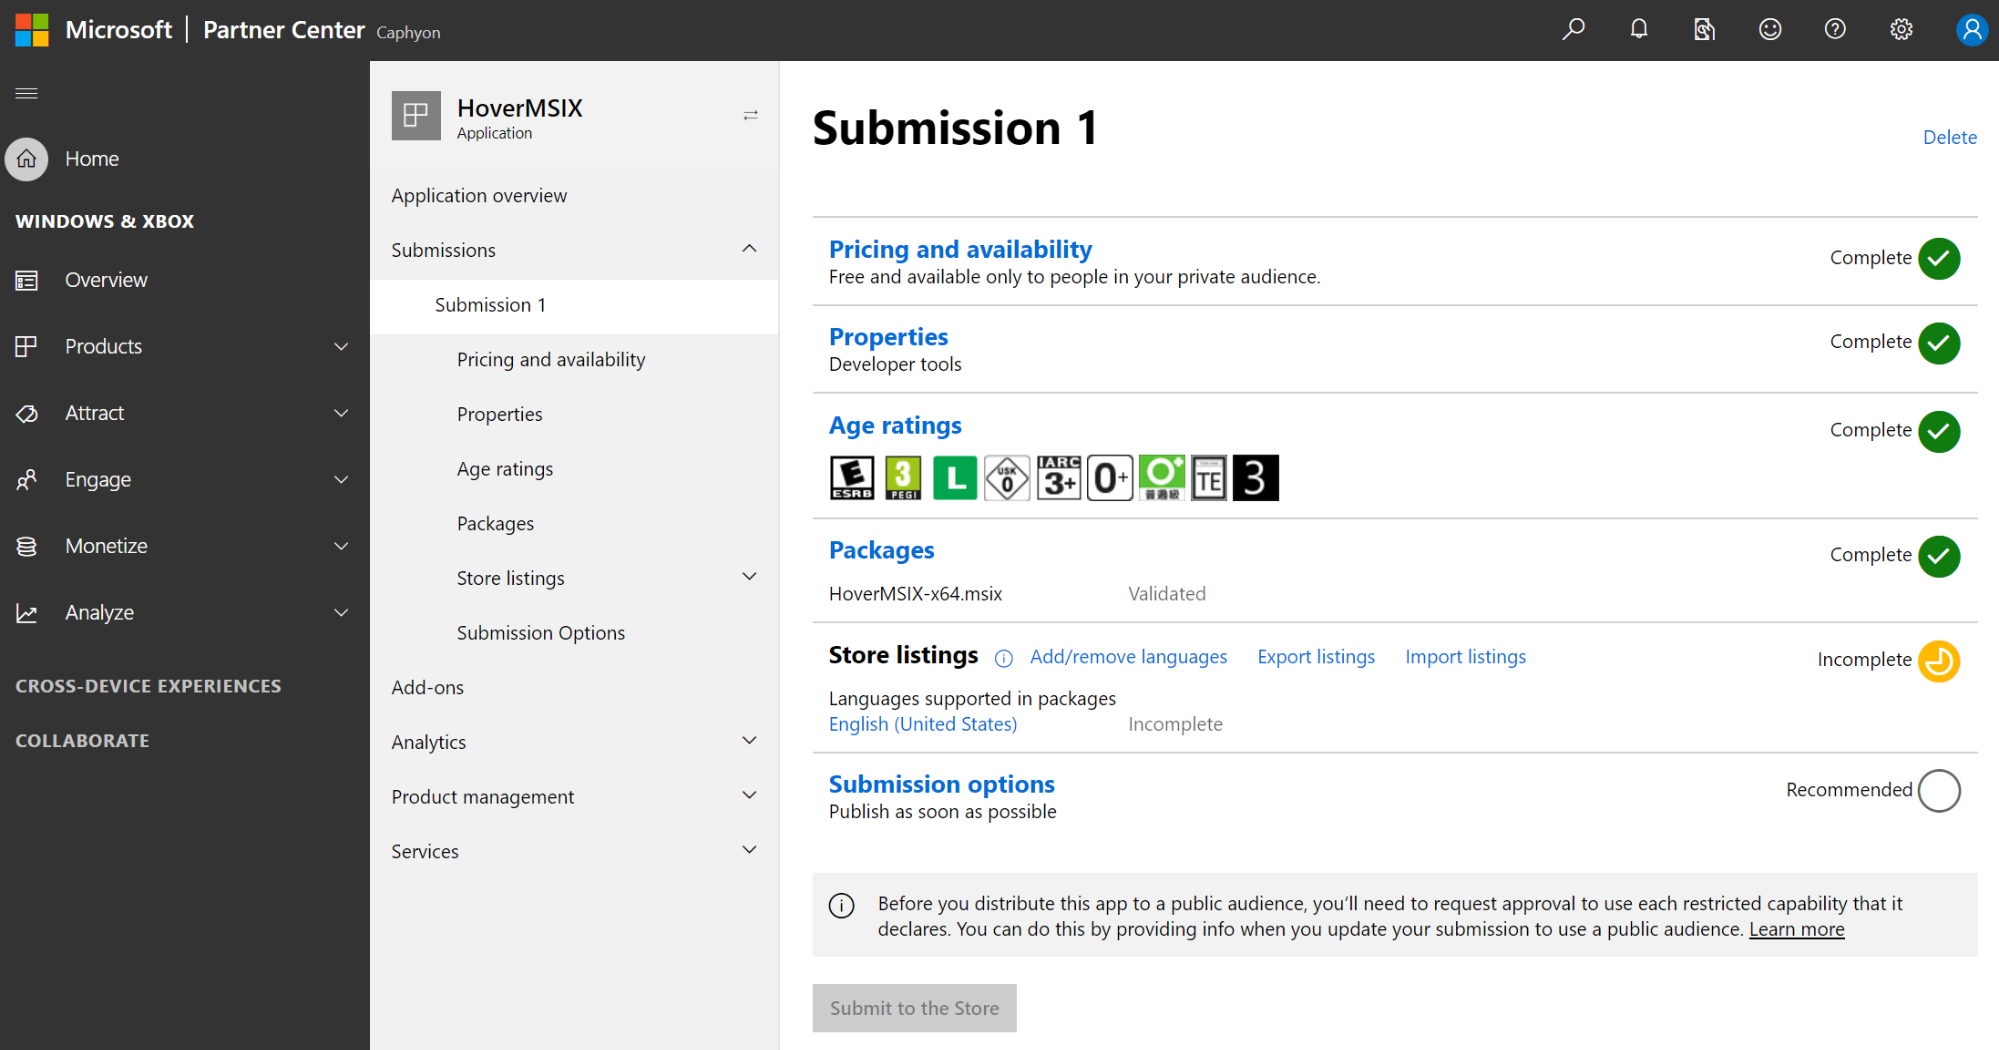
After the language is detected and displayed, you need to complete the store listing. As you can see in the above image, in the English section, the status is Incomplete.
In Additional Store listing homepages, you can add
multiple store listings in different languages. This is the interface
languages that users see in the store, not the supported languages
detected within the actual MSIX package Appxmanifest.xml.
To add additional support languages in your MSIX using
Advanced Installer you have to:
1. Go to the "Translations"
page, and find the "Languages" tab.
2. Check the corresponding
box for the desired language.
3. Go to the "Project Strings"
tab and double-click the rows under each language to translate them in
those languages.
The next thing to do is go to the Submission 1 overview page and click on the English(United States) language, just below the Store listing.Notice the green checkmarks highlighting the previous steps that we have completed? That means we are on the right track.
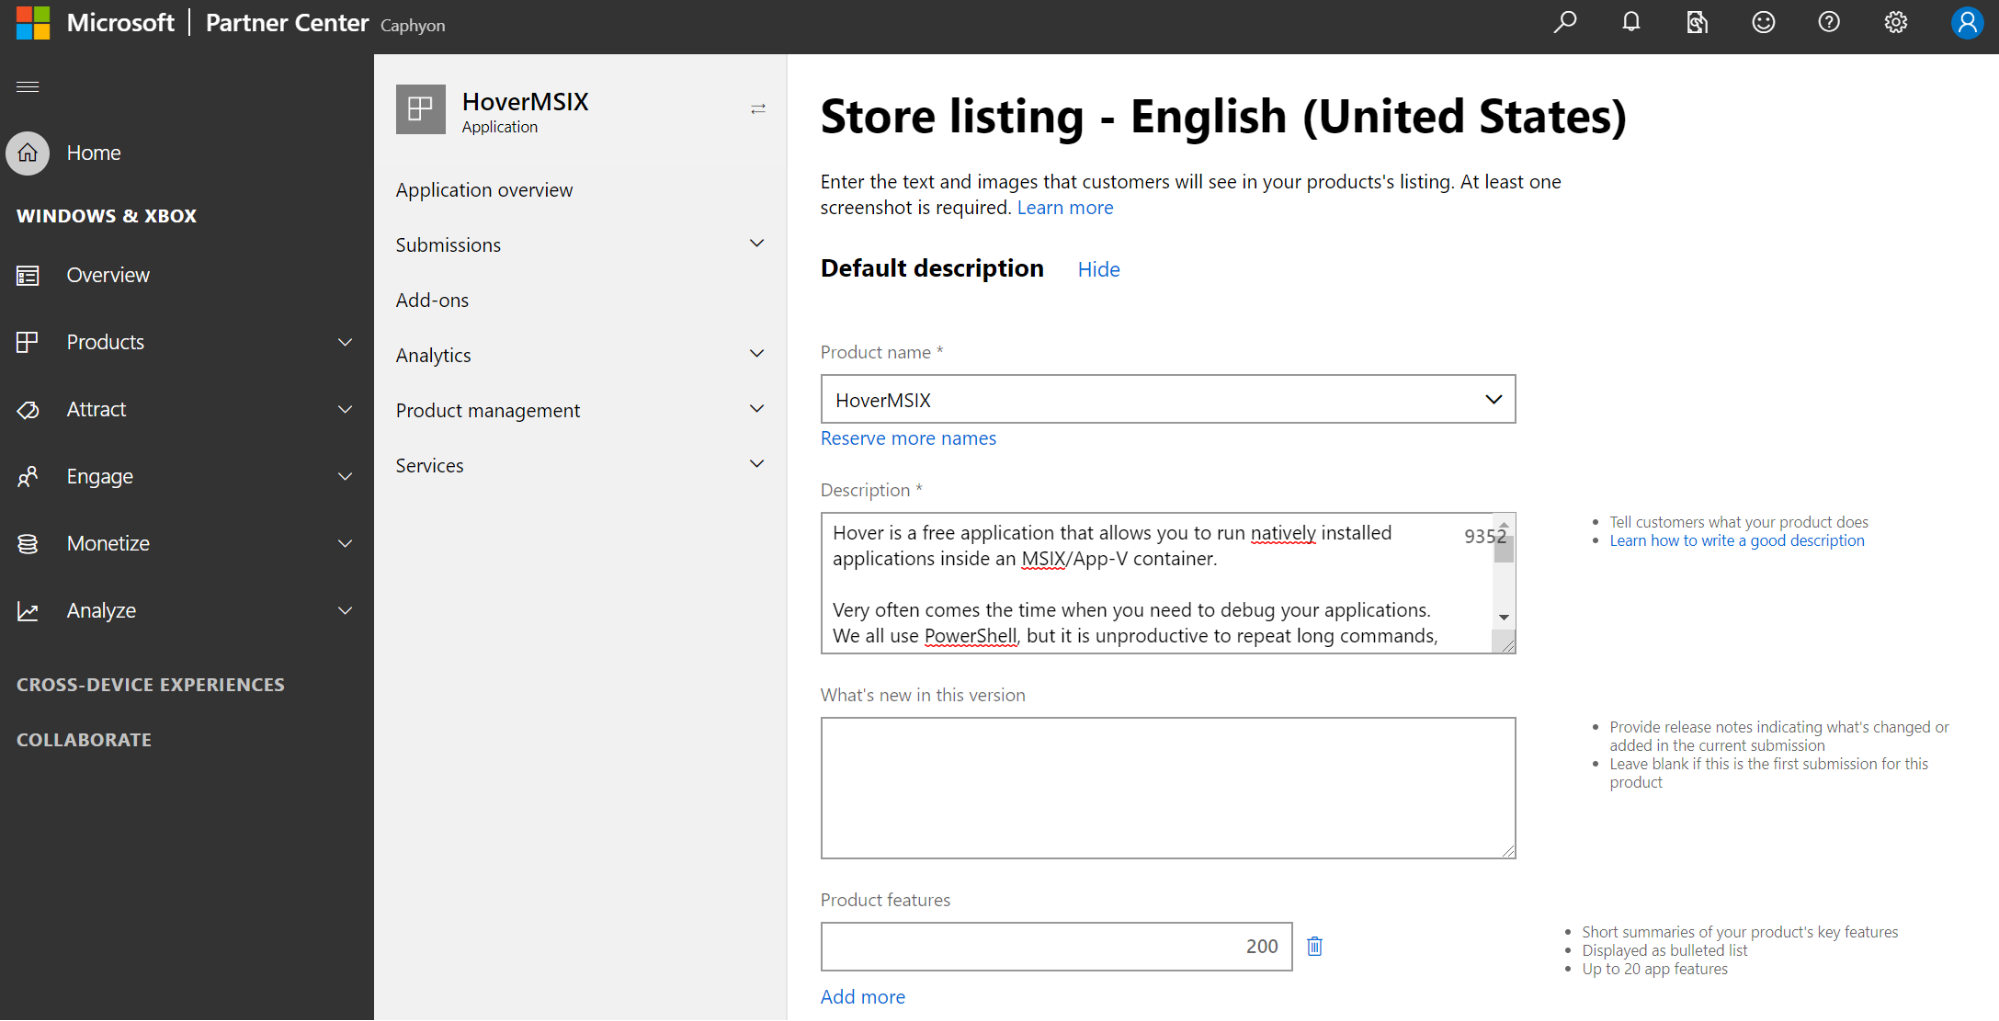
On the English language page, there are three mandatory fields: Product name, Description, and Screenshots. Feel free to complete the rest of the information for a more detailed description.
Remember: you need to complete this action to add any additional language.
4.6 Submission Options
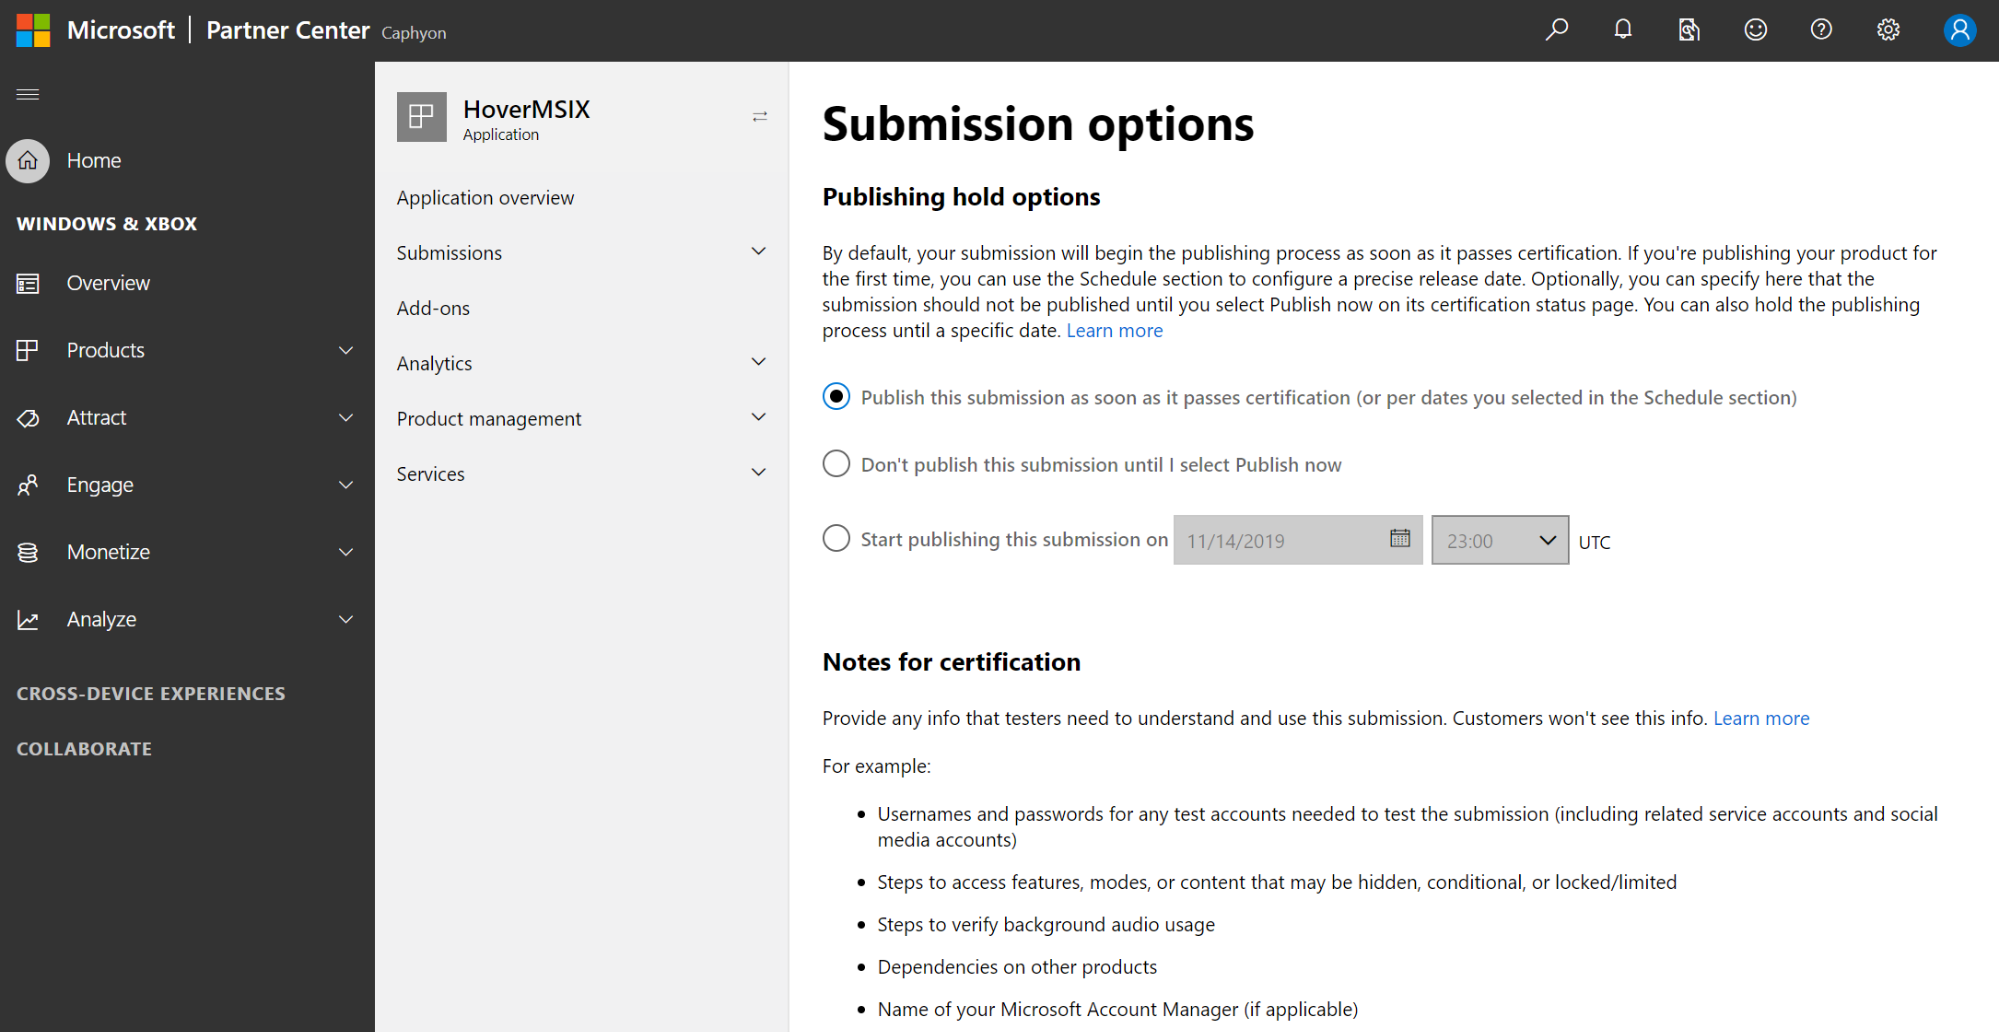
This section is not mandatory but recommended to be
configured.
Publishing hold options allow you to decide when your application is published to the store. By default, after your Submission request is validated, your app is published automatically. But you also have the option to schedule the submission or manually publish it.
"Notes for certification" is a useful text box where you can add additional information that could help up the validation process. Feel free to note any information that you might find convenient (maybe user and password for test accounts, dependencies or other types of info).
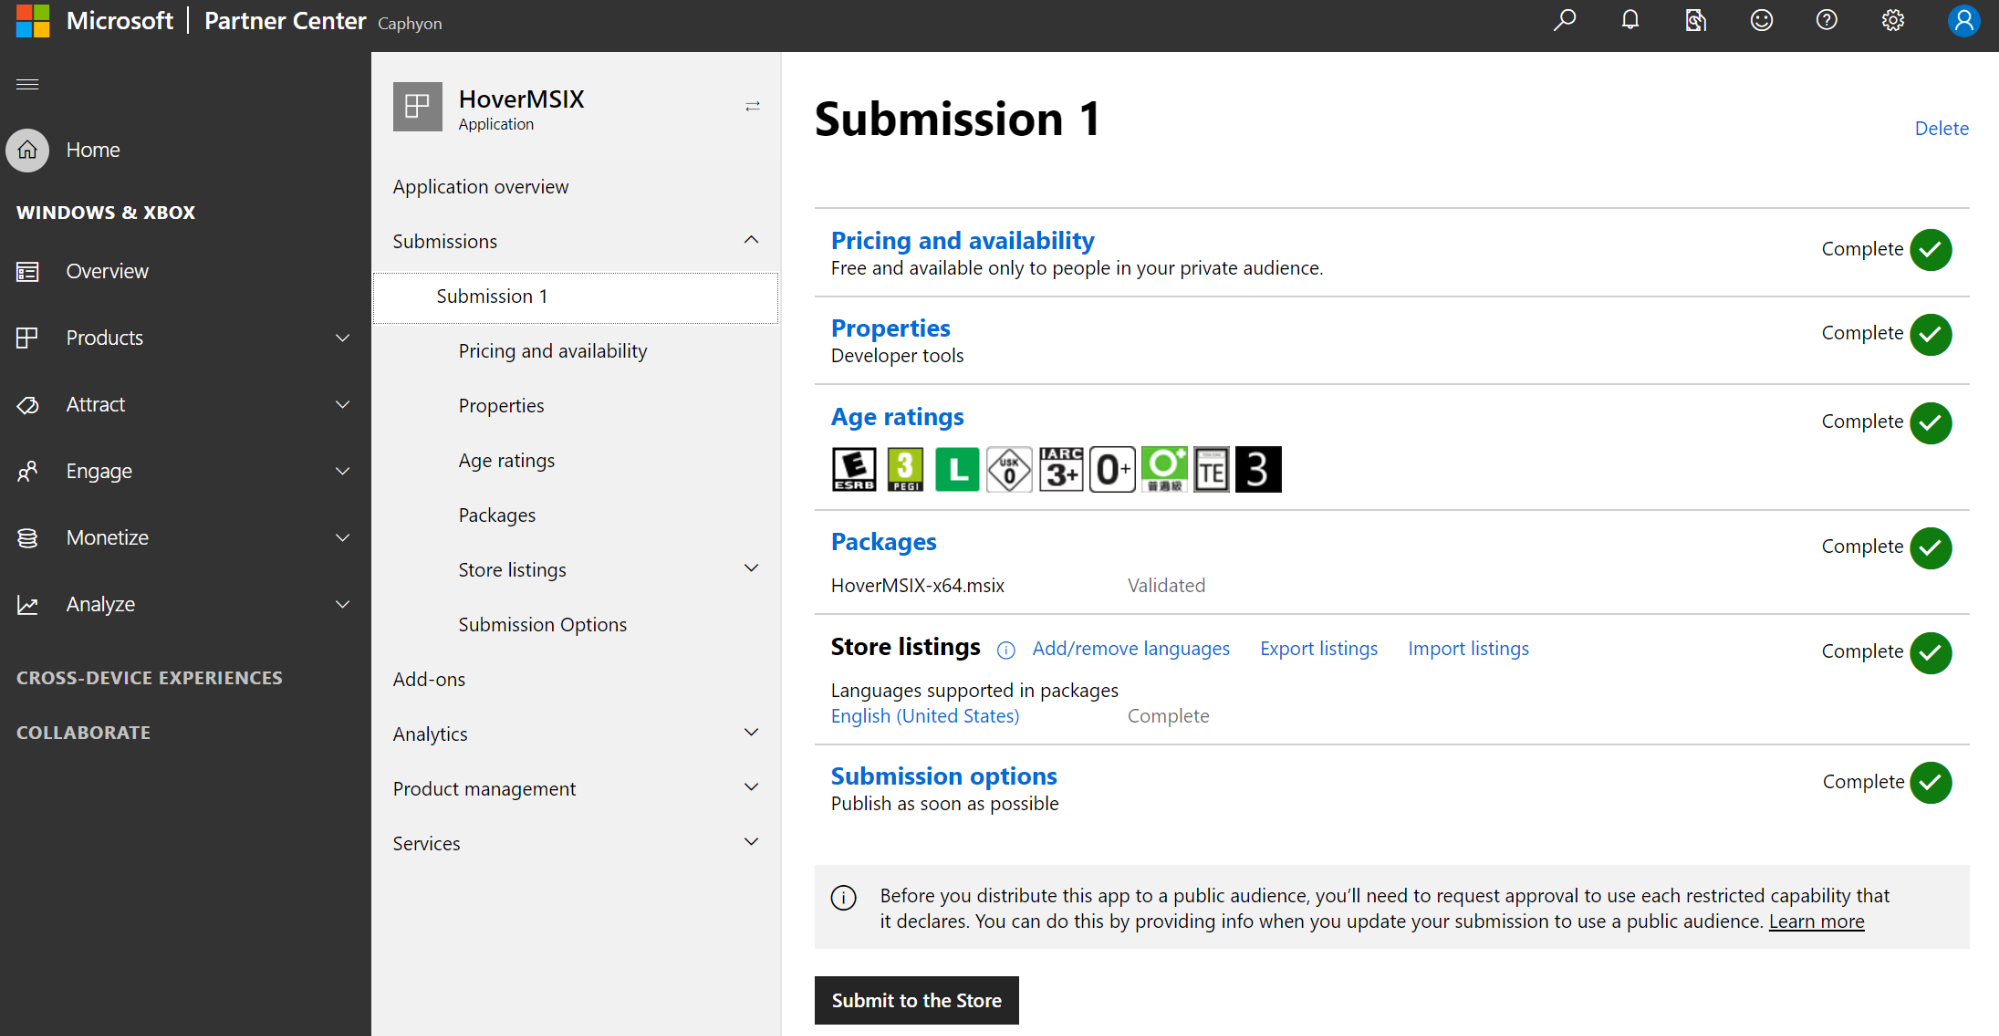
After we review this last step and hit the save button, we can see the green checkmarks, and the Submit to the Store button available on the Submission 1 overview page.
5. Final thoughts
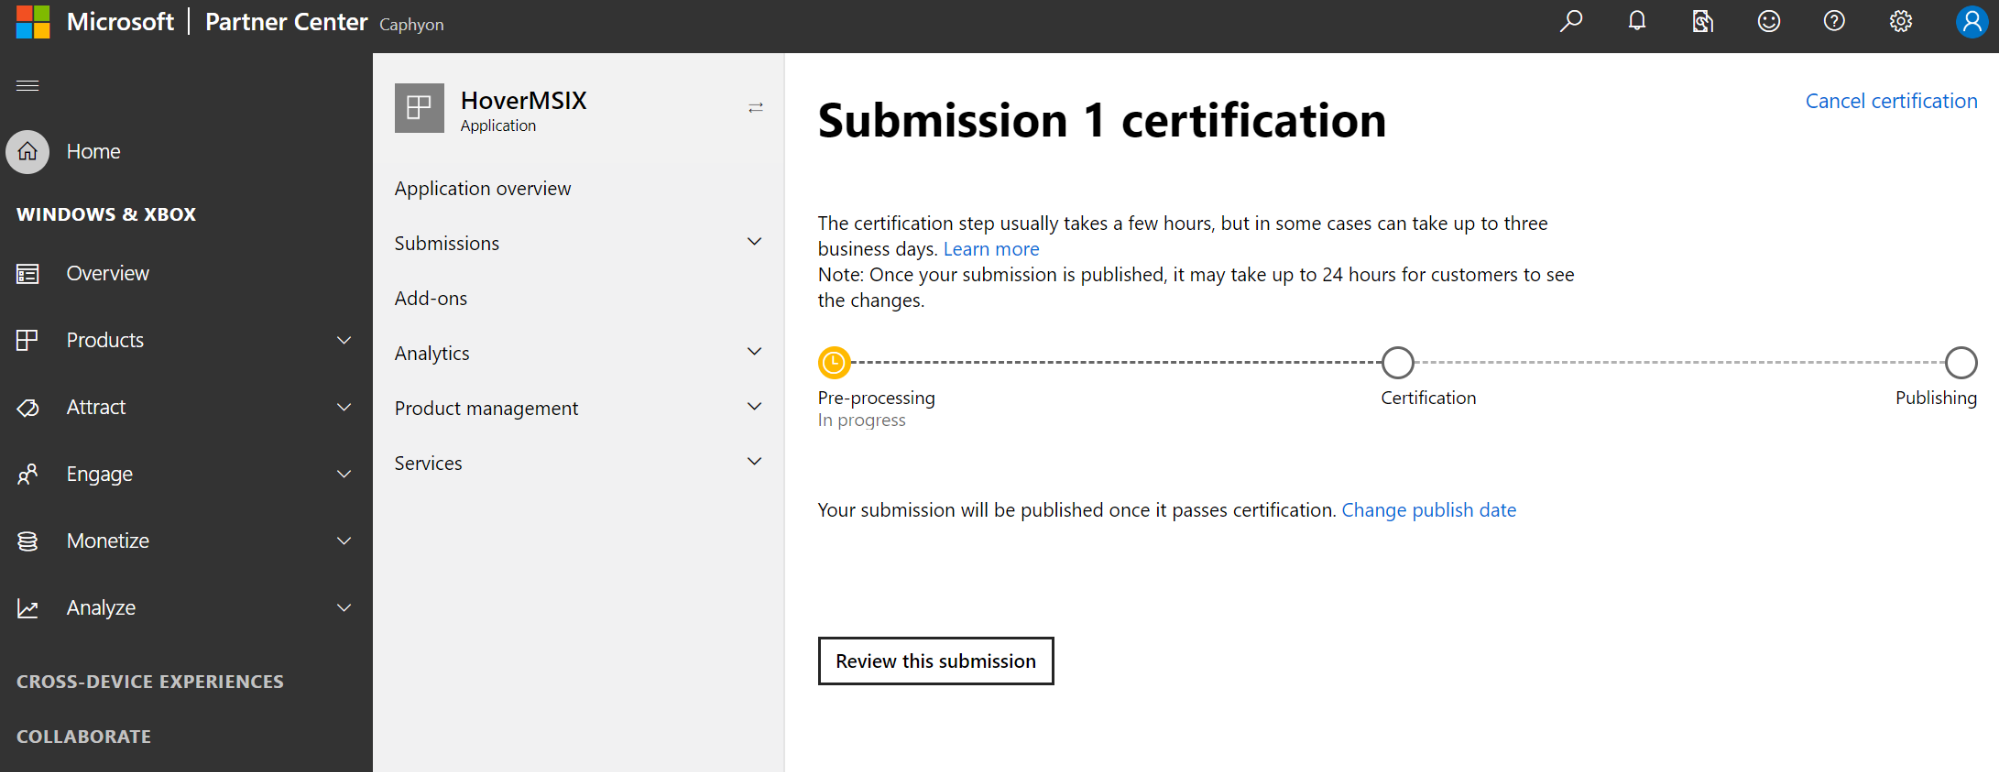
After our final step of clicking the Submit button, what we need to do now is wait. That’s right. We did our part, and now Microsoft has to pre-process and digitally sign our MSIX. Once all of this is done, based on our publishing options edited in the earlier steps, our app will be released either public or private.
What is an MSIX package: FAQ
What is an MSIX package?
MSIX packages are the new way to distribute and install your desktop applications. MSIX is promoted as the successor of the MSI format, by Microsoft. MSIX packages are based on the OPC (Open Packaging Conventions) specification. An MSIX package can be installed, uninstalled, or updated with the help of an MSIX installer tool, such as Advanced Installer.
What are the steps to publish an app to the Microsoft store?
In order to publish an application on Microsoft store, you need to go through the following steps described here:
- Create a developer account and register your app name
- Create a package for your app
- Submit your app for certification
- Publish your app on the store
What is the process of uploading an app on Microsoft Store?
The process of uploading an app on Microsoft Store is not so easy. There are several steps that need to be taken before the app can be published in the store. The following will summarize the steps involved in uploading an app on Microsoft Store.
- You need to have a developer account with Microsoft. This account can be created by logging into the Dev Center and clicking on "Create Account".
- After creating your developer account, you will have to set up your identity by adding a contact email address and phone number, as well as a name and company name.
- Once you have set up your identity, you can start developing your app.
- Submit your app for certification.
- Publish your app on the store, once the certification has passed.
Subscribe to Our Newsletter
Sign up for free and be the first to receive the latest news, videos, exclusive How-Tos, and guides from Advanced Installer.