How to automate the MSI building using GitHub Actions
The GitHub Actions platform simplifies the automation of your software workflows. It allows you to build, test and deploy your code directly from GitHub, making it a super reliable CI/CD platform.
GitHub Actions are not new, these features were already available amongst the big players in the industry like GitLab, Azure Devops, to mention some of them – so why is this such a big deal?
In this article, we'll let you know why they're so relevant and then will go through a step-by-step tutorial showing you how to build your MSI using GitHub Actions.
Why are GitHub Actions so important and what does it include?
GitHub offers a suite of standard actions for different kind of automations that can benefit developers, such as:
- C/C++ with Make
- Deploy a .NET Core app to an Azure Web App
- Build and test a .NET project
- Build and test an ASP.NET Core project.
Unlike its alternatives, GitHub is free and offers the possibility to run these Actions on GitHub hosted runners. This means that you don’t have to worry about investing in powerful machines or paying for Azure DevOps services to achieve these types of actions.
We thought it also needed a way to automate building an MSI. So, here is where Advanced Installer comes into play!
While we strongly encourage you to read our article and Advanced Installer’s solution till the end, we also put a dedicated MSI GitHub Actions resource on the GitHub platform that we want to share with you.
How to use Advanced Installer's GitHub Actions when Building Your MSI?
Advanced Installer now offers its own GitHub Action and we're going to show you how to use it.
This time around, we'll be going through each of the steps you need to follow to build your MSI with GitHub Actions.
If you are a skilled developer, chances are you will know exactly how to use automations and will be able to leverage the Advanced Installer GitHub Actions support by simply scanning our README file. This tutorial is meant for beginners.
Step 1: Create the Advanced Installer AIP
The first thing we need is an Advanced Installer project. This project will contain the definition of your package in terms of Files, Folders, Registry, Custom Actions, etc.
To get started with Advanced Installer, I recommend you to check our user guide on how to create a Simple installation, Professional Installation, Enterprise Installation, and more.
If you want to configure your MSI file with each build, you can just use the CLI support or PowerShell Support that Advanced Installer offers for editing your projects. We will go through these details a bit further as we will dive in the creation of the GitHub automation yml file.
For this example, we created a simple Advanced Installer project. This project only contains a few registry values and the two files that are going to be installed in the default directory defined under Install Parameters Page.
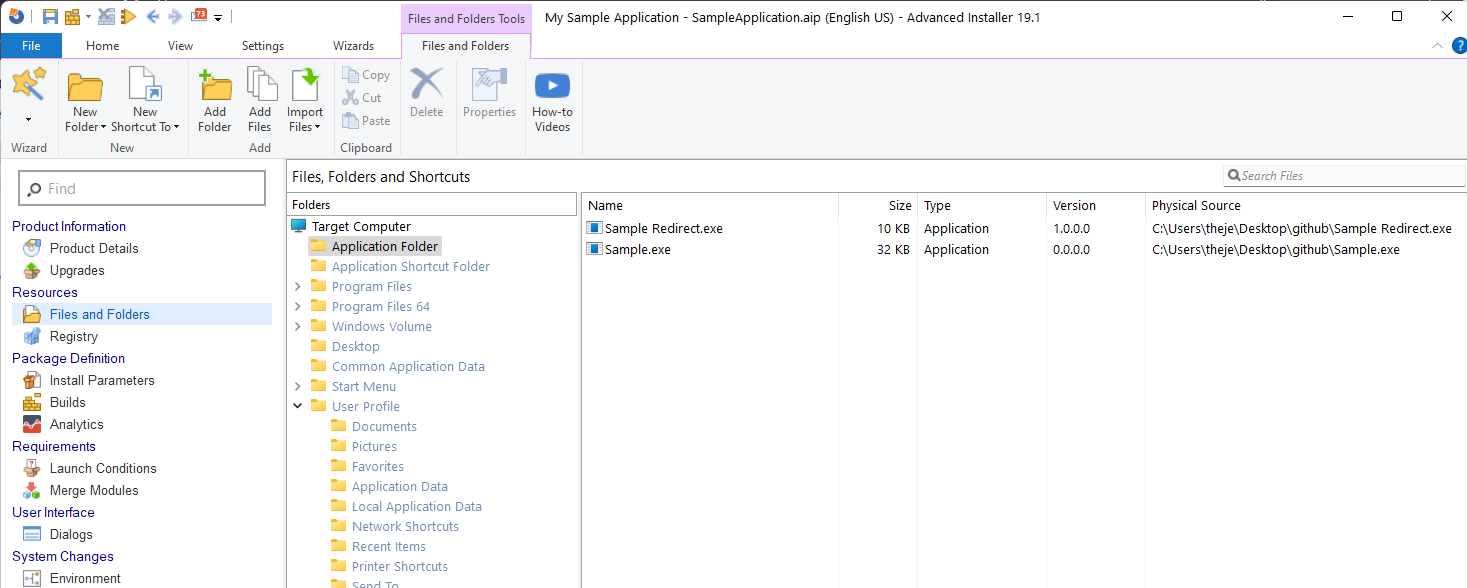
The files are stored inside the AIP Project as a relative path by default, so you don’t have to worry about hardcoded paths when you upload the AIP Project on GitHub.As a best practice, it’s good to save the AIP Project near your file/folder structure. In this example, the AIP Project is saved within the sourcefiles.
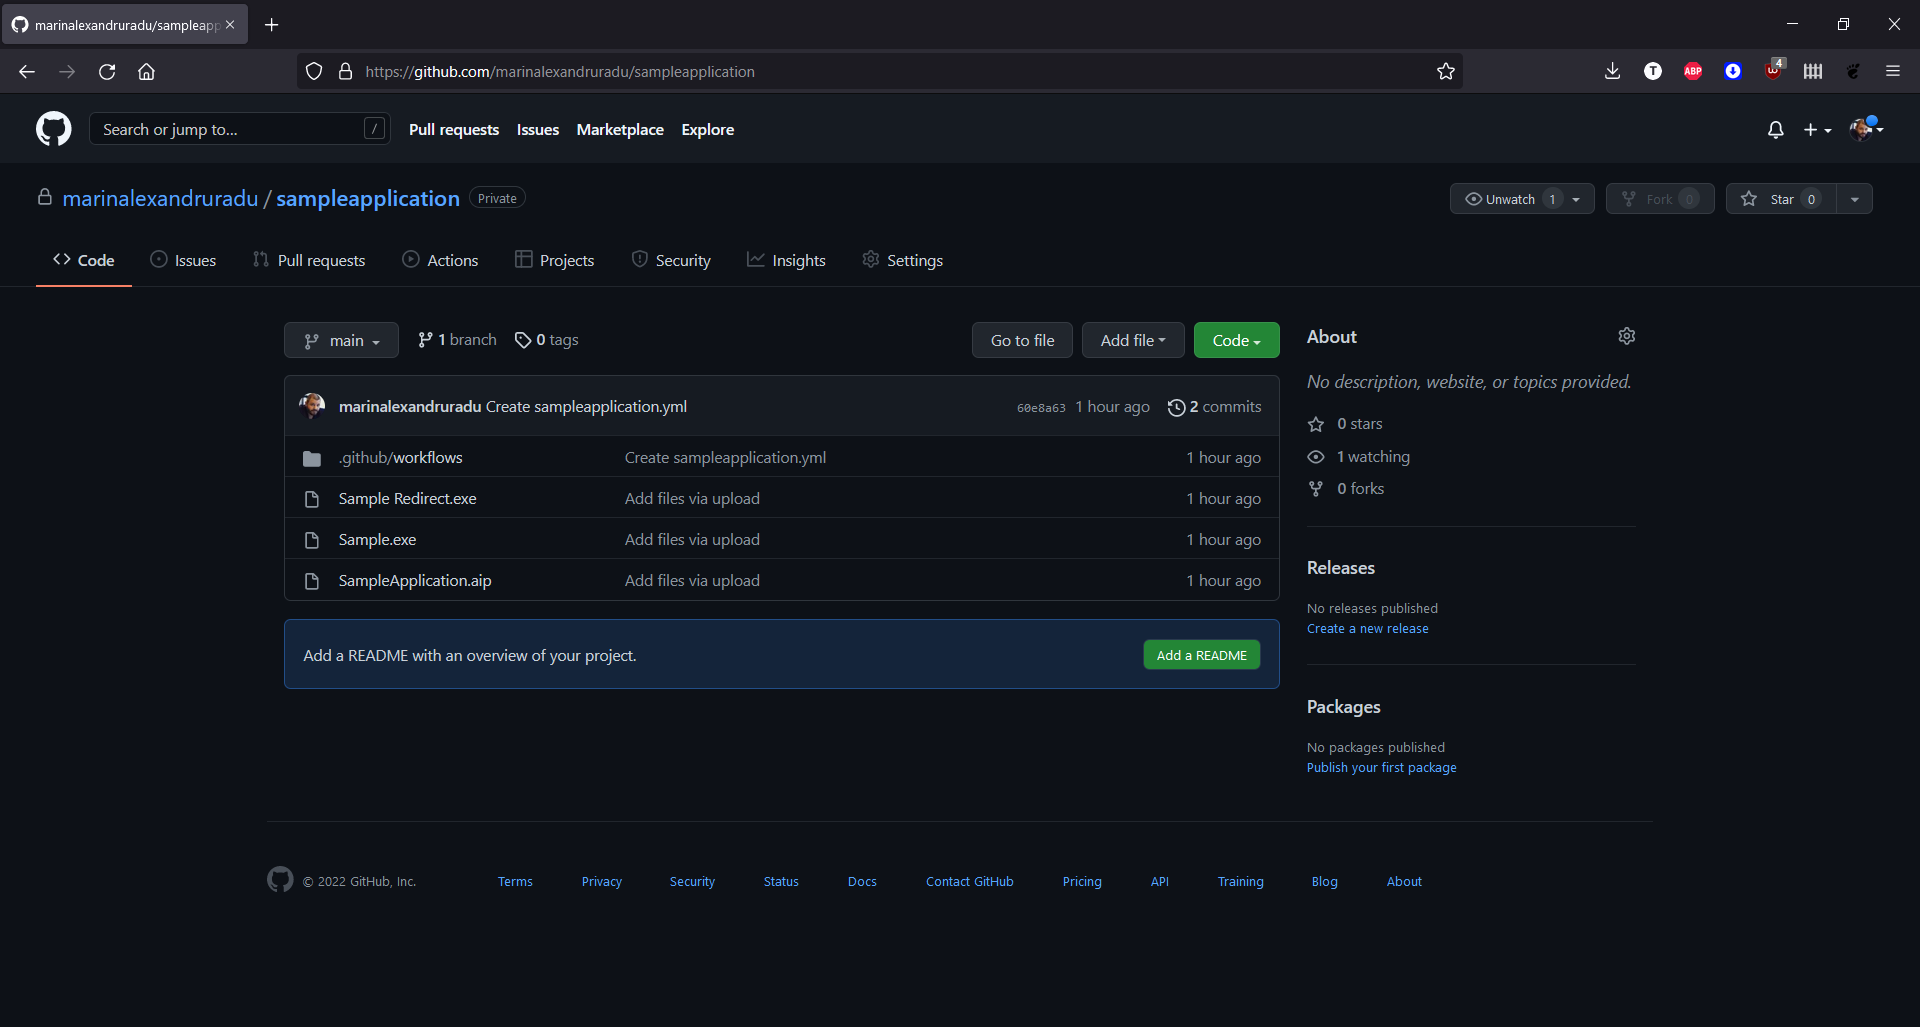
Once the project is configured, upload it to your repository. Once you do that, your repository should look like this:
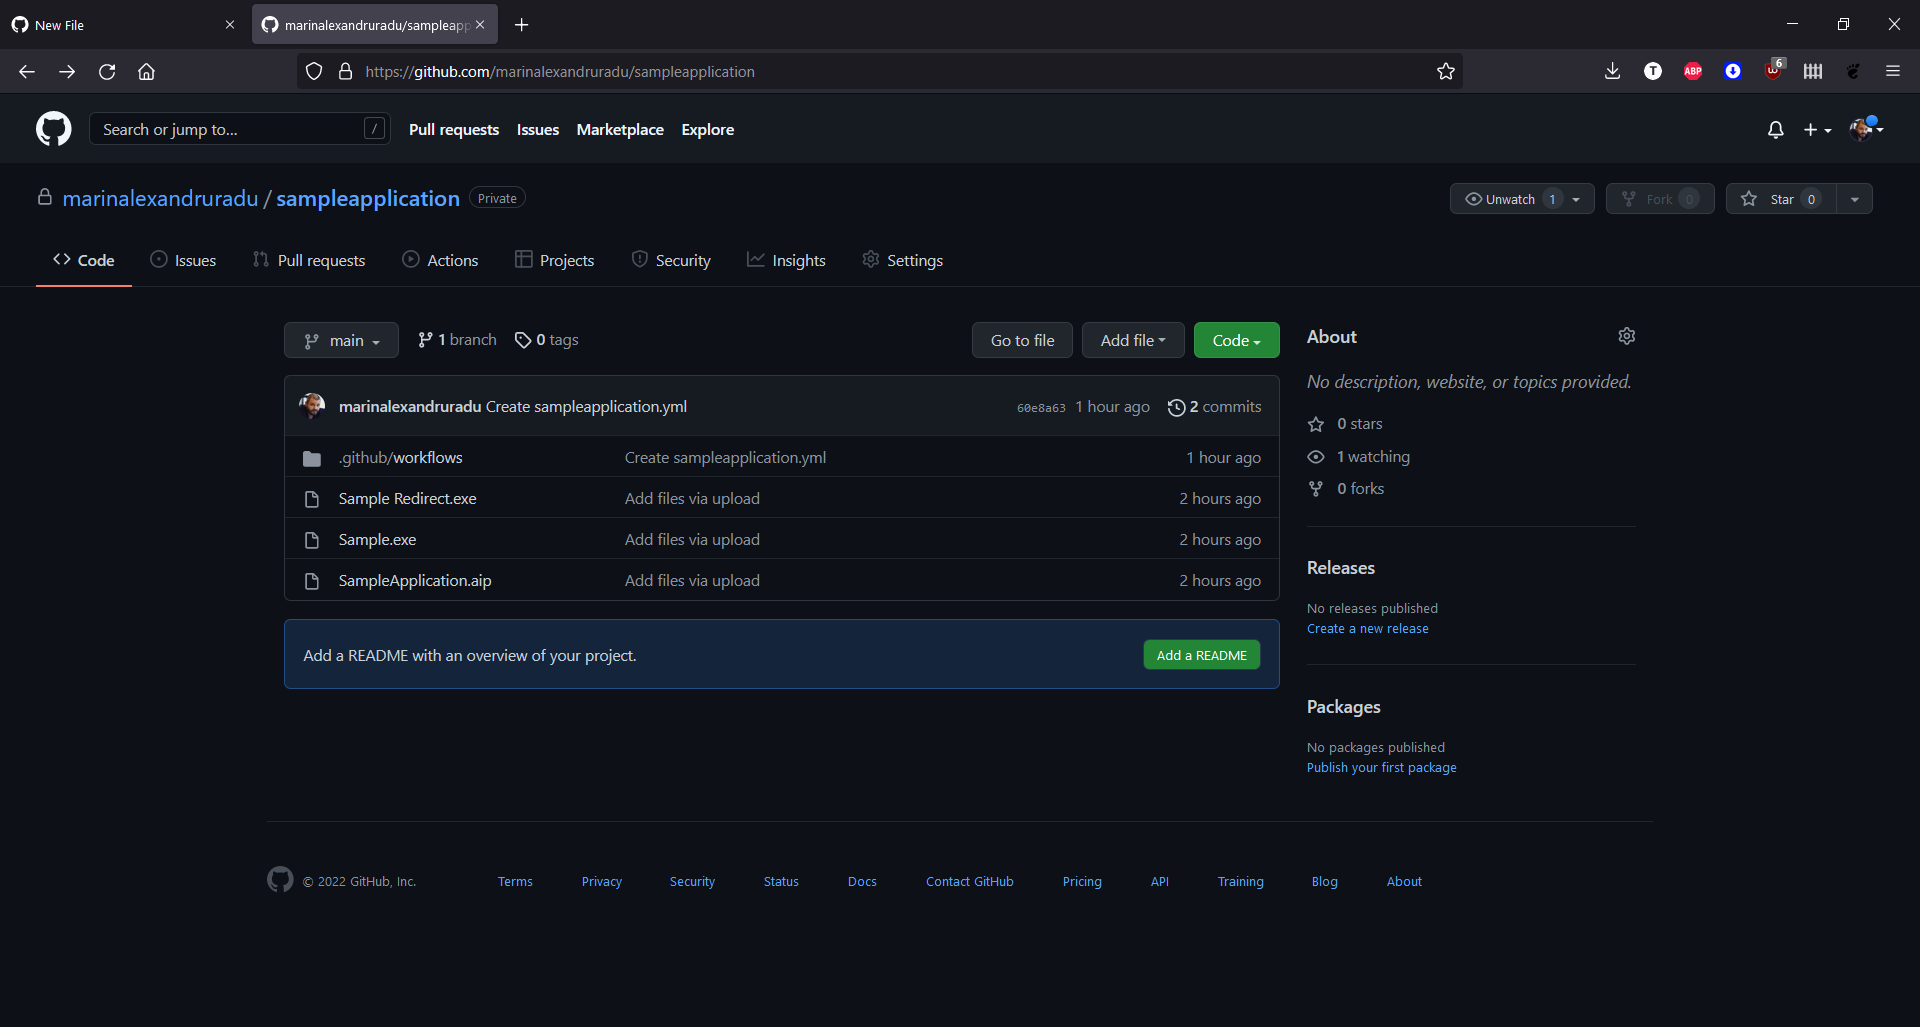
The .github\workflows folder that you see in the screenshot will be created automatically in the next steps.
Step 2: Create the GitHub Automation
Now that the AIP project is uploaded, it’s time to create the GitHub Action that will perform the build. To do this:
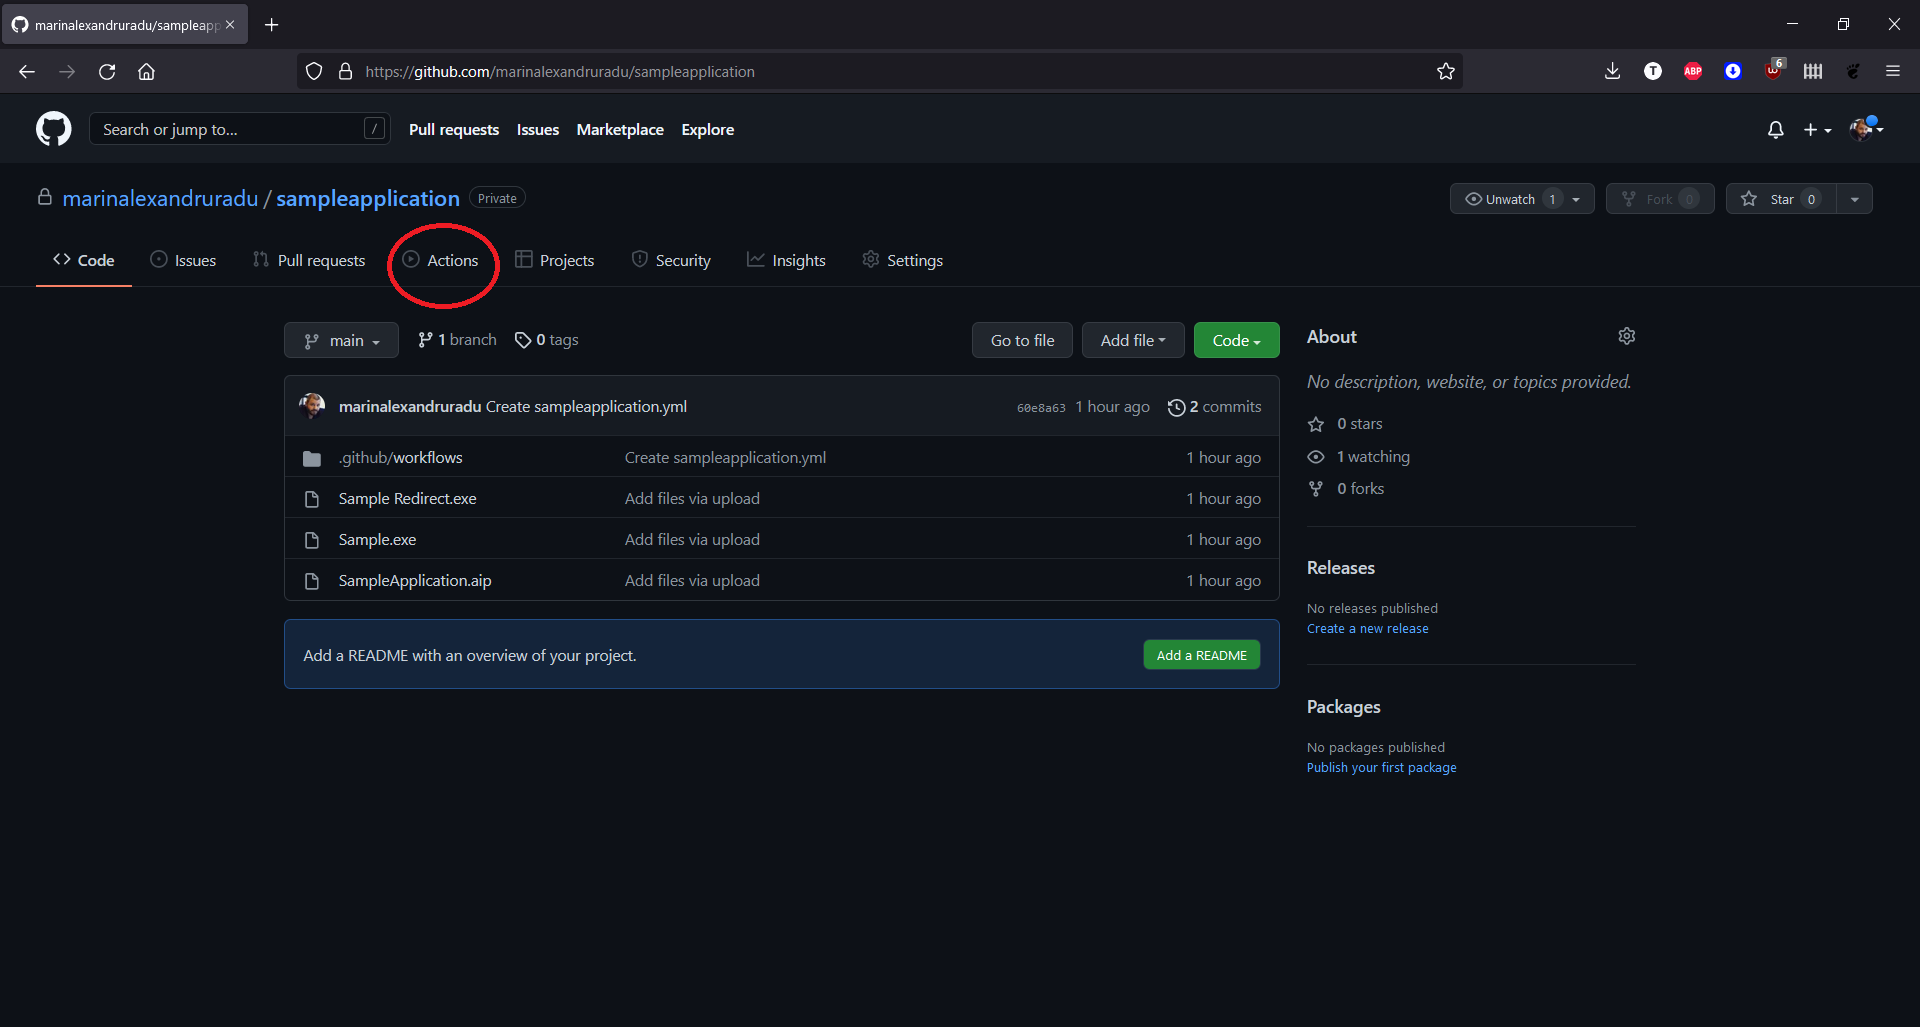
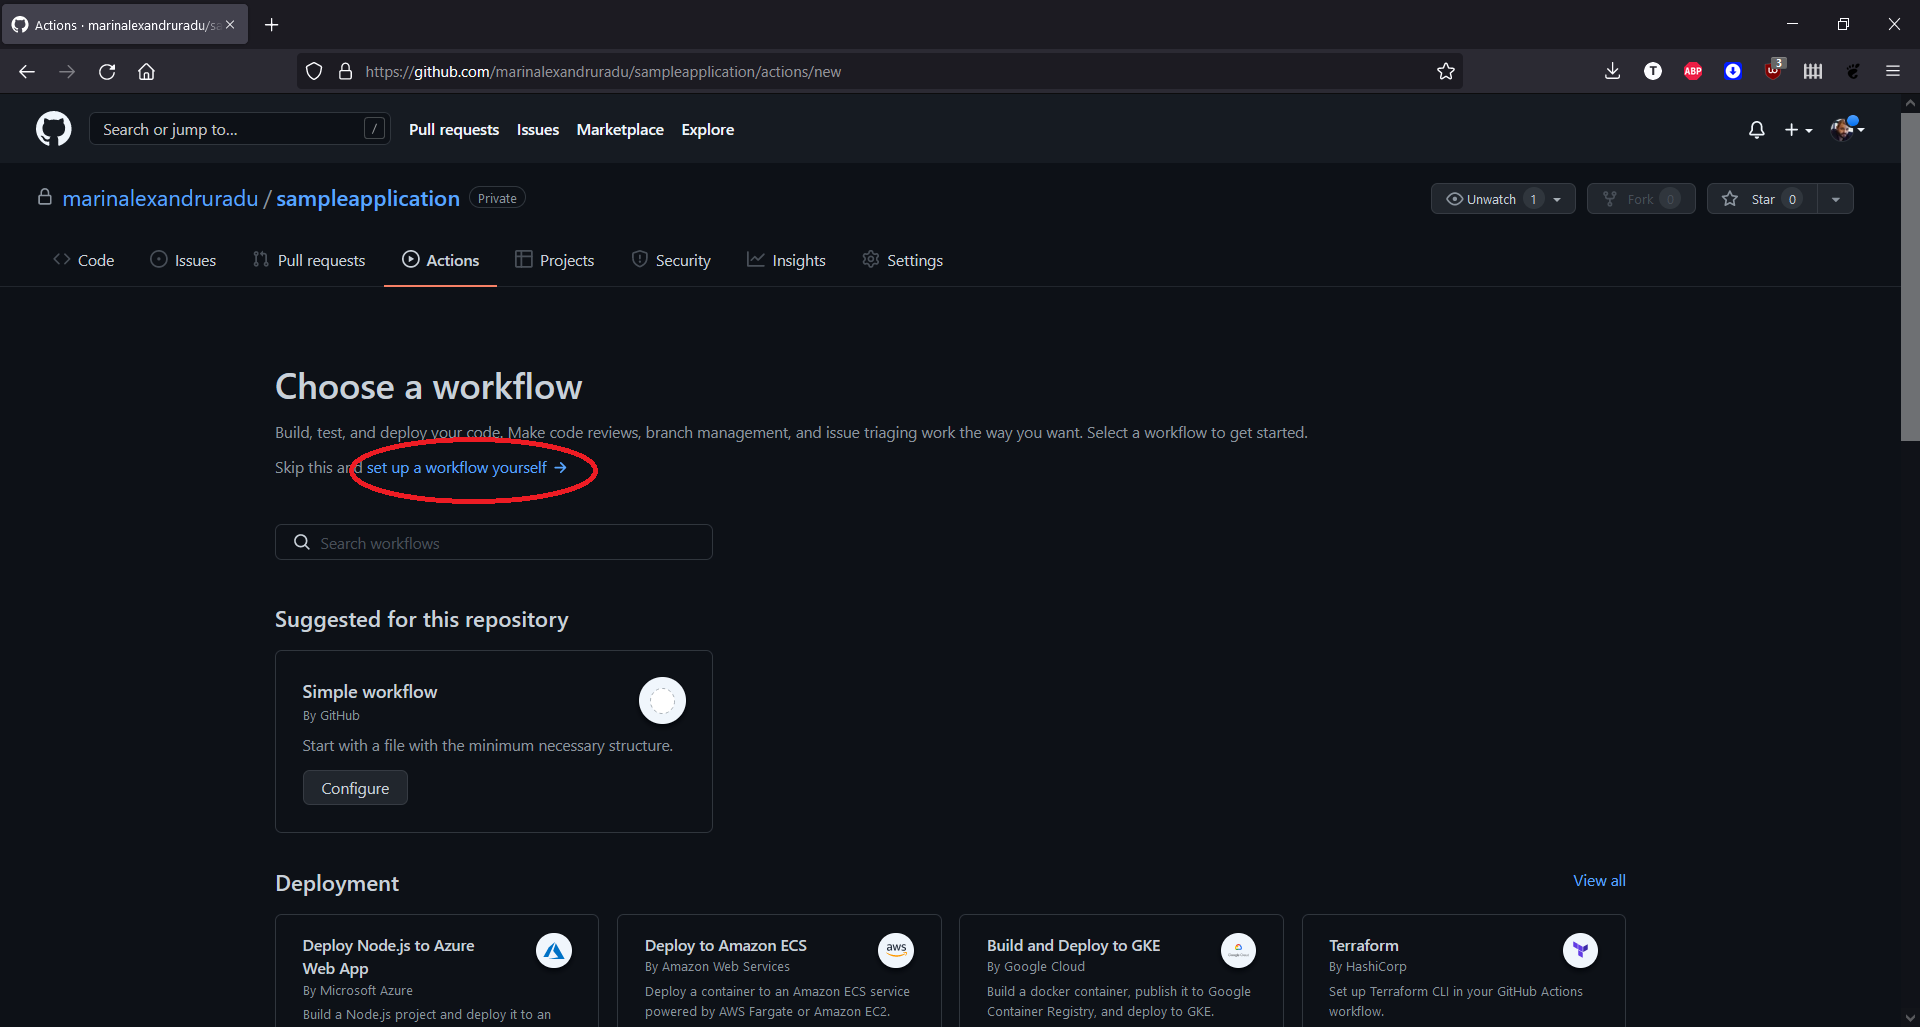
1. Navigate to the repository and click on Actions.
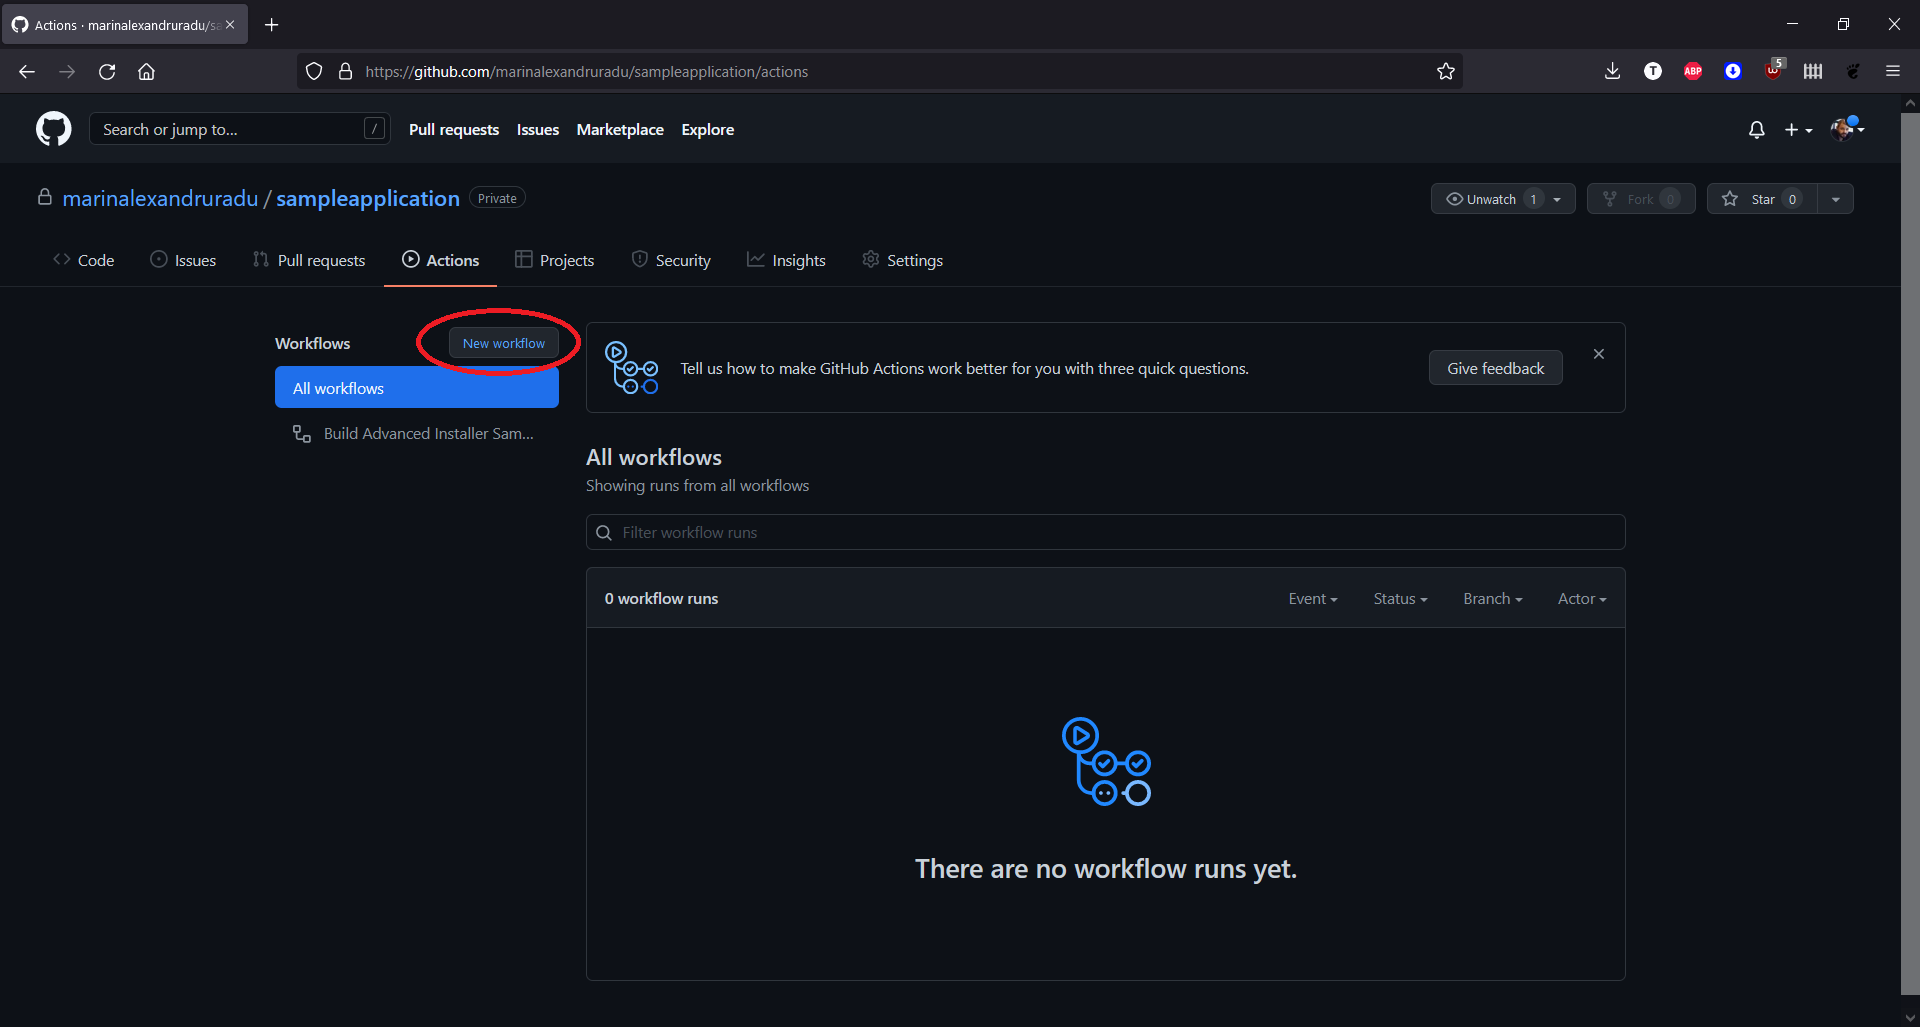
2. Next, create a new workflow:
3. GitHub will show you a set of standard actions that you can choose from, but we will choose the option “set up a workflow yourself”.
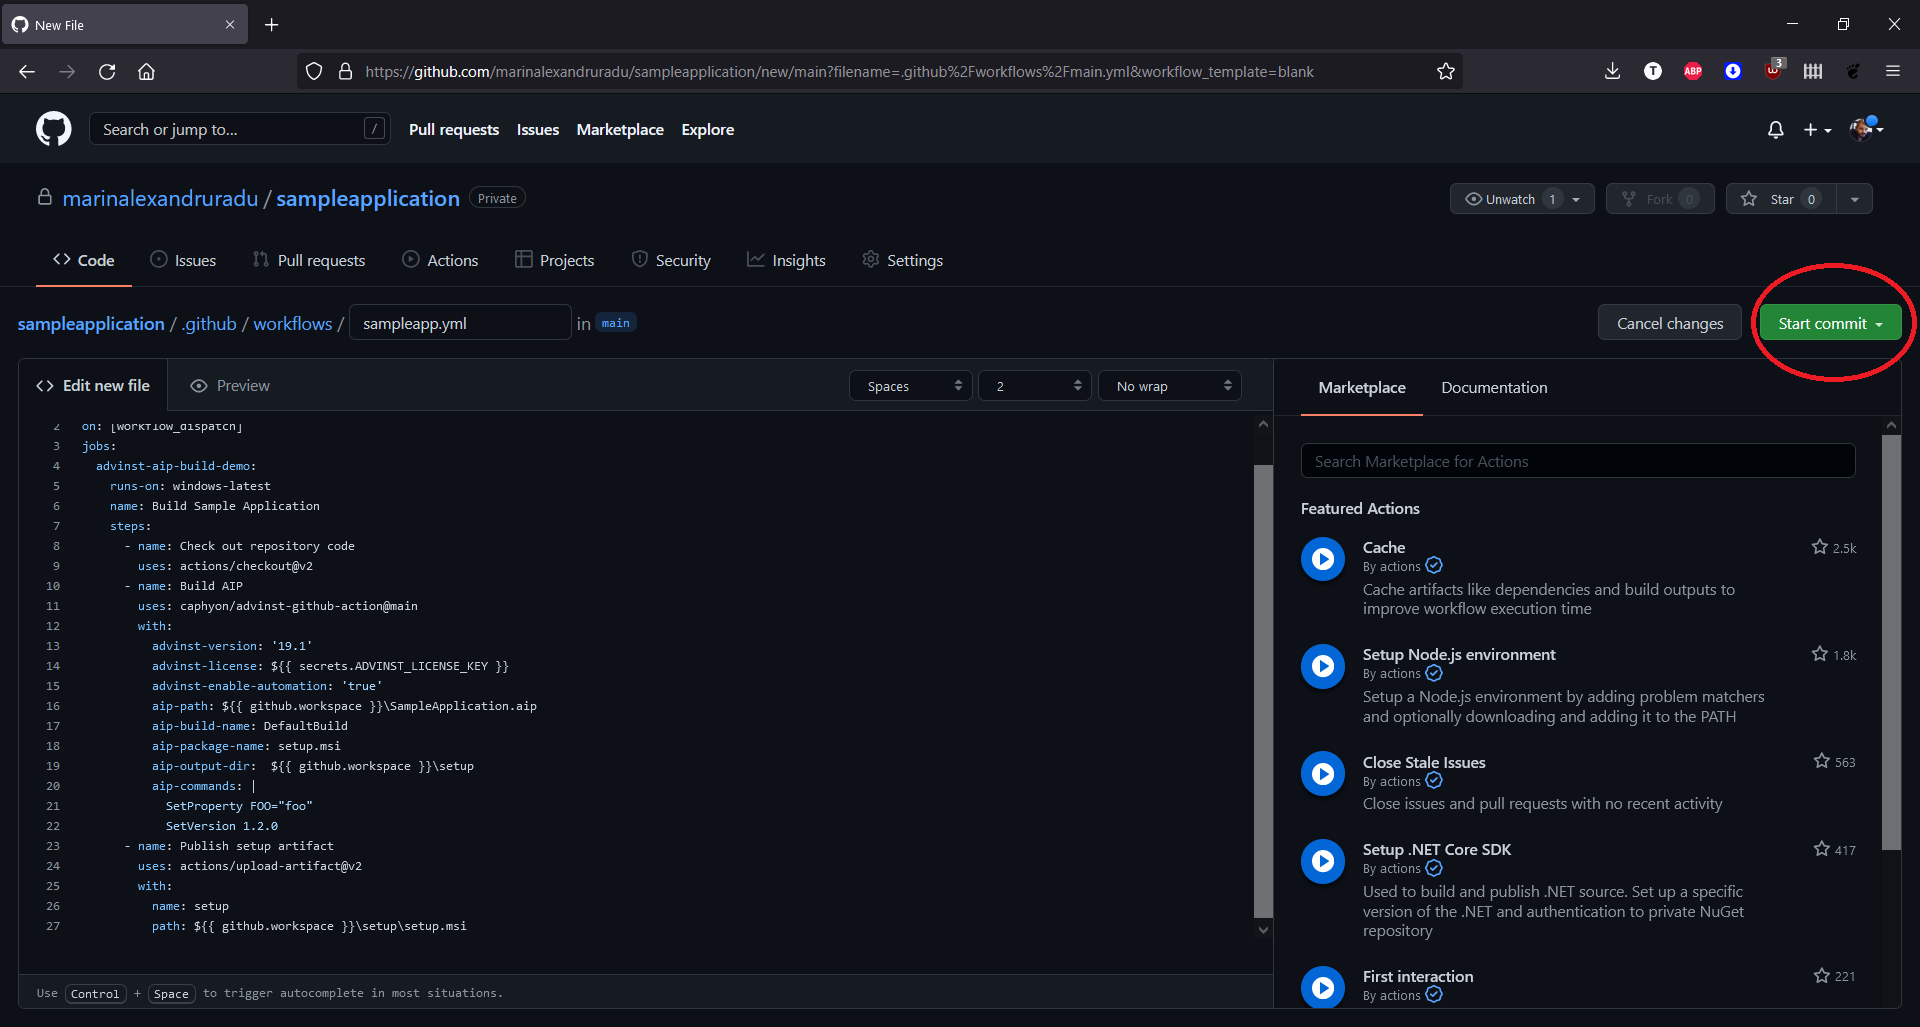
4. As previously mentioned, this is the step where the .github\workflows directory structure is created. Inside this directory, all the workflows (which are just yml files) are stored. In our case we named our yml file sampleapp.
Inside the editor, we’ve used the following code:
name: Build Advanced Installer Project (.AIP)  Demo
on: [workflow_dispatch]
jobs:
  advinst-aip-build-demo:
    runs-on: windows-latest
    name: Build Aip Demo
    steps:
      - name: Check out repository code
        uses: actions/checkout@v2
      - name: Build AIP
        uses: caphyon/advinst-github-action@v1.0
        with:
          advinst-version: '19.0'
          advinst-license: ${{ secrets.ADVINST_LICENSE_KEY }}
          advinst-enable-automation: 'true'
          aip-path: ${{ github.workspace }}\arhitect.aip
          aip-build-name: DefaultBuild
          aip-package-name: setup.msi
          aip-output-dir:  ${{ github.workspace }}\setup
          aip-commands: |
            SetProperty FOO="foo"
            SetVersion 1.2.0
      - name: Publish setup artifact
        uses: actions/upload-artifact@v2
        with:
          name: setup
path: ${{ github.workspace }}\setup\setup.msiBefore we continue, let’s quickly explain what is actually happening inside this yml:
- The name field represents the name of your workflow, you can configure it as wanted.
- In the yml file, you can define a set of jobs, and each job can have multiple steps/actions.
- The yml file is configured to runs-on: windows-latest. As previously mentioned, this is where you configure on which type of host you wish to run your actions. Here is a full list of GitHub hosted runners. For Advanced Installer, a Windows build is needed.
Windows-latest will be soon replaced by GitHub with windows-2022
The first action is to check out the repository code just to be sure that no issues are present. The checkout@v2 is a standard GitHub action.
The second action is to build the AIP and we reference the advinst-github-action that is now available on our repository. This action will integrate the Advanced Installer Tool in the GitHub CI/CD workflow. It has the following capabilities:
- Deploy Advanced Installer on the GitHub runner
- Build an Advanced Installer project (.AIP).
The action supports input parameters, as seen in the example above. The input parameters are of two categories:
- Tool Deploy Parameters - their names use the format: advinst-*
- AIP Project Parameters - their names use the format: aip-*
Before uploading your resources to the repository, make sure to configure the second action properly:
- Configure your action to use the Advanced Installer 19.1 version.
- Add your license.
- Define the path where the AIP project is located in GitHub –in our case it’s on the master repository. (If you have it in a subfolder make sure to correctly configure this into the yml file)
- Define the name of the resulted MSI – in our case Sample.MSI and the output directory of the MSI.
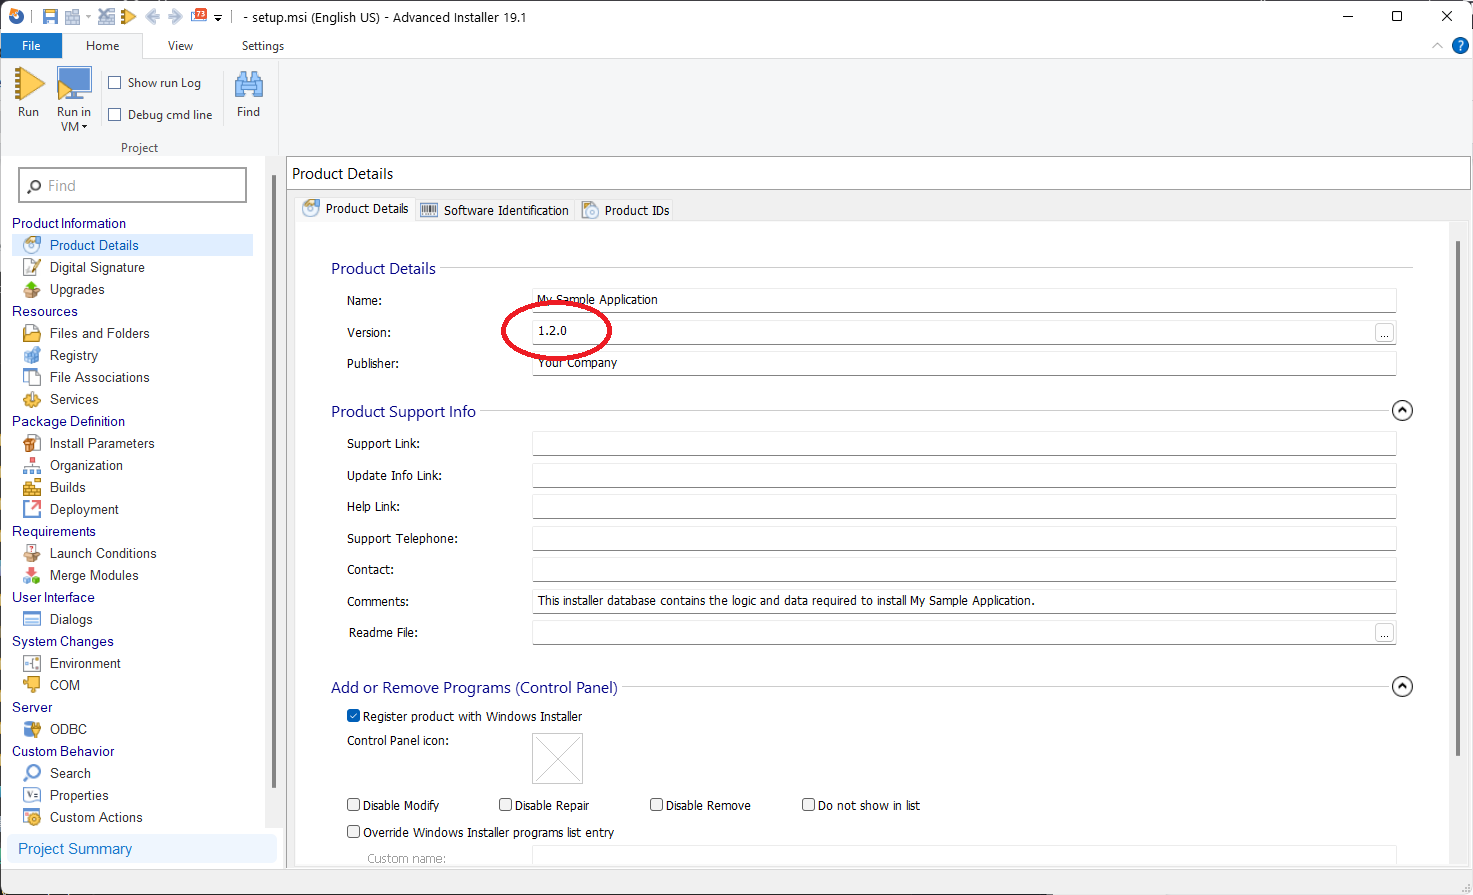
- We also set an additional property in the MSI and increased the Product Version of our MSI.
Using additional properties inside the yml file will not alter the AIP file on your repository. If you want to keep the same settings you have two options:1. Either alter the AIP file and push it back on GitHub2. Keep the same settings in the yml file during multiple builds.
The third action builds the artifact and uploads it to the repository.
Going back to the tutorial:
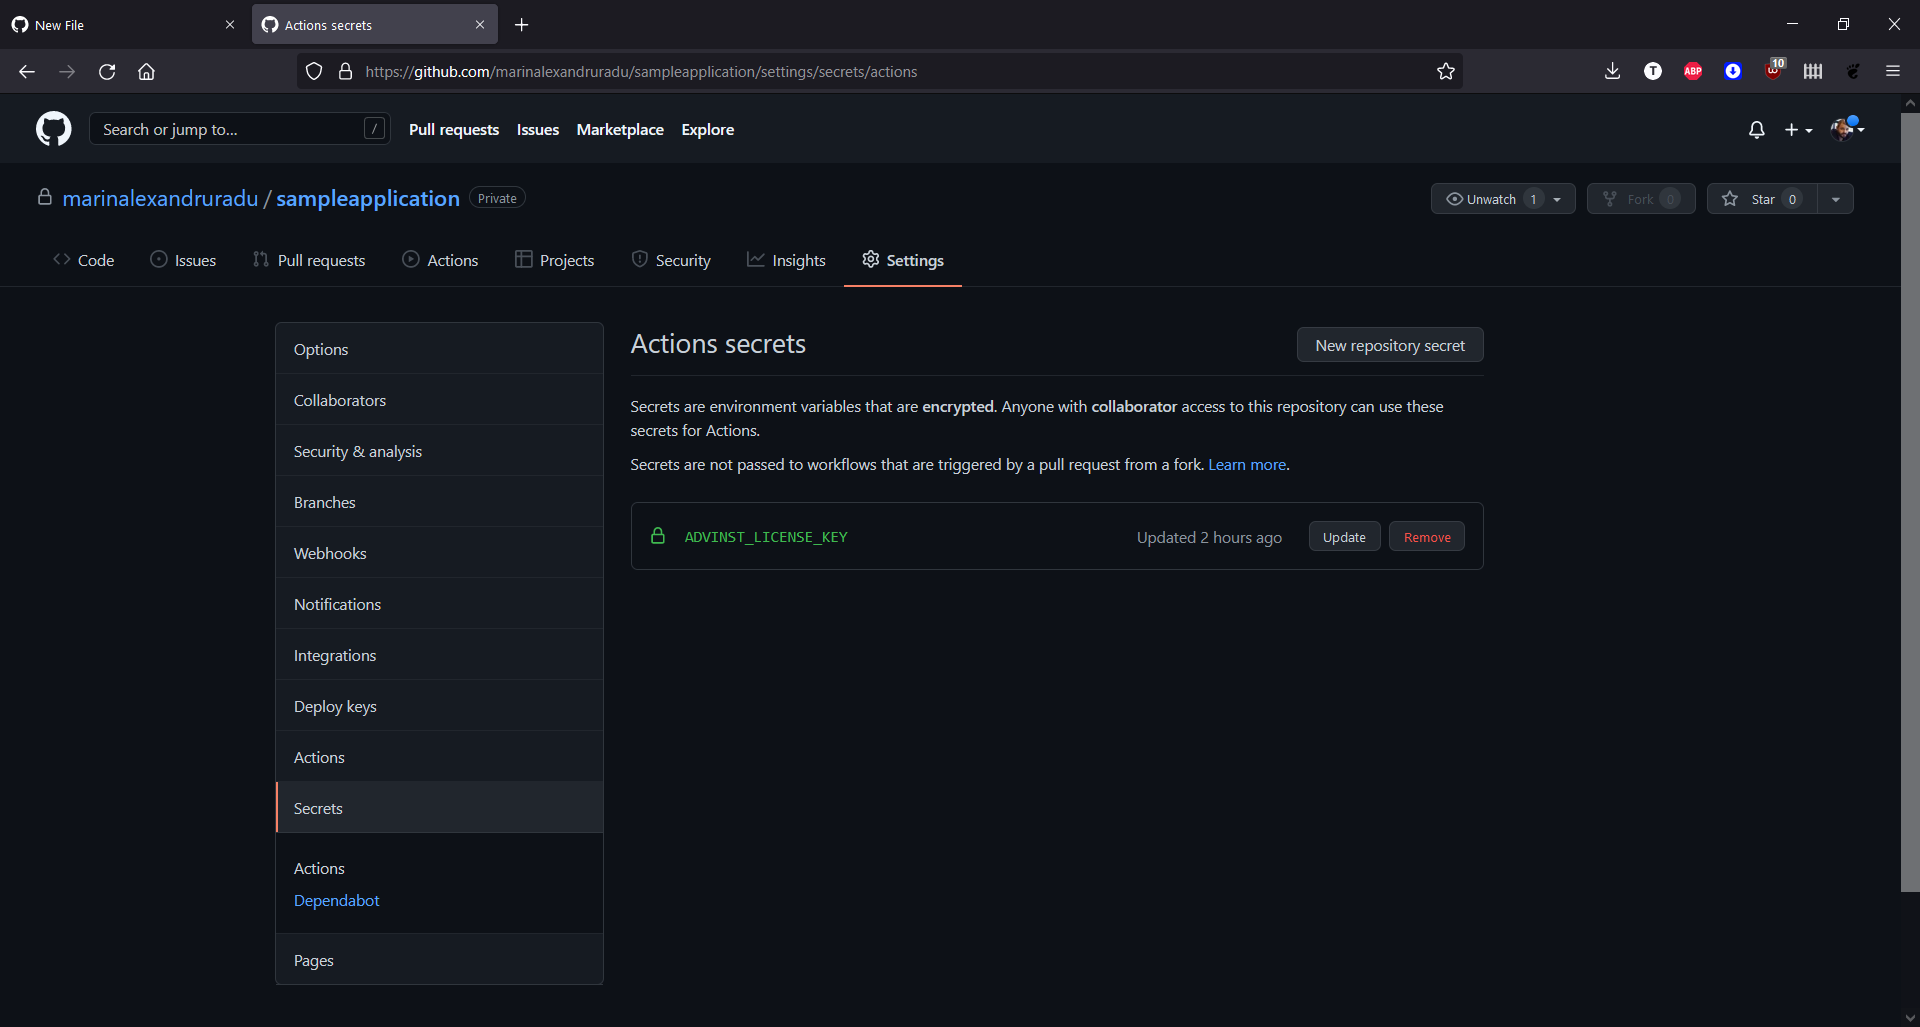
5. It’s not recommended to put the license key in plain text inside the yml file. To hide the license key, navigate to the repository and click on Settings.
6. Next, click on Secrets and create a new secret and paste your Advanced Installer key. You can consider secrets something like variables. In our case, the name of the secret is ADVINST_LICENSE_KEY, as seen in the yml file.
7. Now that the action is defined, click on Start Commit and your workflow will be saved.
Step 3: Run the GitHub Action
You should find the new configured workflow in the Actions section.
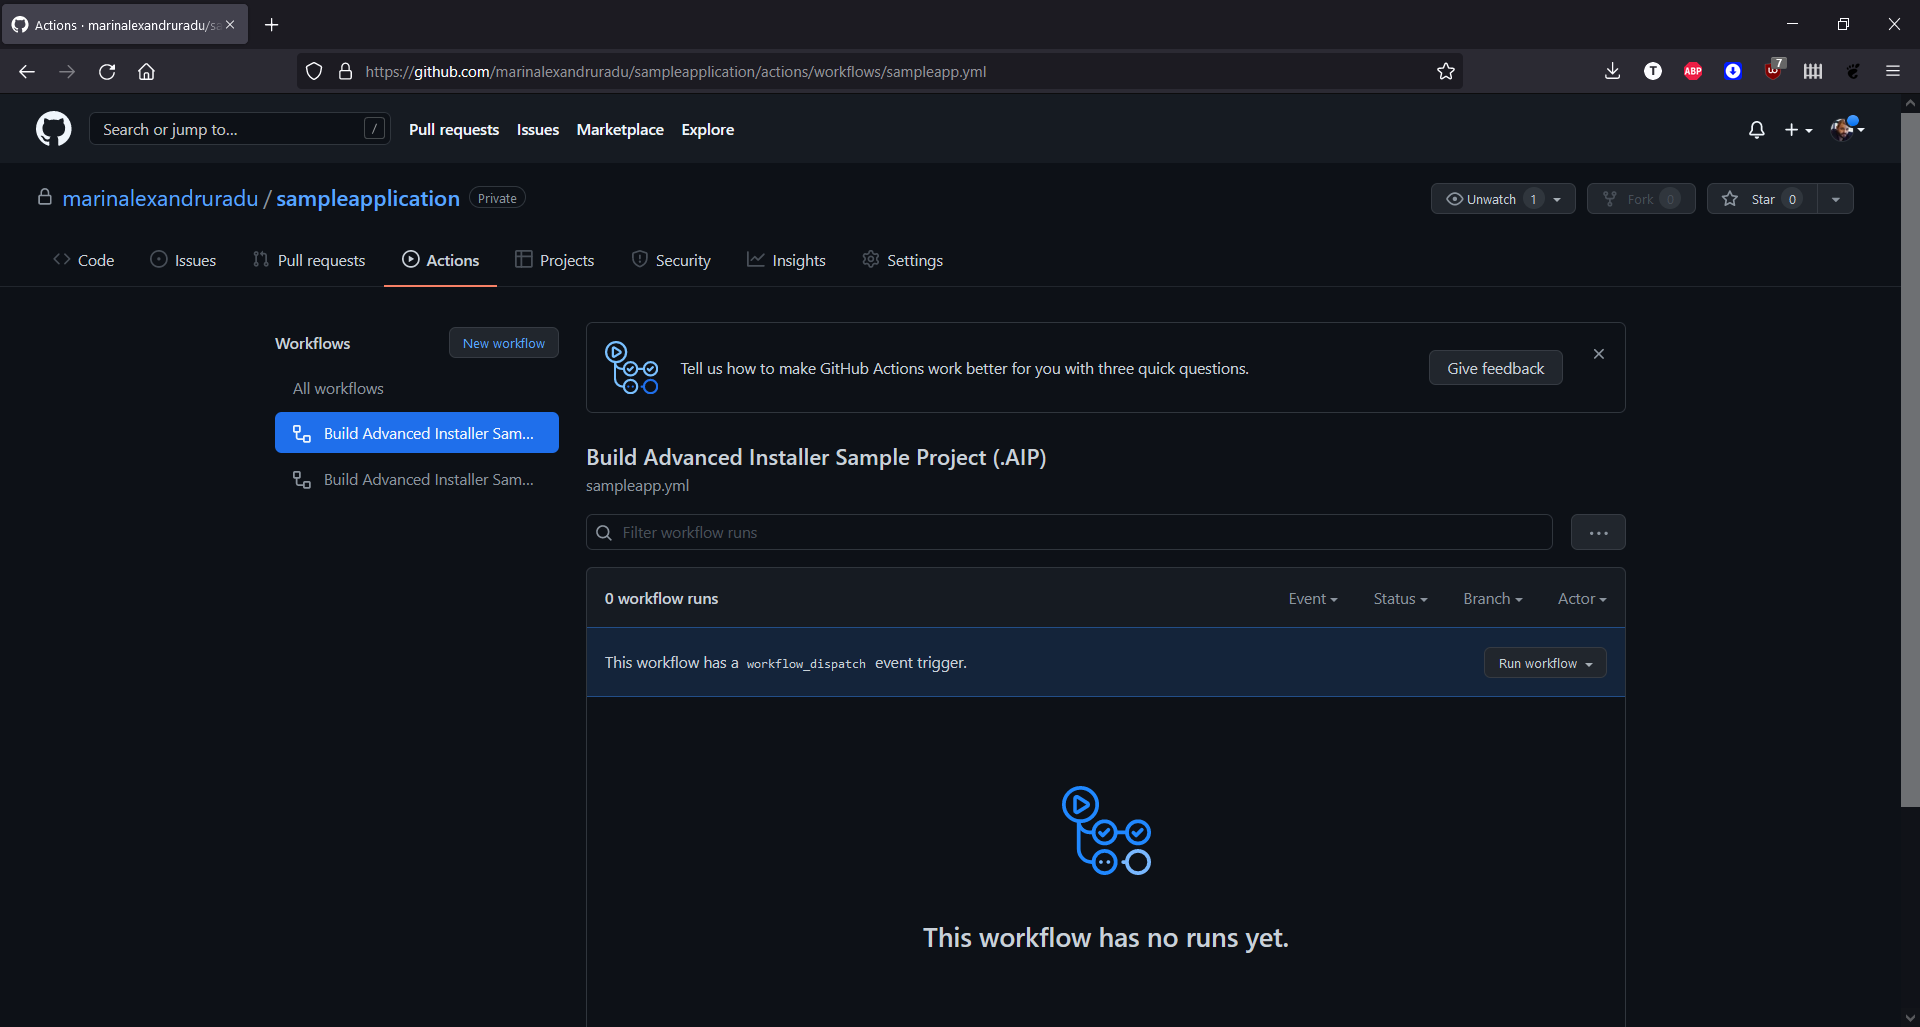
All we have to do now is to click on Run Workflow > Run Workflow and the build should be started.
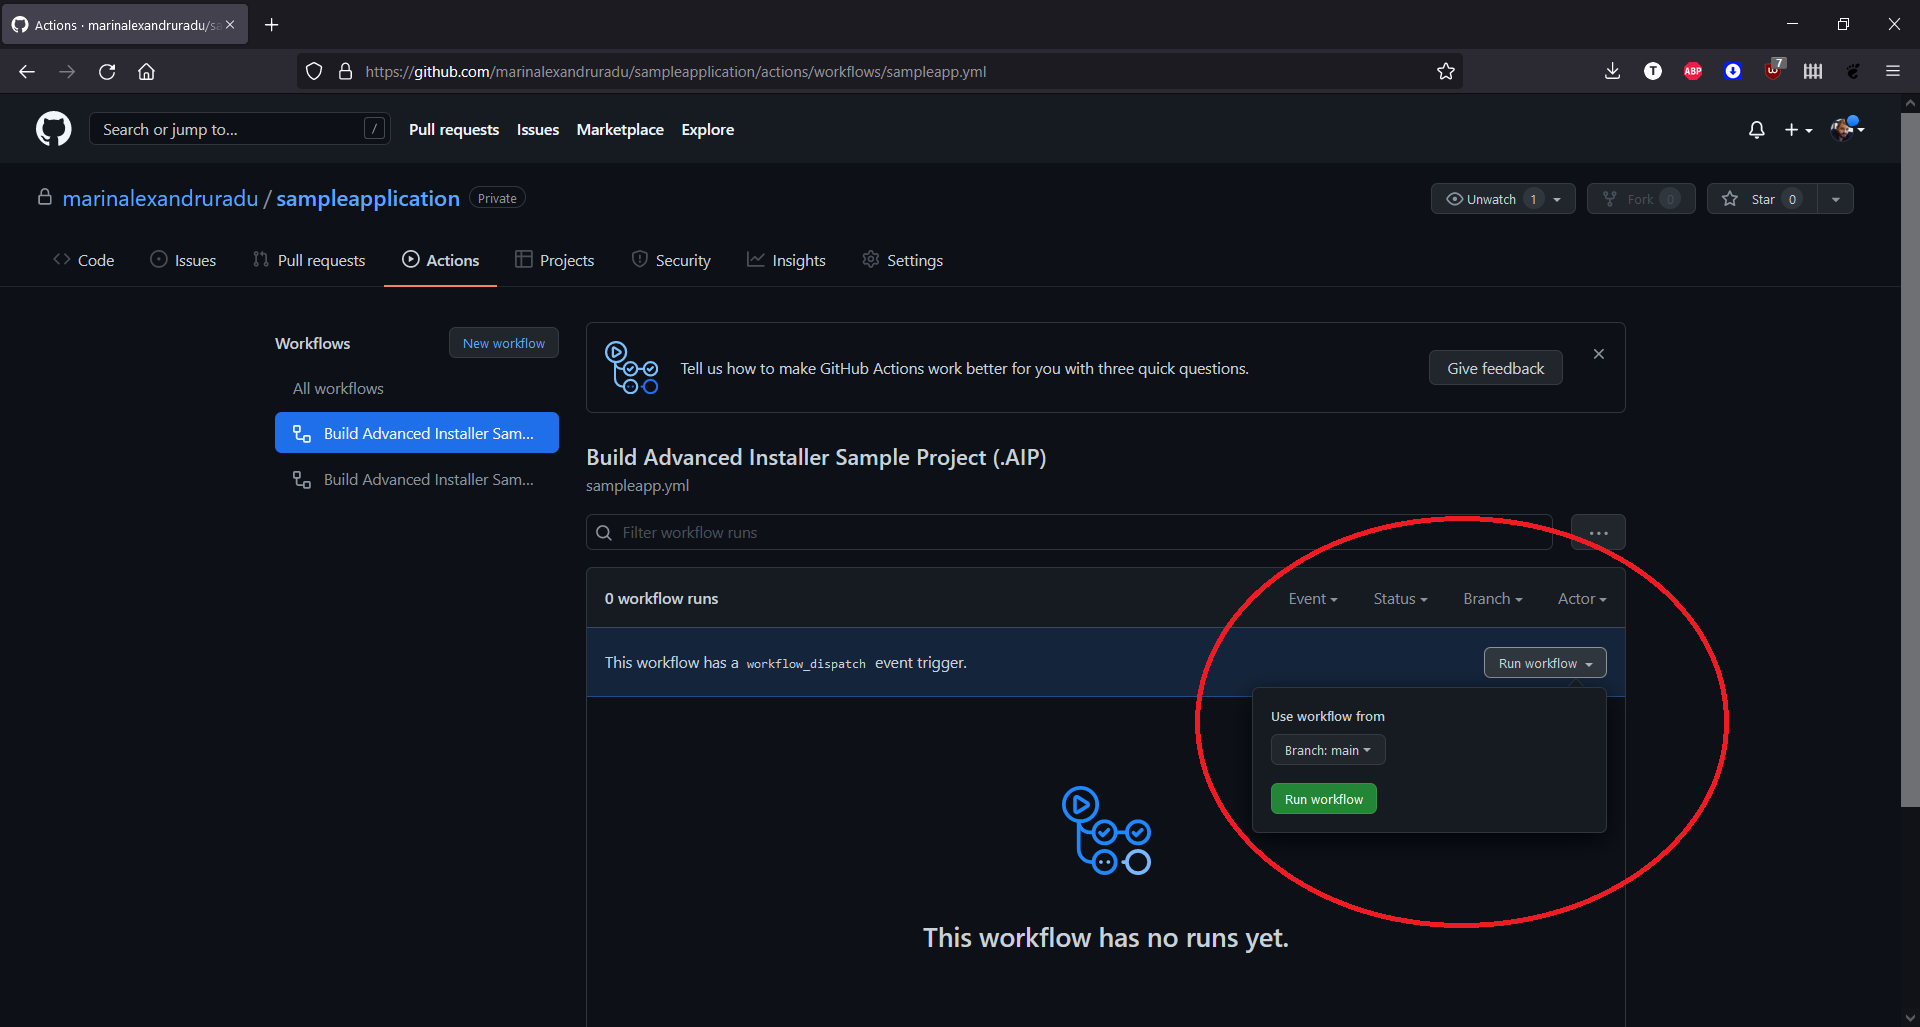
After a while, the action should start and perform the necessary steps that are defined in the yml file, and once it’s completed you should see something like this:
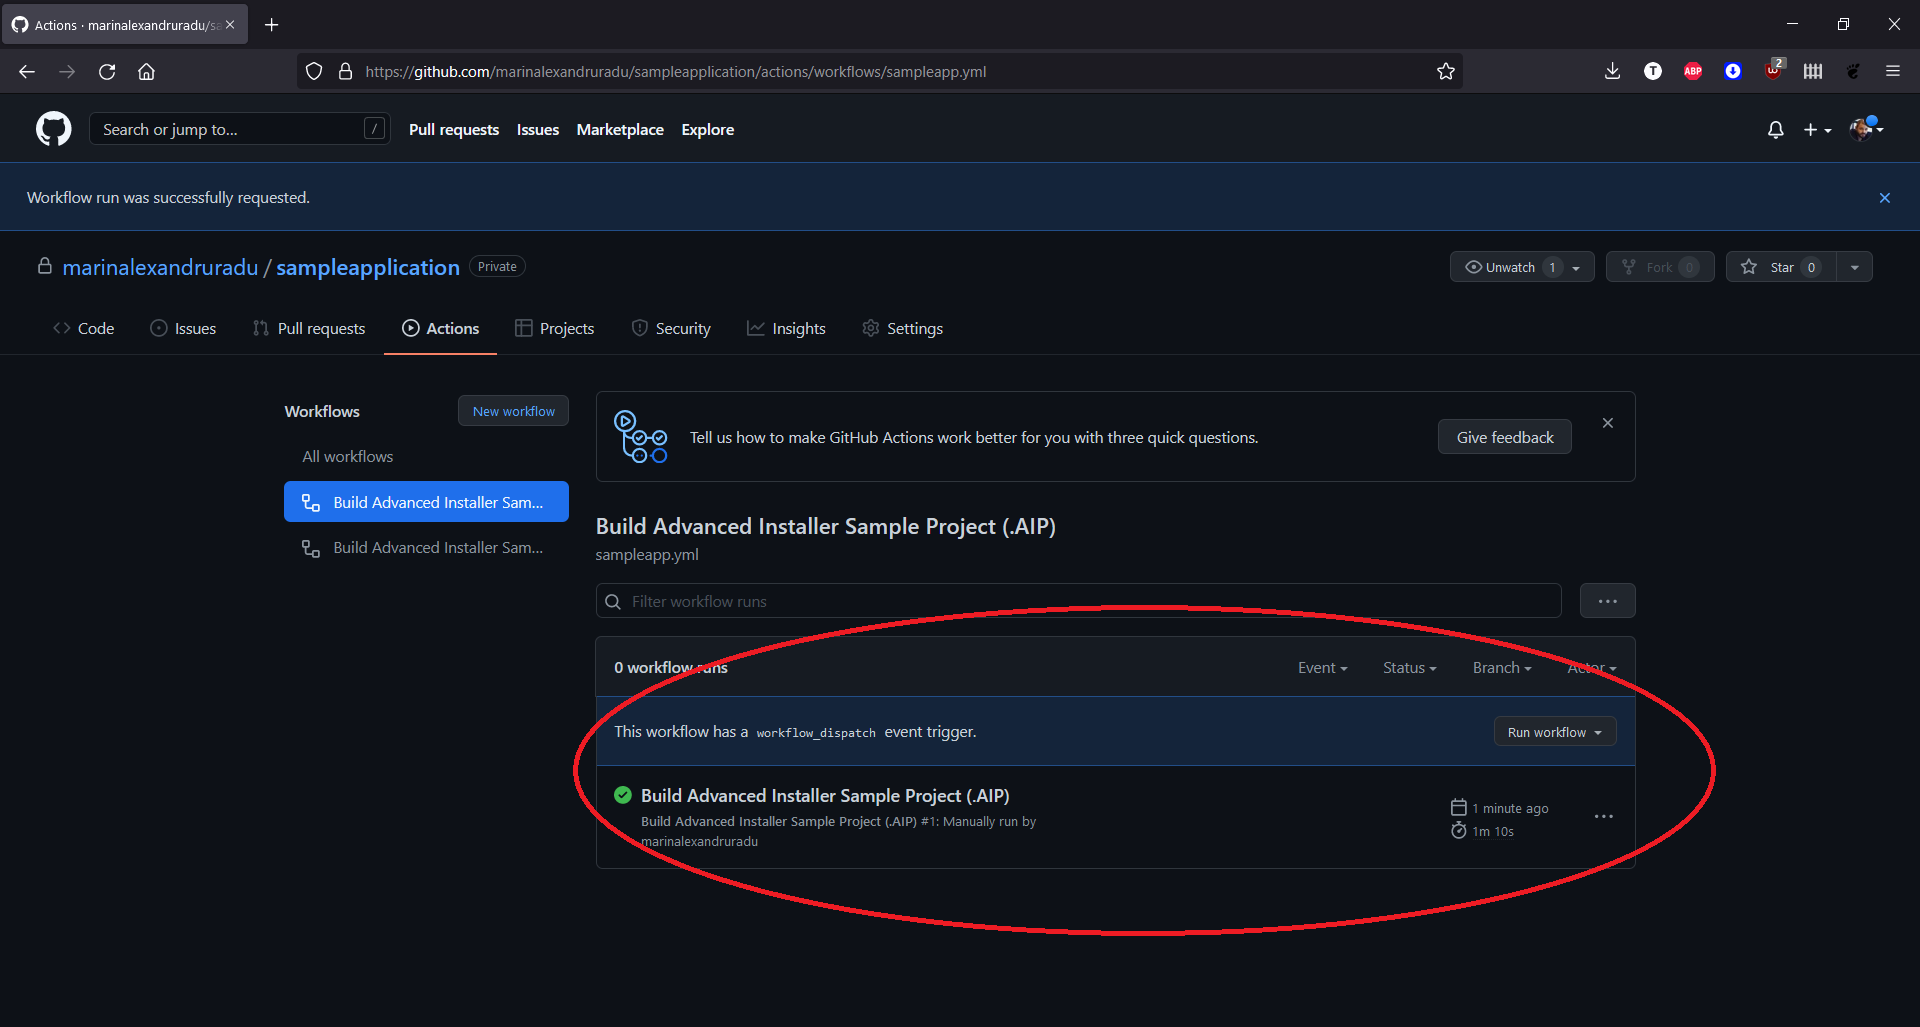
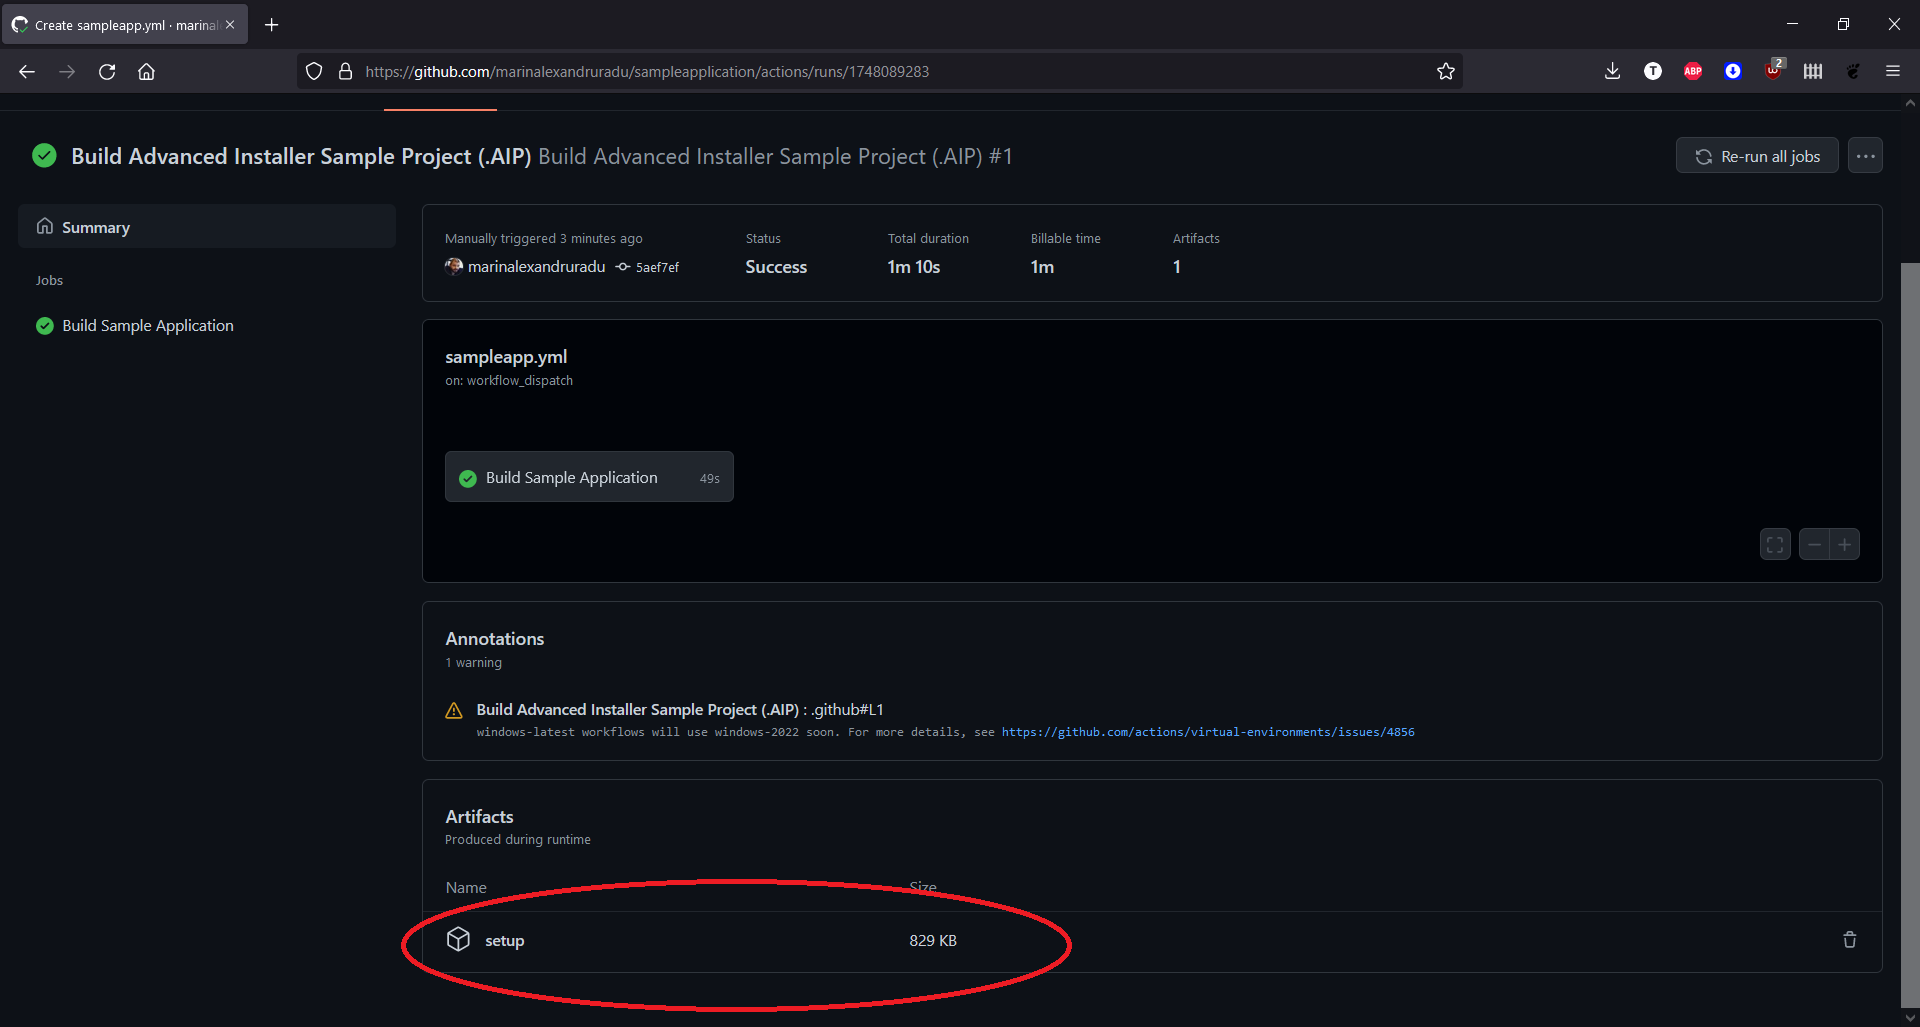
If you click on it, you should see the result, in our case the Setup.zip file. This contains the compiled MSI.
When you install the MSI with Advanced Installer, you will see the Product Version and additional Property that we parsed in the yml file to the builder.
Additional scenarios
The above tutorial is intended for building an MSI using the AIP project, but Advanced Installer supports multiple types of actions, automating PowerShell as shown in this example, or even building a Visual Studio Project (aiproj).
For more examples, check out our playground repository here.
We would love to hear your feedback! Tell us how to improve this action at support@advancedinstaller.com, or open a Github Issue.
On our website you can find a list with all the CI/CD integrations for Advanced Installer.
