Configuring the License Server
To use an Advanced Installer floating license you first need to install and configure the License Server. A running License Server is required when registering your copy of Advanced Installer.
1. Install the license server
The license server is part of Advanced Installer. You must download and install the entire application on your server machine. Just copying the license server files over is not enough.
2. Launch the configuration wizard
Launch advinstlicenseserver.exe from the /bin/x86 subfolder of the Advanced Installer install directory.
The license server configuration process requires Administrator privileges.
3. Set a port number
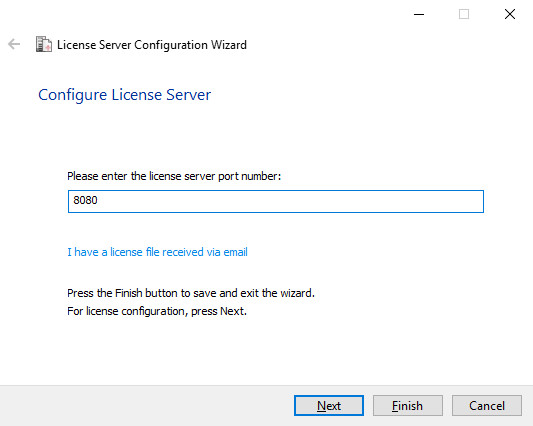
The first setting is the license server port number. It will be used by client Advanced Installer instances to connect to the server.
Set an unused port number in the appropriate field and press button.

The License Server Wizard will automatically check if the specified port is open. It will also configure the Windows Firewall to allow access to this port. If the port is blocked by an external firewall, an error message will be shown.
4. Specify your license key
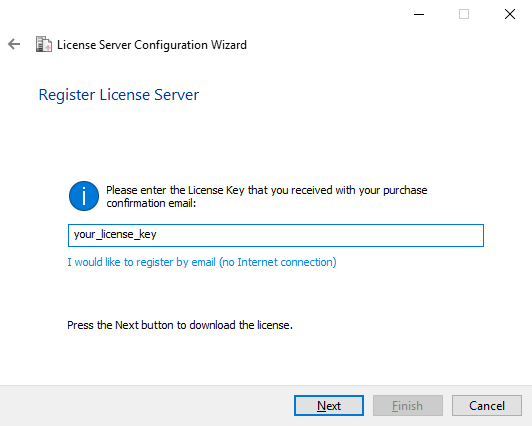
If your server machine has an active Internet connection, you can enter your License Key and press . The wizard will automatically download the license file and finish the configuration.
If no Internet connection is available, you can use the “I would like to register by email” option. We will require your Computer ID along with the License Key to generate and return you a license file.

5. Configuring the License Server from Command Line
The License Server could be also configured using Command Line, by calling our tool advinstlicenseservercli.exe from the /bin/x86 subfolder of the Advanced Installer install directory.
advinstlicenseservercli.exe requires Administrator privileges so it
must be run from an Administrator Command Prompt
5.1 The syntax for configuring the License Server is:
advinstlicenseservercli.exe /ConfigureLicenseServer <floating_license_id> <license_server_tcp_port>
Parameters:
- <floating_license_id> - The License key
- <license_server_tcp_port> - The License Server port number
5.2 The syntax for restarting the License Server is:
advinstlicenseservercli.exe /RestartLicenseServer [-stoppreviousservice]
Parameters:
- -stoppreviousservice - Use this parameter if you have a License Server of an older version of Advanced Installer running on your machine. This will stop the service associated with the old version of the License Server and will start the new version.
6. Configure the license server page
Access the license server page by going to http://[servername]:[port]/admin in your web browser.
Check the available registered licenses, add the computers that use them, and set the priority level of each computer.
Check "Log license incidents" to enable logging the license server. The log is created in %ALLUSERSPROFILE%\Caphyon\License Server\licenseincidents.json on your license server computer.

If one of your computers is a Build Server, or you just want to give priority to a
certain computer in case of a simultaneous request to use the license. you could set its
Priority Level to Build Server.
7. Limit access to the license server page
Limiting access to the license server page can be done by following these steps:
1. Create an empty JSON file in C:\ProgramData\Caphyon\License Server and name it accesslist.json.
2. Copy and paste the code below into the new JSON.
{
 "FormatVersion": 1,
 "AccessList": [
   {
     "Path": ["/admin", "/admin.html", "/getlicense"],
     "Deny": [],
     "Allow":[]
   }
 ]
}
3. Add the IPs of the computers that are allowed access to the license server page; if left empty anyone from your network can access the page.
"Allow":["11.0.0.1" , "11.0.0.2"]
To deny access to a few specific computers, add their IPs to Deny and leave Allow
empty.
FQDN (fully qualified domain name) is supported in Allow and Deny list. To obtain
the FQDN of a computer use ping -a <ip> command line.
Using FQDN can delay license acquiring from the server even when the access list is
not used. The FQDN resolve can be disabled from Admin panel
(http://[servername]:[port]/admin) by uncheking Resolve IP to
fully qualified domain name (FQDN) option.
8. Register using the license server
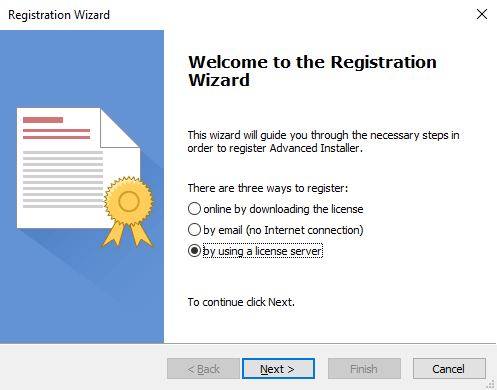
With a running license server, you can now register any Advanced Installer instance. Start Advanced Installer, access the “Help > Register” menu inside the application and select the “by using a license server” option.

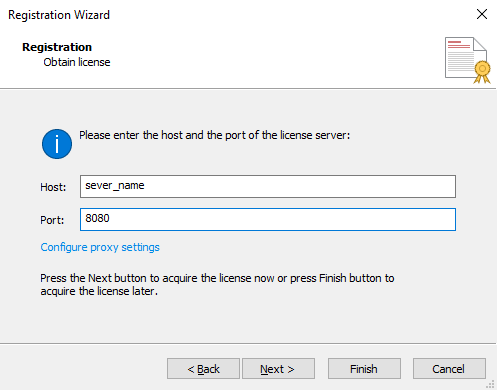
After specifying the license server host name and port number, you can click to finish the registration. Your current Advanced Installer instance will use one of the available license slots.

Once an Advanced Installer copy is registered with a license server, it stays permanently
registered. You don't need to re-register every time you edit a project.