Configuring SQL Connections for MSIX-Deployed Applications
Microsoft’s guidelines for MSIX packages introduced a new approach to app configuration, in contrast with the MSI package format.
For applications deployed through MSIX that require an SQL connection, users need to configure this connection at the application’s first launch, unlike MSI packages where it can be set up during the installation process.
This article outlines how to enable users to establish an SQL connection at the initial launch of a Windows Forms app deployed via an MSIX package.
Create the Application
Firstly, let’s create a sample Windows Forms app in Visual Studio:
- Go to File → New → Project.
- Select the Windows Forms App template from the list of templates.
- Set a name for the project and create it.
Create the Configuration Form
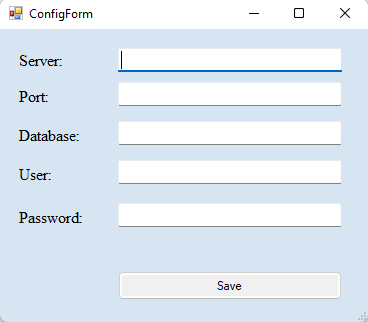
Once the project is created, the next step is to add a new form that allows the user to input their SQL connection settings. Let’s implement this by adding text fields for the server name, database name, port number, user ID, and password. Additionally, include a button for saving these settings.

Manage the SQL Configuration Settings
1. Check for Existing Configuration
Upon launching the application, it should first check if the SQL configuration string is already saved in the registry. If not, the application should prompt the user with the configuration form and remain unusable until these settings are completed.
static void Main()
{
    …
    if (!IsConfigurationSet())
    {
        ConfigForm configForm = new ConfigForm();
        if (configForm.ShowDialog() != DialogResult.OK)
        {
            return;
        }
        else
        {
            Application.Run(new MainForm());
        }
    }
    else
    {
    Application.Run(new MainForm());
    }
}
private static bool IsConfigurationSet()
{
    RegistryKey key = Registry.CurrentUser.OpenSubKey(@"SOFTWARE\Your Company\Your Application");
    if (key != null)
    {
        string connectionString = key.GetValue("SQLConnectionString") as string;
        return !string.IsNullOrEmpty(connectionString);
    }
    return false;
}2. Save User Input in the Windows Registry
After customizing the configuration form, add functionality to save the user’s connection settings in the Windows Registry. However, before saving, test the settings by connecting to the SQL server. Only save the settings if the connection test is successful.
private void btnSave_Click(object sender, EventArgs e)
{
    string connectionString = $"Server={txtServerName.Text};Port={txtPortNumber.Text};Database={txtDatabase.Text};UserId={txtUserId.Text};Password={txtPassword.Text};";
    if (TestSqlConnection(connectionString)) {
        SaveConnectionStringToRegistry(connectionString);
        this.DialogResult = DialogResult.OK;
    }
    else
    {
        // Display an error message or handle the failed connection
    }
}
private bool TestSqlConnection(string connectionString)
{
    try
    {
        // Attempt to open the connection
        return true; // Connection successful
    }
    catch
    {
        return false; // Connection failed
    }
}
 private void SaveConnectionStringToRegistry(string connectionString)
 {
     RegistryKey key = Registry.CurrentUser.CreateSubKey(@"SOFTWARE\Your Company\Your Application");
     key.SetValue("SQLConnectionString", connectionString);
     key.Close();
}3. Retrieve the Connection String
If the connection settings are saved in the registry, retrieve them to establish the SQL connection when needed.
string connectionString = GetConnectionStringFromRegistry();
    if (!string.IsNullOrEmpty(connectionString))
    {
       . . .
    }
private static string GetConnectionStringFromRegistry()
{
    RegistryKey key = Registry.CurrentUser.OpenSubKey(@"SOFTWARE\Your Company\Your Application");
    if (key != null)
    {
        return key.GetValue("SQLConnectionString") as string;
    }
    return null;
}Package the Application as MSIX
When the application is ready to be deployed, the next step is to create the MSIX package. For this, you can use the Advanced Installer extension for Visual Studio, available in the Visual Studio marketplace.
Explore the benefits of the Advanced Installer extension for Visual Studio.
Find it in the Visual Studio marketplace to enhance your app packaging experience.
For guidance on using the extension to create the MSIX package, refer to the steps in the following video:
Install and Test the Application
After creating the MSIX package, run it to install the application. The configuration form will appear on the first launch. Once you input the connection settings and the connection is successful, the application will be ready for use.
Conclusion
Configuring SQL connections at the first launch of MSIX-deployed apps, as opposed to during installation in MSI packages, offers a more flexible and user-friendly approach. This method ensures that users can easily manage their connection settings, enhancing the overall usability of Windows Forms apps.
Stay Updated
Don’t miss out on more useful guides and updates. Subscribe to our blog newsletter for the latest insights and tips in application packaging and deployment.
