Azure Virtual Desktop - Step by Step Guide of Creating, Configuring and Managing your AVD setup
Virtual Machines are not a new concept in the business world. In fact, companies are very familiar with services such as VMWare and Citrix to handle specific tasks, like giving users access to applications.
However, using these services could be pricey for large organizations given the limits that force them to use one machine per user.
When it comes to finding a well-suited solution for dealing with enterprise user access and applications, both virtual machines and app virtualization come to mind. They do, however, impose some limitations.
In this article, we will be showcasing your options, and going deeper into a solution that could be beneficial for enterprise environments: Azure Virtual Desktop.
Before we begin, let's see what the limitations are with app virtualization.
App Virtualization Limitations and How to Address them
App virtualization is a process that allows you to "virtualize" an app in the cloud so that you can quickly assign or remove apps from a user without having to install them on the OS. For example, VMWare provides a solution to this with VMWare App Volumes or ThinApp.
VMWare App Volumes, for instance, captures the applications in a VMDK file, which is later attached to a user account.
A VMDK (Virtual Machine Disk) is a file format for virtual hard disk drives.
If you browse in your Windows Disk Management tool after attaching a VMDK to a machine, you'll see it as a VHD alongside your other partitions.
In theory everything sounds great, but you encounter some limitations with this technology. Virtualized applications lack features like services or drivers, and can sometimes just simply not work in a virtualized container.
Another issue with this implementation is that the VHD is detached every time you reboot your computer, so you must reattach it when the user logs in again.Think of a scenario where a user has 15 or 20 assigned virtual apps to her machine. To attach them all, you must first download them to the user’s machine -- increasing the wait time and bandwidth usage.
Microsoft solves both of the above issues with Azure Virtual Desktop (AVD). It's all in the cloud, and it also offers great scalability with the Azure management system. Let's see what it's all about!
What is Microsoft Azure Virtual Desktop?
During the Microsoft Ignite event in October 2018, we got a quick tour of Windows Virtual Desktop (later renamed Azure Virtual Desktop).
Check the resource guide page Microsoft published on their website to find more about the Ignite presentation.
The Azure Virtual Desktop is an Azure service that allows you to manage your:
- VDI (Virtual Desktop Infrastructure)
- or RDSH (Remote Desktop Session Host) in the cloud.
An RDSH is a role in RDS (Remote Desktop Services). These kinds of servers are used to host Windows Desktops or applications accessed remotely by users.
Another thing that Microsoft announced is the multi-user Windows 10 experience which allows you to log remotely into Windows 10 multiple users.
As you might know, if you have Windows 10 running up your devices, there is a limit of one user, so either you use it physically, working at that computer, or you connect remotely into it.
With AVD on Azure in the Windows 10 Enterprise edition, you can now set up a multi-session Windows 10 deployment.
AVD (Azure Virtual Desktop) comes optimized for Office 365 continuous integration. However, Microsoft had challenges related to caching apps like Outlook, for example. These apps rely heavily on caching which was a major issue they had to address in non-persistent environments.
They addressed this with AVD, and now you can use your Office 365 easily and flawlessly as a virtualized app – withAzure AD identities as an authentication method.
As previously stated, AVD allows you to virtualize full apps and desktops, but most importantly, you can virtualize Win32 and modern apps with it.
Virtualizing Win32 and modern apps with AVD is a big improvement from what we have right now, because it increases the success rate of working applications.
Since this is an Azure service, it is a great scalable option to deploy and manage applications. In just a few clicks, you can create machines or scale down your organization by deleting multiple machines. Microsoft tried to make this as simple as possible.
What are the requirements for Azure Virtual Desktop?
1.The first and most obvious prerequisite for AVD is having a subscription to the Azure services.
2. Furthermore, you need to use the Azure Active Directory, or link your local Windows Server Active Directory environment to the Azure one.
There are two options when linking your current local Active Directory to Azure:1. ADDS (Active Directory Domain Services)2. Azure ADDS which can be turned on via the Azure portal
3. You will also need an Azure subscription with a virtual network that either contains or is connected to the Windows Server Active Directory.
The Azure virtual machines for Windows Virtual Desktop service must be Windows Desktop Machines that join the Azure AD using a stranded method or Hybrid AD-join method. It can’t be Azure AD-Join.
Microsoft teamed with Nerdio, an independent software vendor, to make AVD a success. Check out this page to learn more about ADDS and how you can configure it for your AVD.
4. You also need to have the valid licenses for your users and your servers.
Based on your Windows version, you need the following licences:
- For Windows 10:
- Microsoft 365 E3, E5, A3, A5, F1,
- BusinessWindows E3, E5, A3, A5.
- For Windows Server you need to have: RDS Client Access License (CAL) with Software Assurance.
You can find more information about the requirements in this article.
5. Once all the prerequisites are configured, note that the devices must be set as Standard domain-joined or Hybrid AD-joined – they only run on Windows 10 Enterprise multi-session and Windows Server 2016 OS images.
How do I create a Windows Virtual Desktop?
1. Create a virtual network
We need to create a virtual network for the machines we are going to use later on. To do this, perform the following steps:
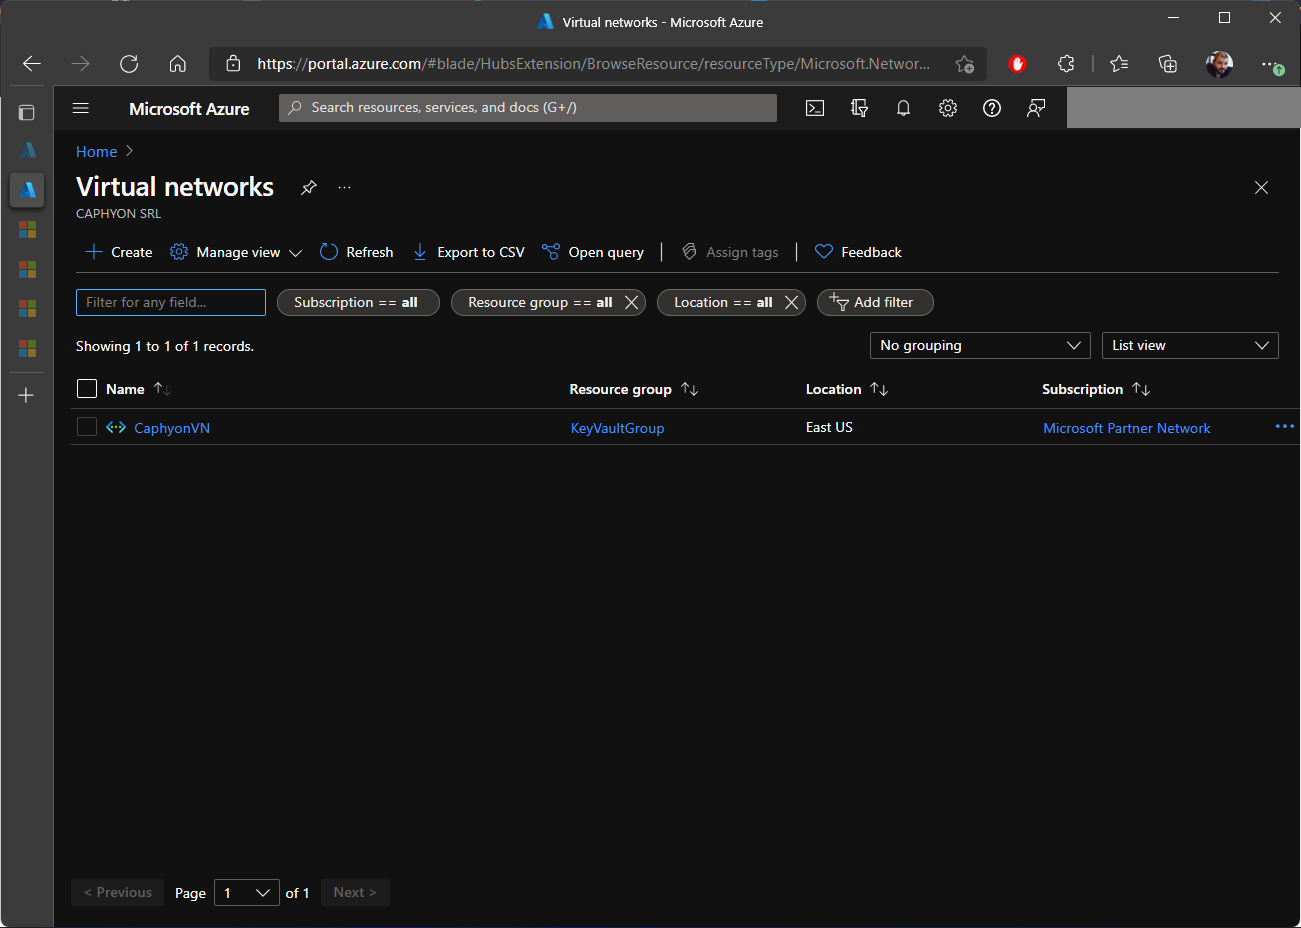
1. Open Azure Portal as an Administrator.
2. Search for Virtual Networks.
3. Click on Create.
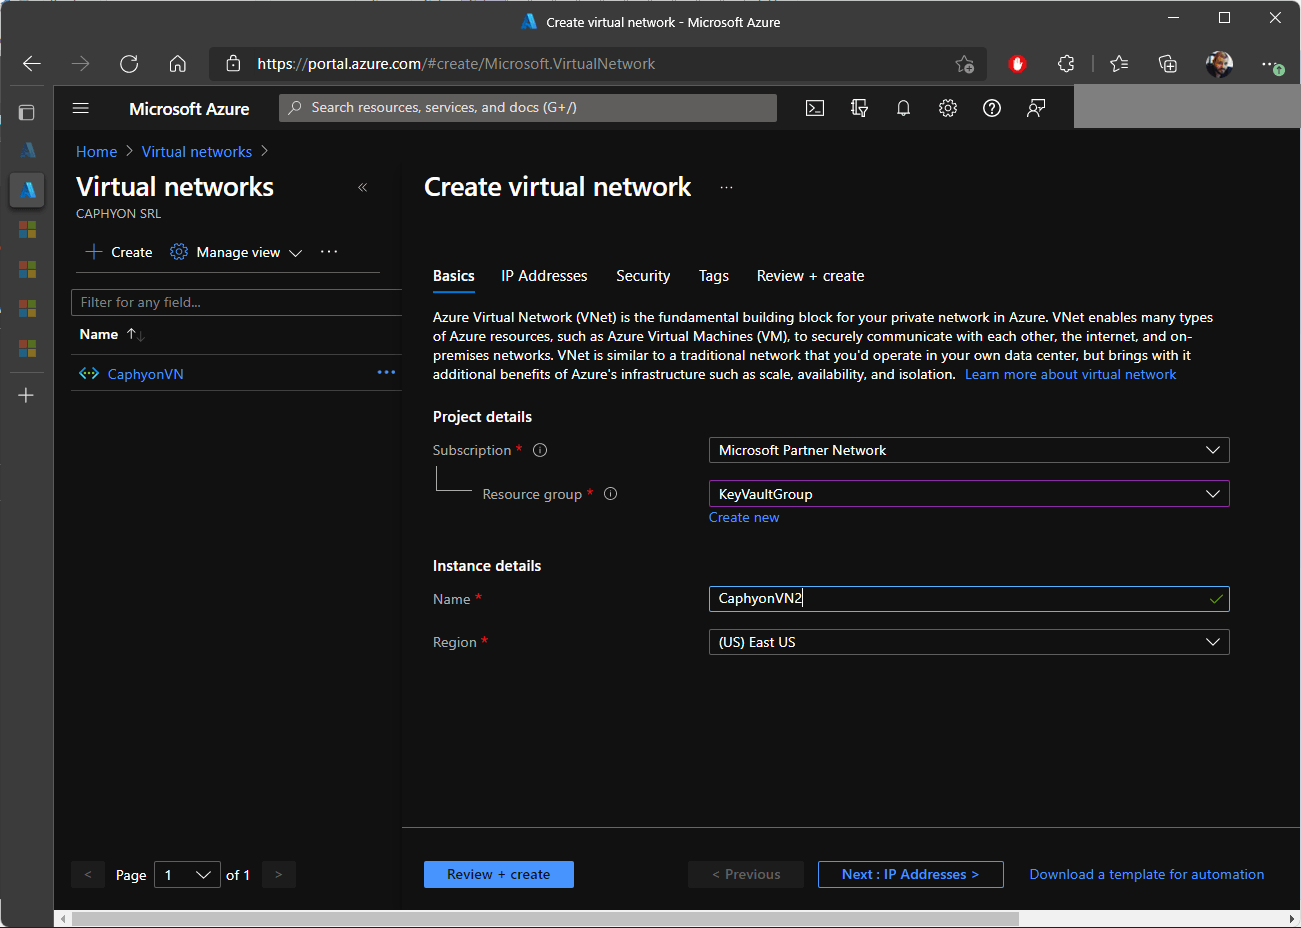
4. Select your subscription type and add the resource group that will have access to the network.
For more information about resource groups, check out How To Configure Azure Key Vault to Sign your MSIX Packages: A Step-by-Step Guide article.
5. Give a name to the virtual network and select the region.
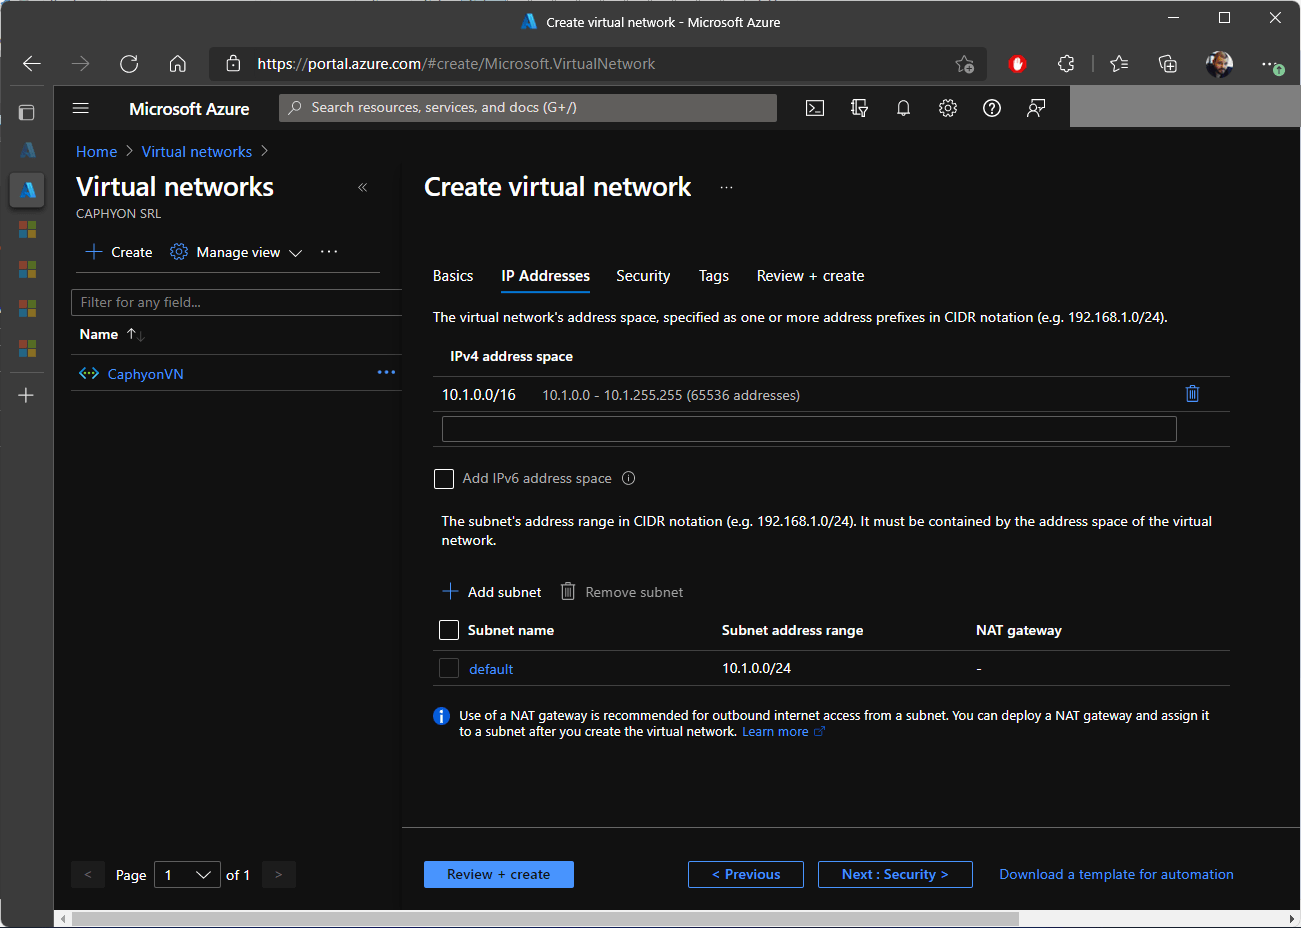
6. In the IP Addresses tab, leave everything as default.
7. Then, in the Security tab, disable any firewalls or DDos protections.
We are only doing this as a test. We would NOT advise this if you are going "efficient" with this setup.

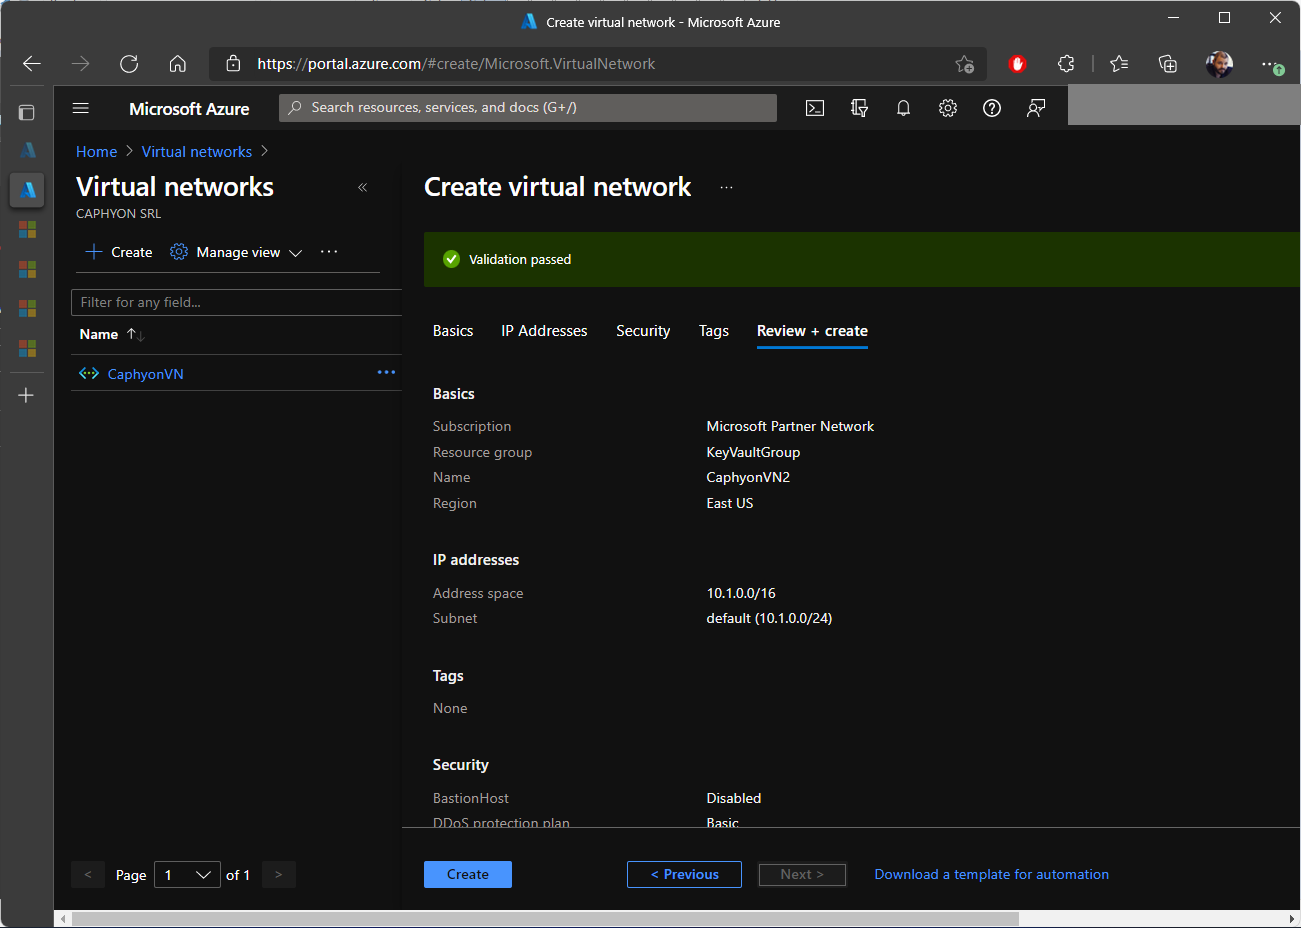
8. Click on Review + create.
9. After a few seconds, when the validation passes, click on Create.
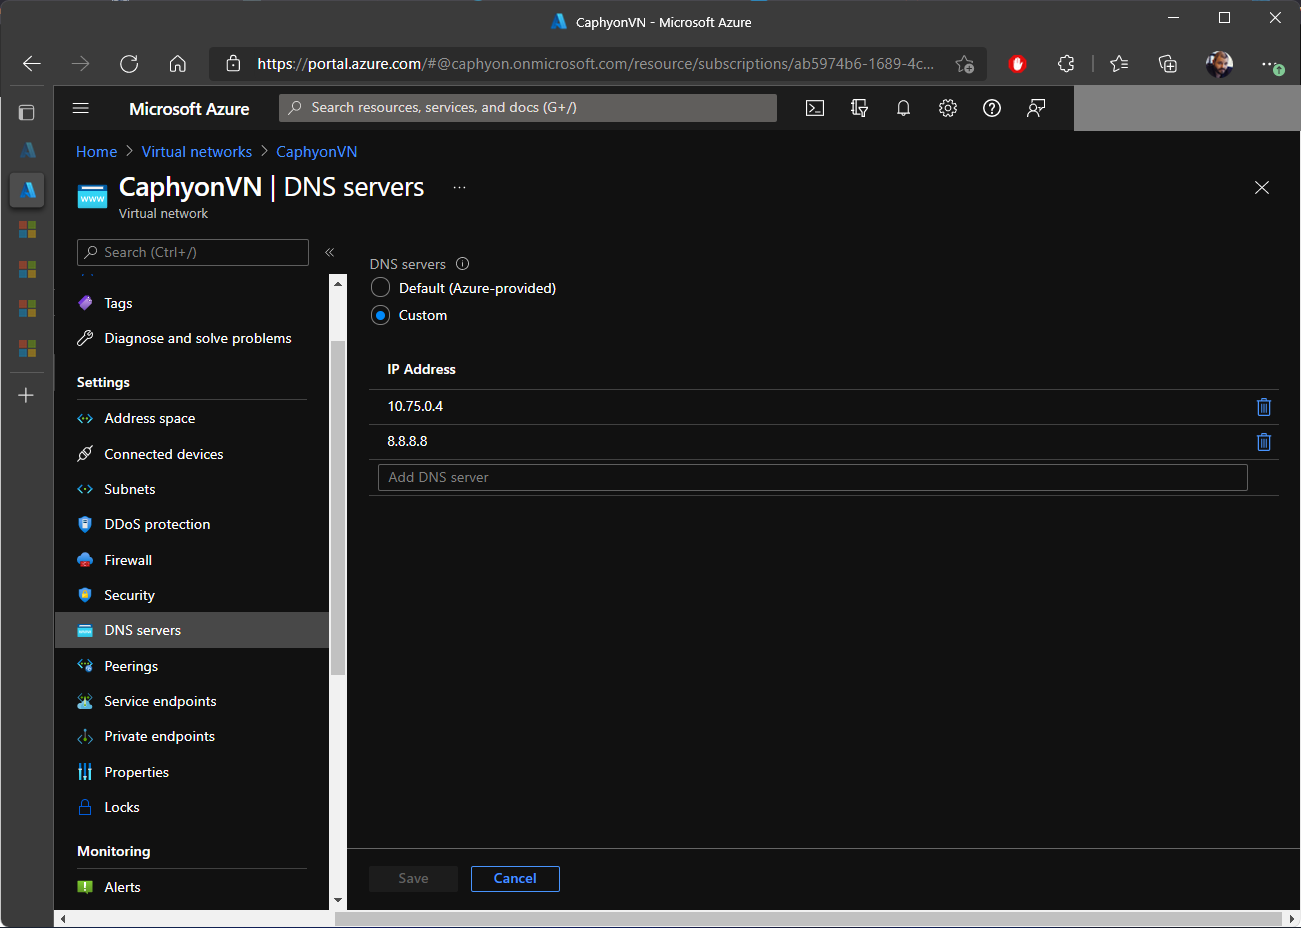
10. Select your newly created virtual network and navigate to DNS Servers. There, instead of leaving everything as default, we chose to add the following IP addresses: 10.75.0.4 and 8.8.8.8 (Google Default).
2. Create a host pool
After the virtual network is configured, we need to create a host pool for the virtual machines. To do this, perform the following steps:
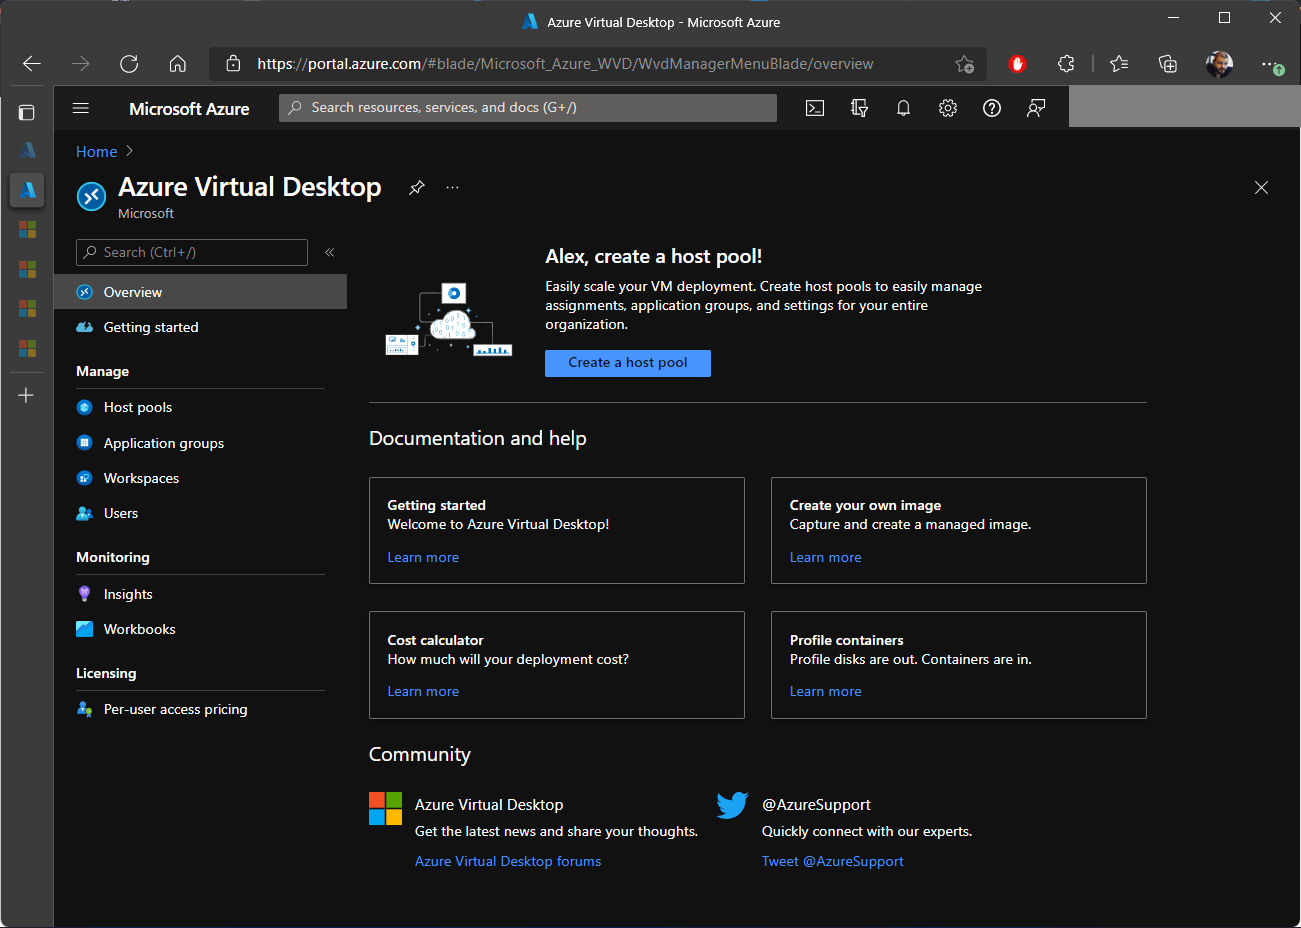
1. In Azure Portal, search for Azure Virtual Desktop.
2. Click on Create a host pool.
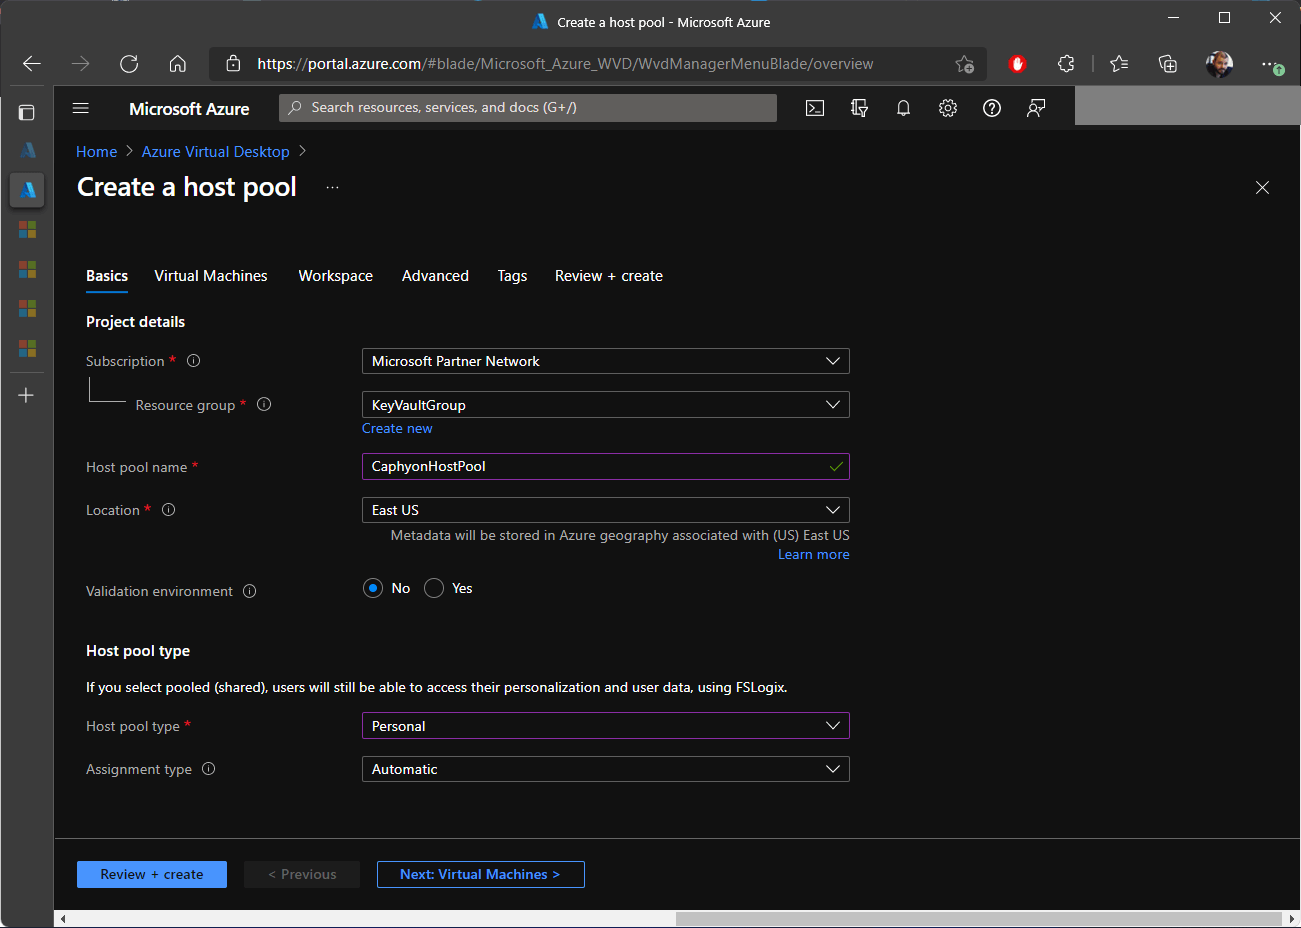
3. Select your subscription and choose the resource group you previously added for the virtual network.
4. Add a host pool name and location.
5. Under the host pool type, select personal.
6. The assignment type should be set to Automatic.
7. Click Next.
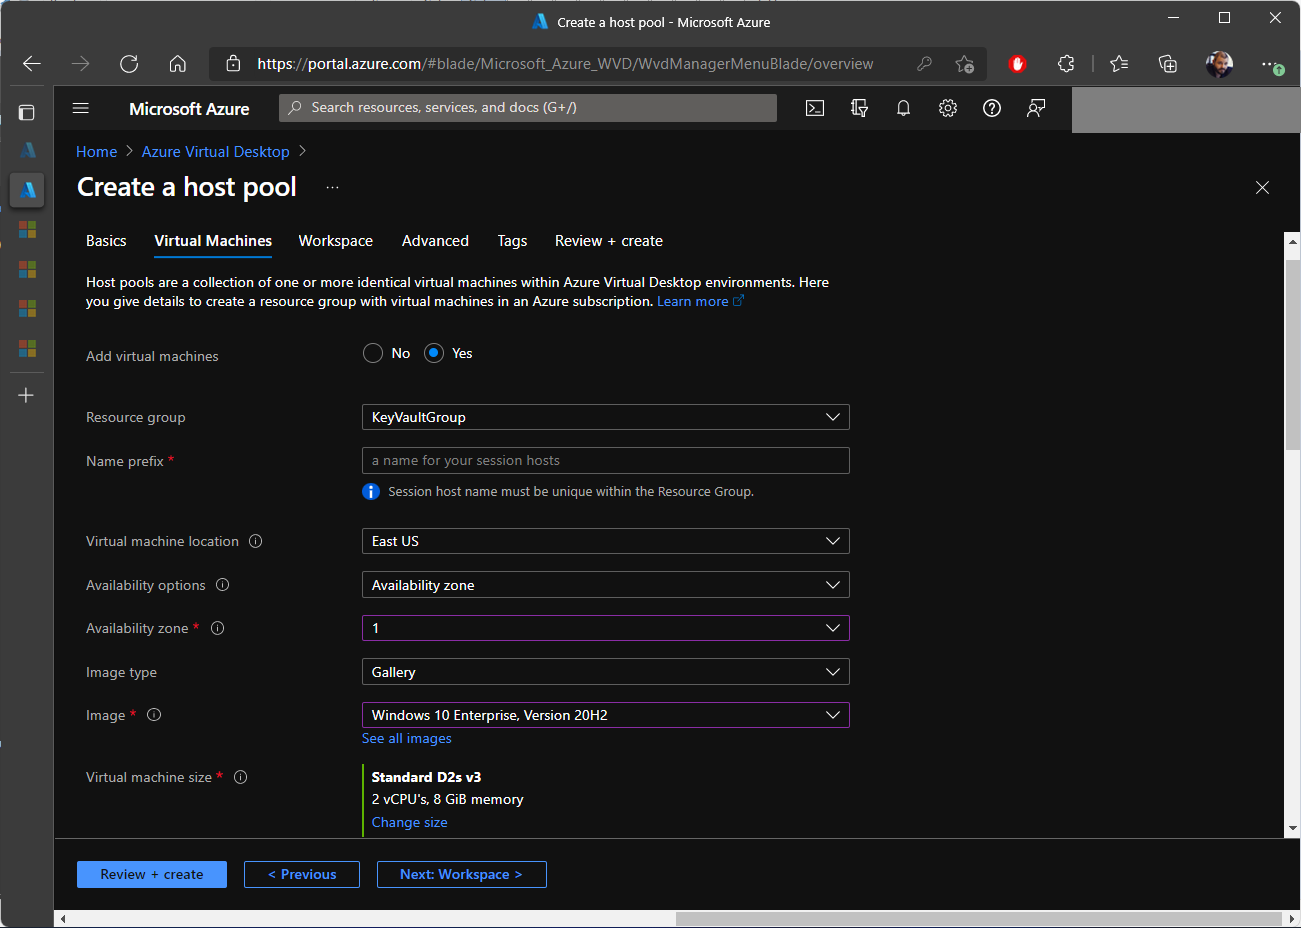
8. In the Virtual Machines tab, select Yes to add a virtual machine.
The resource group should be the same one we used above. Configure the machines as you wish at this step. We went for the availability zone 1 and the latest version of OS ( Windows 10 Enterprise version 20H2 at the time we're writing this).
9. You can add as many machines as you want in this step. We only added one and left everything else to standard.
10. Under the Network and security, make sure to select the previously created Virtual Network. No other network configurations are necessary.
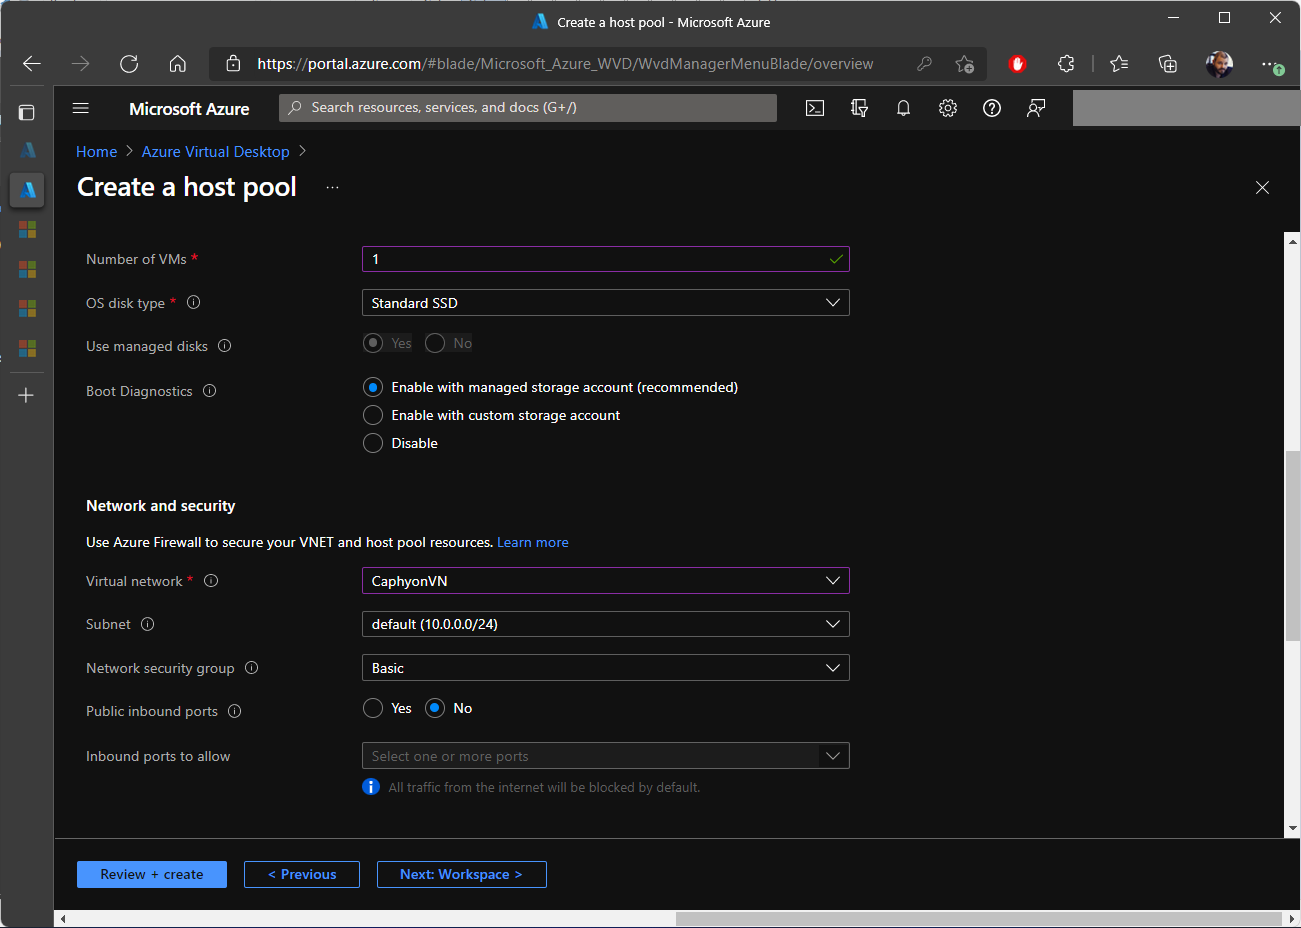
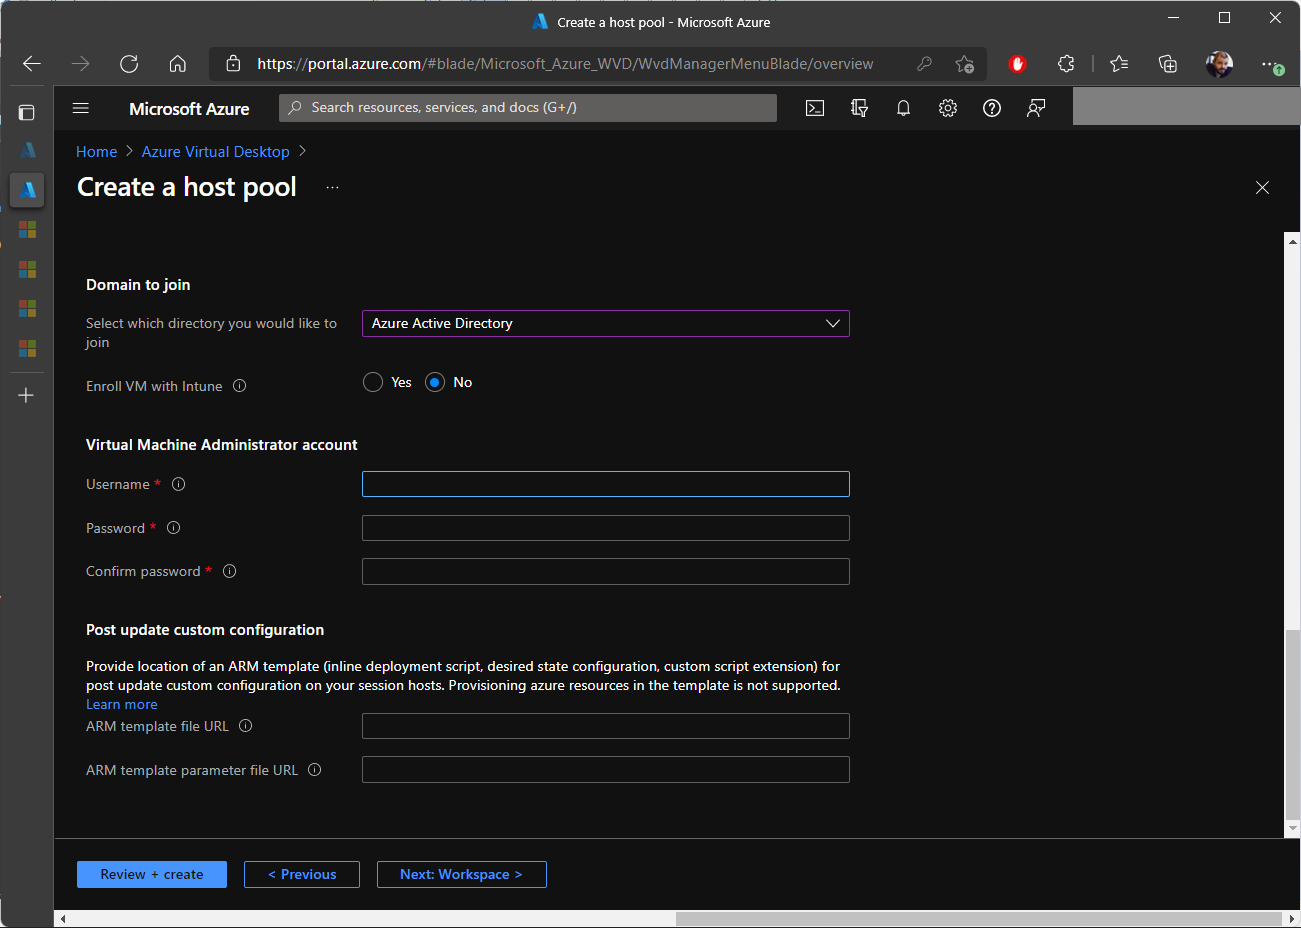
11. In our case, we don’t have a separate AD site, so we chose to join with the Azure Active Directory. We also went with the option to not enroll the VM with Intune.
12. As a last step in this tab, create an administrator account so you can access the VM.
13. Click Next.
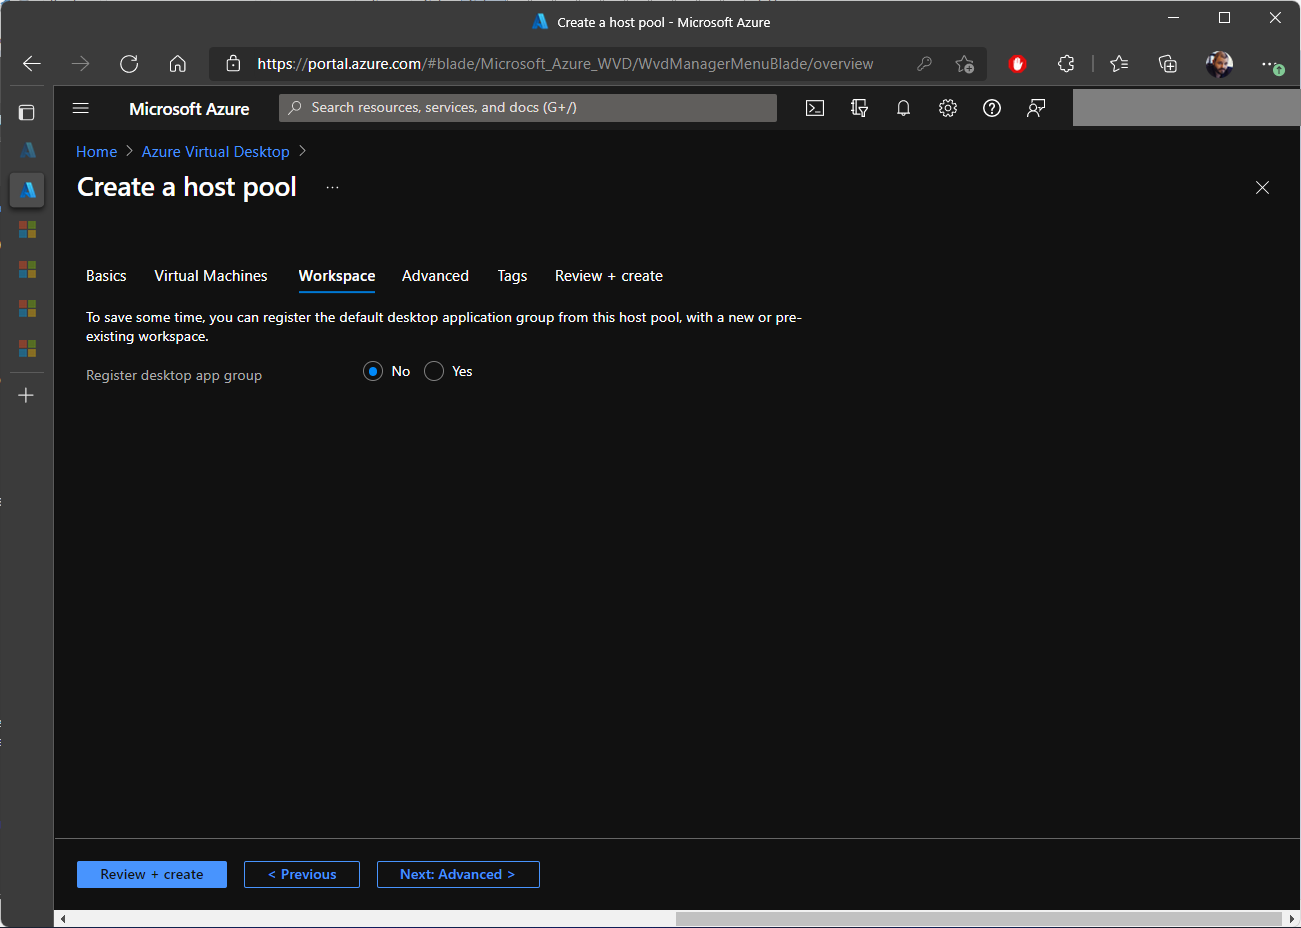
14. We don’t want to Register desktop app group yet, so leave it as NO.
15. Click on Review + create.
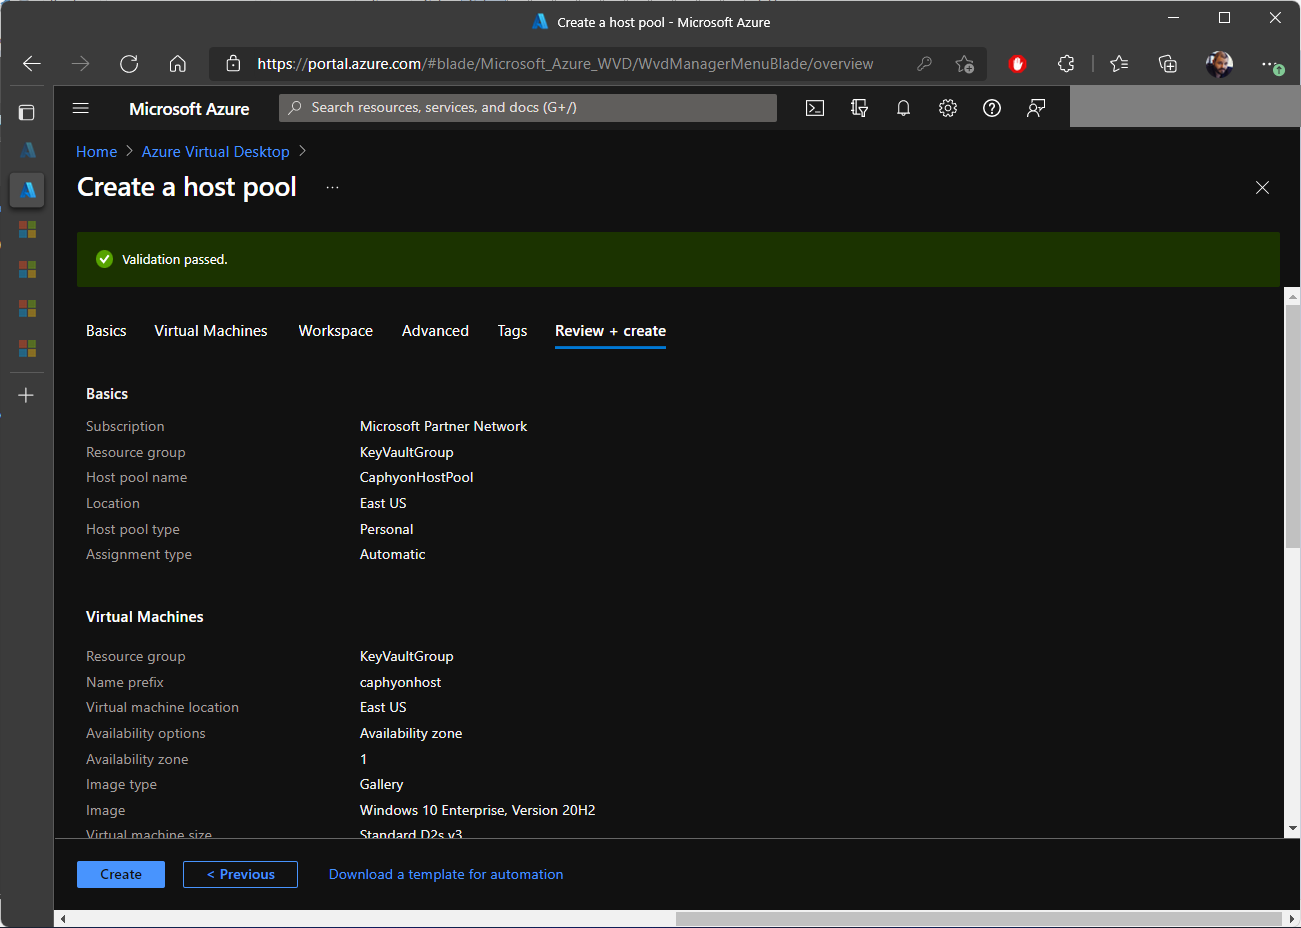
16. After the validation is passed, click on Create.
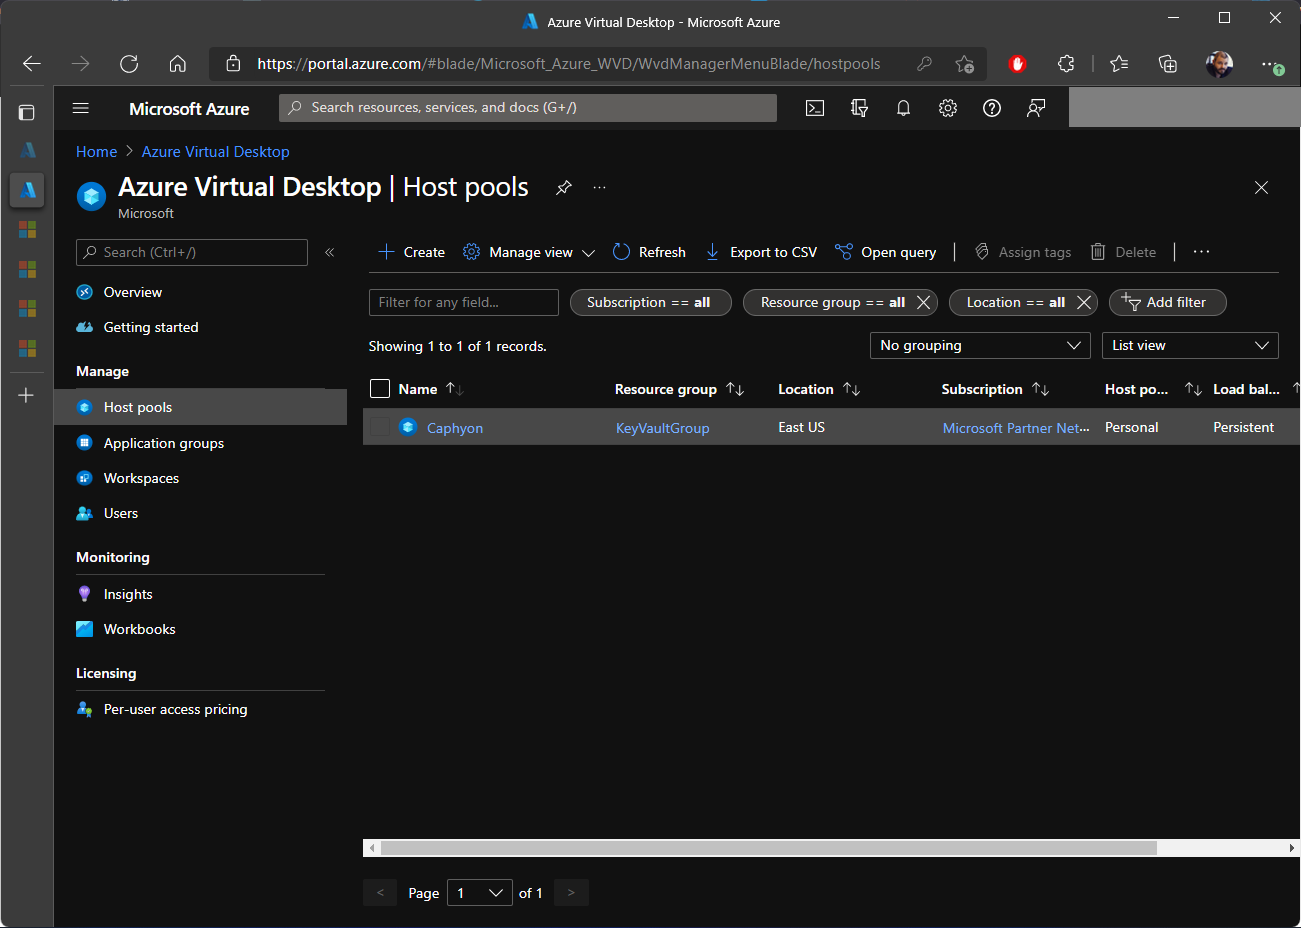
17. The creation will take a while, but at the end, you should be able to see the host pool under Azure Virtual Desktop.
3. Assign users to the Windows Virtual Desktop Applications group
After we created the host pool, it’s time to assign Active Directory users to the application group. To do this, perform the following steps:
1. Navigate to Azure Virtual Desktop.
2. Click on Application Groups.
3. An application group was created automatically when we created the host pool.
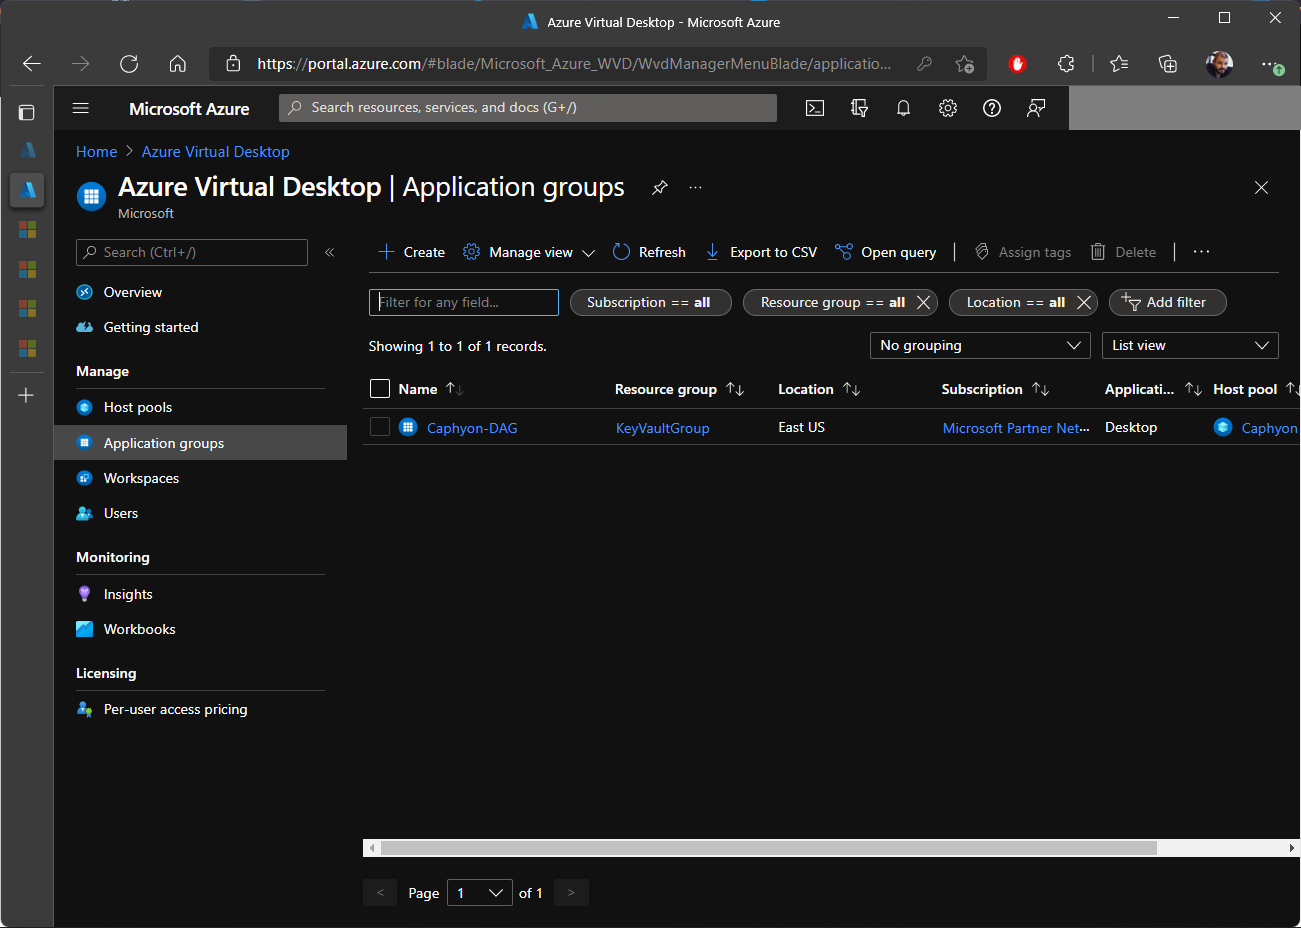
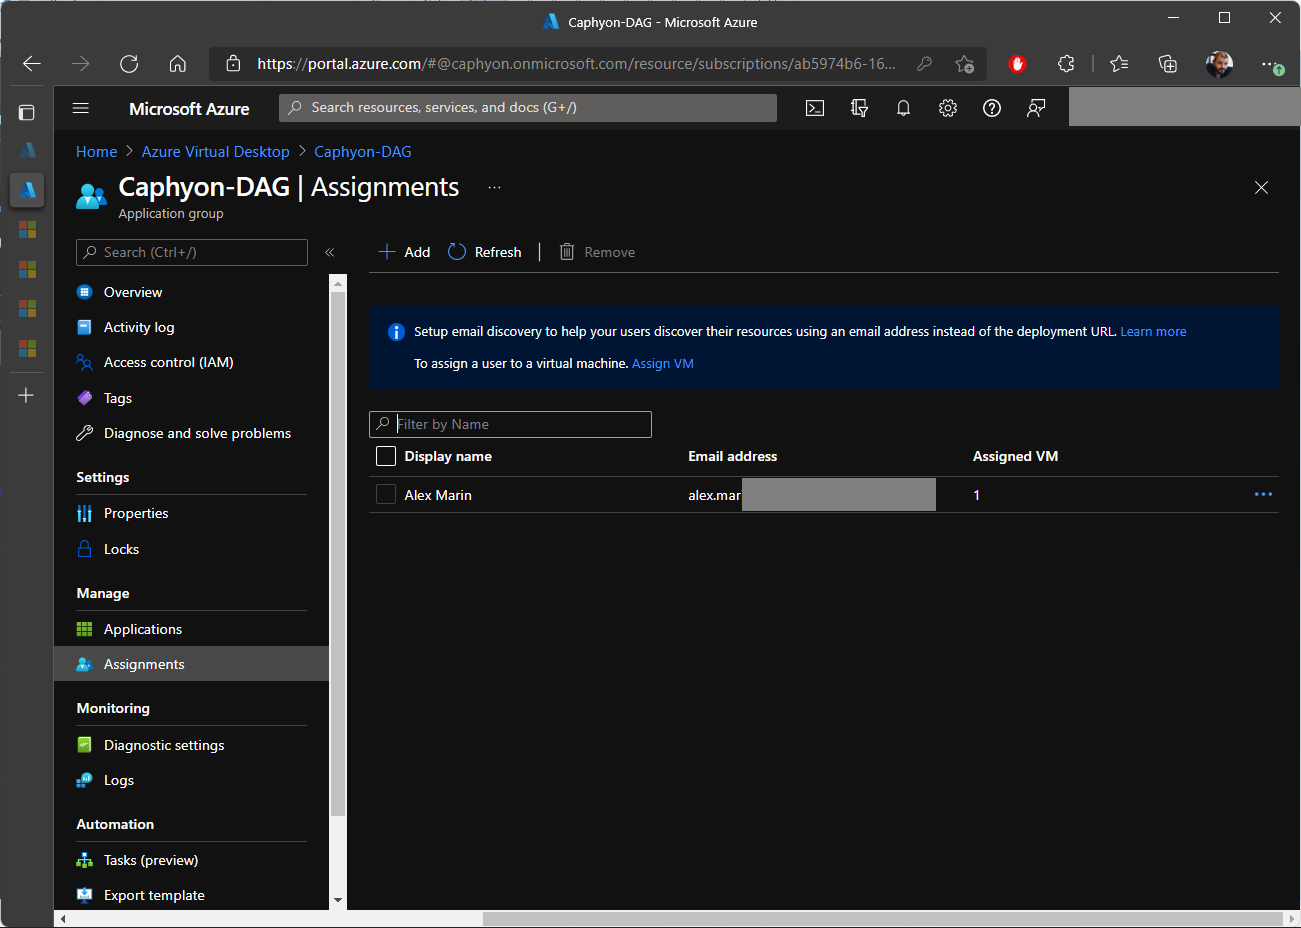
4. Select the application group and navigate to the Assignments tab.
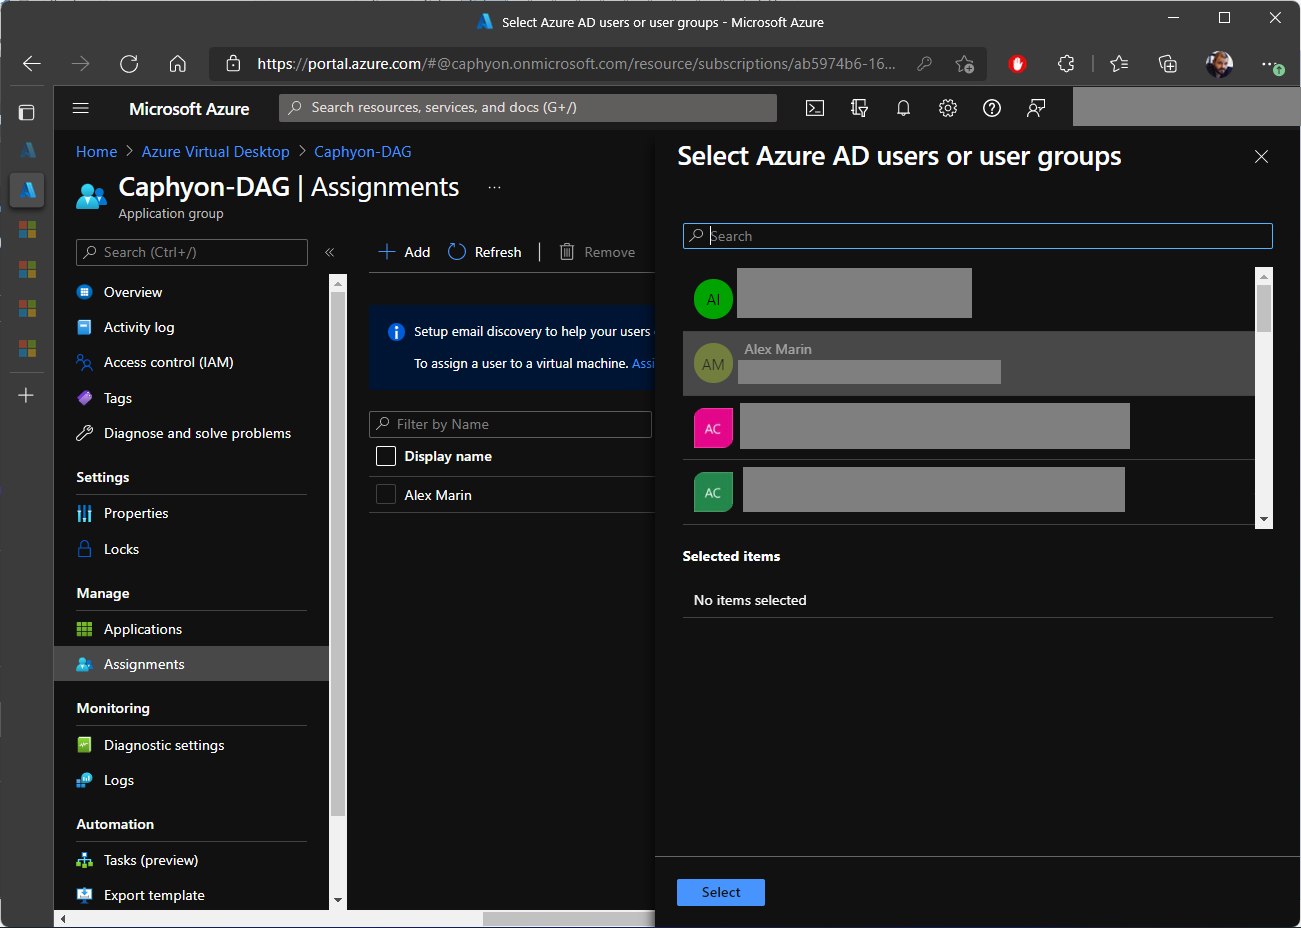
5. Click Add and select the users/groups that will have access to Windows Virtual Desktop.
4. Setup the Windows Virtual Desktop Workspace
The final step is to create a workspace and publish the application group there. This is where users will be able to connect to. Follow these steps to accomplish this:
1. Navigate to Azure Virtual Desktop.
2. Select Workspaces.
3. Click on Create.
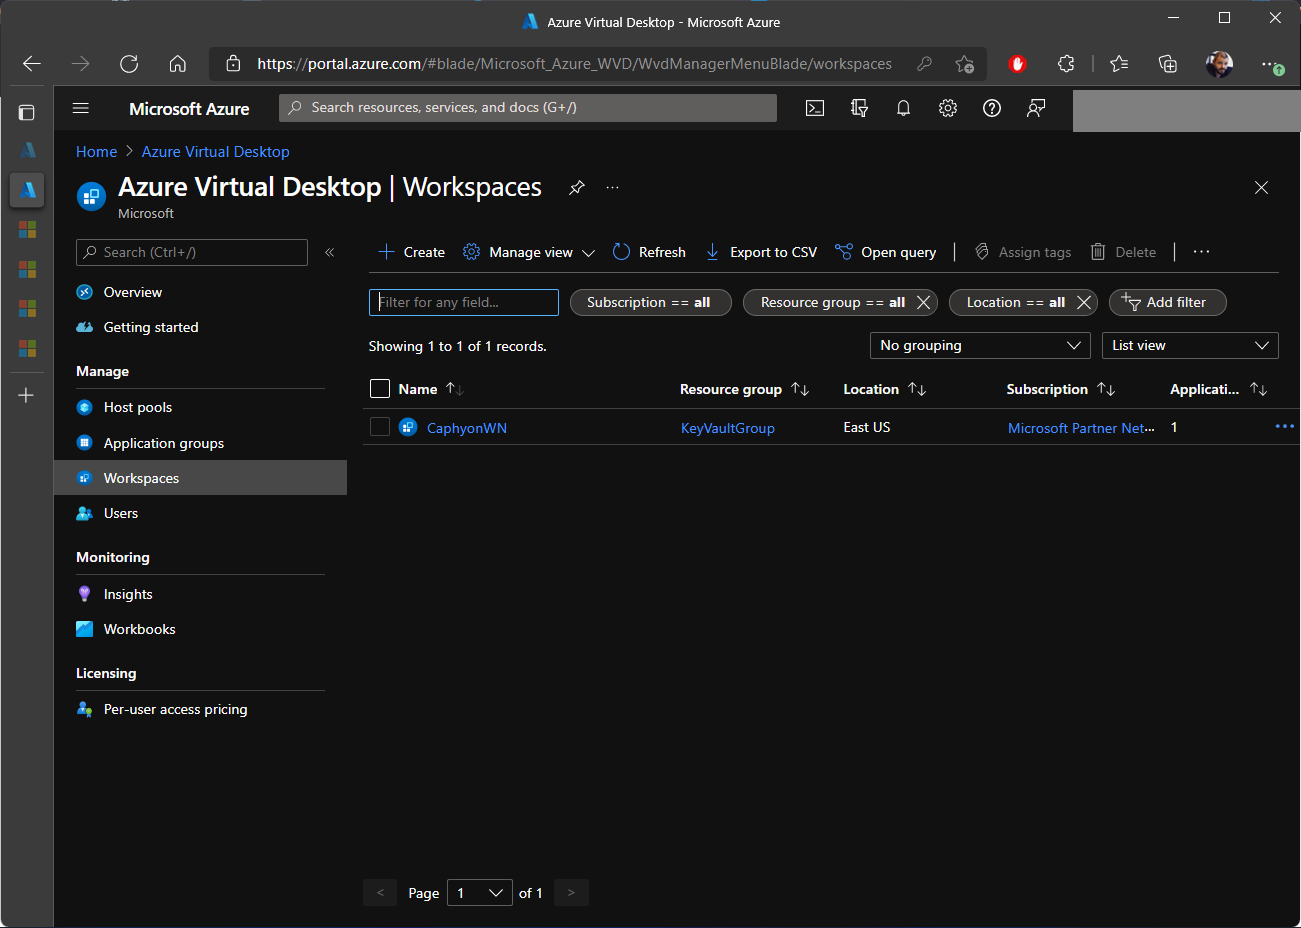
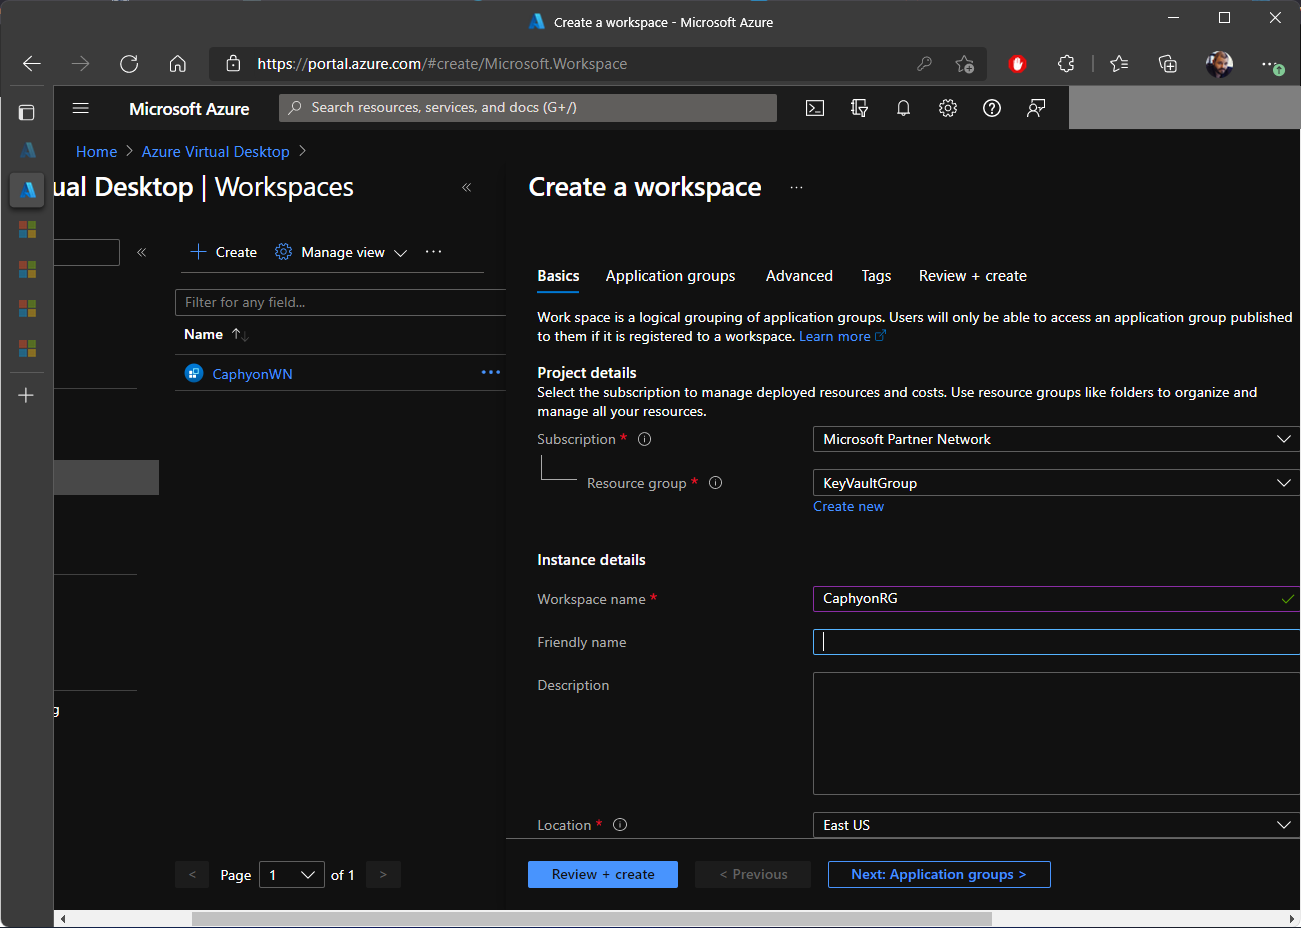
4. Select the subscription and make sure to choose the same resource group we have been using.
5. Add a Workspace name and the Region.
6. Click Next.
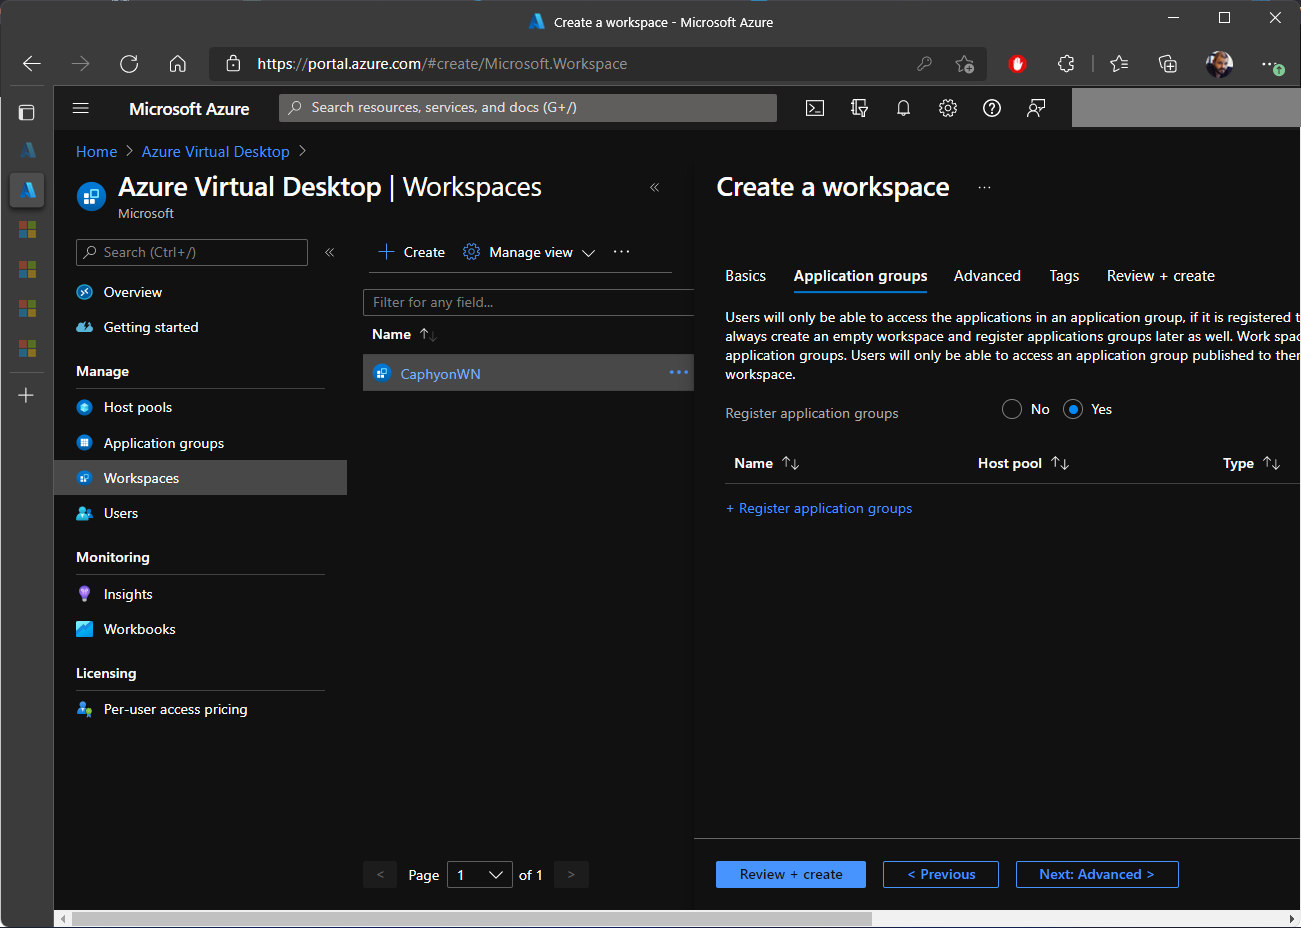
7. Under the Application groups tab, select Yes to register an application group, and pick the application group that was automatically built when we previously created the Host Pool.
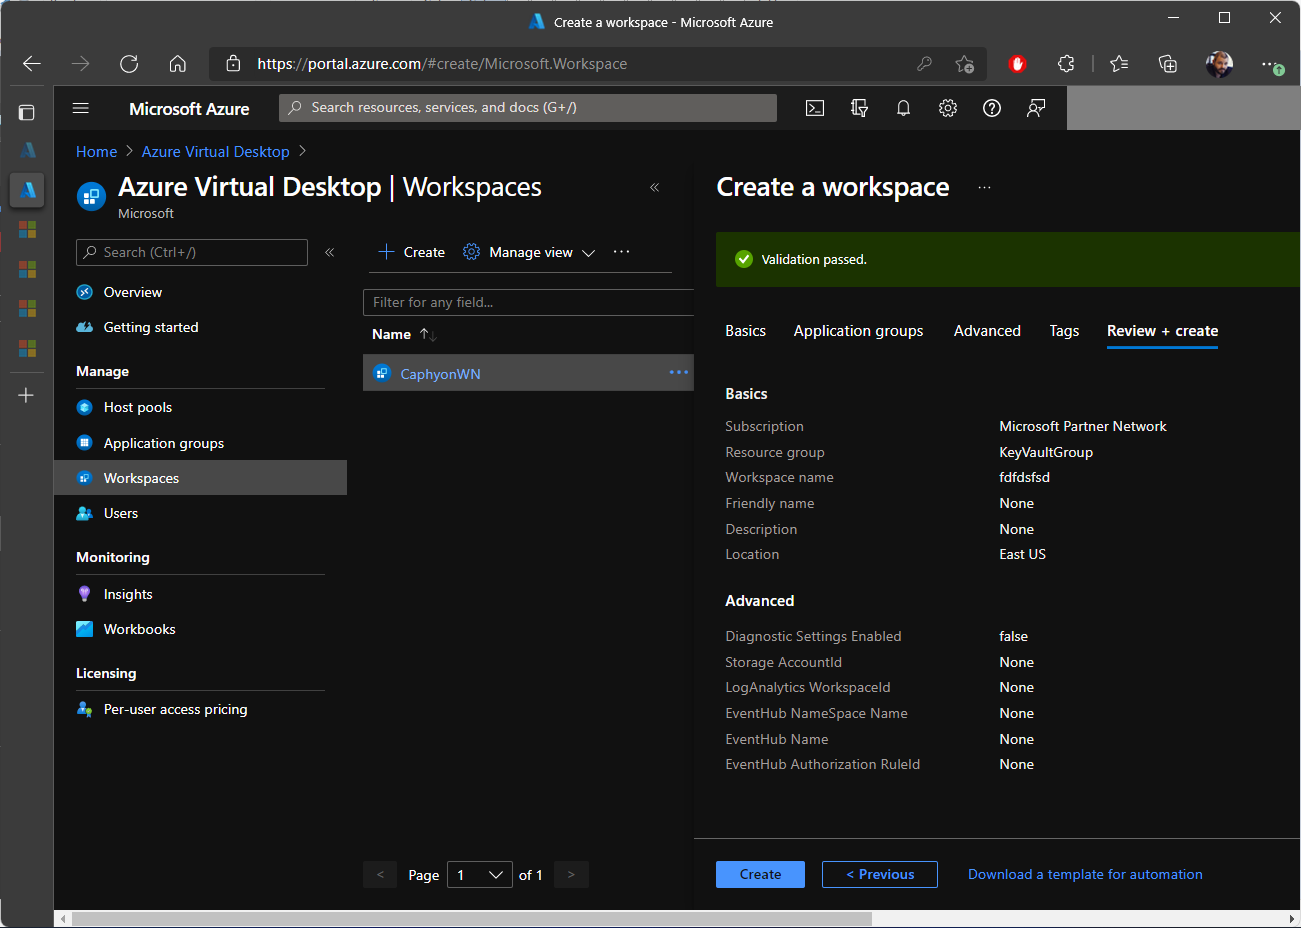
8. Click on Review + Create.
9. After the validation has been passed, click on Create.
5. Connect to the Azure Virtual Desktop
To connect to the Azure Virtual Desktop, use the following link:
https://rdweb.wvd.microsoft.com/arm/webclient
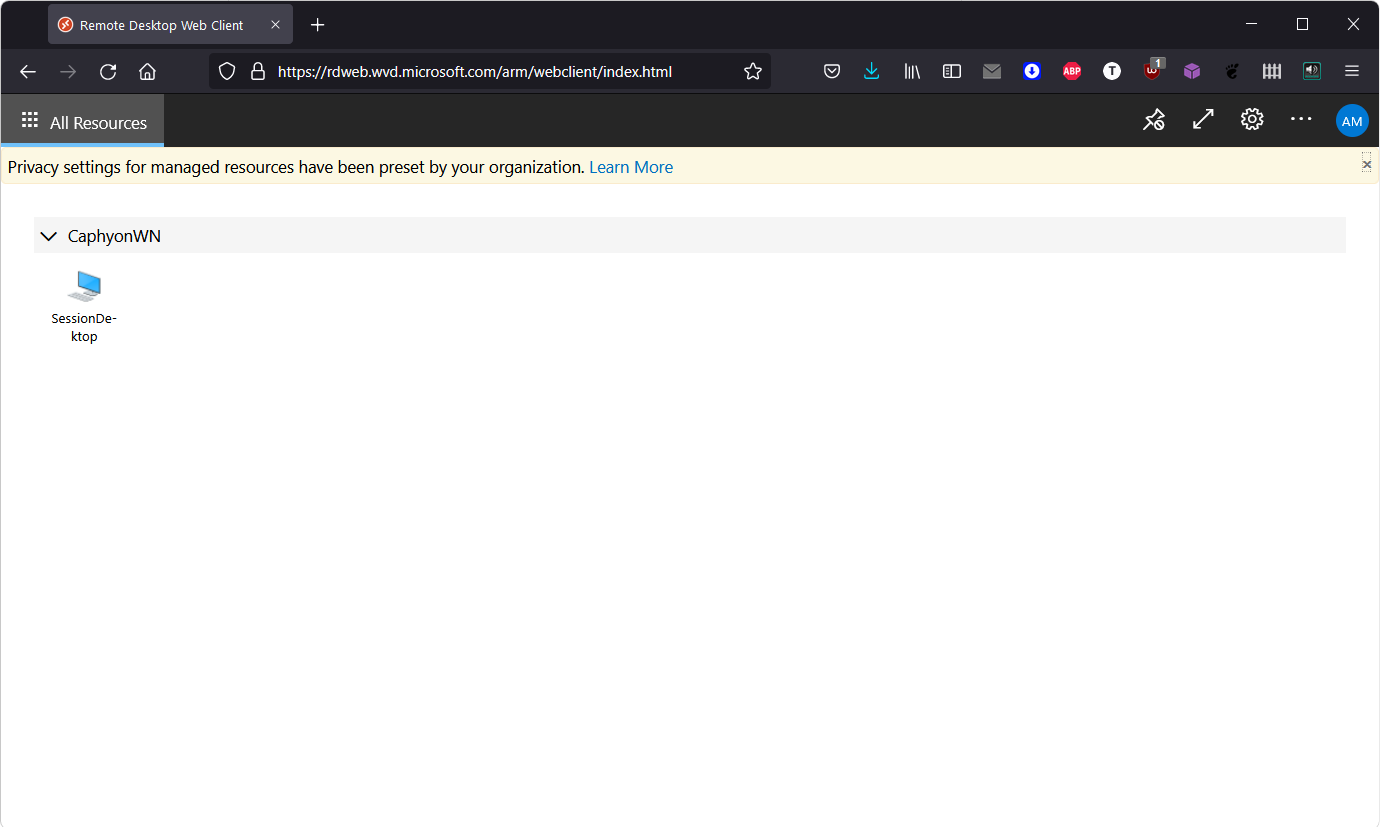
Once there, login using your Azure account. You should see a session desktop under the workspace we previously created:
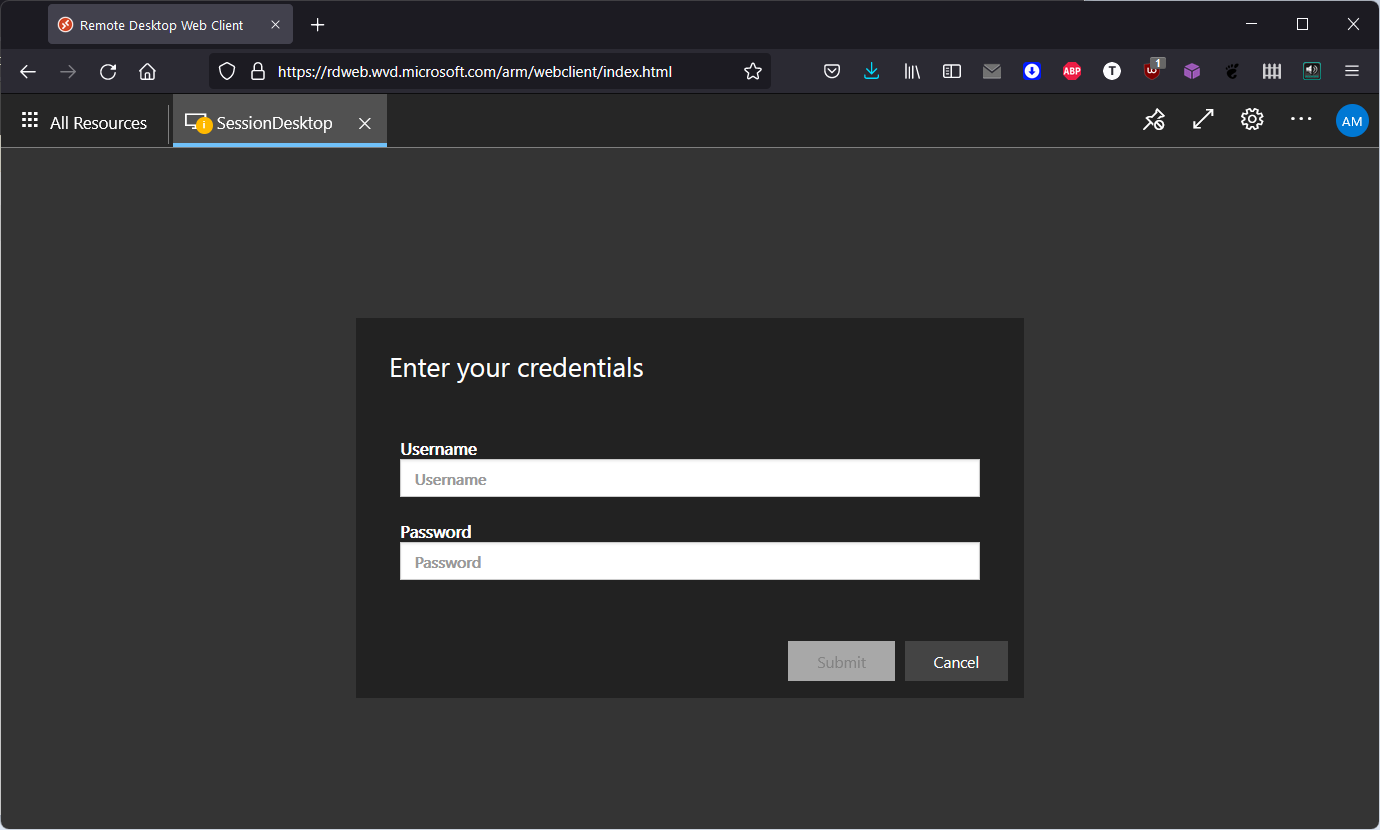
If you click on it, it will prompt you to input an username and password. This can be either your Azure account (if it has been added in the permissions list earlier), or you can use the administrator account we previously created.
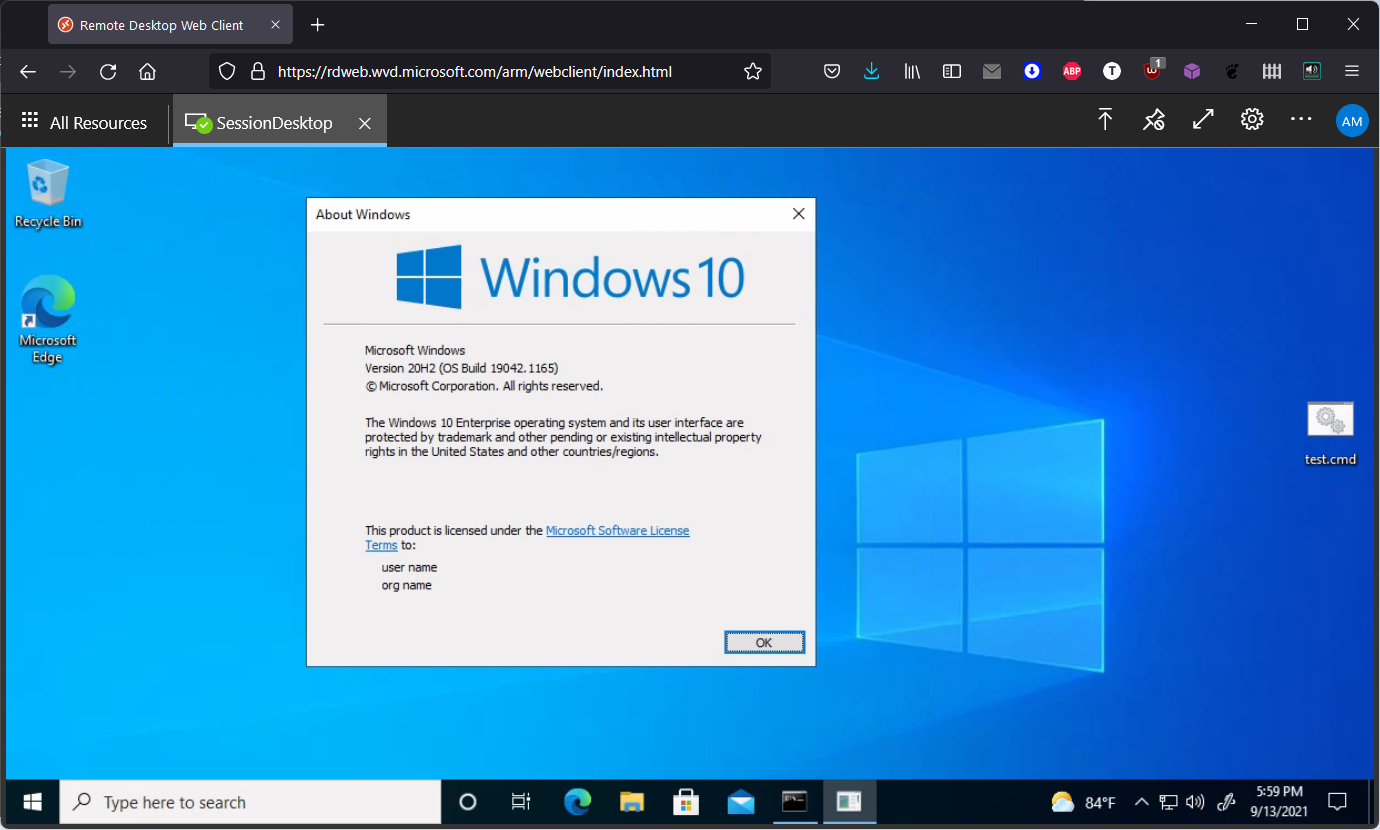
Once logged in, we should have a functional Windows 10 machine with 20H2:
How do I manage Windows Virtual Desktop?
By default, the full desktop experience is provisioned for the users you previously added when you created the AVD. However, you may wish to add specific programs, remote apps, or remove the desktop capability, among other things.
With REST APIs or Powershell, Microsoft allows you to customize and manage these types of settings.
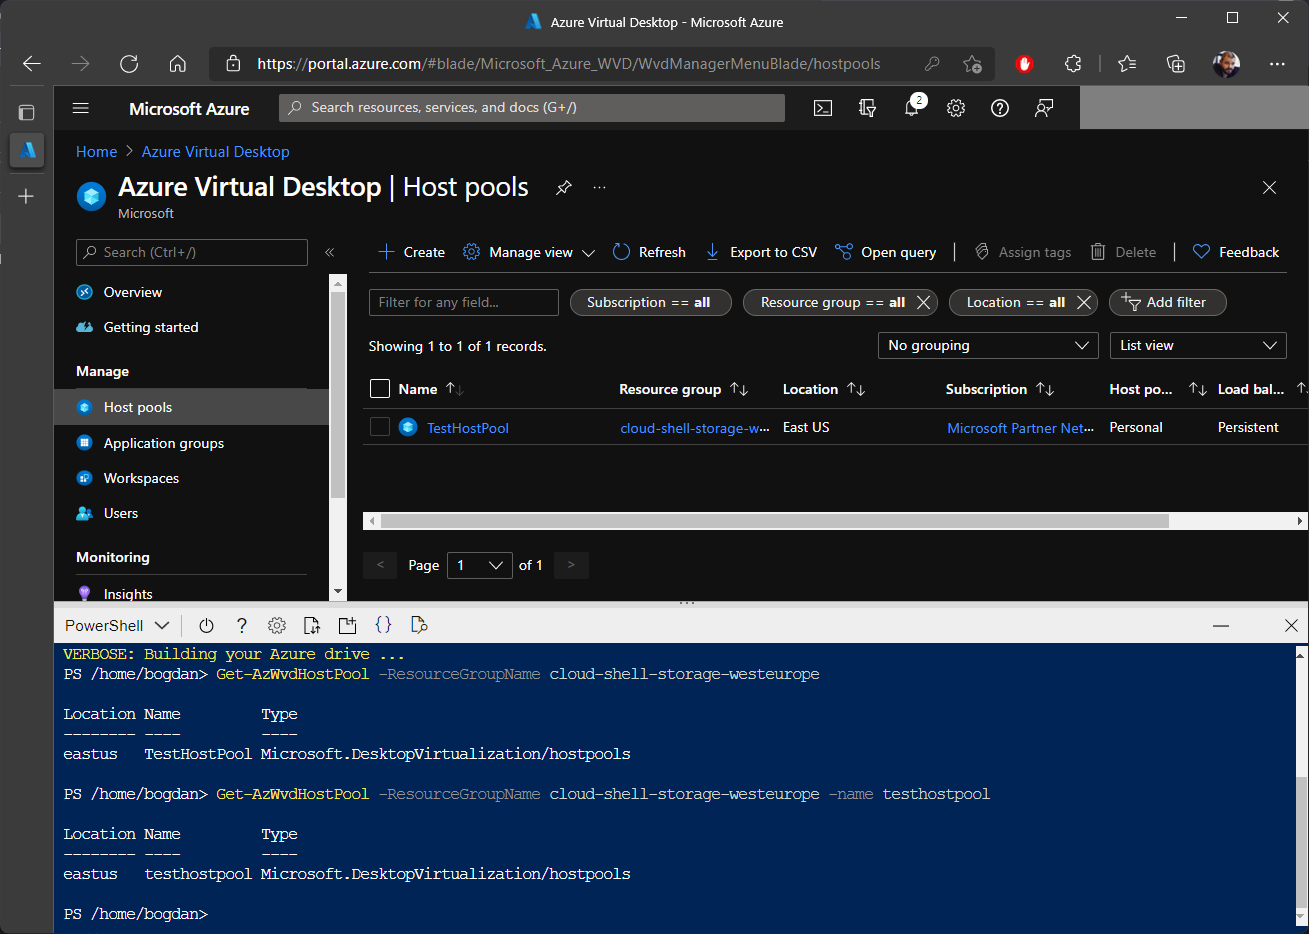
As an example, we can query the previously created resource groups and host pools using the following PowerShell cmdlet:
Get-AzWvdHostPool
You can find the full list of available PowerShell cmdlets here.
Conclusion: What are the PROS and CONS for Windows Virtual Desktop?
Since AVD is still a relatively new service, this is an early question to ask, but let us highlight some of the benefits and drawbacks we've discovered.
What are the PROs of Azure Virtual Desktop?
One of the most significant advantages of AVD is how fast you can set up your infrastructure. Keep in mind that you have to do the following before this choice became available:
- Get a physical server to install everything
- Install the Windows Server
- Install Roles
- Connect the Roles to the internet
- Domain join the roles
- Expose one of the domain joins to the internet
- Configure your settings
- And much more
This is just a shortlist of what you had to do in order to have something similar to the AVD. And this could take days or weeks to set up. With AVD this is done in a couple of clicks and it takes up to half an hour.
Another benefit that we noticed is how easily you can expand or scale down your infrastructure (for example add more resources or configure the users, etc).
Another advantage of AVD is the user experience that Microsoft showed in the demos, and how quickly and seamlessly everything works and looks for the user. This is a topic that we must keep an eye on in the future.
What are the CONs of Azure Virtual Desktop?
Let's start with a subjective CON that depends on your type of business. Some businesses prefer to have local management of the infrastructure instead of using cloud-based options as the one provided with Azure.
Another drawback of using AVD is the pricing. Azure is a great service but it comes at a cost. It is up to you to calculate what is better for you, if you want to migrate and use Azure or just "go old school" with a local administration of the infrastructure.
Now we want to hear from you – Have you used Azure Virtual Desktop? What are your thoughts about it?
Contributor: Radu Popescu
Subscribe to Our Newsletter
Sign up for free and be the first to receive the latest news, videos, exclusive How-Tos, and guides from Advanced Installer.