How do I add a new dialog when using Spring theme?
The following article uses options that are available starting
with the Enterprise edition and project
type.
This tutorial will show the basics on how to edit the HTML based Spring Theme when a new dialog is added in the sequence. We will add a new dialog and assign a new HTML layout with the dialog. Because Spring theme is an HTML based theme and uses HTML Host Controls, in order to change how the dialogs look when running the package the following steps must be taken:
- 1. Create an Enterprise Project
- 2. Select the Spring Theme
- 3. Add a new dialog in the project
- 4. Create the HTML file
- 5. Change the Title and Description
- 6. Add logo picture for your dialog
- 7. Assign the HTML file to the dialog
- 8. Hide native Windows Installer controls in HTML layout
- 9. Set native Windows Installer controls to be displayed in both interfaces
- 10. Build the project
- 11. See also
2. Select the Spring Theme
![]() Go to the Themes Page, select the Spring theme and press the button. A warning message will appear. Press the
button to continue.
Go to the Themes Page, select the Spring theme and press the button. A warning message will appear. Press the
button to continue.
Optionally, you can customize the general appearance by selecting a different Style and Frame or if to use a header or not. You can also change the Icon and Background for your theme by pressing the button and using the option.
3. Add a new dialog in the project
![]() Go to the Dialogs Page and create a new dialog by using
the toolbar button or "New Dialog..."
context menu option. Add the dialog between "WelcomeDlg" and
"SetupTypeDlg".
Go to the Dialogs Page and create a new dialog by using
the toolbar button or "New Dialog..."
context menu option. Add the dialog between "WelcomeDlg" and
"SetupTypeDlg".
- Using the "Properties" pane on the right select the Title control.
- In the Text field write something meaningful about what this dialog does. In this tutorial we will use My Dialog.
This view of the dialog will be displayed on machine without Internet Explorer 6.
On machines with Internet Explorer 6 or greater the HTML layout will be
displayed.
4. Create the HTML file
Using a file editor, like Notepad++ create a new file and save it as newdialog.html.
In this file paste the following code:
<!DOCTYPE HTML PUBLIC "-//W3C//DTD HTML 4.01//EN" "http://www.w3.org/TR/html4/strict.dtd">
<html>
<head>
  <title>Dialog</title>
  <meta http-equiv="Content-Type" content="text/html; charset=UTF-8" />
  <link rel="stylesheet" type="text/css" href="style.css" media="screen" />
  <link rel="stylesheet" type="text/css" href="varstyle.css" media="screen" />
  <script type="text/javascript" src="jquery-1.3.2.js"></script>
  <script type="text/javascript" src="common.js"></script>
  <script type="text/javascript">
    $(document).ready(function() {
      InitPage();
      UpdateBackGroundInd("DialogBitmap", 'main');
      ResolveTag("span");ResolveTag("p");ResolveTag("h1");
      var a = ['leftBtnA', 'leftBtnSpan', 'rightBtnA', 'rightBtnSpan'];
      UpdateBackGroundIndVec("BannerBitmap", a);
      ShowFooter();
    });
  </script>
</head>
<body>
  <div id="main">
    <div id="header">

  <div id="logo">

  </div>
      <h1>My Dialog</h1>
      <div class="clear">
      </div>
    </div>
    <div id="content">
      <p class="description">My Dialog Description</p>


<!-- Place the content of the dialog here. -->

    </div>
    <div id="footer" style="visibility: hidden">
      <div class="button-group">
        <div class="buttonwrapper">
          <a id="leftBtnA" onclick="external.MsiPublishEvents('Back');" href="#"><b>
            <img src="back.png" width="16" height="16" />
          </b><span id="leftBtnSpan" formatted="noarrow">[ButtonText_Back]</span> </a>
        </div>
        <div class="buttonwrapper buttonwrapper-right">
          <a id="rightBtnA" onclick="external.MsiPublishEvents('Next');" href="#"><b>
            <img src="next.png" width="16" height="16" />
          </b><span id="rightBtnSpan" formatted="noarrow">[ButtonText_Next]</span> </a>
        </div>
      </div>
    </div>
  </div>
</body>
</html>5. Change the Title and Description
You can customize the Title and Description tags from the above template by following these steps:
- Find the following line <h1>My Dialog</h1> and replace "My Dialog" with your desired name.
- Find the following line <p class="description">My Dialog Description</p> and replace "My Dialog Description" with the desired one.
If you would like to include installer properties the HTML file must be modified like this:
- <h1 formatted="true" style="visibility: hidden">[TitleProperty]</h1>
- <p class="description" formatted="true" style="visibility: hidden">[DescriptionProperty]</p>
- The properties must be declared in the Install Parameters and they support localization when multiple languages are being used.
The properties used above are just an example. Any property name,
that is not reserved by Windows Installer or Advanced Installer can be used.
6. Add logo picture for your dialog
Spring dialogs are designed to have a logo in the left upper corner. In order to add one the following steps must be taken:
- In the HTML file find the following line: <div id="logo"> and replace it with <div id="logo" style="background-image: url(logo.jpg);"/>.
7. Assign the HTML file to the dialog
![]() Switch back to Advanced Installer and go
to the Files and Folders Page - Installer Project.
Switch back to Advanced Installer and go
to the Files and Folders Page - Installer Project.
- Navigate to Windows Volume\Temporary\[|ProductCode]\Spring.742DA8B7 where the temporary files reside.
- Add the previously created HTML file by using the toolbar button.
- If you decided to add a logo picture, add the referenced logo.jpg file by using the above method.
All the resource files referenced by the HTML file also need to be
added as temporary files in order to be accessible when the package
runs.
- Add a HTML Host control by using the toolbar button and resize it to Width = 450 ; Height = 360, then center it on the dialog.
- With the HTML Host control still selected use the toolbar button.

- In the Source type field select the File value.
- In the File field use the and select the previously added HTML file. In our case "newdialog.html".
8. Hide native Windows Installer controls in HTML layout
![]() Go to the Dialogs Page and select the "NewDialog" dialog
from the tree list on the left.
Go to the Dialogs Page and select the "NewDialog" dialog
from the tree list on the left.
- Select the Title control and set the False value for the Visible attribute.
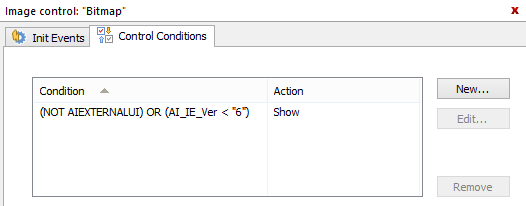
- With the control still selected navigate to the "Control Condition" tab and add the following condition:
| Condition | Action |
|---|---|
| (NOT AIEXTERNALUI) OR (AI_IE_Ver < "6") | Show |
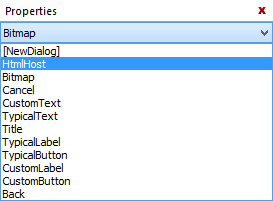
- Repeat the above two steps for the Next, Back button controls and Bitmap controls.

The Next, Back buttons and
Image will be overridden by the elements
declared in the HTML file and will be displayed in the Windows Installer interface
only on machines where Internet Explorer 6 or higher is not
installed.
9. Set native Windows Installer controls to be displayed in both interfaces
This section is optional.
![]() Go to the Dialogs Page and select My
Dialog dialog from the list tree.
Go to the Dialogs Page and select My
Dialog dialog from the list tree.
Add a new ListBox control by using the or toolbar buttons.
If the Visible parameter associated with this control is not modified, the control will be displayed in both HTML and Windows Installer interfaces.
