Configure MySQL Server Connection
The following article uses options that are available starting with the Enterprise edition and project type.
The following tutorial uses the preset SQLConnectionDlg dialog and all settings will be gathered and provided to the installer during the installation process. Public properties will be used in order to make this happen.
2. Add SQL connection dialog
![]() Navigate
to the Dialogs Page and choose the
FolderDlg dialog. Select “Add Dialog” toolbar option or
“Add Dialog...” context menu option.
Navigate
to the Dialogs Page and choose the
FolderDlg dialog. Select “Add Dialog” toolbar option or
“Add Dialog...” context menu option.
Add Dialog, the dialog box for adding a dialog, will be displayed. Select SQLConnectionDlg from the list and press "OK". The new dialog will be added in the chain after the FolderDlg dialog.
The SQLConnectionDlg dialog will present you with the "ODBC Resource" static text control option, select it and then spot the Properties pane located in the right side. From there, set the Visible attribute to False.
Repeat the same procedure for the edit box control associated with "ODBC Resource".
3. Install MySQL ODBC driver
A suitable ODBC driver is required to connect to a MySQL Server. We'll pretend the MySQL ODBC driver is already installed on the developer workstation for our tutorial article.
The MySQL ODBC driver can be downloaded, for free, from MySQL
website as installer or source files packages.
Once the MySQL ODBC driver has been downloaded it can be set as a prerequisite package. Through this, the installer will determine whether the ODBC driver is already installed on the target computer and, if not, will install it.
If the source files have been downloaded the driver can be installed by this package using the ODBC page. For information on how to install an ODBC driver please see the Configure an ODBC Driver section from our tutorial.
4. Create the SQL connection
![]() On the SQL Databases Page, Database server spot the toolbar or context menu and from
it, choose the “New SQL Connection -> Predefined SQL Connection” option.
On the SQL Databases Page, Database server spot the toolbar or context menu and from
it, choose the “New SQL Connection -> Predefined SQL Connection” option.
This will change the installation type to "Per-machine only".
You can now rename the connection to a friendly name. Using the "SQL Connection" properties pane from the right side, write the following settings:
| Parameter name | Value |
|---|---|
| Connection Type | MySQL Server |
| Connection Mode | ODBC Driver |
| ODBC Driver | MySQL ODBC 5.1 Driver (or the one installed on the machine) |
| Server | [SERVER_PROP] |
| Port | [PORT_PROP] |
| Username | [USERNAME_PROP] |
| Use a property to set password | [PASSWORD_PROP] |
| Database | [DATABASE_PROP] |
Since we are going to use this connection with MySQL Server we will not use a property to set the "ODBC Driver" parameter and we will hard-code it instead.

![]() Add all the necessary
resources like files and folders to the project, build and run it.
Add all the necessary
resources like files and folders to the project, build and run it.
5. Test the installation package
Before distributing the software to your clients, make sure it connects to the MySQL Server successfully.
The Test SQL Connection How To article shows the
steps needed to take in order to test your SQL connection.
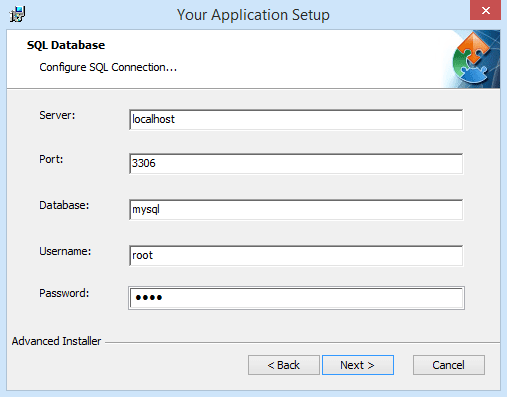
As you run the installation package, go to the "SQL Database" dialog and fill in the following information:
- Server
- The name of the SQL Server. If the server is hosted on the local machine use localhost.
- Port
- The port used by the SQL Server. By default, Microsoft SQL Server uses the 3306 port.
- Database
- The name of the database to which the install package will connect to.
- Username
- The username under which the connection will be initiated. By default, MySQL Server comes with the root user.
- Password
- The password associated with the user. For the root user this password is set during the MySQL Server installation.

.
