Suites Installer: Wise vs Advanced Installer
There are times when you need to install multiple applications at once, either EXEs or MSIs; we call this a suite installation. Wise Installer was one of the most popular software tool used for creating application installers. It was discontinued in November 2013 and offered a solution for such cases. In this article, we have a look at how you can achieve that in a simple and modern manner using Advanced Installer compared with the old ways of Wise Studio.
The Wise Studio way
Let’s assume that you have two MSIs that you want to install, in our case Google Chrome and VLC Media Player.
There are two ways you can do this in Wise. The fast way is:
- Open Wise Package Studio
- In the left pane double click on Windows Installer Editor
- Create a new Windows Application
- In Product details fill the Application and Package name
- In the left pane select Build Options
- For EXE Options select Single-file .EXE (only valid for files inside .msi)
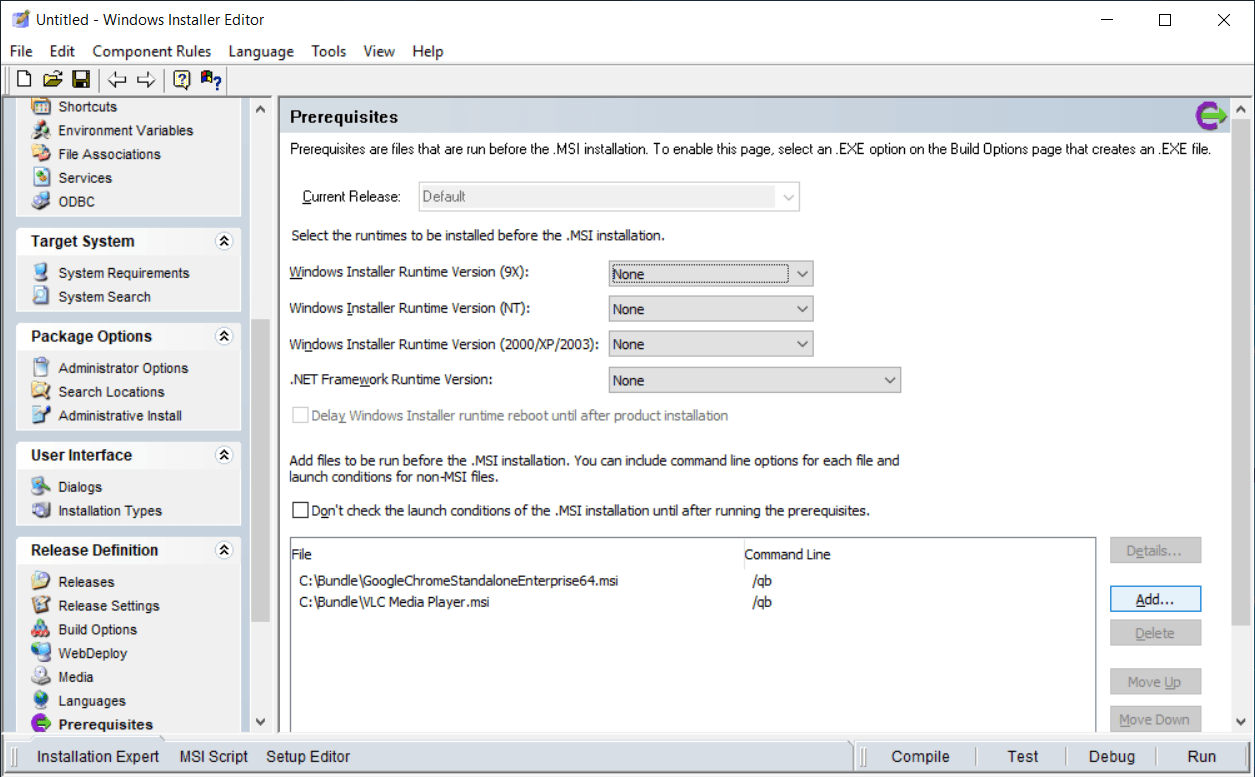
- In the left pane select Prerequisites
- In the Prerequisites pane select Add > Prerequisite
- Browse to your MSI, input the command-line (in our case /qb) and click OK
- Repeat the same steps for the second MSI
- In the right corner click Compile

You now have a simple EXE suite that by default installs as silent.
If you want more options or advanced control over how to create a suite Wise offers a WiseScript Editor.
Open Wise Package Studio. In the left pane double click on WiseScript Editor.

Once the editor is open perform the following steps:
1. On the bottom left corner click on Setup Editor. Wise creates by default a template with customizable Dialogs and initialized variables.
2. Scroll down to Custom Dialog “Start Installation” and select it.
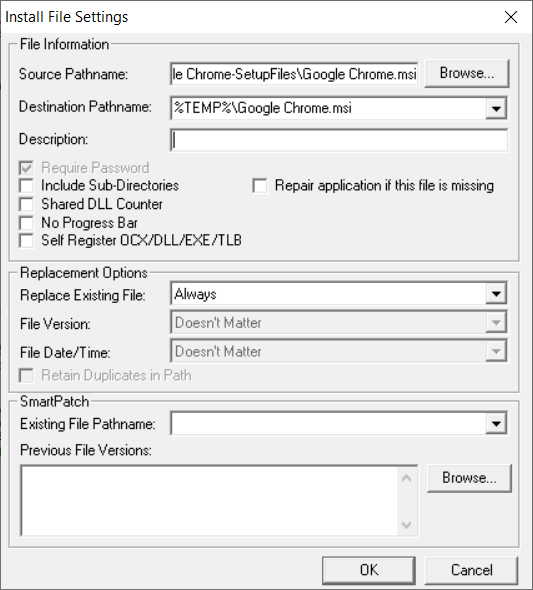
3. In the left pane double click Install File(s).
4. In the Install file settings dialog that appeared click Browse, navigate to your desired MSI and select it.
5. Destination Pathname is the location where your MSI will be extracted during install. In this case, we will use %TEMP%\Chrome.msi
6. In replacement options, make sure that Replace existing file is set to Always.
7. Click OK.
8. Repeat the same process for the second MSI, in our case VLC Media Player

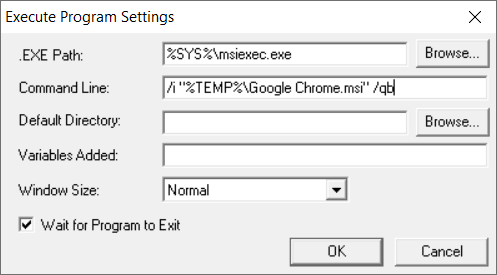
9. In the left pane double click on Execute Program
10. Write %SYS%\msiexec.exe to the EXE path in the new window opened
11. In the command-line write /i "%TEMP%\Google Chrome.msi" /qb
12. Check Wait for program to exit

13. Repeat the same steps for the second MSI, in our case VLC Media Player
14. To change your application title, scroll on top of the installation script, double click Set variable APPTITLE to and input the desired value.
15. In the bottom right corner click Compile
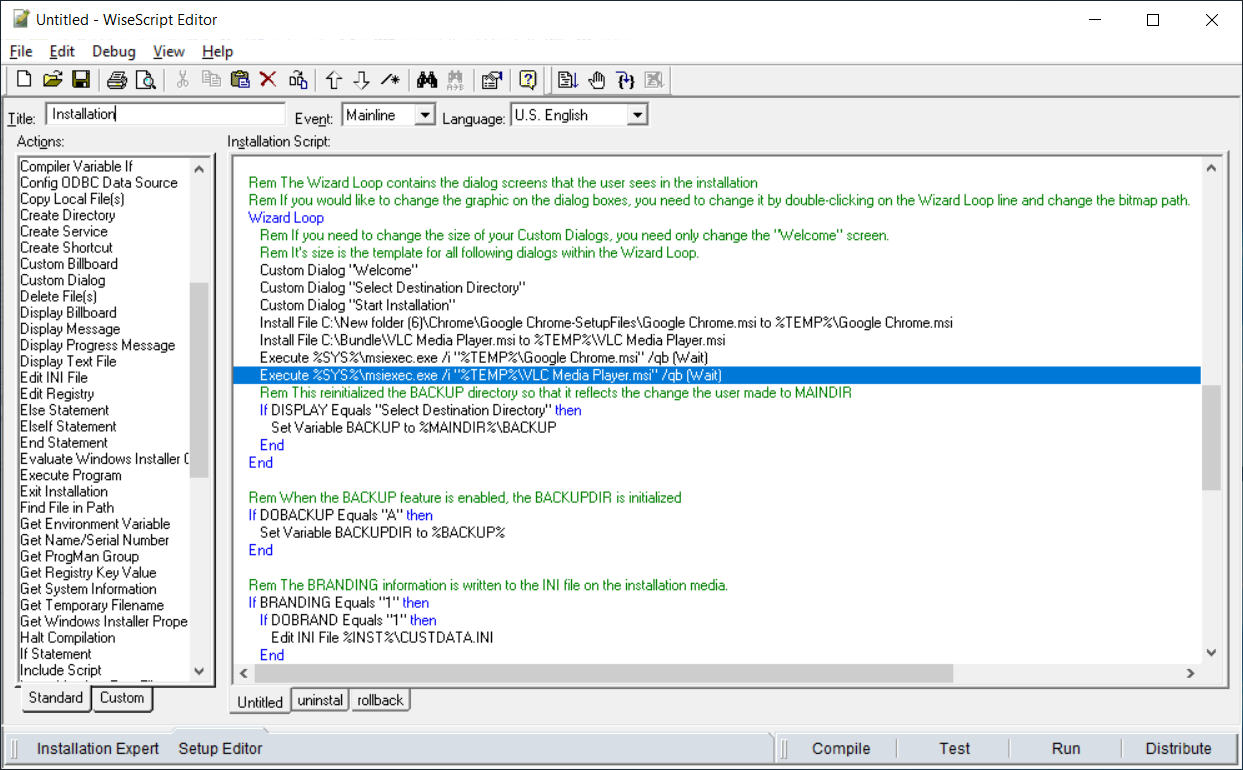
In the end, the installation script should look something like below.

The Advanced Installer Way
We have a more in-depth article regarding creating suite applications using Advanced Installer that can be found here.
In this case, we go shortly over the quick process that Advanced Installer offers you and pros. Once you created a new Enterprise project and entered the product details (Product Name, Product Version, etc), navigate to the Prerequisites page.
Once here, we can add Chrome and VLC as Feature-based prerequisites like so:
- Right-click Feature-based and select New Package Prerequisite
- Browse to your MSI and select it. Advanced Installer automatically detects the name and version of the MSI.
- Select the Setup Files tab from the right and scroll down to Install Command Lines
- In our case everything is silent so we will write /qb in all of the three cases of install (Full UI, Basic UI, Silent (no UI)
- Select Install Conditions tab and check Always Install Prerequisite
- Repeat the same process for VLC Media Player
- Go to the Builds page and select what type of Suite you want Advanced Installer to create. You can also choose the extract location for your files.
The resulted CaphyonSuiteInstallation.exe can also be executed silent using the “/qb” parameter. For example CaphyonSuiteInstallation.exe /qb
That’s it. Advanced Installer with its powerful and modern UI you can create installation suites in minutes compared with Wise Studio. For example, you can choose how the archive is done (cab inside, multiple cabs, media outside), you can choose what features you want at installation, customize the interface more easily and so much more.
Subscribe to Our Newsletter
Sign up for free and be the first to receive the latest news, videos, exclusive How-Tos, and guides from Advanced Installer.