How to Run EXE files as Administrator in Windows Programmatically
Do you need to execute your application (exe file) as an administrator or apply compatibility options to it?
There are situations where we need to run applications in admin mode, such as when your application is actively modifying the system and requires permissions, or when a legacy application is not working correctly in a modern system because it needs compatibility adjustments.
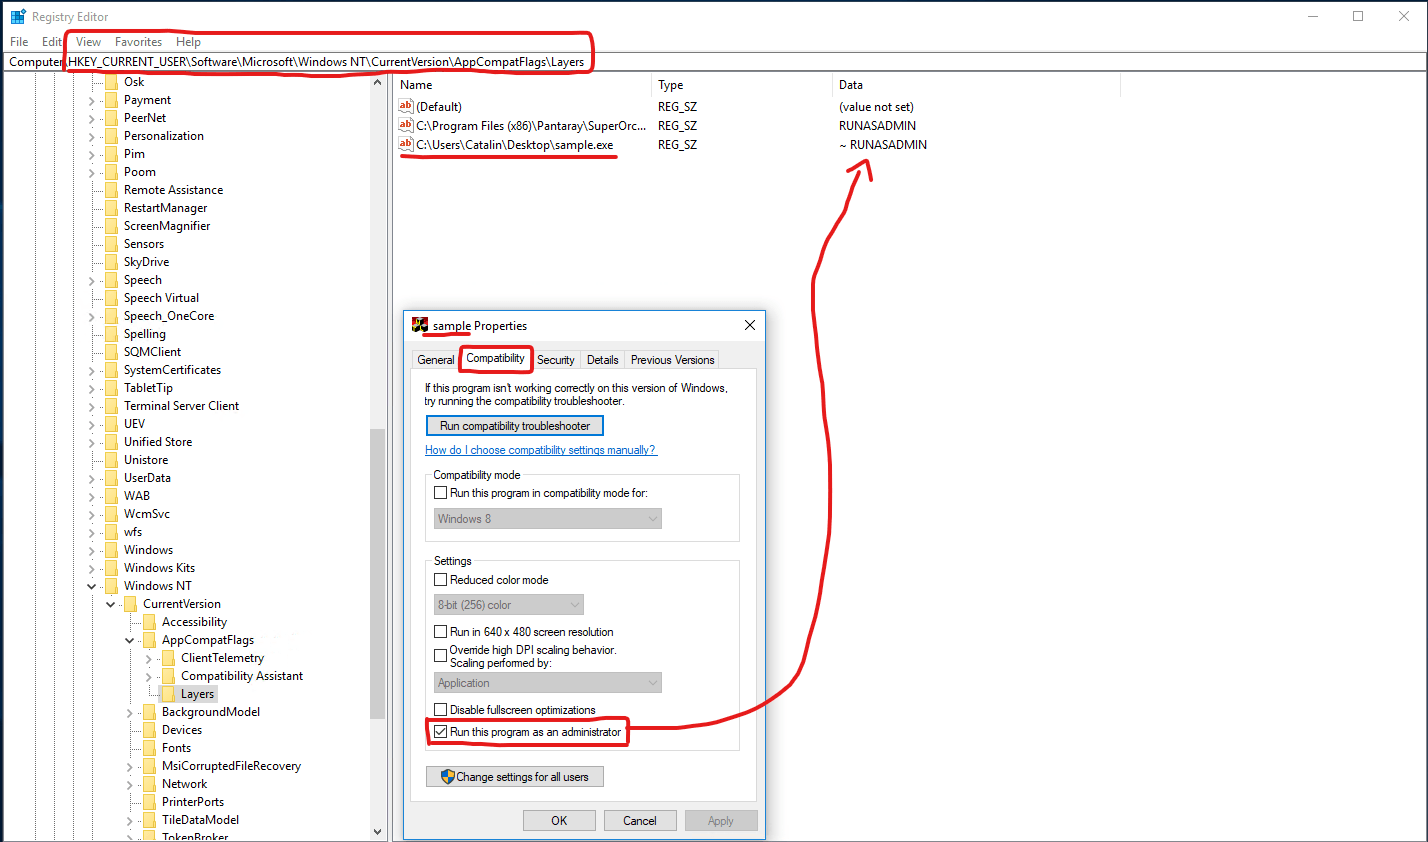
To manually set an application to run as administrator, you can right-click your EXE --> "Properties" --> "Compatibility" tab --> "Run this program as an administrator" option (or maybe "Run this program in compatibility mode for:" option).
But what if you want to do this programmatically? In this article, we'll provide a step-by-step guide to help you code your way into admin mode.
Step 1: Finding the settings
First, it's essential to understand that any change you make to your Windows system will likely be reflected in the registries.
If you apply any setting mentioned before (“Run as Administrator” or “Run this program in compatibility mode”), these will be reflected in the following registry locations:
- "HKCU:\Software\Microsoft\Windows NT\CurrentVersion\AppCompatFlags\Layers"
- "HKLM:\Software\Microsoft\Windows NT\CurrentVersion\AppCompatFlags\Layers"

As seen in the screenshot above, when you select "Run this program as an administrator" for an executable, the "RUNASADMIN" value is added to the registry.
To do this programmatically, you can use a script to add the necessary registry value. You can use different scripting languages (e.g., PowerShell, VBS) or a .DLL/.EXE (C#). For this article, we chose to use PowerShell, and here's an example script:
# The registry key that stores the option
$runAsAdminReg = "HKCU:\Software\Microsoft\Windows NT\CurrentVersion\AppCompatFlags\Layers"
# The path to our .EXE application
$name = "C:\Users\Catalin\Desktop\sample.exe"
# The registry value for our option
$value = "RUNASADMIN"
# The cmdlet that adds the value
New-ItemProperty -Path $runAsAdminReg -Name $name -Value $value -PropertyType string -Force | Out-Null
Using the script above, we can also force the program to run in compatibility mode by changing the $value variable to one of the following values:
- WIN95
- WIN98
- WIN4SP5
- WIN2000
- WINXPSP2
- WINXPSP3
- VISTARTM
- VISTASP1
- VISTASP2
- WIN7RTM
- WINSRV03SP1
- WINSRV08SP1
- WIN8RTM
Step 2: Using Advanced Installer to Run EXE as Administrator
Now that we know how to make a program always run as an administrator or run in compatibility mode programmatically, let’s see how we implement it through the Advanced Installer.
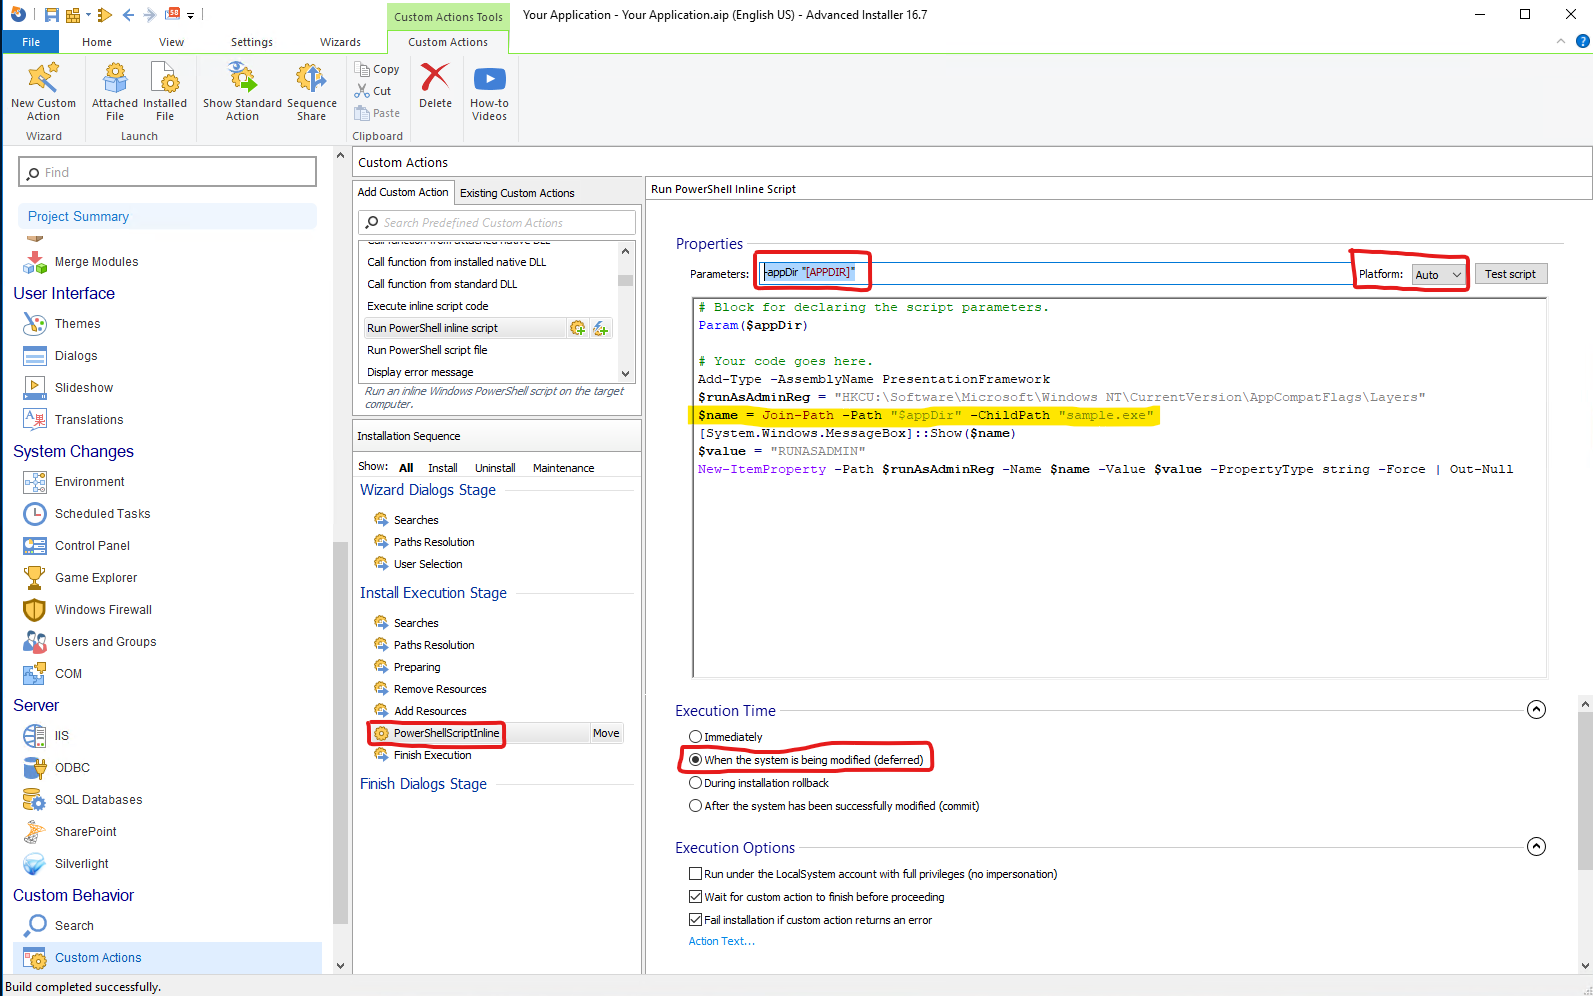
You can add the PowerShell script as a "Run PowerShell Inline Script" custom action. The steps to add the script are:
1. Navigate to the Custom Actions Page.
2. Click on the "Add custom action with sequence" button that you can find on the right side of the custom action's name.
3. Schedule the custom action after the "Add Resources" action group.
4. Set the custom action execution time to "When the system is being modified (deferred)".
5. If you are unsure whether your setup will be installed on a 32-bit machine or a 64-bit machine, you could set the "Platform" to "Auto".
6. To avoid using a hard-coded path in your script, you can make use of the installer properties.
If the .EXE is added in the "Files and Folders" page, under the "Application Folder" folder, your script can look like this:

What we are doing above is taking the path that is stored in the "APPDIR" property and adding the name of our .EXE to the path.
Important: For the script to successfully execute, the setup must be run with administrative privileges, as they are required when writing to the registries.
7. Click Build in the upper left corner.
Conclusion
That's it! You now know how to configure any application (EXE) to always run as needed (either as an administrator or with compatibility settings). If you have any other questions or need further assistance, feel free to reach out.
