Windows Installer vs. SCCM Cache Folder - How to repair or upgrade an MSI installed via SCCM?
We've received inquiries from users that encounter issues with the SCCM cache folder.
When trying to upgrade or repair an MSI that was previously installed with SCCM, they get asked for media of a former MSI.
In this article, we will cover the following points:
- How MSI caching works
- The differences between the CCMCache folder and the Windows Installer folder
- Working on fixing the "media not being found" error
What is the CCMCache Folder?
The CCMCache folder is the location where the SCCM downloads all the files needed for various installations. This applies not only to applications but also to patches, task sequences, and other items.
By default, this folder is set to C:\Windows\ccmcache.
You can always change the default location of the CCMCache folder by using the SMSCACHEDIR install parameter.
When you click on the “Install” button in the Software Center, you are downloading the software into the cache folder (if the app is configured to download the data) and then the installation starts from there.
By default, the install location of an MSI is in the registry. So, when you install an MSI from CCMCache -- the installation data will be saved in the registry entry.
Caching in Windows Installer Folder - How does it work?
As we already covered in the “Do not delete your installer folder” article, this is the folder that Windows Installer uses for application caching such as MSI, MST, or MSP.
The OS (Operating System) hides the installer by default. However, it is not hard to reach it and there aren't any additional security measures (e.g. taking ownership of the folder).
This means that every time you install an app or a patch in the system, Windows Installer automatically starts a caching process in the C:\Windows\Installer folder of the specific app or patch you're installing.
However, you should not confuse it with a common “cache” folder like the SCCM cache folder.
What is the difference between the SCCM cache folder and the Windows Installer folder?
The SCCM CCMCache folder is only meant to be used as a storage space for the entire installation, while the MSI uses the Windows Installer to cache certain elements following specific rules.
Windows Installer caching on previous versions of Windows -- disk space challenges
Back in the day, when we used Windows XP/Vista and Windows Installer 4, Windows Installer would only copy a small cached version of an MSI.
To save disk space, this version was stripped of any binaries that were compressed in the original MSI. Keep in mind that back then, space was a big problem.
But this aspect of Windows Installer 4 only worked for uninstallation. MSI could still contain some elements in its tables (i.e. Custom Actions) or a registry that had to be deleted during the uninstallation process.
Starting with Windows 7 and Windows Installer 5, Microsoft decided for MSIs to be cached entirely into the “Installer” folder. The decision wasn’t made just because the HDDs became cheaper, it had to do with digital signing.
Digital Signing and changes to the caching process
When you sign an MSI and install it, your UAC prompt will be shown with blue, and an unsigned package will prompt the UAC with a yellow color. But, if you strip the MSI in the cache of all its binaries, the digital signing will no longer apply, thus you will receive a yellow UAC color.
The status of an MSI's digital signing process is represented in colors. It works like this:
- When you sign and install an MSI, your UAC prompt will be blue,
- When you install an unsigned package, the prompt of the UAC will be yellow.
Still, if you remove the MSI in the cache of all its binaries, the digital signing will no longer apply, and you should expect to get a yellow UAC.
However, the full caching of an MSI does not apply in every situation.
For example, if you have an MSI with an outside CAB file, only the MSI will be stored in the “Installer” folder.

What are the issues with MSI caching?
Now that we understand the differences between the SCCM ccmcache folder and the Windows “Installer” folder, let's talk about the issue we mentioned before: not finding the media of the former MSI -- with the prompt of an error message!
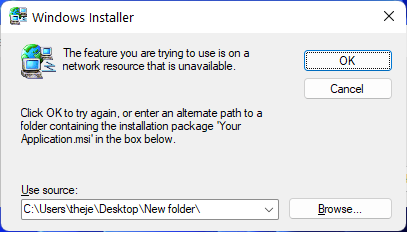
This error message appears during the repair of the application.
For example, if we install a simple MSI, delete the folder used for the installation and then try to repair the MSI via the Control Panel, an error message appears. It states that the resource is unavailable.

You might ask yourself why is this happening? Didn’t we just say that the MSI is fully cached in C:\Windows\Installer?
This is due to “name randomization”.
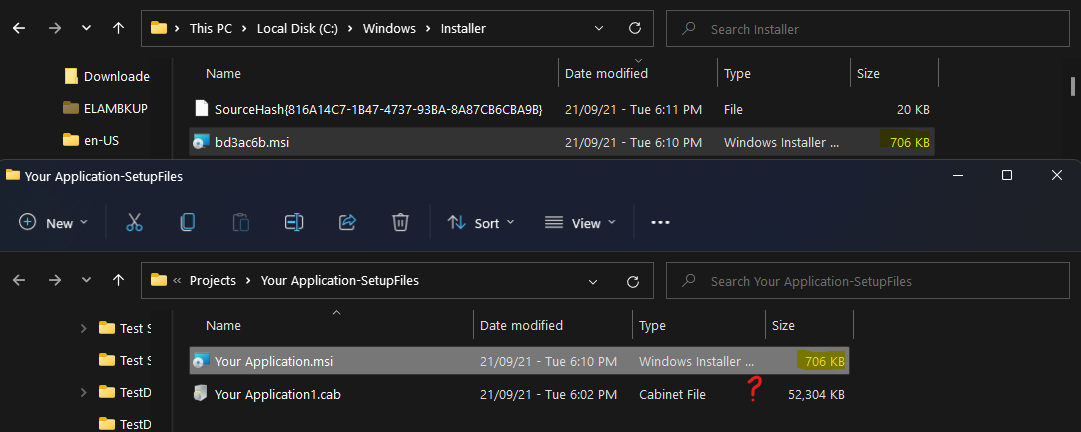
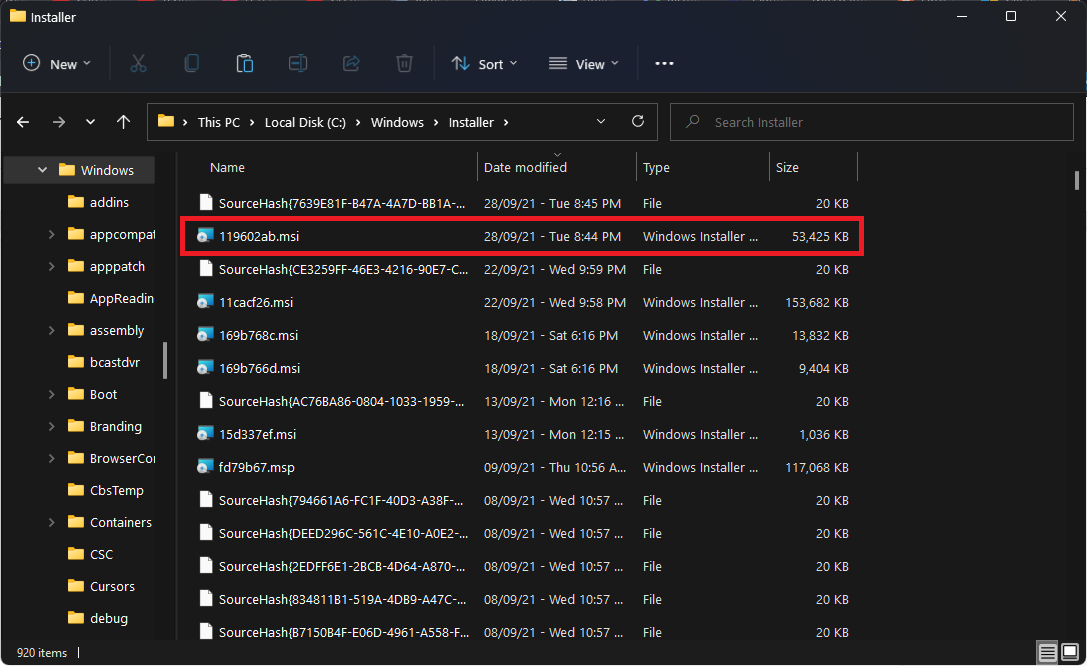
In the previous example, our MSI was named "Your Application.msi," but if we look in the Installer folder, we will find that there is no MSI with that name:

Installer folder stores our MSI under the random name of 119602ab.msi with all of its contents. Since the system doesn’t record this information anywhere else on the system if it needs a repair the MSI will not know where to look for it.
The same problem might occur during an upgrade of the previous version, or with patches.
How to address name randomization issues with MSI caching?
To prevent an MSI from asking for the media during an upgrade, repair or patch, there are a few solutions you can take. Let's go through them:
1. Persist in client cache
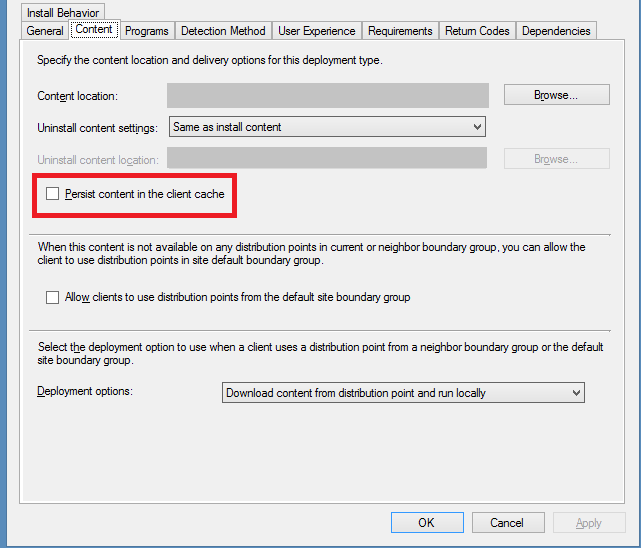
It is safe to assume that during an upgrade or patch, not all MSI installers are asking for the source files. With this in mind, we can consider using the “Persist content in the client cache” option that SCCM offers.

While SCCM automatically deletes content from the CCMCache to create space, using this option will ensure that your MSI will forever reside in the location -- until it is superseded or uninstalled from the client machine.
However, this does not work for all MSI packages, because the CCMCache has a limited amount of space defined to it (depending on what you configure in the console).
2. Scripting
We could also use scripting. This solution relies on creating installation scripts that will first copy the MSI to a different location (C:\Temp for example) and install it from there. You can use the classical VBScript to achieve these results or the PowerShell App Deployment Toolkit.
This way, the CCMCache will always be clean and will have enough space for other operations. So, if the MSI is copied to a location that will not be interfered with, it will find the required source during any operation.
As a downside to this approach, we can consider that during an upgrade, we need to make sure that we delete the previous MSI that was copied to the temporary location. Otherwise, the client will be filled with unused MSIs.
3. Debugging
This is the solution we recommend - try to debug the MSI to find out why it is asking for media during the upgrade or uninstall operation.
For repair operations, there is nothing to debug and you should use only one workaround for that scenario.
It's worth mentioning that this debugging solution is not an exact science and it is not really meant for beginners.
Here's what we need to do to find out why your MSI is asking for its sources:
- Create a log file for the operation.
- Once you have your log file created, open it and search for “return value 3”. For more information about these values, check this article.
- The return value of 3 will find the point where the error appeared in the log.
- We need to analyze from that point backward to see what is happening.
Most likely the issue will appear when a file that is the key of a certain component needs to be verified to see if the component is overwritten or not. If you find this kind of error in the log file, a simple fix would be to navigate to the Organizations Page, select the component with the issue, and check the “Never Overwrite” option.
As previously stated, the above option does not mean it’s 100% a fix, and each MSI will differ from another, so you need to be prepared for it.
Have you ever encountered this issue with your MSI? Let us know how you sorted it out!
Subscribe to Our Newsletter
Sign up for free and be the first to receive the latest news, videos, exclusive How-Tos, and guides from Advanced Installer.