How to integrate and debug custom actions
The following article uses options that are available starting
with the Enterprise edition and project
type.
Although Advanced Installer comes with a predefined list of custom actions, in many cases you need to create your own custom action to implement a scenario, to either complete the installation or prepare the application for the first launch.
In the Advanced Installer Custom Actions Page, you can easily create and add custom actions.
Tools required
In order to create a custom action in C#, the WiX Toolset is required to be installed on the developer machine. Once downloaded and installed, the toolset will add all necessary modules enabling you to create C# custom actions from Microsoft Visual Studio.
- 1. Creating a C# custom actions project
- 2. Integrate the C# custom action in Advanced Installer
- 3. Setting execution time for custom actions
- 4. Retrieving and setting properties
- 5. Pass installer properties in deferred custom action
- 6. Creating a single DLL for both deferred and rollback actions
- 7. Configuring the deferred and rollback function in Advanced Installer
1. Creating a C# custom actions project
Once all the necessary tools are installed, the following steps must be followed:
- Start Microsoft Visual Studio
- From the Menu bar select “File > New Project”
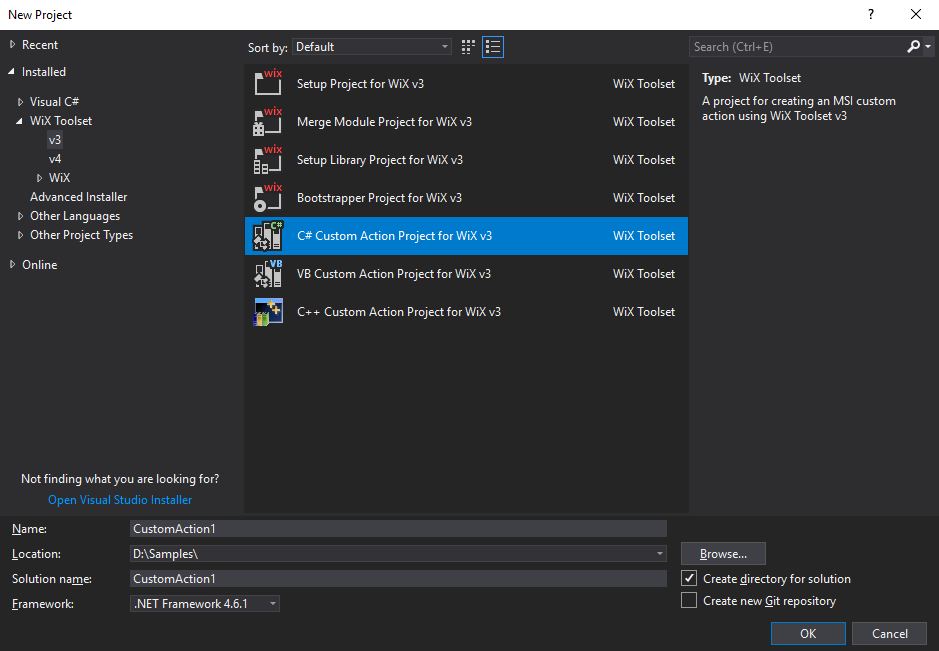
- From the "New Project" dialog select “Windows Installer XML” project type and “C# Custom Action Project”

By default, the new project will generate a simple custom
action that will write some text in the installer log.
Let's add
a simple MessageBox which will be displayed
when the custom action will be executed. So, your custom action code
should look like this:
using System;
using System.Collections.Generic;
using System.Linq;
using System.Text;
using Microsoft.Deployment.WindowsInstaller;
using System.Windows.Forms;

namespace CustomAction1
{
    public class CustomActions
    {
        [CustomAction]
        public static ActionResult CustomAction1(Session session)
        {
            session.Log("Begin CustomAction1"); // Here you can write your own custom action code

            MessageBox.Show("This is a message box", "My custom action");

            return ActionResult.Success;
        }
    }
}1.1 Generate the custom action file which will be used in Advanced Installer.
- From the Menu bar select the “Build > Build Solution” option.
- This will generate two DLL files: CustomAction1.dll and CustomAction1.CA.dll
- The CustomAction1.CA.dll file is the one that holds the C# custom action which will be used in Advanced Installer.
2. Integrate the C# custom action in Advanced Installer
If Advanced Installer is not currently running, launch it by double-clicking a desktop icon or selecting it from the “Start” menu. When the application starts, you will see a dialog where you can choose the type of the project you want to create.

Select the Enterprise project type.
2.1 Add a custom action with a sequence
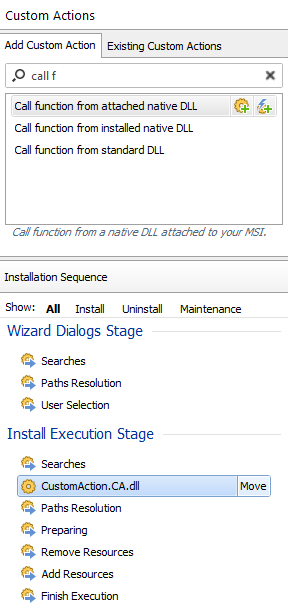
In the Custom Actions view, you can select the predefined Call function from attached native DLL custom action.
Use the ![]() to add the custom action
with sequence. When prompted, select the
CustomActionSample.CA.dll file.
to add the custom action
with sequence. When prompted, select the
CustomActionSample.CA.dll file.
The custom action is placed in a default location, appropriate for this type of custom action. Let's move this custom action, using a drag and drop operation after the Searches Standard Action.

![]() Click on the
toolbar button and a “Build
Project” dialog will appear showing you the build
evolution.
Click on the
toolbar button and a “Build
Project” dialog will appear showing you the build
evolution.
![]() Once the build is complete,
click on the toolbar button.
Once the build is complete,
click on the toolbar button.
The custom action will be executed right away the installation package is launched.
2.2 Add custom action without sequence, using a published event as a trigger
Use the ![]() to add the custom
action without sequence. When prompted, select the
CustomActionSample.CA.dll file.
to add the custom
action without sequence. When prompted, select the
CustomActionSample.CA.dll file.
The custom action does not appear to be added, either in the
Install Execution Stage or Wizard Dialogs
Stage.
If you will ![]() Run your installation package you
can see that the custom action will not be executed. Without any event
as a trigger, the custom action will never be executed. In order to
execute this custom action, it needs to be added as a published control event.
Run your installation package you
can see that the custom action will not be executed. Without any event
as a trigger, the custom action will never be executed. In order to
execute this custom action, it needs to be added as a published control event.
Suppose we want to execute this custom action when the control from the FolderDlg.
![]() Go to the Dialog Editor page. Select the button that
will trigger the execution of the custom action.
Go to the Dialog Editor page. Select the button that
will trigger the execution of the custom action.
Select the “Published Events” tab from the “Control” pane.
Use the button to create a new control event. The Edit Control Events Dialog will be displayed.
Configure the control event as follows:
- Name = Execute custom action
- Argument = Select the name of the custom action that you created earlier, in our case CustomActionSample.CA.dll.
- Condition = Leave this field unchanged if you don't want to condition the execution of this control event.

If you will ![]() Run your installation package you
can see that the custom action will be executed when the
from the FolderDlg will be
pressed.
Run your installation package you
can see that the custom action will be executed when the
from the FolderDlg will be
pressed.
All the custom actions which are added as published
events are running as immediate custom actions.
3. Setting execution time for custom actions
After you added the custom action, you can set the execution
time from its properties.
3.1 Immediately custom action
The immediately - custom action will be executed immediately upon encountering it in an action sequence.
The characteristics of an immediate custom action are:
- The immediate custom action should not modify the target system because they cannot be rolled back.
- It has access to the installation database.
- The only changes that should be made are the ones that influence the installation process, e.g. set and verify properties.
- A custom action set as immediate can only run in the context of the user initiating the installation. For example, if your custom action requires administrator rights, it cannot be scheduled as an immediate custom action.
The custom action without sequence can be only set as immediate
actions.
3.2 Deferred custom action
The deferred actions can run only during the installation script execution. So, a custom action deferred is not executed immediately upon encountering, instead, it is scheduled to run later during the execution script.
The characteristics of a deferred custom action are:
- The deferred custom action can be only scheduled between InstallInitialize and InstallFinalize standard actions.
- These cannot have access to the installer's public properties. However, you can pass information process through the CustomActionData property.
- These custom action can run in:
- Context of the user initiating the installation
- Elevated rights using the system context
- The custom actions that should run with elevated rights must be of deferred in the system context. For this, you can enable the Run under the LocalSystem account with full privileges (no impersonation) option from the Execution Options pane.
- Best practice: Each deferred action should have a rollback action so that the changes it makes can be undone if the setup fails or is canceled.
3.3 Rollback custom action
These actions are performed during the installation rollback
and its purpose is to reverse a custom action that has made changes to
the system, e.g. a deferred custom action. As you noticed, a rollback
custom action must always precede the deferred custom action it rolls
back in the action sequence.
A rollback custom action should
also handle the case where the deferred custom action is interrupted
in the middle of execution. For example, if the user were to press the
button while the custom action was
executing.
3.4 Commit custom action
The commit actions are the opposite of the
rollback actions. The commit script is executed after the
InstallFinalize standard action when everything ended
successfully. Its purpose is to delete the backup files created by the
rollback script.
Commit custom actions are the first actions
to run in the rollback script. If a commit custom action fails, the
installer initiates rollback.
4. Retrieving and setting properties
Using DTF C# approach, getting and setting the value for a property is very easy.
- Get property value:
- YourVariable = session["YOUR_PROPERTY"];
- Set property value:
- session["YOUR_PROPERTY"] = "YOUR_VALUE";
In your code, these statements can be used as this:
using System;
using System.Collections.Generic;
using System.Linq;
using System.Text;
using Microsoft.Deployment.WindowsInstaller;
using System.Windows.Forms;

namespace CustomActionSample
{
    public class CustomActions
    {
        [CustomAction]
        public static ActionResult CustomAction1(Session session)
        {
            session.Log("Begin CustomAction1");

            // getting a property
            string myVariable = session["MY_PROP"];

            // setting a property
            session["MY_PROP"] = "Your Value";

            return ActionResult.Success;
        }
    }
}
5. Pass installer properties in deferred custom action
Deferred custom actions can receive information about the installation process, mostly only embedded in the CustomActionData property.
Let's change the previous code of the custom action and try to access a property during the installation process. Supposing that we want to copy the installation log into the "C:\" drive.
We need to check the Enable verbose logging option from Install Parameters page. By enabling this option, a log file will be generated each time the install package runs. Windows Installer will automatically set the MsiLogFileLocation property to the path where the log file will be generated.
Once we have the log file location, you can move it to the
desired location. Since we want to copies the log file on
C:\ drive, we need administrator rights. So, the custom
action needs to run as deferred and with no impersonation.
Add
the Call function from attached .DLL predefined custom
action with sequence after the Add Resources
action group. Make sure this custom action is set as
deferred and the Run under the LocalSystem account
with full privileges (no impersonation) option is enabled since
we copy the log on a per-machine location we need full administrator
rights.
As told before, the deferred custom action does not have access
to installer properties. We send the log file location through action
data field.
A sample code which can handle the copy log file location is the following:
using System;
using System.Collections.Generic;
using System.Linq;
using System.Text;
using Microsoft.Deployment.WindowsInstaller;
using System.Windows.Forms;
using System.IO;

namespace CustomActionSample
{
    public class CustomActions
    {
        [CustomAction]
        public static ActionResult CustomActionDeferred(Session session)
        {
            session.Log("Begin CustomAction1");

            // retrieving the value for the CustomActionData property
            string logFile = session.CustomActionData.ToString();
            // set the destination path for the log file and rename it comprehensible
            string destinationPath = @"C:\MyInstallLog.log";

            try
            {
                System.IO.File.Copy(logFile, destinationPath, true);
            }
            catch (Exception myEx)
            {
                MessageBox.Show(myEx.Message);
            }
            return ActionResult.Success;
        }
    }
}
5.1 Adding the custom action rollback functionality
Since it is a best practice that a deferred action has its rollback action, we will add this functionality in our example too. Our deferred custom action copies the log file on the C:\ drive. Assuming the user cancels the installation after the deferred action is executed, we need a rollback action which reverses the changes to the system. In our particular case, the log file needs to be deleted from the C:\ drive.
A simple code which can handle this is the following:
using System;
using System.Collections.Generic;
using System.Linq;
using System.Text;
using Microsoft.Deployment.WindowsInstaller;
using System.Windows.Forms;
using System.IO;

namespace CustomActionSample
{
    public class CustomActions
    {
        // Rollback custom action
        [CustomAction]
        public static ActionResult CustomActionRollback(Session session)
        {
            session.Log("Begin CustomActionRollback");
            MessageBox.Show("Start CA Rollback", "MyCa");

            try
            {
                string logPath = @"C:\MyInstallLog.log";
                if (File.Exists(logPath))
                {
                    File.Delete(logPath);
                }
                else
                {
                    MessageBox.Show("The log file does not exist", "CA Rollback");
                }
            }
            catch (Exception myEx)
            {
                MessageBox.Show(myEx.Message);
            }
            return ActionResult.Success;
        }
    }
}
In the code samples you might see a lot of message boxes. These
are simply added for debugging purposes.
6. Creating a single DLL for both deferred and rollback actions
There is no need to create each time a .DLL for each function.
You can easily have a single .DLL with multiple functions which will be
called accordingly.
Considering the above example you should be
able to use the following code for a single .DLL and have both
functionalities:
- A function used in a deferred action
- A function used in a rollback action
Here's the sample code:
using System;
using System.Collections.Generic;
using System.Linq;
using System.Text;
using Microsoft.Deployment.WindowsInstaller;
using System.Windows.Forms;
using System.IO;

namespace CustomActionSample
{
    public class CustomActions
    {
        [CustomAction]
        public static ActionResult CustomActionDeferred(Session session)
        {
            session.Log("Begin CustomActionDeferred");

            string logFile = session.CustomActionData.ToString();
            string destinationPath = @"C:\MyInstallLog.log";

            try
            {
                System.IO.File.Copy(logFile, destinationPath, true);
            }
          // we'll simultate that the user had canceled the installation in our custom action
            return ActionResult.UserExit;
         // return ActionResult.Success;
        }

        // Rollback action
        [CustomAction]
        public static ActionResult CustomActionRollback(Session session)
        {
            session.Log("Begin CustomActionRollback");

            MessageBox.Show("Please check the C:\ drive to see the log file", "Rollback sequence");

            try
            {
                string logPath = @"C:\MyInstallLog.log";
                if (File.Exists(logPath))
                {
                    File.Delete(logPath);
                }
            }
            return ActionResult.Success;
        }
    }
}
Using the above code, we simulate that the deferred action fails to execute in order to start the rollback sequence so the rollback action gets executed. This is done by the return ActionResult.UserExit; statement from the deferred action. At this moment, the rollback sequence is triggered and the rollback action should be executed. Before the rollback action gets executed, a simple message box has been added so you can search on the C:\ drive and make sure the log is there. Click on the button and the rollback action will be executed so the log file will be deleted.
7. Configuring the deferred and rollback function in Advanced Installer
In order to call a function from the .DLL we will use the predefined Call function from attached native DLL custom action.
- Call the deferred action:
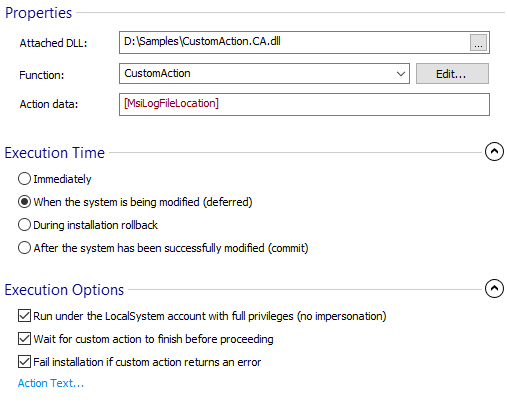
Add this custom action with sequence and when you are prompted please select the CustomActionSample.CA.dll. Edit the custom action properties as below:
- Call the rollback action:
Add another Call function from attached native DLL custom action. When prompted, please select the same .DLL as before.
Edit the custom action properties as below:
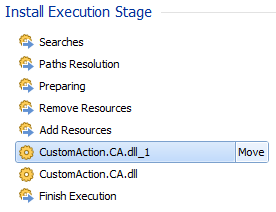
Make sure your custom actions are scheduled as below:
where:
- CustomActionSample.CA.dll_1 is for rollback action;
- CustomActionSample.CA.dll is for deferred action;
See also
To learn more, read the Custom Actions How Tos articles.