How to set the authorization type of an SQL connection?
The following article uses options that are available starting with the Enterprise edition and project type.
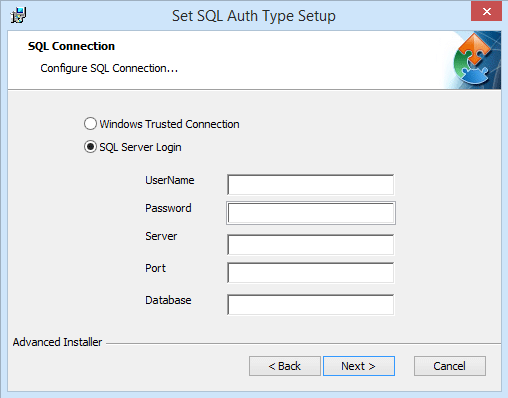
This can be done using a custom selection dialog that will allow the user to choose the desired authorization type. Using this dialog, we will set the value of the properties Uid and Pwd. This How To is presented as a step by step operation:
1. Go to the SQL Databases page and create a "Custom SQL Connection"
2. The "Connection string" will contain the following values:
Driver=SQL Server;Server=[DBSERVER_PROP];Port=[DBPORT_PROP];Uid=[DBUSER_PROP];Pwd=[DBPASS_PROP];Database=[DBNAME_PROP];
3. From the above string you will remove the following elements:
Uid=[DBUSER_PROP];Pwd=[DBPASS_PROP];
4. The new string should look like this:
Driver=SQL Server;Server=[DBSERVER_PROP];Port=[DBPORT_PROP];Database=[DBNAME_PROP];
5. Now to this string you will add a public property that you define, called lets say:
"SQL_AUTHORIZATION"
6. The new string should look something like this:
Driver=SQL Server;Server=[DBSERVER_PROP];Port=[DBPORT_PROP];Database=[DBNAME_PROP];[SQL_AUTHORIZATION]
7. Go to the Dialogs page and create a new dialog that will contain the controls for setting the SQL Connection
- DBSERVER_PROP,DBPORT_PROP and DBNAME_PROP values can be collected at install time from Edit Box controls having the same associated public properties.
- Alternatively, you can set these properties from a custom action or even hardcode their values in the connection string like this:
Driver=SQL Server;Server=(local);Port=1433;Database=Database;[SQL_AUTHORIZATION]
8. On the above or a new different dialog you should add the following elements using the toolbox:
- a radio button group
- two buttons into that group (named for example: Windows Trusted Connection and SQL Server Login)
- next to that group add two more edit boxes, for the username and password (with the associated properties: USER_NAME and PASSWORD), in case the user chooses SQL Server login

9. Lets suppose the radio buttons have the values "TrustedConnection" and "UserDefined", and the radio button group's property is "RADIO_GROUP"
- if "Trusted Connection" button is selected the property "RADIO_GROUP" will contain the text: "TrustedConnection"
- if "SQL Server Login" button is selected the property "RADIO_GROUP" will contain the text: "UserDefined"
10. Add two Published Events on the [Next] button of the dialog with the following settings:
| Order | Name | Argument | Condition |
|---|---|---|---|
| First Published Event | [SQL_AUTHORIZATION] | Uid=[LogonUser];Trusted_Connection=yes; | RADIO_GROUP = "TrustedConnection" |
| Second Published Event | [SQL_AUTHORIZATION] | Uid=[USER_NAME];Pwd=[PASSWORD]; | RADIO_GROUP = "UserDefined" |
11. For the two edit boxes you will have to set Control Conditions, in order to enable/disable them based on the radio button selection. Here is how it is done:
- select an edit box and go to Control Conditions tab
- use the [New] button to create a new control condition
- in the Control Condition dialog that will appear set the fields like this:
| Condition | Action |
|---|---|
| RADIO_GROUP = "UserDefined" | Enable |
- now add another control condition to disable it in case the first radio button is selected, like this:
| Condition | Action |
|---|---|
| RADIO_GROUP = "TrustedConnection" | Disable |
12. Repeat step 11 for the second edit box
The two edit boxes should be disabled by default. To do so, you can select them, then go
to Properties pane, in the right side of the page. Under the "Enabled" column select
"False".
This way if the user selects the first radio button the settings for Windows Trusted Connection will be applied. If the second radio button is selected, a username and password will be requested from the user for the connection to take place.
A sample project of the above explained settings can be downloaded from this
link.