How to deploy a React application to IIS Web Server
Deploying applications, especially those built on modern frameworks like React, can pose enough challenges even for experienced developers
One of the most popular options is to deploy a React application on a Windows server using Microsoft's Internet Information Services (IIS).
IIS is a powerful, flexible web server that offers a highly reliable environment for hosting web applications. However, the publishing process involves several steps and could become a bottleneck if not managed effectively.
The following article uses options that are available starting with the Professional edition and project type.
In this tutorial, we’ll guide you through the process of publishing a React application to a Windows server, with step-by-step instructions to ensure a successful deployment.
Set up your Base URL
Before proceeding with the React application deployment steps, you need to make sure that you specify a Base URL for your application to avoid any issues during IIS publishing.
To set the Base URL to ‘/myapp’ for a React application, run the next command in PowerShell:
$env:PUBLIC_URL='/myapp'
Then, use the npm run build command to build the application. This will generate a “build” folder containing a production-ready version, which is used to publish the React application.
If you want to deploy a Vue.js application to IIS, run the next command to set the Base URL to ‘/myapp’:
.\node_modules\.bin\vue-cli-service build --publicPath /my-app/
To build the Vue.js application, run the vue-cli-service build command. This will generate a “dist” folder containing the resource files that are used to host the application.
Add the resource files
To create the installation package, you need to add the React application’s resources to the Files and Folders page, located in the ‘build’ folder.
Because the ‘build’ folder content might change during the development process, you can automatically track the changes by using the folder synchronisation feature from Advanced Installer. So, create a regular folder in the Application Folder from the Files and Folders page and then synchronize it with the ‘build’ folder.

Create the application on the IIS page
After adding the application resources, it is time to create the application. To achieve this, go to IIS view and use the [New Web Application] toolbar button.

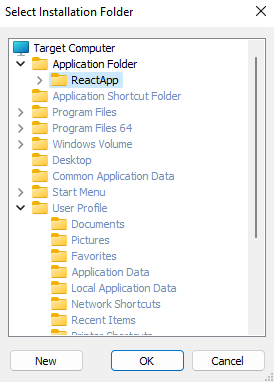
When prompted, select the folder created in the previous step as Installation Folder.

Create the Application Pool
To ensure your application is running correctly, make sure it runs under its own application pool instead of the Default App Pool. To create an application pool, use the [New Application Pool] toolbar button from the IIS view. To use it for the application, go to the Application Pool tab. There, enable "Use installed application pool” and select the created pool.

Enable the required IIS Windows Features
Now, we have to enable the IIS features using a Windows Feature Bundle. To add one, go to the Prerequisites view and use the [New Windows Feature Bundle] toolbar button. Based on your scenario, select the Target Operating System for the windows feature.

When a new application is created in the Advanced Installer project, an IIS launch condition is automatically enabled in the Software tab from the Launch Condition page. Since we made sure that IIS is enabled on the target machine, via Windows Features, it is safe to remove the software launch condition.
Launch the application at the end of the installation process
If it is necessary for the application to be launched in a browser at the end of the installation process, go to the Custom Action view and use the predefined Open URL custom action. Provide the URL, enable only the Install option under Execution Stage Condition and then place the custom action at the end of the Install Execution Stage.

Conclusion
In conclusion, by following the steps outlined in this guide, you can successfully host your React application to IIS on Windows Server. You can take advantage of the strength and effectiveness of IIS to ensure a seamless and stable user experience for your web application.