How to deploy a Node.js application on IIS Windows Server
This tutorial will guide you through the process of deploying a Node.js application to IIS Web Server using Advanced Installer.
- 1. Add the resource files
- 2. Create the application on the IIS page
- 3. Create the Application Pool
- 4. Enable the required IIS Windows Features
- 5. Launch the application at the end of the installation process
- 6. Video Tutorials
- 7. Conclusion
Before proceeding with the deployment steps below, make sure you have specified a Base URL for your application and meet the following prerequisites:
- Node.Js on the Windows machine where you want to publish your application.
- IISnode module to enable hosting of Node.js applications.
- URL Rewrite module to ensure the application handles all the requests properly.
- The web.config file that includes the configuration settings for iisnode and URL Rewrite.
- The file should be placed in the root directory of the application you want to publish.
The following article uses options that are available starting with the Professional edition and project type.
1. Add the resource files
The initial step in generating the installation packages is to add the application resources - the files in the root folder of the application.
Since the content of this folder can undergo modifications during the development phase, it becomes quite challenging to keep track of which files need to be included or excluded in the Advanced Installer project.
However, there's a solution to this - you can make use of the folder synchronization feature offered by Advanced Installer to automate this task.
Go to the Files and Folders page and create a regular folder in the Application Folder view. Then, synchronize the created folder with the root folder of the application.

2. Create the application on the IIS page
Once the resources are added to the project, you have to create the application. To achieve this, follow the next steps:
- Go to the IIS view
- Use the [ New Web Application ] toolbar button to create a new application.
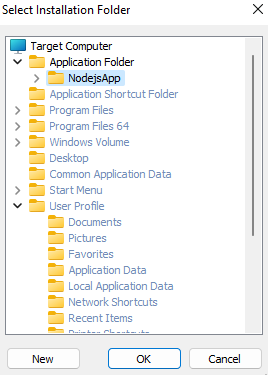
- From the opened dialogue, select the folder previously created in the Application Folder view as Installation Folder.

3. Create the Application Pool
To make sure your application runs as expected, it is recommended that it run under its own application pool instead of the Default App Pool. To create an application pool, go to IIS view and use the [ New Application Pool ] toolbar button. Once created, follow the next steps to use it for your web application:
- Go to the application → Application Pool tab.
- Enable Use installed application pool and select the created pool.

4. Enable the required IIS Windows Features
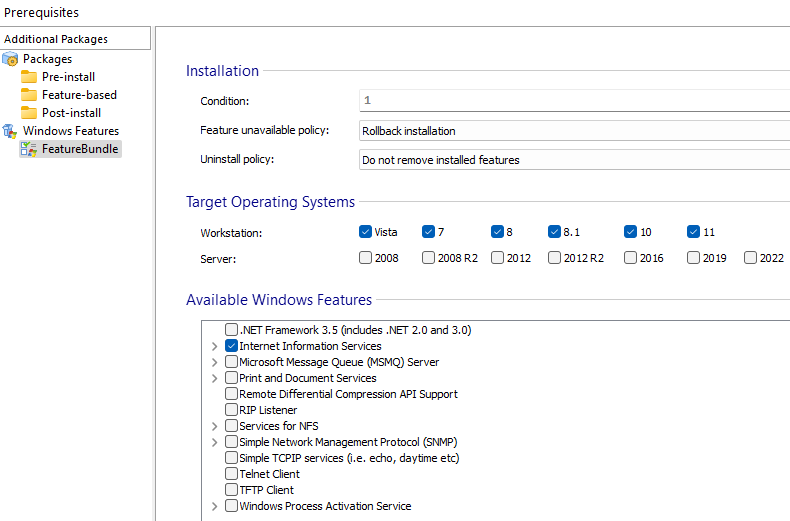
To enable the required IIS features, use a Windows Feature Bundle. To add one, go to the Prerequisites view of Advanced Installer and simply use the [New Windows Feature Bundle] toolbar button.

An IIS launch condition is automatically created in the Software tab of the Launch
Condition page when a new application is created in the Advanced Installer project. It is
safe to remove the software launch condition because we made sure that IIS is enabled on the
target computer using Windows Features.
5. Launch the application at the end of the installation process
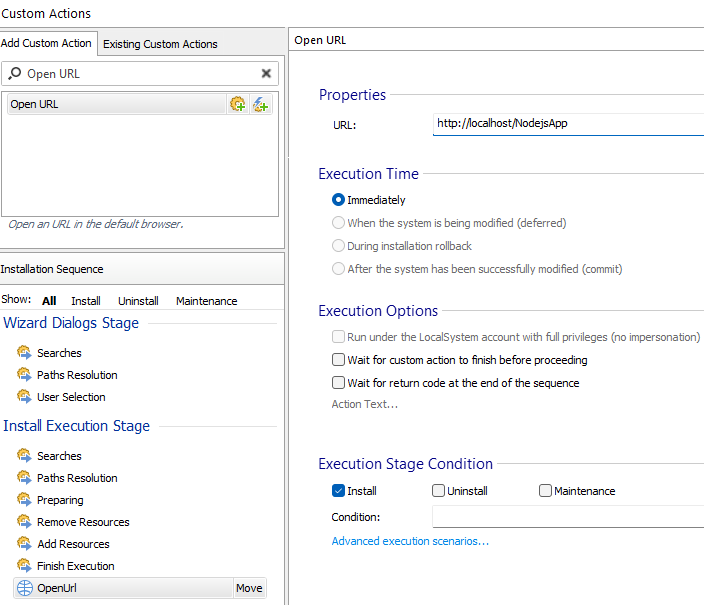
If you want to launch the application in a browser at the end of the installation process, follow the next steps:
- Go to the Custom Actions view.
- In the Add Custom Action section select the Open URL custom action.
- Provide the URL and check only the Install option under Execution Stage Condition.
- Place the Open URL custom action at the end of the Install Execution Stage.

6. Video Tutorials
The following video tutorials can help you configure an installer for your Node.js web app.
7. Conclusion
We hope this article helped you publish your Node.js application to IIS. Let us know if there's any other topic you'd like us to address.