How to display some dialogs depending on the selected features?
The following article uses options that are available starting
with the Enterprise edition and project
type.
You may want to let the user select which features he wants to install from your application and display a specified dialog for each feature that the user selected. In order to achieve this, you can implement the steps described below.
You can download and unzip the “Dialogs by Features” sample project to better understand how to configure your own package. The Enterprise or Architect edition of Advanced Installer is required in order to build and run the project.
In the attached project you will find 4 features with 4 dialogs linked to them.
The steps to follow are presented below:
1. Go to the Organization page, create your features and set some suggestive identifiers for them (e.g., Feature1, Feature2, etc.)
2. Go to the Dialogs page and add the “ConfigureDlg” dialog
3. Under the “ConfigureDlg” dialog add a “New Dialog” for each feature that you have in your package and rename each dialog as you please (e.g. Feature1Dlg, Feature2Dlg, etc.)
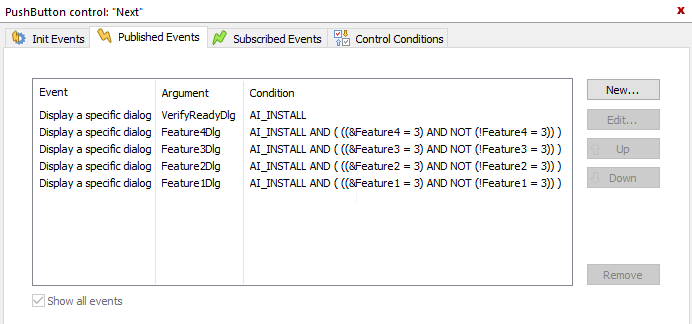
4. Select the [ Next ] button of the “ConfigureDlg” dialog and add as many “Display a specific dialog” published events as the dialogs that you want to set a condition for (e.g. in case of 4 feature dialogs + the “VerifyReadyDlg” dialog that follows them you will need 5 events)
- From the “Argument” combo box choose the name of the dialog that will be displayed
- In the “Condition” field use the feature that you want to link to the dialog selected above: ((&Feature1 = 3) AND NOT (!Feature1 = 3))
- Place the events in a reverse order of the dialogs displaying (e.g. VerifyReadyDlg, Feature2Dlg, Feature1Dlg)
For more information about the control events and the order they are
performed you can take a look at the ControlEvent Table article.
The image below shows the control events created on the [ Next ] button of the “ConfigureDlg” dialog and their configuration:

5. Select the [ Next ] button of the dialogs related to your features and perform the same actions described at step 4. (pay attention to the number of the control events that you need to add because it is different for each dialog).
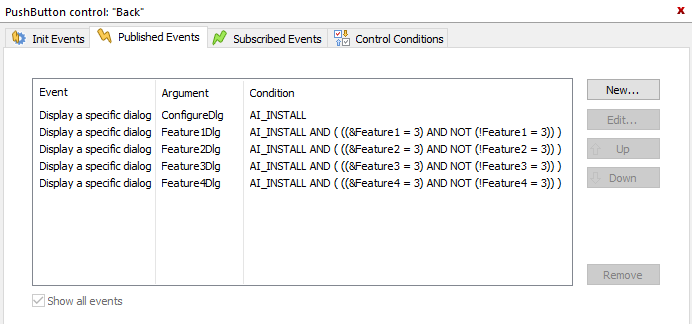
6. Select the [ Back ] button of the “VerifyReadyDlg” dialog and the dialogs related to your features and create the control events described at steps 4 and 5 but in a reverse order.
The image below shows the control events created on the [ Back ] button of the “VerifyReadyDlg” dialog and their configuration:

7.Build and run the project