How to append data to existing REG_BINARY using Advanced Installer
The following article uses options that are available starting with the Professional edition and project type.
When building an installer you may want to append data to existing registry values. If that registry value is a string, Advanced Installer already supports appending new data to the existing value. The problem comes when trying to work with different types of registry values.
This article will show you how to append new data to existing REG_BINARY values using custom actions in Advanced Installer.
1. Can we append values to a REG_BINARY registry?
As said before, Advanced Installer supports appending new data to existing registry values only for the string values. For any other type of value, you will have to overwrite the existing content with the new one.
Let’s say that your setup package needs to append new data to a REG_BINARY value installed by another application. In that case we will have to store the existing value in a property, append the new data to it and then replace the registry value’s data with the one stored in the property
Fortunately, Advanced Installer offers built-in support for the majority of the operations presented previously.
2. Setting up the properties used by the Custom Action
Go to the Search page and create a new registry search in which you will target the REG_BINARY in question.

Now, the ORIGINAL_REG property will store the value of the REG_BINARY, before appending the new content.
Go to the properties page and add a new property. This property will store the data you want to append to the REG_BINARY.

3. Using the custom action
If you want to know more about creating custom actions using C#, check out our article on this topic.
using Microsoft.Deployment.WindowsInstaller;
using System;
using System.Collections.Generic;
using System.Text;
using Microsoft.Win32;

namespace RegAppend
{
    public class CustomActions
    {
        [CustomAction]
        public static ActionResult AppendReg(Session session)
        {
            session.Log("Begin AppendReg");
            string original = session["ORIGINAL_REG"];
            string toappend = session["APPENDREG"];
            original = (original + toappend).Substring(2);
            session["ORIGINAL_REG"] = original;
            return ActionResult.Success;
        }
    }
}
This custom action is simply getting the properties that you have defined and concatenates them. The Substring method is called in order to get rid of the hexadecimal prefix of the original registry. The prefix will be added again when assigning the property value to the new registry entry.
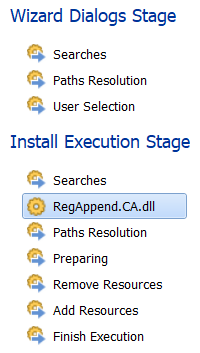
In the Custom Actions page add a new “Call function from attached native DLL” custom action and select the previously built custom action DLL file. Place this custom action right after the “Searches” step in the Install Execution Stage.

Also, because this custom action needs to access the session’s properties, you have to set its Execution Time as Immediate.

4. Replacing the registry value
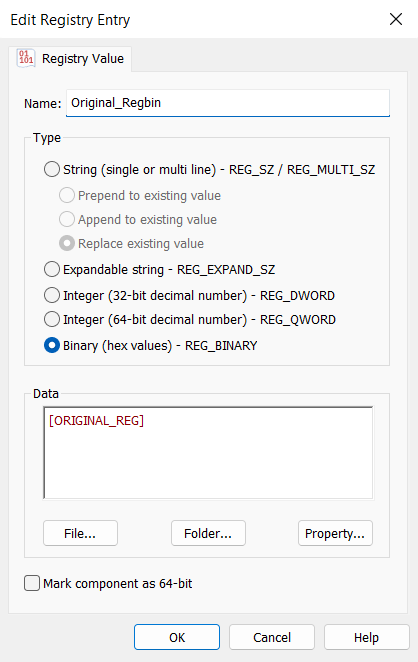
In order to add new content to existing registry keys you have to recreate their structure in the Registry page from Advanced Installer.

After recreating the registry structure in which you want to work in, add a new REG_BINARY value with the same name as the one you want to replace, and in the Data field pass the ORIGINAL_REG property.
