How to Handle Process Custom Actions in MSI Packaging
Understanding custom actions can be challenging, and most beginner IT Professionals tend to “leave the chat” when custom actions are brought to the table. Without a doubt, MSI technology is complex, and best practices have evolved over the years, adding to the difficulty.
So let’s start an article series where we touch nine of the most popular custom actions that are used in the industry. In these articles, we will have a look on how you can implement them easily with Advanced Installer but also by using VBScript or PowerShell custom actions.
Terminate Process in Advanced Installer
The terminate process custom action is frequently used in installers to close any running processes associated with an application before starting the installation or uninstallation. This ensures that no other files are in use during the operation, increasing the installation’s success rate.
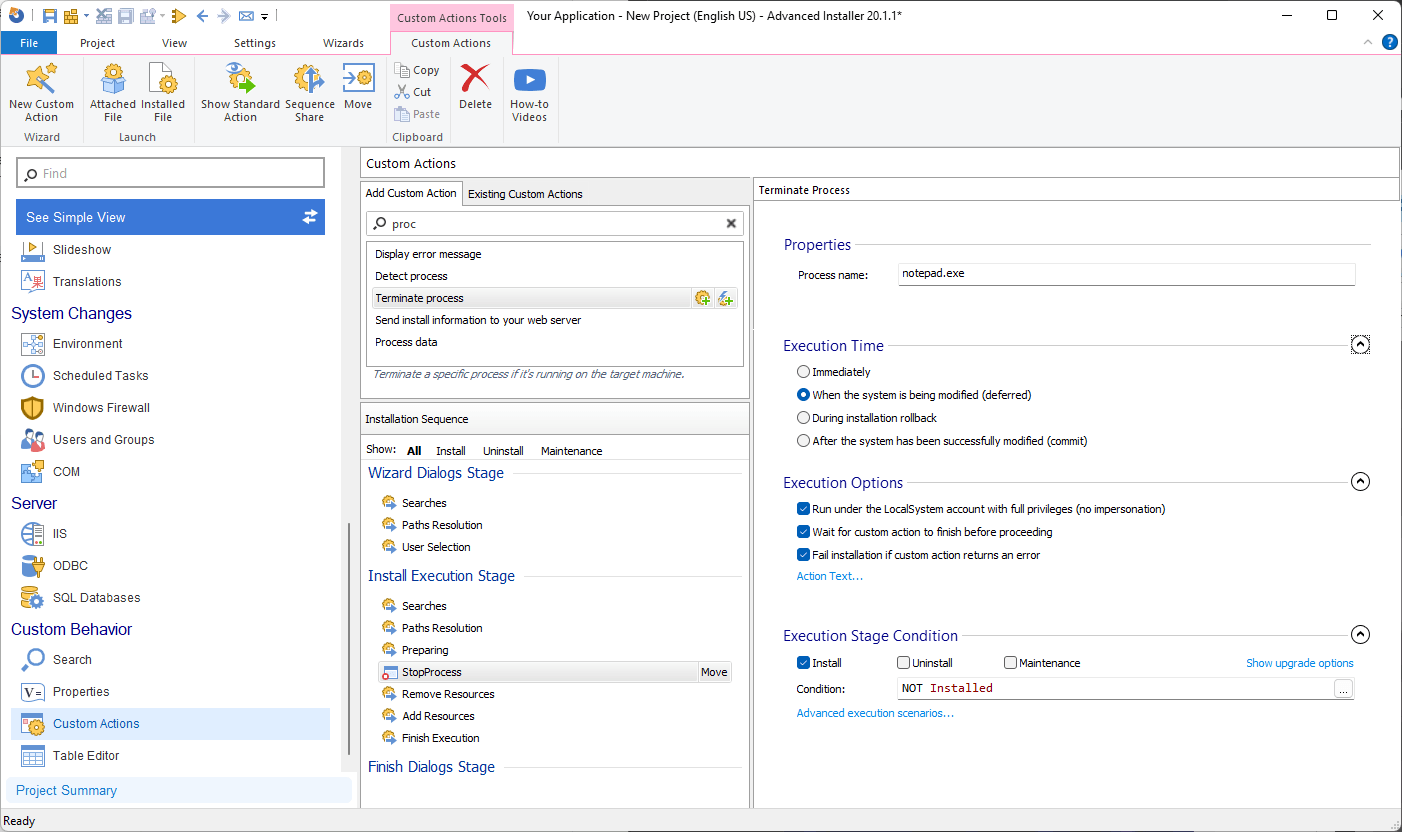
For example, let’s say I want to terminate the “notepad.exe” process. With Advanced Installer, it's straightforward:
1. Navigate to the Custom Actions Page
2. Search for Terminate Process custom action and add it in sequence
3. Type the process name (in our case notepad.exe)

4. Build and run the installation
If you want to run the same action during the uninstallation:
- Go to Execution Stage Condition
- Check the Uninstall checkbox
- Modify the Condition to:
NOT Installed OR REMOVE~=ALL
Terminate Process with VBScript
Using VBScript to close a specific process is also achievable. There are two methods:
- Using the taskkill command available in cmd.
Dim oSH
Dim returnVal
Dim shellCommand
    Set oSH = CreateObject("WScript.Shell")
    shellCommand = "cmd.exe /c taskkill /f /fi " & Chr(34) & "notepad.exe" & Chr(34) & " /t"
    returnVal = osh.Run (shellCommand, 0, true)
Set oSH = nothingTo learn more parameters for the taskkill utility type taskkill.exe /? In
- Using the Win32_Process via WMI query.
strComputer = "."
Set objWMIService = GetObject("winmgmts:" _
    & "{impersonationLevel=impersonate}!\\" & strComputer & "\root\cimv2")
Set colProcessList = objWMIService.ExecQuery _
    ("Select * from Win32_Process Where Name = 'Notepad.exe'")
For Each objProcess in colProcessList
    objProcess.Terminate()
NextBoth taskkill command and Win32_Process will get the same result with notepad.exe being stopped. However for more complex operations, the Win32_Process route is preferred.
Once you have your VBScript ready, open Advanced Installer and perform the following steps:
1. Navigate to the Custom Actions Page
2. Search for Launch Attached File and add it to the sequence
3. A window will appear to chose the previously created VBScript

4. Build and run the installer
New to Advanced Installer? Level up your software installations with seamless custom actions. Try our 30-day free trial today!
Terminate Process with PowerShell
Similar to VBScript, PowerShell offers two ways to terminate a process:
- Using the taskkill command
PowerShell makes it even easier by allowing a simple command to terminate a process:
taskkill /f /im notepad.exe /t
- Using the Stop-Process cmdlet
Stop-process -name notepad -Force
Once you have your PowerShell script ready, open Advanced Installer and perform the following steps:
1. Navigate to the Custom Actions Page
2. Search for “Run PowerShell script file” and add it to the sequence
3. Select “Attached Script”
4. A window will appear to chose the previously created PowerShell script

5. Build and run the Installer
What is the difference between TASKKILL and Stop-Process?
Both the TASKKILL and Stop-Process allow you to kill a process forcefully with a PID or name.
The difference in Stop-Process is that you can define a process object (a variable or command), but you can’t define other objects such as system name, username, or password, as you would in the TASKKILL command.
However, Stop-Process helps you create an autonomous task with scripting powers. For example, the “-passthru” parameter allows you to return objects from commands, which you can later use for scripting. The Stop-Process also includes two risk mitigation parameters (-WhatIf) and (-Confirm) to avoid the Stop-Process from unwanted changes on the system.
As you can see the difference between the number of lines needed for VBScript and PowerShell is quite big. Again, both of the above commands achieve the same result, it’s up to you to decide which is best for you.
Particular Terminate Process Scenario
While the above examples cover most of the cases of process closure, there are specific scenarios that require a more complex scripting approach. One of these cases can be seen with Java applications.
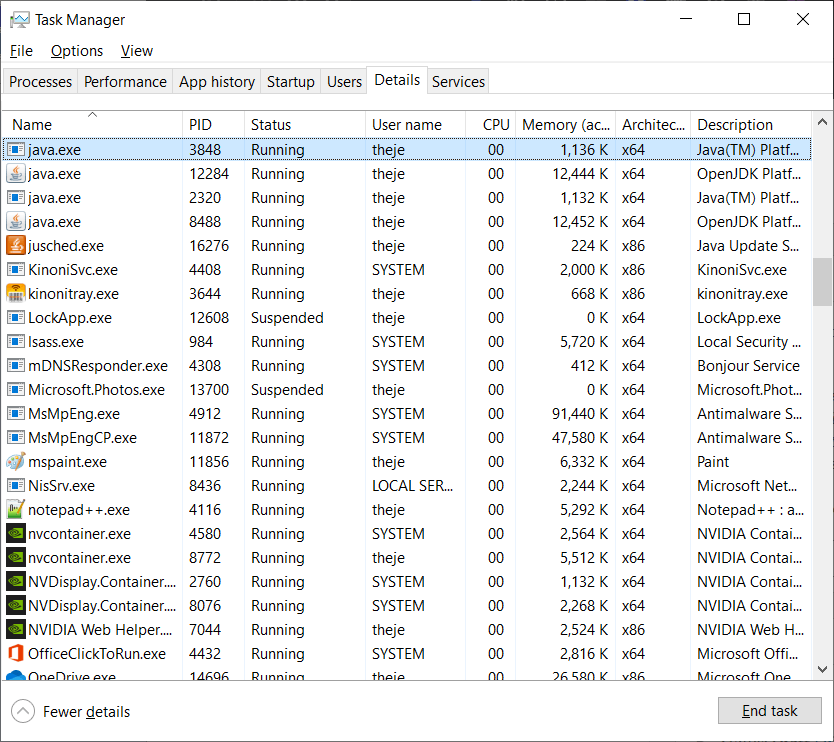
If you have multiple Java applications opened and check the Task Manager, you will see that you actually have multiple Java.exe processes running.

If you are using the above techniques you will close all the Java processes which is not what we want.
But, we want to identify the corresponding application for each Java process. The most effective approach is to examine the command line of each Java process and match it with our specific application.
For full details on how to get the command line check out this article.
For example, let’s assume we have a Java application called Demo. If we search for the command line of each process we should find something like:
“C:\Program Files\Java\jdk-15.0.2\bin\java.exe” Demo
All we have to do is modify our script to search through all processes and find the exact one which has the specific string in it, in our case “Demo”.
- For VBScript, we can use the following:
On error Resume Next
Dim objWMIService, objProcess, colProcess, Linie, strComputer, strList
strComputer = "."
Set objWMIService = GetObject("winmgmts:" & "{impersonationLevel=impersonate}!\\" & strComputer & "\root\cimv2")
Set colProcess = objWMIService.ExecQuery _
("Select * from Win32_Process")
For Each objProcess in colProcess
if (objProcess.CommandLine <> "") Then
Linie = objProcess.CommandLine
if (InStr(Linie,"Demo")) Then
objProcess.Terminate
end if
end if
Next
Set objWMIService = Nothing
Set colProcess = Nothing- For PowerShell, we can use the following:
$CommandLines = Get-CimInstance Win32_Process
foreach ($command in $CommandLines)
{
    If ($command.CommandLine -like "*Demo*"){
        write-host $Command.processId
        Stop-Process -id $Command.processId
    }
}Once you have the script edited, follow the above steps to add it in Advanced Installer and test the installer.
Detect Process in Advanced Installer
When you want to check if a process is running before starting the installation or need to wait for a specific process to close before proceeding with the installation process, you can use Advanced Installer’s “Detect Process”.
Advanced Installer comes with built-in custom actions to detect and wait for processes. All you have to do is:
1. Navigate to the Custom Actions Page
2. Search for Detect Process custom action and add it in sequence
3. Type the process name (in our case notepad.exe)

4. Build and run the installation
This custom action only sets the AI_PROCESS_STATE property which you can later on use throughout your installer. For more information, check out this article on How to detect or stop a process.
Detect process with VBScript
To detect a process with VBScript, we are going to use the Win32_Process WMI which we earlier used to terminate a process.
If we want to detect if notepad is opened, we can use the following:
On error Resume Next
Dim strComputer
Dim objWMIService
Dim colProcessList
Dim objProcess
strComputer = "."
Set objWMIService = GetObject("winmgmts:" & "{impersonationLevel=impersonate}!\\" & strComputer & "\root\cimv2")
Set colProcessList = objWMIService.ExecQuery("Select * from Win32_Process Where Name = 'notepad.exe'")
If colProcessList.Count > 0 Then
	msgbox "Notepad is opened"
End If
Set objWMIService = Nothing
Set colProcessList = NothingUpon execution, a message box which states that “notepad is opened” will appear. You have the flexibility to decide how to handle the discovery of a specific process on the machine.
For instance, you can choose to:
- proceed with the installation of the application by returning a successful execution state;
- or set up a variable within the MSI to capture this information.
On error Resume Next
Dim strComputer
Dim objWMIService
Dim colProcessList
Dim objProcess
strComputer = "."
Set objWMIService = GetObject("winmgmts:" & "{impersonationLevel=impersonate}!\\" & strComputer & "\root\cimv2")
Set colProcessList = objWMIService.ExecQuery("Select * from Win32_Process Where Name = 'notepad.exe'")
If colProcessList.Count > 0 Then
	Session.Property("ISPROCESSRUNNING") = "Yes"
End If
Set objWMIService = Nothing
Set colProcessList = NothingThe above code will set the ISPROCESSRUNNING MSI variable to Yes.
Make sure that the ISPROCESSRUNNING property is available in the MSI before executing the script.
Detect Process with PowerShell
When it comes to process detection, PowerShell offers a convenient solution with similar results. Use the following code snippet:
$notepad = Get-Process notepad -ErrorAction SilentlyContinue
if ($notepad) {
Write-host “notepad is running”
}Additionally, you can set an MSI Property using PowerShell to achieve the same outcome as Advanced Installer. Consider the following code:
$notepad = Get-Process notepad -ErrorAction SilentlyContinue
if ($notepad) {
	AI_SetMsiProperty ISPROCESSRUNNING "Yes"
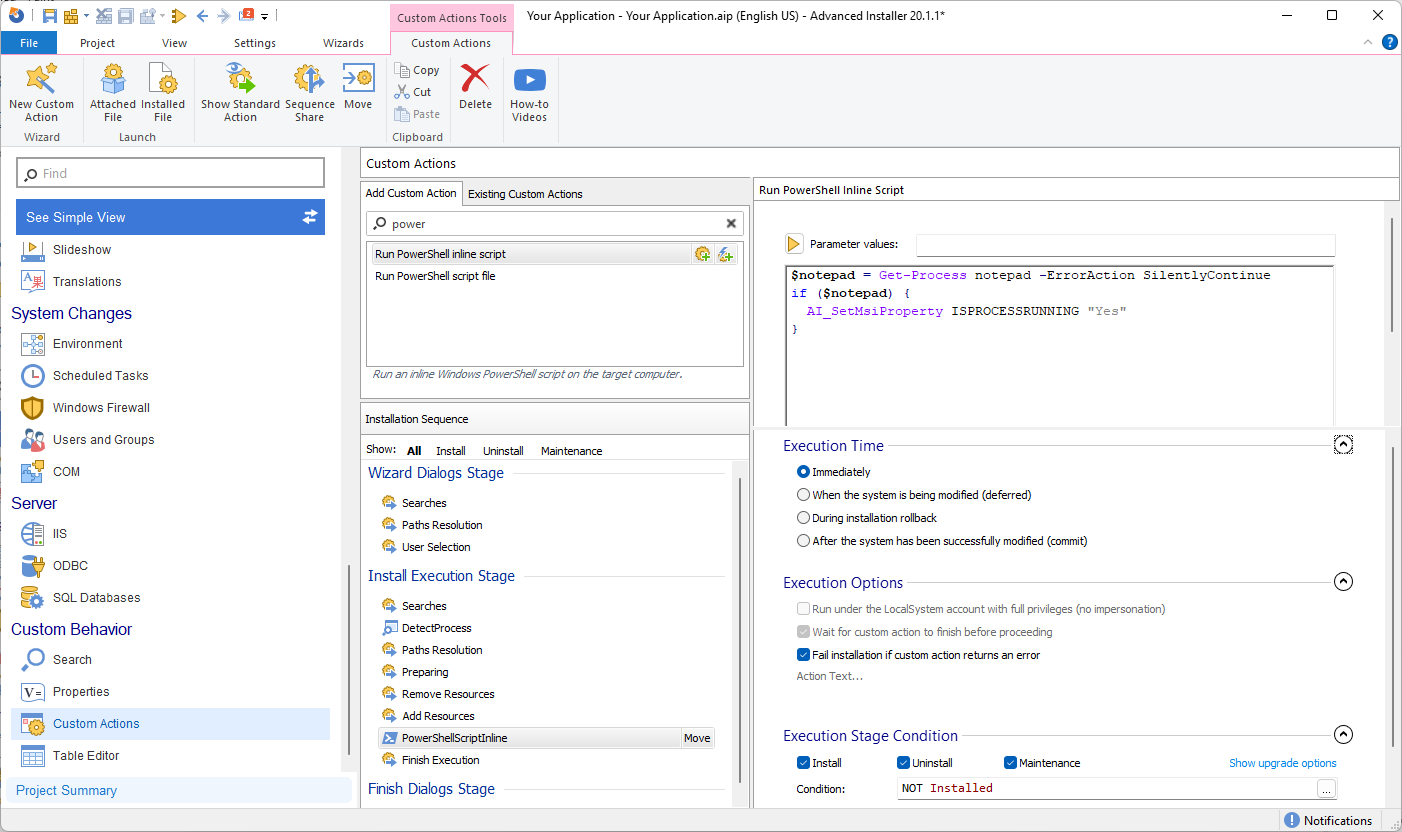
}You can also write the PowerShell code directly into Advanced Installer with these steps:
1. Navigate to the Custom Actions Page
2. Search for Run PowerShell inline script custom action and add it in sequence
3. Write the above script

4. Build and run the installation
Wait for Process with VBScript
Let’s say you need to wait for a specific process to close before continuing with the installation process. To achieve this with VBScript, use this code:
On error Resume Next
Dim strComputer
Dim objWMIService
Dim colProcessList
Dim objProcess
strComputer = "."
Set objWMIService = GetObject("winmgmts:" & "{impersonationLevel=impersonate}!\\" & strComputer & "\root\cimv2")
Set colProcessList = objWMIService.ExecQuery("Select * from Win32_Process Where Name = 'notepad.exe'")
Do While colProcessList.Count > 0
	Set colProcessList = objWMIService.ExecQuery("Select * from Win32_Process Where Name = 'notepad.exe'")
	Wscript.Sleep(1000) 'Sleep 1 second
Loop
Set objWMIService = Nothing
Set colProcessList = NothingWhile notepad.exe is running, the script continues to run, thus blocking the installation to continue. Of course this can be later modified to show a certain message to the user until the process is closed.
Wait for Process with PowerShell
It’s even easier to wait for a process with PowerShell, since it offers the Wait-Process cmdlet:
Wait-Process -name notepad
You can easily add it in Advanced Installer as previously shown in the Process Detection case.
Conclusion
Although custom actions may initially seem daunting, with practice and better understanding, you will become more adept at handling and managing them effectively. We would love to hear about your experiences and insights with custom actions! Please share your thoughts and questions in the comment section below.
