How to Install Unsigned Drivers easily on Windows 10/11?
The confusion of dealing with unsigned drivers can sometimes disrupt your software installation process. Windows typically raises a red flag when such drivers come into play, triggering a warning message that it can't validate the publisher's credibility.
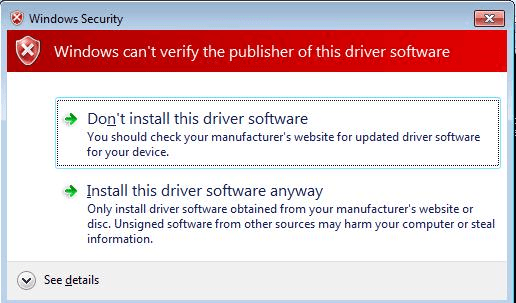
To push past this hurdle, you usually have to opt for "Install this driver software anyway". But what if there was a way to run these tricky drivers without user intervention?
Sounds tempting, doesn't it? In this article, we will walk you through the process of installing unsigned drivers.
What should we do when installing unsigned drivers?
To begin, let's gather the tools we need. Most of these are sourced from the Windows Driver Kit (Latest version: Windows Driver Kit W11 22H2):
- Inf2Cat.exe - For generating the unsigned catalog file from our INF
- MakeCert.exe - Used to create our certificate
- SignTool.Exe - To sign our catalog file with an Authenticode digital signature
- Certmgr.exe - To add and delete our certificate from the system root
Now, let's have a look at the steps you should follow to get your unsigned certificates installed silently.
How to Create a digital certificate by using the MakeCert tool?
A digital certificate is an electronic document that guarantees the identity of a website or an individual. It's a necessity for installing unsigned drivers as it creates an aura of trustworthiness.
Now, we’ll focus on creating a self-signed digital certificate using the MakeCert tool from the Windows Driver Kit.
For this process, we will be using an x86/x64 Free Build Environment command prompt with administrator permissions.
This task might sound daunting, but we have broken it down into simple steps for you. So let's jump right into it:
1. On the Start menu, right-click x86 Free Build Environment and select Run as administrator.
2. At the x86/x64 Free Build Environment command prompt, type the following command on a single line (it appears here on multiple lines for clarity and to fit space limitations):
makecert -r -n "CN=Name"
		 -ss CertStore
		 -sr LocalMachine
Ex: makecert -r -n CN="TestCert" -ss Root -sr LocalMachine
Let's break down what each parameter represents:
- -r: Specifies that the certificate is to be "self-signed," rather than signed by a CA. Also called a "root" certificate.
- -n "CN=Name": Specifies the name associated with this new certificate. It is recommended that you use a certificate name that clearly identifies the certificate and its purpose.
- -ss CertStore: Specifies the name of the certificate store in which the new certificate is placed.
- -sr LocalMachine: Specifies that the certificate store created by the -ss option is in the per computer store, instead of the default per user store.
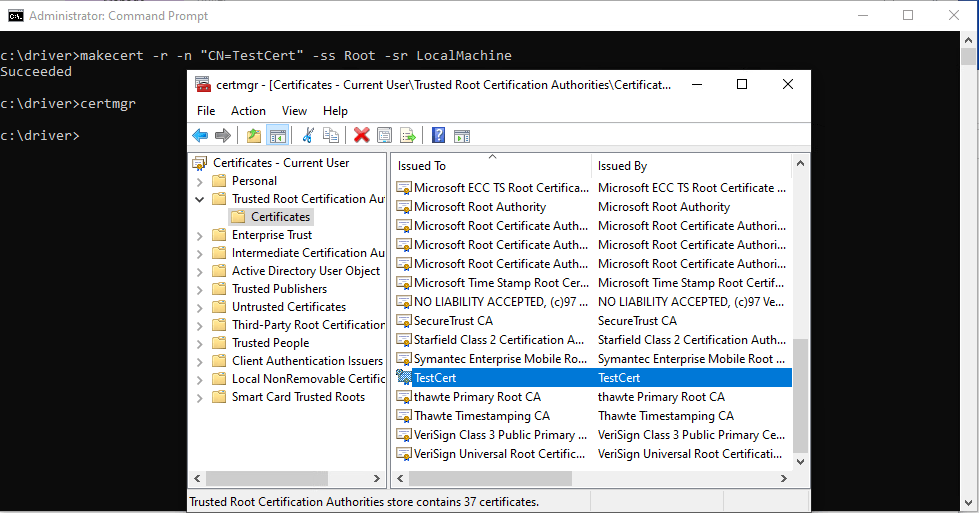
3.The command returns the message "Succeeded" when the store and certificate are created.
How to create a .cat (catalog) file for the driver?
At times, you might come across drivers that lack a .cat (catalog) file, and you'll need to generate one yourself. The .cat file is crucial as it serves as the digital signature for your driver package. This section will guide you step by step on how to create a .cat file using the Inf2Cat tool provided by Microsoft.
Follow the steps below to generate a .cat file:
1. Open the .INF (Information File) of your driver in a text editor. The .INF file contains all the necessary details about the driver, including its configuration.
2. In this file, under the [version] section, check whether there is an entry specifying a .cat file. If it's absent, add it at the end of the section as shown below:
[version]
Signature=xxxxxx
Provider=xxxxxx
CatalogFile=MyCatalogFile.cat
3. In the CatalogFile=MyCatalogFile.cat line, "MyCatalogFile.cat" represents the name of the .cat file that you want to generate. If the line specifying it is absent, you will encounter an "Error 22.9.4 - Missing 32-bit catalog file entry" when you run Inf2Cat.exe.
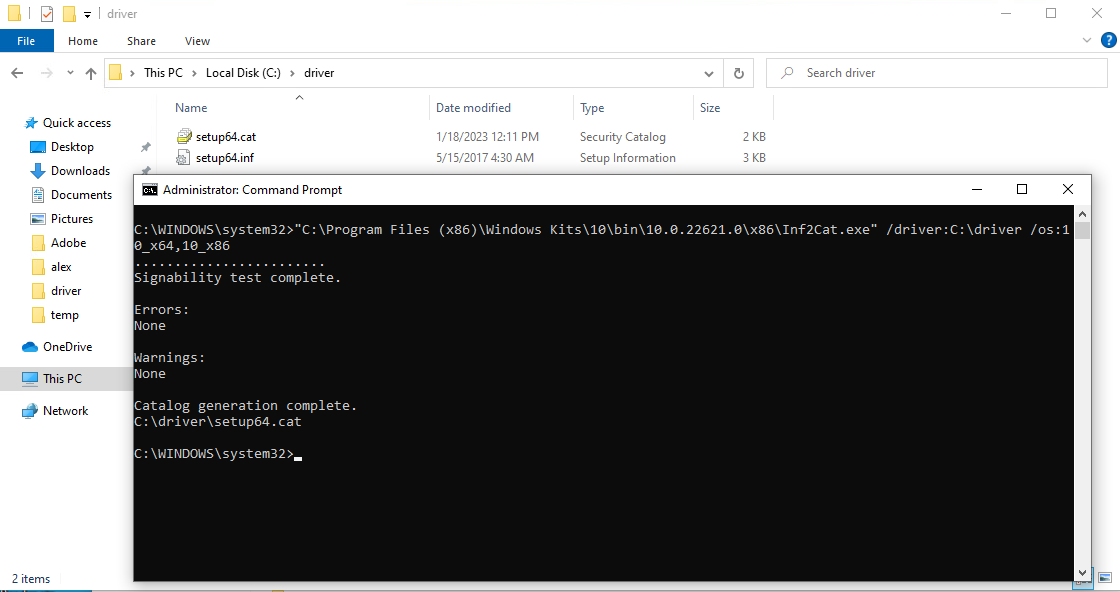
4. Once you've confirmed the presence of the CatalogFile entry in the .INF file, you can proceed to generate the .cat file using the Inf2Cat tool. Run the following command line in the command prompt:
Inf2Cat.exe /driver:"<Path to folder containing driver files
Ex : Inf2cat.exe /driver:[PathToINFwithoutFile] /os:10_x64,10_x86
This command line's parameters are as follows:
- /driver:c:\toaster\device: Specifies the location of the .inf file for the driver package. You must specify the complete folder path. A '.' character does not work here to represent the current folder.
- /os:10_x86 or 10_x64:Identifies the 32-bit version of Windows 10 as the operating system. Run the command inf2cat /? for a complete list of supported operating systems and their codes.
How to Sign the catalog file using SignTool?
After you create a catalog for your driver, it's time to apply your digital signature using SignTool.
The signing process involves attaching a digital signature to your .cat file, which adds an extra layer of security and verifies the author of the driver.
Let's walk through the steps on how to sign your catalog file:
First, familiarize yourself with the necessary command parameters. Below is an example command to sign your catalog file using SignTool:
signtool sign /v /sm /s Root /n "TestCert" /t http://timestamp.digicert.com path\example.cat
The meaning of each parameter is as follows:
- /v: Enables verbose output. SignTool will provide more detailed output about the signing process.
- /sm: Specifies that it's using a machine store, instead of a user store.
- /s CertStore: Specifies the name of the certificate store in which SignTool searches for the certificate specified by the parameter /n. In our case we look at the Root.
- /n “Name”:Specifies the name of the certificate to be used to sign the package.
- /t path to time stamping service: Specifies the path to a time stamping service at an approved certification authority. If you purchase your certificate from a commercial vendor, they should provide you with the appropriate path to their service.
- path\example.cat: Specifies the path and file name of the catalog file to be signed.
Note: You must include enough of the name to allow SignTool to distinguish it from others in the store. If this name includes spaces, then you must surround the name with double quotes.
Run the command in the command prompt with the correct parameters for your specific case. Make sure you run the command prompt with administrator permissions.
SignTool will indicate successful completion with the following message: "Successfully signed and timestamped: C:\toaster\device\example.cat"

This process, when executed correctly, guarantees that your catalog file is securely signed, promoting trust and acceptance when distributing your driver package.
How to Manually Exporting the Certificate from Certstore
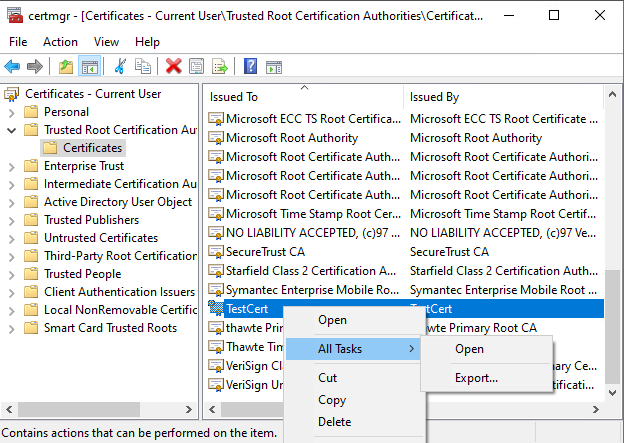
Next, export the certificate manually by:
- Run the administrator command: certmgr.exe
- Right-click on your certificate, then select All Tasks → Export…
Install the certificate to Root and TrustedPublisher
With your certificate ready, install it to Root and TrustedPublisher using the 'certutil.exe' command:
certutil.exe -addstore "Root" [PathToCertificatewithFile]
certutil.exe -addstore "TrustedPublisher" [PathToCertificatewithFile]

To remove it, you can use this command:
certutil.exe -delstore "Root" [PathToCertificatewithFile]
certutil.exe -delstore "TrustedPublisher" [PathToCertificatewithFile]
Now we can install the driver without the prompt.
How to Build the MSI to Install Unsigned Drivers?
Now that we know how to sign a driver, let's focus on integrating these actions into an MSI. It takes two steps:
- Install the certificate
- Install the driver
For the second step, we already have an article that explains how to install drivers in multiple ways.
Now, we'll focus on crafting a script that executes the 'certutil' commands mentioned earlier.
Let’s assume that the driver .inf name is HP.inf and that we are going to place the certificate directly into the C:\Windows\DPInst.
For VBScript:
Option Explicit
On Error Resume Next
Dim strCmd,WshShell,strInstalldir
Set WshShell = CreateObject("WScript.Shell")
strInstalldir = WshShell.ExpandEnvironmentStrings( "%SYSTEMROOT%" )
strCmd = "certutil.exe -addstore " & chr(34) & "Root" & chr(34) & " " & chr(34) & strInstalldir & "\DPInst\TestCer.cer" & chr(34)
WshShell.Run strCmdOnce the script is created, navigate to the Custom Actions Page and add the Launch attached file predefined custom action into the sequence, select the installation vbscript file that was previously created and configure the Custom Action as such:
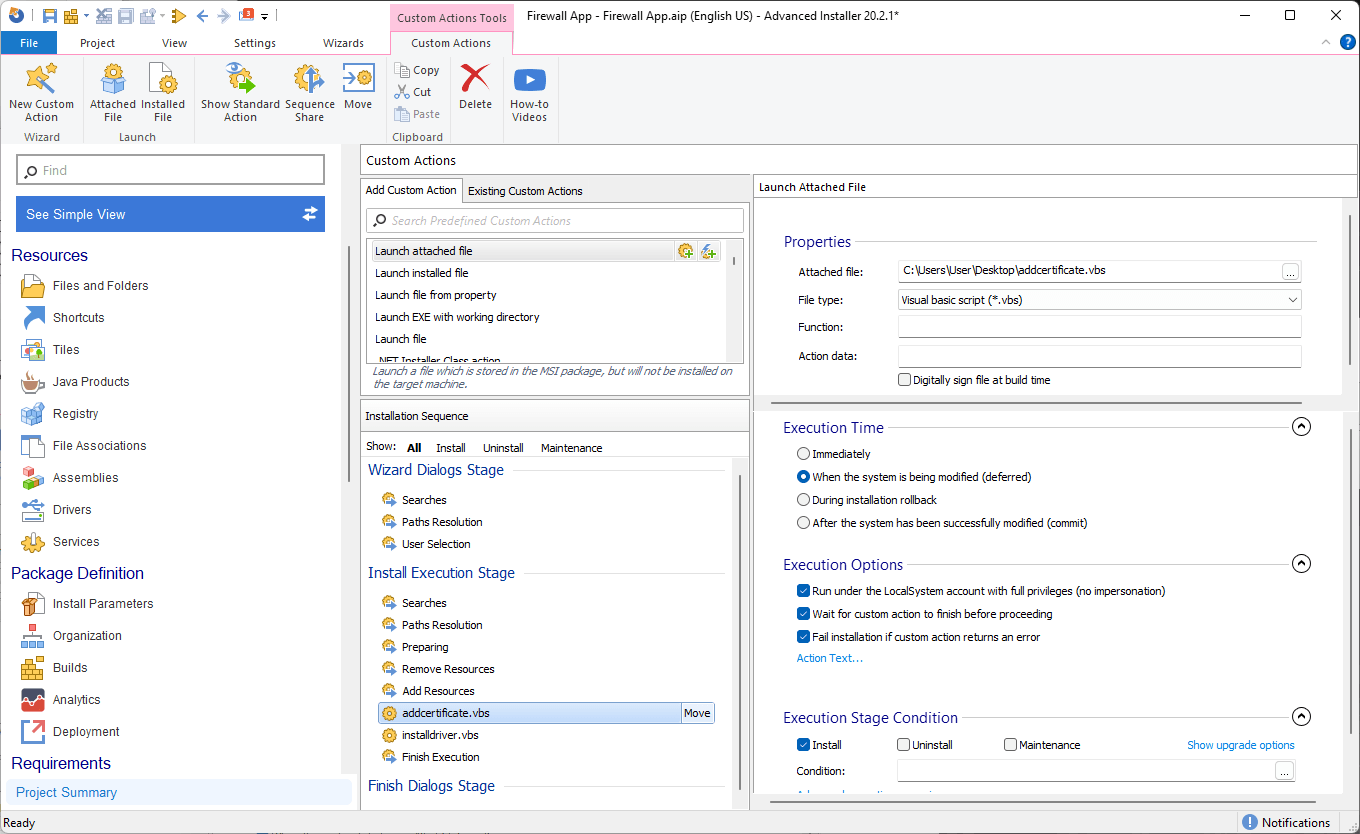
Make sure that the script which installs the certificate is placed before the script that installs the driver under the “Install Execution Stage” section.
It's even easier if you use PowerShell, since we can use the Import-Certificate cmdlet:
$CerLocation = $env:SystemRoot + "\DPInst\TestCer.cer"
Import-Certificate -FilePath $CerLocation -CertStoreLocation Cert:\LocalMachine\Root
Import-Certificate -FilePath $CerLocation -CertStoreLocation Cert:\LocalMachine\TrustedPublisher
Once we have the script ready:
1. Navigate to the Custom Actions Page and add the Run PowerShell script file predefined custom action into the sequence,
2. Select Attached Script
3. Choose the file that was previously created and configure the Custom Action as seen in the image below:
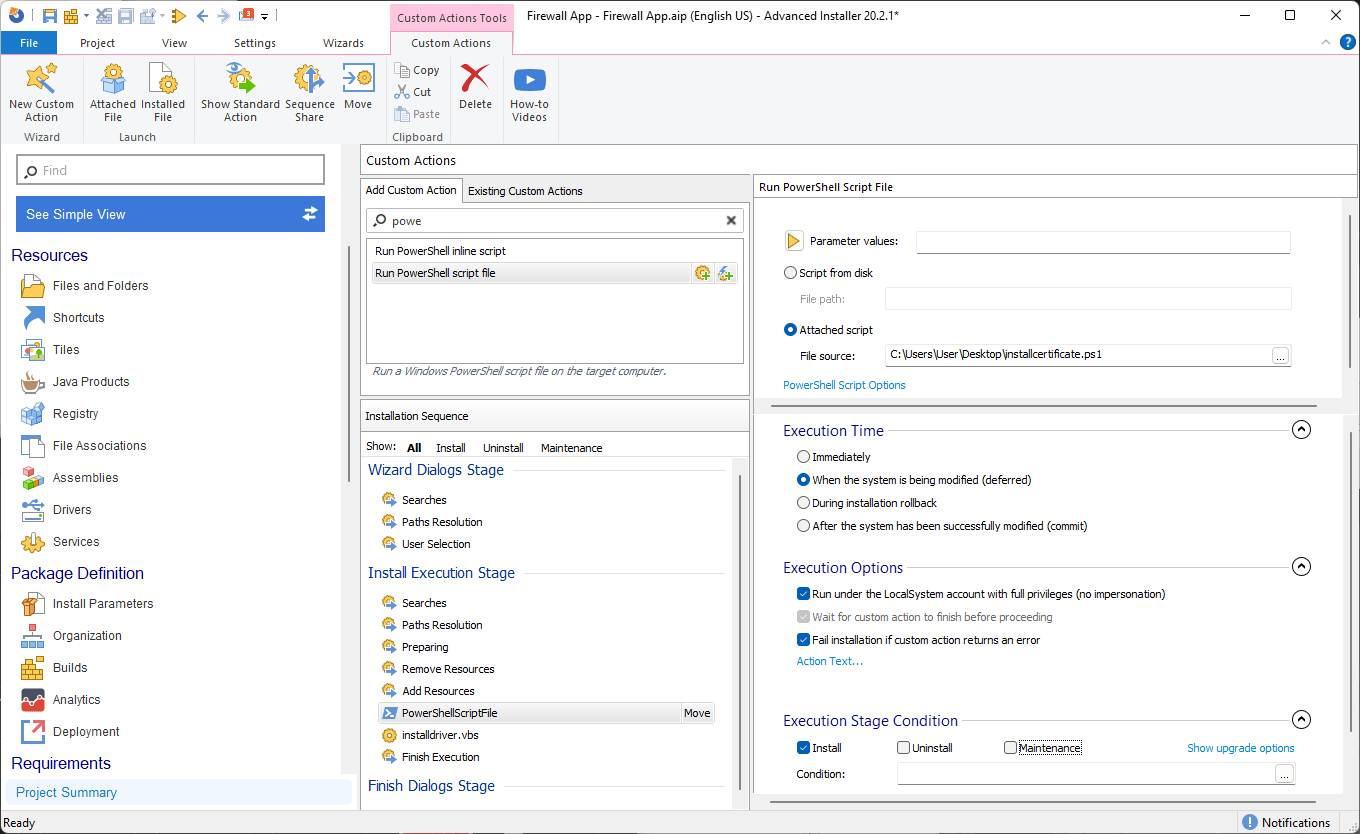
4. Next, build the package. During installation/uninstallation, the PowerShell scripts will run and install/uninstall the driver without asking if we want to install an unsigned driver.
Installing unsigned drivers with Advanced Installer
As you can see, handling unsigned certificates is time consuming and complicated.
Advanced Installer allows you to install unsigned drivers with just a few clicks:
1. Navigate to the Drivers page and click on New Driver.
2. Select the .inf file which must be present in the package.

3. Click on “Install unsigned driver packages and driver packages that have missing files” and let Advanced Installer take care of the rest.

That is it! Now, just build and install the package and you should have a clean installation without any warning messages from the OS.
Conclusion
Installing unsigned drivers can be a daunting task for IT professionals. A seemingly straightforward process can quickly become complex and time-consuming.
However, with the right tools and the tips provided in this guide, you can navigate this challenge with confidence and efficiency. Remember, your ultimate goal is to ensure a seamless and user-friendly installation process.
Good luck!
