How to Handle Driver Installation through an MSI package?
Installing software drivers can often seem like a complex task, but it doesn’t have to be. While MSI technology doesn't directly support driver installation, the Operating System (OS) provides a multitude of ways to achieve this.
In this article, we'll go through various methods of installing drivers using MSI.
How to Install a Driver in MSI with DPInst
Driver Package Installer (DPInst) is a component of Driver Install Frameworks (DIFx) version 2.1. DIFx simplifies and customizes the process of driver package installation on your device. This type of installation is commonly known as a software-first installation.
DPInst supports automatic driver updates for installed devices, ensuring they benefit from the latest features and enhancements.
The DPInst searches for INF files, necessary for driver packages in a specific location called the DPInst working directory. By default, this is the DPInst root directory, where the DPInst executable itself (DPInst.exe) is stored.
To specify a custom DPInst working directory, use the /path command-line switch. You'll find the DPInst utility log files in the %SystemRoot%\DPInst.log directory.
Remember, DPInst isn't native to the OS; it must be included in the MSI package, ideally near the driver .inf files.
Here's the command to install a driver with DPInst:
DPInst_x64.exe /F /LM /S
To see the full list of commands supported by DPInst, use this command:
DPInst_x64.exe /?
How to Install Drivers with PnPUtil?
Unlike DPInst, PnPUtil comes as a built-in tool in your OS and allows administrators to perform actions on driver packages. You can use PnPUtil to add, install, or delete a driver package.
To install a driver with PnPUtil, type down the following command:
PNPUtil.exe /add-driver PATH\DRIVERNAME.inf /install
For a full list of PnPUtil supported commands, use the following command:
PNPUtil.exe /?
Now that we know these two methods to install the drivers, let’s see how we can use them in VBScript or PowerShell.
How to Install Drivers with VBScript
Let’s consider this scenario: the driver .inf name is HP.inf and the DPInst.exe utility, along with the .inf file, are placed in the C:\Windows\DPInst folder.
Here's the script to install the driver:
Option Explicit
On Error Resume Next
Dim strCmd,WshShell,strInstalldir
Set WshShell = CreateObject("WScript.Shell")
strInstalldir = WshShell.ExpandEnvironmentStrings( "%SYSTEMROOT%" )
strCmd = chr(34) & strInstalldir & "\DPInst\DPInst_x64.exe" & chr(34) & " /F /LM /S"
WshShell.Run strCmd
Set WshShell = NothingAnd, the script to uninstall the driver:
Option Explicit
On Error Resume Next
Dim strCmd,WshShell,strInstalldir,strcmd1, strcmd2
Set WshShell = CreateObject("WScript.Shell")
strInstalldir = WshShell.ExpandEnvironmentStrings( "%SYSTEROOT%" )
strcmd= chr(34) & strInstalldir & "\DPInst\DPInst_x64.exe" & chr(34) & " /S /U " & chr(34) & strInstalldir & "\DPInst\HP.inf" & chr(34) &" /D"
WshShell.Run strCmd
Set WshShell = NothingOnce we are done creating the scripts and downloading the DPInst utility, we need to:
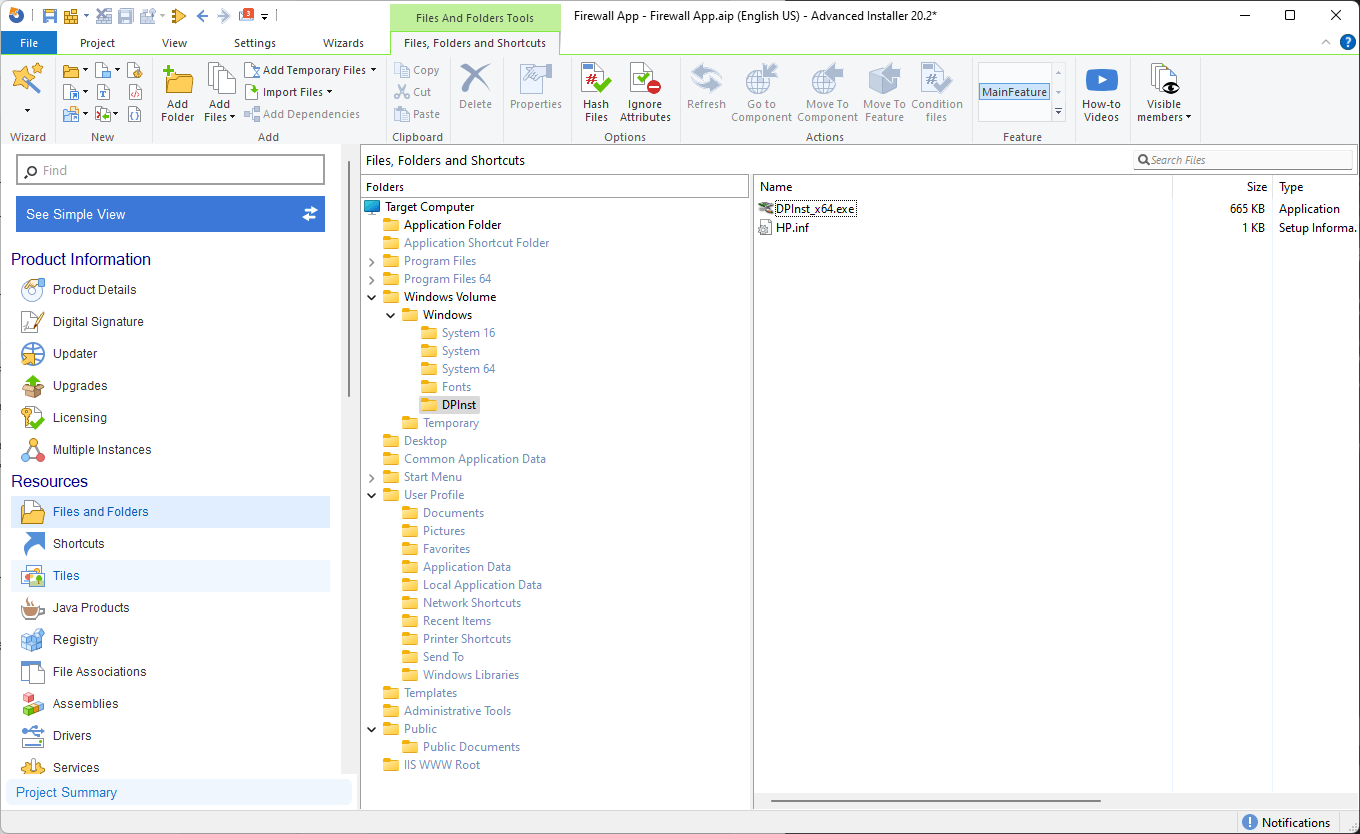
1. Open Advanced Installer and navigate to the Files and Folders Page;
2. Create a new directory under Windows Volume\Windows called DPInst;
3. Add the DPInst utility with the HP.inf file near it.
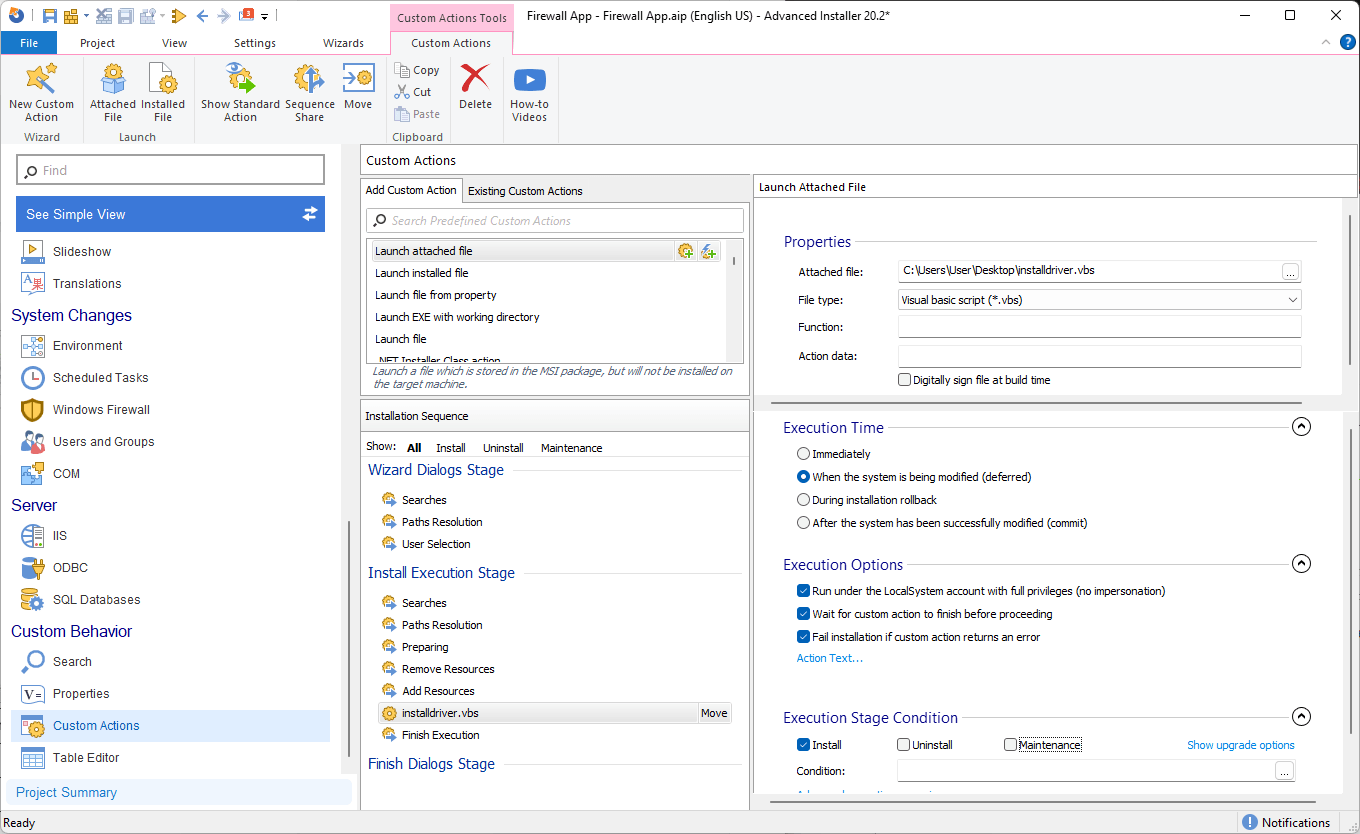
4. Now, move to the Custom Actions Page and add the Launch attached file predefined custom action into the sequence;
5. Select the installation vbscript file that was previously created and configure the Custom Action as such:
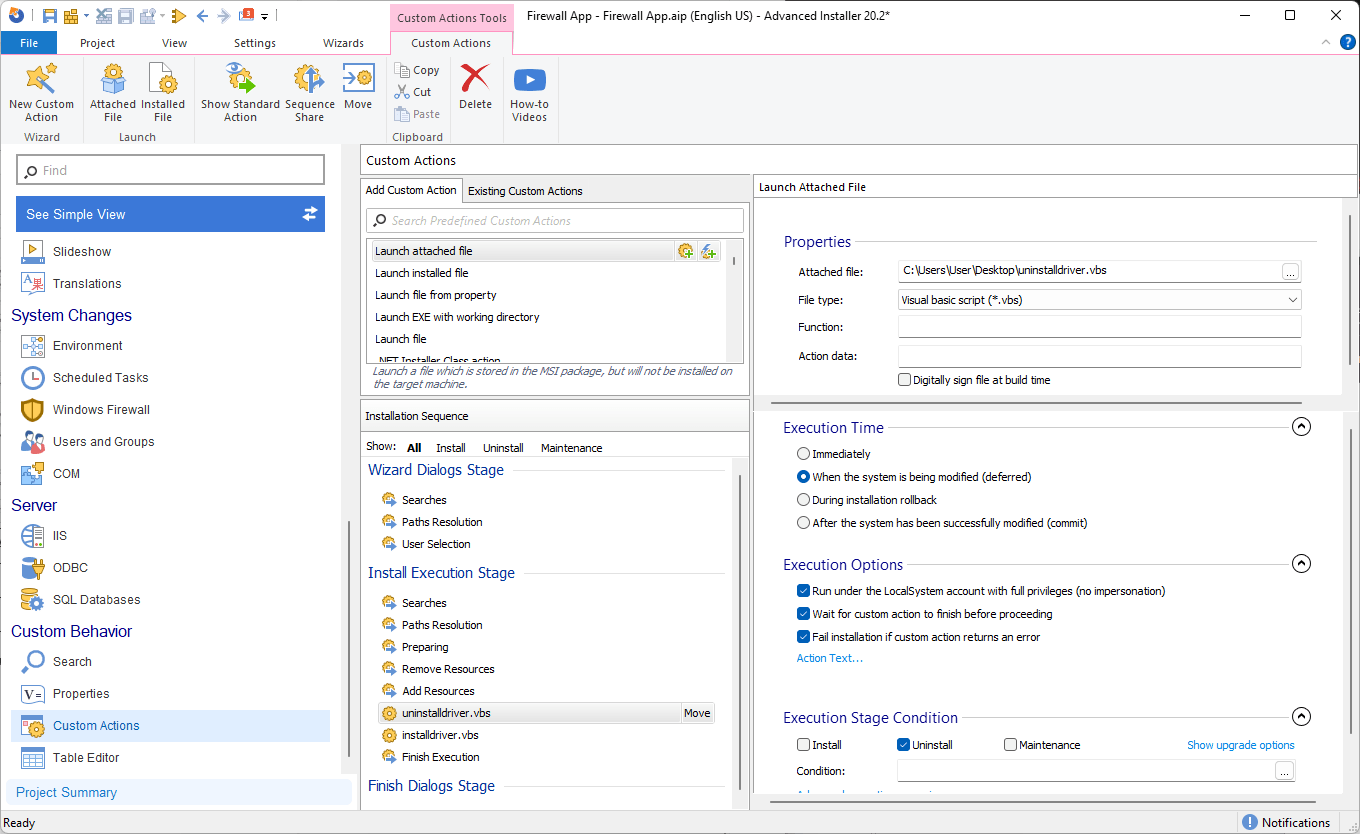
6. Perform the same steps for the uninstall script.
You're done!
Build and install your package, and your driver will be successfully installed.
If you prefer using PnPUtil over DPInst, the VBScript for installation should look like this:
Option Explicit
On Error Resume Next
Dim strCmd,WshShell,strInstalldir,strcmd1, strcmd2
Set WshShell = CreateObject("WScript.Shell")
strInstalldir = WshShell.ExpandEnvironmentStrings( "%SYSTEROOT%" )
strcmd= "pnputil.exe /add-driver " & chr(34) & strInstalldir & "\DPInst\HP.inf" & chr(34)
WshShell.Run strCmd
Set WshShell = NothingThe script to remove the driver with PnPUtil is:
Option Explicit
On Error Resume Next
Dim strCmd,WshShell,strInstalldir,strcmd1, strcmd2
Set WshShell = CreateObject("WScript.Shell")
strInstalldir = WshShell.ExpandEnvironmentStrings( "%SYSTEROOT%" )
strcmd= "pnputil.exe /delete-driver " & chr(34) & strInstalldir & "\DPInst\HP.inf" & chr(34)
WshShell.Run strCmd
Set WshShell = NothingFollow the same process to add the VBScript files in the custom actions and build the installer. Your driver should now be successfully installed.
How to Install Drivers with PowerShell
Let’s assume that we have a driver file named HP.inf. We’ll store this file, along with the DPInst.exe utility, in a specific folder on our computer: C:\Windows\DPInst.
The script to install the file as we did with VBScript is:
$DPInstLoc = $env:SystemRoot + "\DPInst\DPInst_x64.exe"
$cmd = "$DPInstLoc /F /LM /S"
Invoke-Expression $cmd
The script to uninstall the driver is:
$DPInstLoc = $env:SystemRoot + "\DPInst\DPInst_x64.exe"
$INFLocation = $env:SystemRoot + "\DPInst\HP.inf"
$cmd = "$DPInstLoc /S /U $INFLocation"
Invoke-Expression $cmd
After creating the scripts and downloading the DPInst utility, you need to:
1. Open Advanced Installer and navigate to the Files and Folders Page.
2. Create a new directory under Windows Volume\Windows called DPInst and add the DPInst utility with the HP.inf file near it.
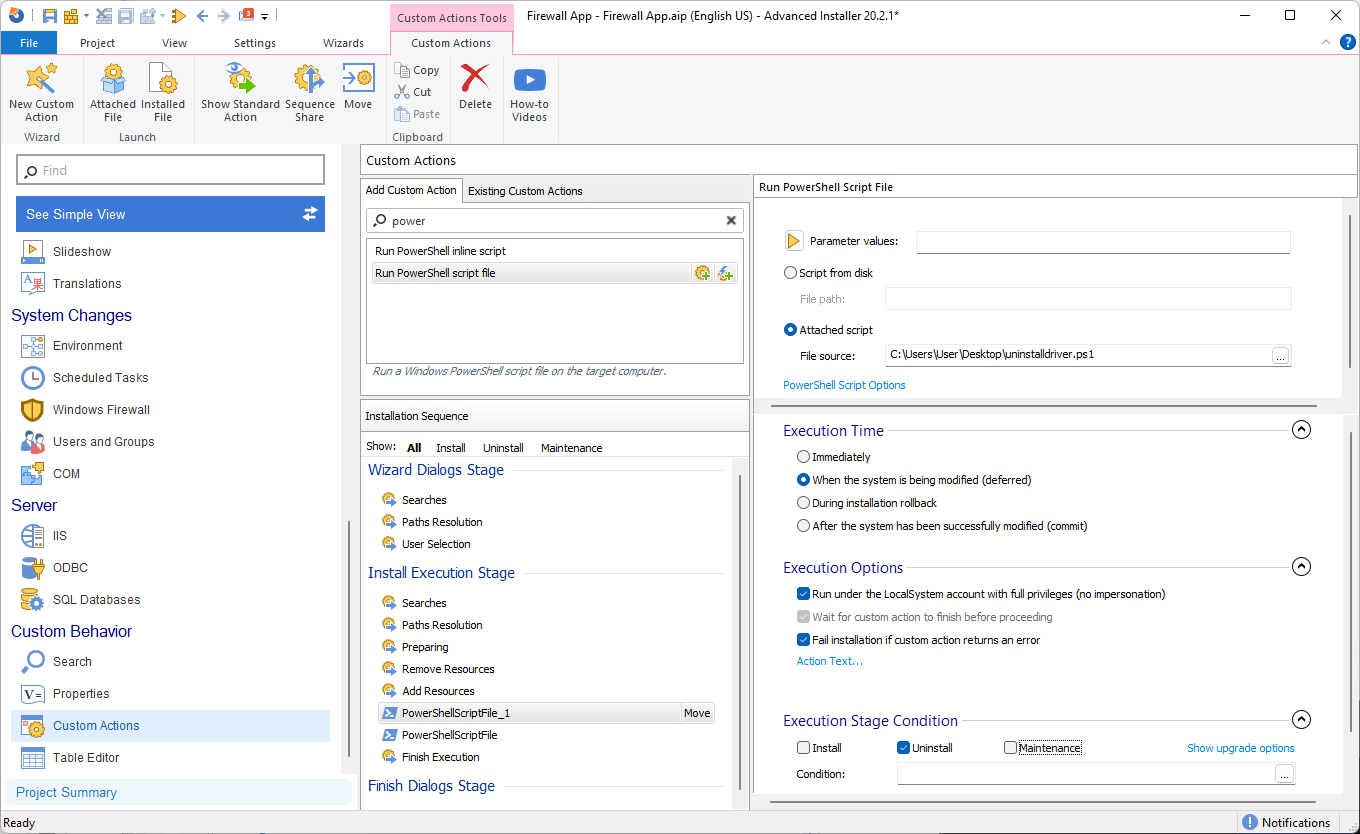
3. Go to the Custom Actions Page and add the Run PowerShell script file predefined custom action into the sequence,
4. Select Attached Script and select the file that was previously created and configure the Custom Action as such:
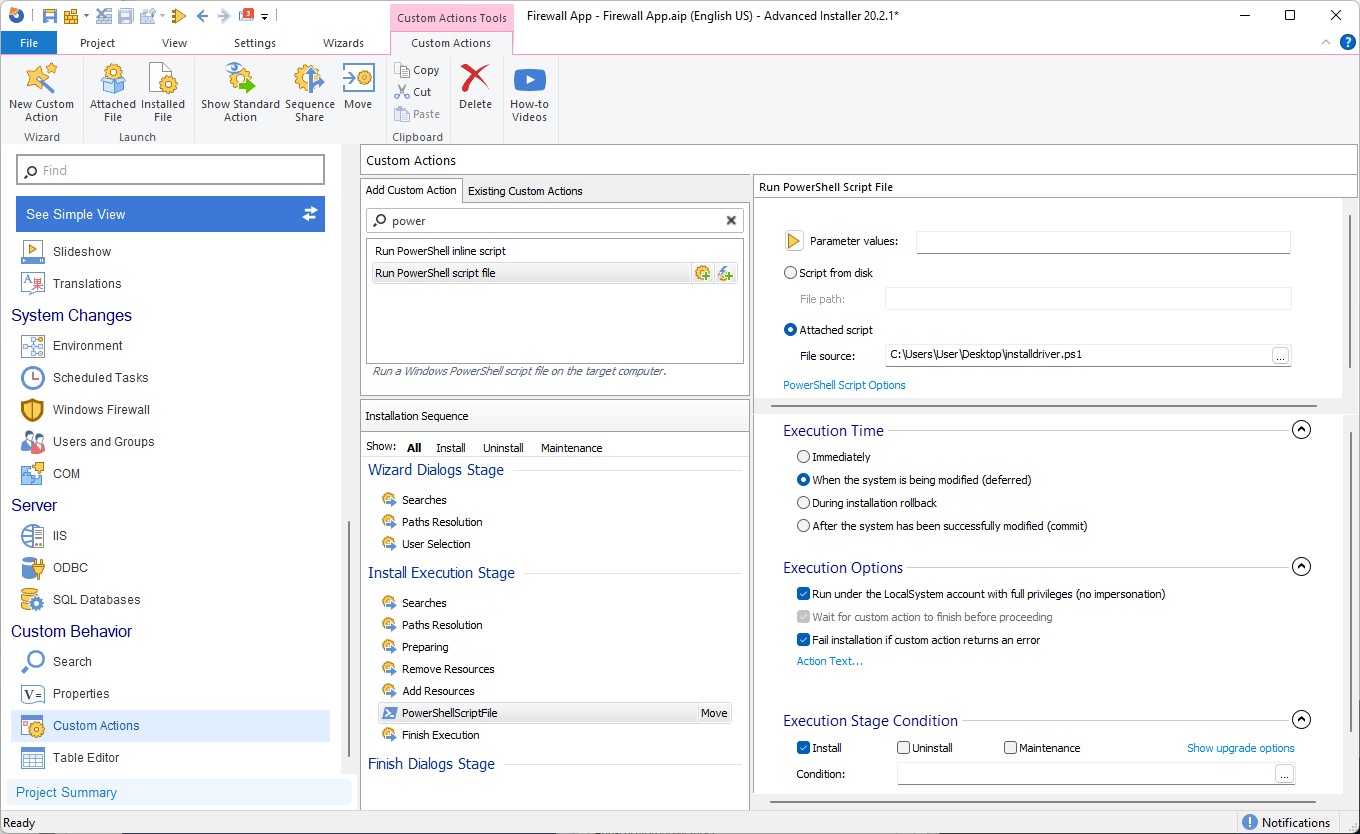
5. Repeat the same process for the uninstall script and configure the Custom Action as follows:
6. Next, build the package and during installation/uninstallation, the PowerShell scripts will run and install/uninstall the driver.
7. If you prefer using PnPUtil with PowerShell, the script to install is quite simple:
$DriverPath = $env:windir + "\DPInst"
Get-ChildItem $DriverPath -Recurse -Filter "*inf" | ForEach-Object { PNPUtil.exe /add-driver $_.FullName /install }8. The script to uninstall the driver with PnPUtil is:
$DriverPath = $env:windir + "\DPInst\HP.inf"
$Arguments = "pnputil /delete-driver $DriverPath"
Start-Process -FilePath PowerShell.exe -ArgumentList $Arguments -Wait
Once we have the scripts, perform the same steps as for the DPInst method, build, and install the package.
How to Install Drivers with Advanced Installer?
Advanced Installer makes it much easier to handle driver operations by providing a simple and intuitive GUI for these actions.
Navigate to the Drivers page and click on New Driver. A window will open for you to select the .inf file which must be present in the package.
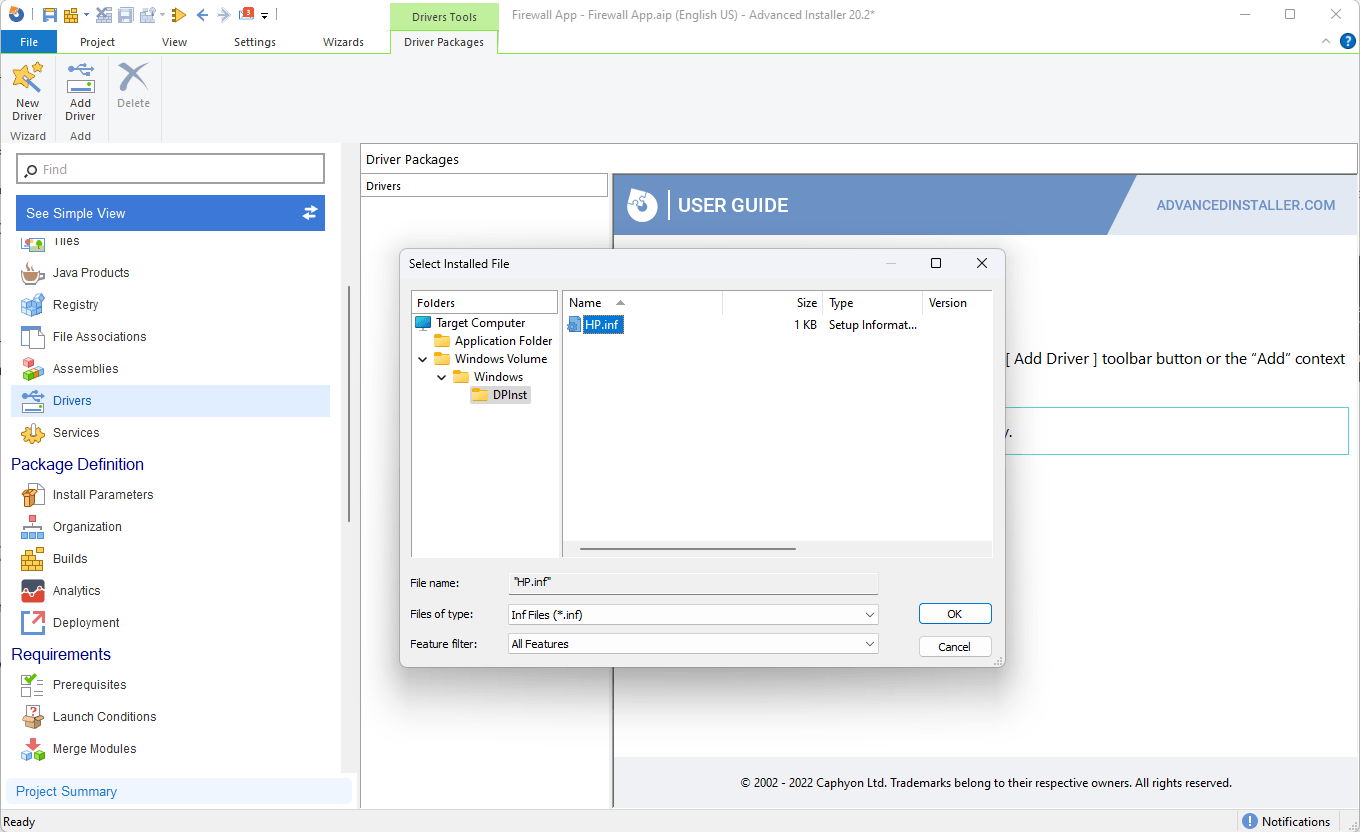
Advanced Installer parses the .INF file and detects what is needed and you have multiple settings to choose from:
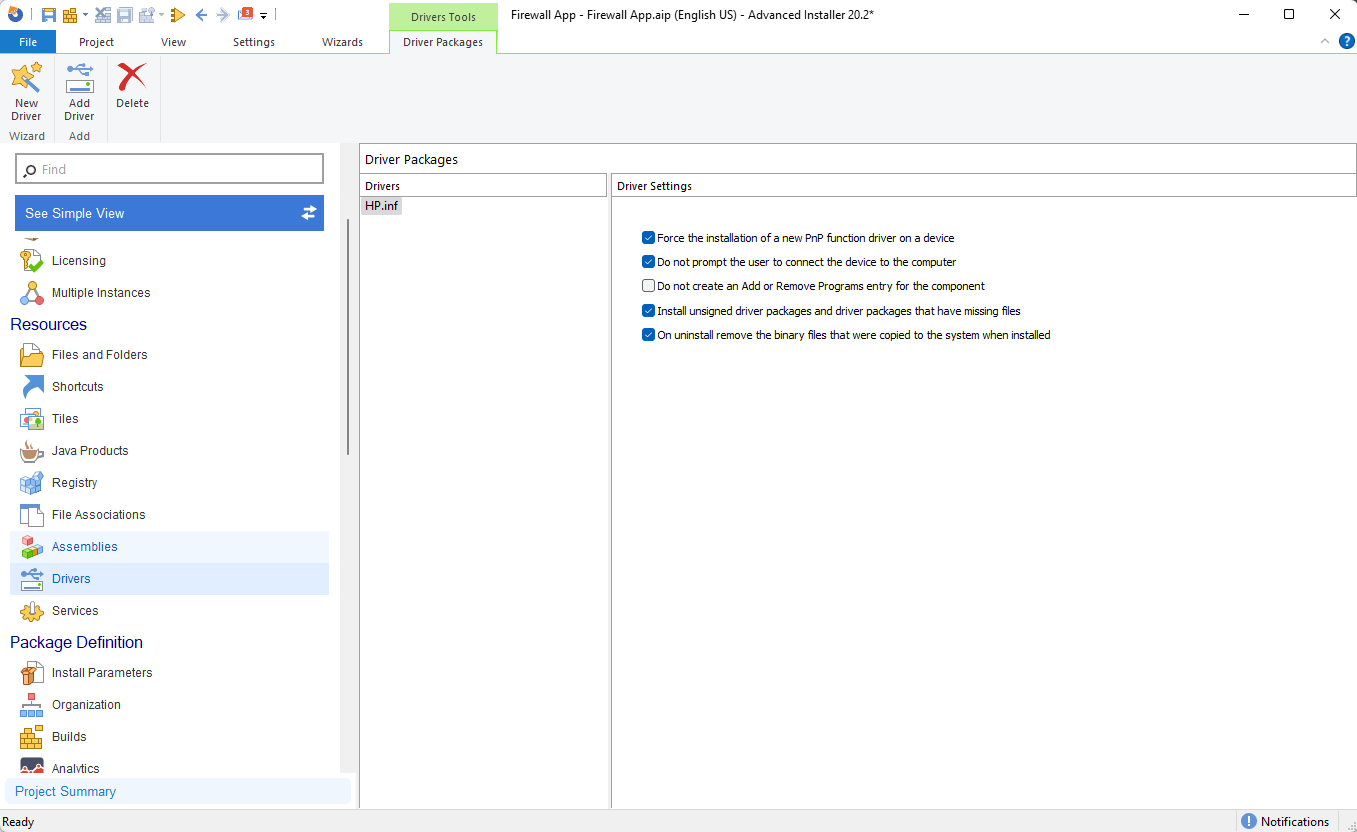
And that is it, all you have to do is build the MSI and install the package.
Conclusion
Despite the lack of a native option in MSI for driver installations, there are several viable alternatives. As you can see, there are many ways you can achieve that goal.
Here's to successful driver installations!
