The most common MSIX limitations and how to fix them with the Package Support Framework (PSF)
Advanced Installer was the first application to fully support MSIX technology – and we truly believe in its power.
Naturally, as it happens with any young technology, there are still some limitations within the MSIX packaging technology -- especially when compared to the MSI packaging format.
In our MSI vs MSIX: Practical Side-by-Side Comparison, we put together an overview of the features and limitations for each of the two packaging formats: MSI and MSIX. If you are new to MSIX, check out our MSIX Tutorial: A comprehensive 24-chapter guide blog article.
MSIX is always in development, and we work hard to stay on top of the updates supporting improvements that help the application packaging community.
One of the most useful improvements Microsoft released and has been working on is the Package Support Framework (PSF). It supports organizations globally with their transition to MSIX.
In this article, we will cover the most common MSIX limitations and how to fix them using the Package Support Framework (PSF).
PSF is an open-source kit, based on the Detours technology, that helps you apply fixes to your Win32 applications that are no longer under active development, so that they can run inside an MSIX container.
How to set current working directory for MSIX target application
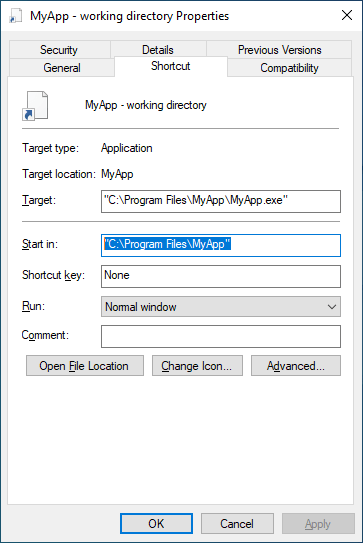
With traditional .lnk shortcuts, you can set a working directory (“Start in” field in the shortcut’s property). By default, this is the directory where the target executable is located.

On the other hand, modern MSIX application entries do not allow for a working directory to be set.
By default, the working directory of the target process is set to the System32 folder.
How to set the current working directory using the MSIX Packaging Tool
To go around this limitation, here are the steps you need to follow:
1. Create a new config.json and insert the following code into it:
{
    "applications": [
    	{
            "id": "",
            "executable": "",
            "workingDirectory": ""
    	}
	]
}2. Open the MSIX package in MSIX Packaging Tool – Package Editor.
3. Open the AppxManifest.xml file.
4. Copy the value in the “Id” field within the AppxxManifest.xml file to the Applications “id” field in the config.json file.

5. Copy the value in the “Executable” attribute of the “Application” element within the AppxManifest.xml file to the Applications “Executable” field in the config.json file.

6. Set the “working directory” field in the config.json file to the folder where you will start your process.
7. Save the config.json file and copy it into the MSIX package (directly in the Package Root Directory).
{
    "applications": [
        {
            "id": "MYAPP",
            "executable": "MyApp.exe",
            "workingDirectory": "MyApp Subfolder"
        }
	]
}8. Depending on your application architecture, add the corresponding PSF files into your MSIX package (directly in the Package Root Directory, next to the config.json file).
- PsfLauncher32.exe/PsfLauncher64.exe
- PsfRunDll32.exe/PsfRunDll64.exe
- PsfRuntime32.dll/PsfRuntime64.dll
9. Edit the manifest file – change the value of the “Executable” attribute of the “Application” element to point to the PsfLauncher executable instead of the original executable of your application.

Set the current working directory with Advanced Installer
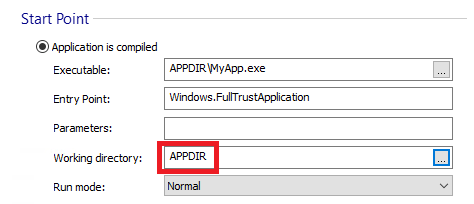
With Advanced Installer, you don’t need to do any of the above. It’s all done automatically in the background for you. Just go to the “Application Details” page, scroll down to “Start Point” section and set the “Working directory” you need.

How to set command line arguments for MSIX target application using the Package Support Framework (PSF)
By default, MSIX does not allow for command line arguments to be set for shortcuts. So, when you perform a capture with an open source tool - such as the MSIX Packaging Tool - any argument passed to the executable is simply ignored.
This is different from a common scenario that affects Enterprise environments, especially where Win32 apps have shortcuts to pass arguments to the executable at runtime.
How can we address this in MSIX? With the Package Support Framework.
How to set command line arguments with MSIX Packaging Tool
To bypass the command line arguments limitations in MSIX, follow these steps:
1. Create a new config.json and insert the following code into it:
{
    "applications": [
    	{
            "id": "",
            "executable": "",
            "arguments": ""
    	}
	]
}2. Open the MSIX package in MSIX Packaging Tool – Package Editor.
3. Open the AppxManifest.xml file.
4. Copy the value in the “Id” field within the AppxxManifest.xml file to the Applications “id” field in the config.json file.

5. Copy the value in the “Executable” attribute of the “Application” element within the AppxManifest.xml file to the Applications “Executable” field in the config.json file.

6. Set the “arguments” field in the config.json file to the value you need to be passed to the executable at runtime.
7. Save the config.json file and copy it into the MSIX package (directly in the Package Root Directory).
{
    "applications": [
        {
            "id": "MYAPP",
            "executable": "MyApp.exe",
            "arguments": "/k cd %MsixPackageRoot%/MyApp Subfolder "
        }
	]
}%MsixPackageRoot% is a pseudo-variable that can be used inside of the MSIX packages and points to the root folder of the MSIX package.
8. Depending on your application architecture, add the corresponding PSF files into your MSIX package (directly in the Package Root Directory, next to the config.json file).
- PsfLauncher32.exe/PsfLauncher64.exe
- PsfRunDll32.exe/PsfRunDll64.exe
- PsfRuntime32.dll/PsfRuntime64.dll
9. Edit the manifest file – change the value of the “Executable” attribute of the “Application” element to point to the PsfLauncher executable instead of the original executable of your application.

How to set command line arguments with an application packaging tool - Advanced Installer
Just like setting a current working directory, setting a command line argument for the StartMenu application entry is a smooth and straightforward operation using Advanced Installer.
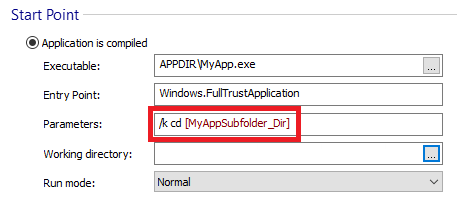
All you need to do is to go to the “Application Details” page, scroll down to “Start Point” section and set the “Parameters” you need.

How to set non-executable files as MSIX target application using Package Support Framework (PSF)
Many traditional Win32 apps have shortcuts that point to non-executables files (e.g. .txt, .pdf, .docx). When launched, these shortcuts trigger the default applications associated with that particular file type (FTA) and use that to open the file.
By default, MSIX does not support application entry points that are not executables. But, we can fix this limitation with the Package Support Framework (PSF).
How to set a non-executable as the target application using the MSIX Packaging Tool
Any shortcut to non-executable files is ignored by the MSIX Packaging Tool during the capture. That’s the reason why the corresponding entry needs to be manually added to the “Applications” element within the AppxManifest.xml file.
To overcome this limitation, you need to follow these steps:
1. Create a new config.json and copy the following code into it:
{
    "applications": [
    	{
            "id": "",
            "executable": ""
    	}
	]
}2. Open the MSIX package in MSIX Packaging Tool – Package Editor.
3. Open the AppxManifest.xml file.
4. Create a new entry.
5. Point the “Executable” attribute of the “Application” element to the PsfLauncher executable.

6. Copy the value in the “Id” attribute of the “Application” element within the AppxManifest.xml file to the Applications “id” field in the config.json file.
7. Save the config.json file and copy it into the MSIX package (directly in the Package Root Directory).
{
    "applications": [
        {
            "id": "MYAPPREADME",
            "executable": "MyAppLauncher.txt"
        }
	]
}8. Depending on your application architecture, add the corresponding PSF files into your MSIX package (directly in the Package Root Directory, next to the config.json file)
- PsfLauncher32.exe/PsfLauncher64.exe
- PsfRunDll32.exe/PsfRunDll64.exe
- PsfRuntime32.dll/PsfRuntime64.dll
How to set a batch file as a target in Advanced Installer
To set a batch file as a target for your application in Advanced Installer, just:
1. Go to the “Application Details” page.
2. Scroll down to the “Start Point” section.
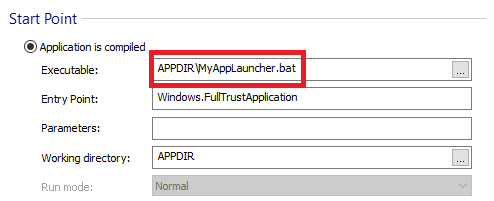
3. Set the “Executable” field to point to the batch file.
You can see how these settings look in the image below.

Conclusion
The Package Support Framework is a very helpful tool to workaround various MSIX limitations, such as setting command line arguments for a target application or setting non-executable files as target apps in MSIX.
Let us know if you found this helpful and if you have any additional questions!
Subscribe to Our Newsletter
Sign up for free and be the first to receive the latest news, videos, exclusive How-Tos, and guides from Advanced Installer.