How to fix file redirection for Win32 applications running in an MSIX container
When Win32 applications run inside an MSIX container, they behave differently than when they are installed natively. Because of that, we come across errors in the operations we often perform.
One of those common errors for MSIX packages is the access-denied-error.
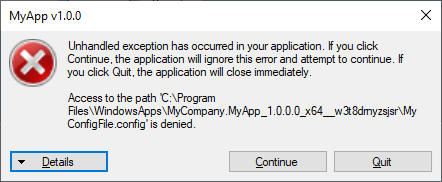
This happens when an application tries to write a file in the installation which is not permitted within the MSIX container. When this happens, you will get a pop-up window like the one in the image below showing that the operation failed.

We don't need to worry! We can easily overcome this limitation using the Package Support Framework (PSF).
Once the PSF FileRedirectionFixup is injected, Windows will redirect all the operations, including the reading ones to leverage the local storage location:
%LOCALAPPDATA%\Packages\<Package_Family_Name>\LocalCache.
In this scenario, the error description will generally tell you exactly what the file is and the path location – so we don't have to look for the root of the issue.
If you don't have the error “details”, you will need to trace the root of the error before applying any PSF Fixup.
For more information on how to trace the root cause of an MSIX package failure and what options and tools you have, check out How to debug an MSIX package failure with the Package Support Framework (PSF Trace Fixups) article.
Inject the PSF FileRedirectionFixup with the MSIX Packaging Tool
Now that we have identified the file and its path location associated with the error, we can apply a fixup.
Here's how you can inject the PSF FileRedirectionFixup into your MSIX package:
1.Create a new config.json file and copy the following code into it:
{
    "applications": [
        {
            "id": "",
            "executable": ""
        }
    ],
    "processes": [
        {
            "executable": ".*",
            "fixups": [
                {
                    "dll": "FileRedirectionFixup",
                    "config": {
                        "redirectedPaths": {
                            "packageRelative": [
                                {
                                    "base": "",
                                    "patterns": [
                                        ""
                                    ]
                                }
                            ]
                        }
                    }
                }
            ]
        }
    ]
}2. Open the MSIX package in the MSIX Packaging Tool – Package Editor.
3. Open the AppxManifest.xml file.
4. Copy the value from the “Id” field within the AppxxManifest.xml file to the Applications “id” field in the config.json file.

5. Copy the value from the “Executable” attribute of the “Application”element within the AppxManifest.xml file to the Applications “Executable” field in the config.json file.

6. Configure the “FileRedirectionFixup” elements as needed. For our scenario, all we need is to set the “patterns” element to ".*\\.config"-- which will redirect all the files with the .config extension located under the MSIX Package Root directory.
{
    "applications": [
        {
            "id": "MYAPP",
            "executable": "MyApp.exe"
        }
    ],
    "processes": [
        {
            "executable": ".*",
            "fixups": [
                {
                    "dll": "FileRedirectionFixup",
                    "config": {
                        "redirectedPaths": {
                            "packageRelative": [
                                {
                                    "base": "",
                                    "patterns": [
                                        ".*\\.config"
                                    ]
                                }
                            ]
                        }
                    }
                }
            ]
        }
    ]
}7. Save the config.json file and copy it into the MSIX package (directly in the Package Root Directory).
8. Depending on your application architecture, add the corresponding PSF files into your MSIX package (directly in the Package Root Directory, next to the config.json file).
- PsfLauncher32.exe/PsfLauncher64.exe
- PsfRunDll32.exe/PsfRunDll64.exe
- PsfRuntime32.dll/PsfRuntime64.dll
- FileRedirectionFixup32.dll/FileRedirectionFixup64.dll
9. The last step is to edit the manifest file. Change the value of the “Executable” attribute of the “Application” element to point to the PsfLauncher executable (instead of the original executable of your application).

Inject the PSF FileRedirectionFixup with Advanced Installer
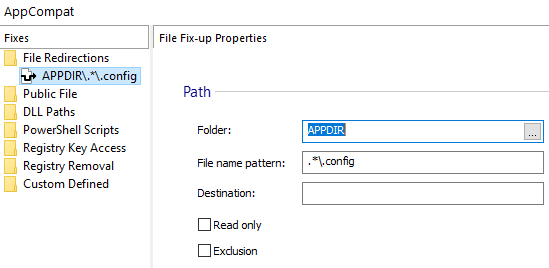
There are three easy steps to set a PSF File Redirection Fixup when using Advanced Installer’s GUI:
- Go to the “AppCompat” page.
- Add your “File Redirections” Fixup.
- Configure it as needed.
Check out how PSF FileRedirectionFixup works in Advanced Installer through our 30-day full featured trial (with access to technical support during the entire trial period).
As you can see in the screenshot below, the "File Redirection" Fixup is configured as follows:

Conclusion
That’s it! Now you have two options to overcome the file redirection limitation in an MSIX container.
As you can see, it is way simpler to do this with Advanced Installer in comparison to the MSIX Packaging Tool – thanks to its predefined fixups.
Let us know if you have any questions or suggestions for future topics.
Subscribe to Our Newsletter
Sign up for free and be the first to receive the latest news, videos, exclusive How-Tos, and guides from Advanced Installer.