Deploying PowerShell Scripts in SCCM: Application Model vs. Legacy Packages vs. Scripts
There are multiple ways to deploy PowerShell scripts in SCCM. Some of the most popular options are the Application model, the Legacy Packages model, and most recently, the Scripts option.
In this article, we will show you how to deploy PowerShell scripts in SCCM by going through each of these options.
How to deploy PowerShell scripts via Application Model?
The main concern when implementing the Application model is that SCCM expects a specific detection method to be set within the script. This detection method can be an empty MSI product code, a registry key, or a file, among other options.
We have covered multiple ways in which you can deploy an MSIX package per-machine.
In that article, we created a simple PowerShell script that installs the MSIX package and then, we created a registry key to be used as a detection methodfor SCCM.
If you are going to use the “uninstall” feature as well, make sure to delete the detection method during the process.
Now that we're aware of the detection method requisite, let's deploy a PowerShell script via Application model. Follow these steps:
1. Navigate to the Software Library Workspace > Application Management > Applications.
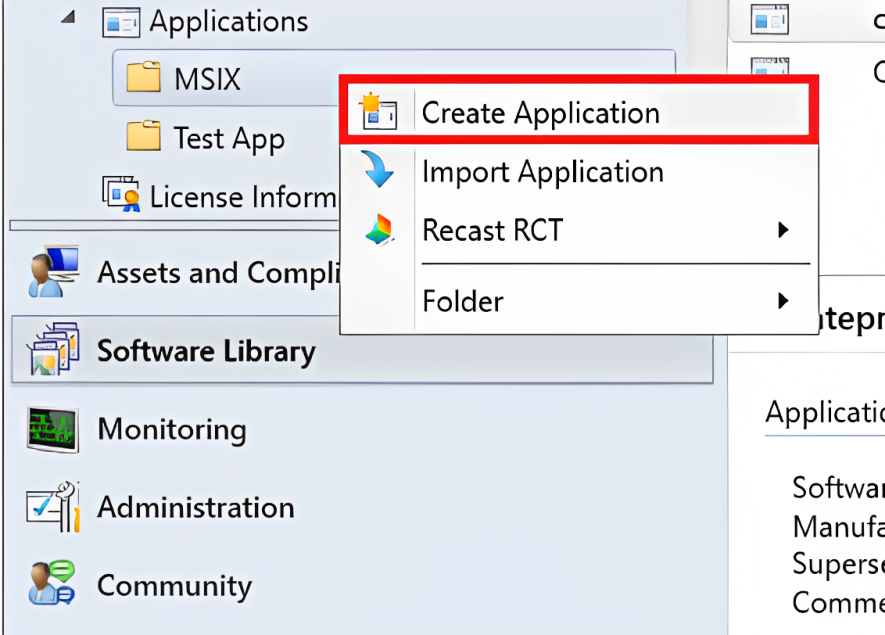
2. Right click on the Applications node or subfolder and click Create Application. The Create Application Wizard page will appear.
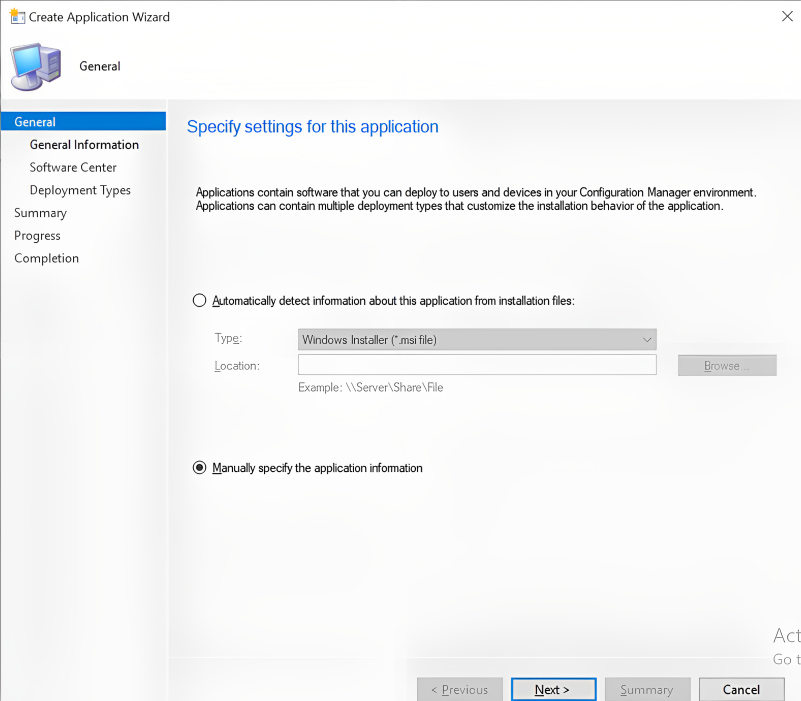
3. On the Specify settings for this application window, select Manually specify the application information and click Next.
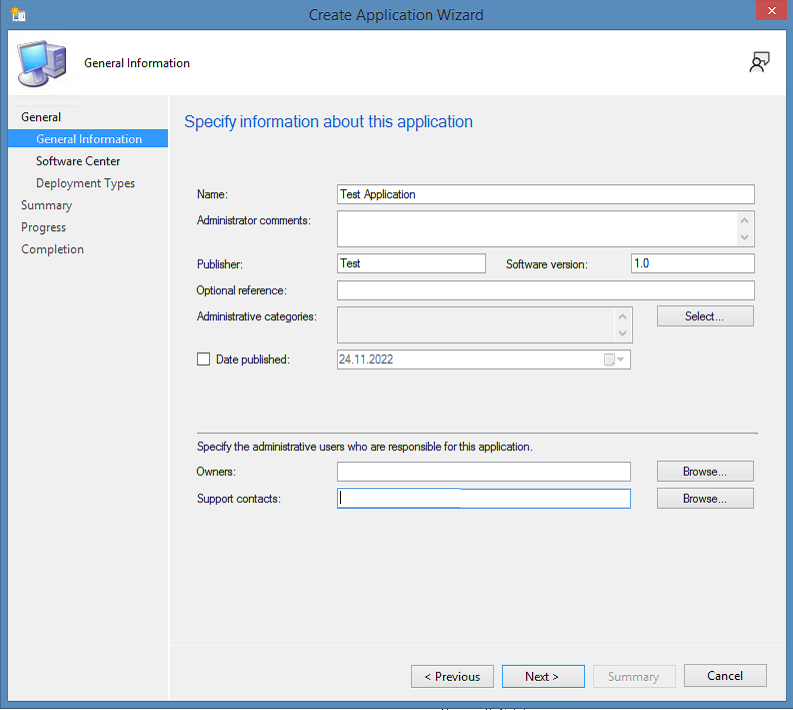
4. Type the Name, Publisher, Software Version and other details, and then click Next.
The "Name" field represents the application name in SCCM and not the actual display name in the Software Center.
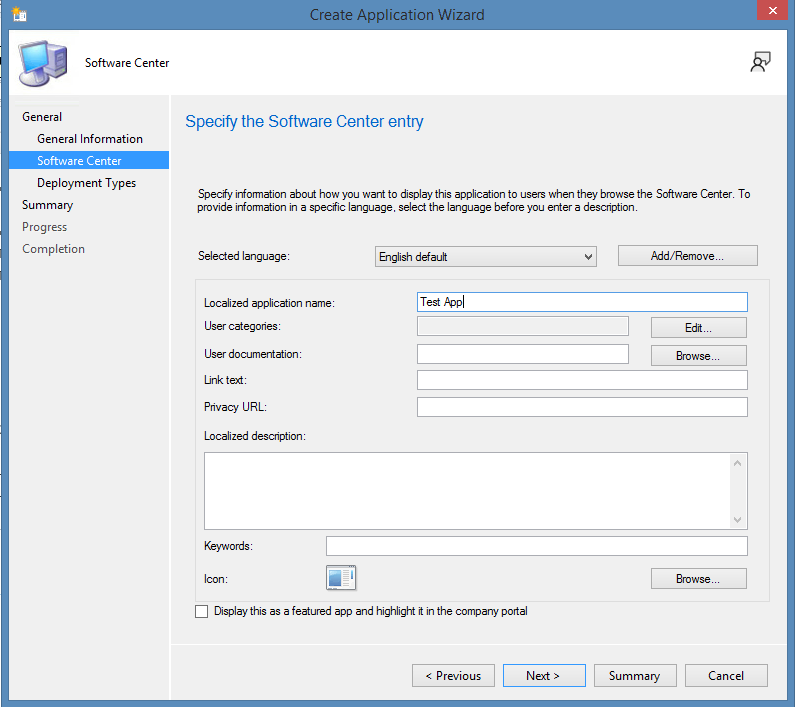
5. In the next window, the Localized application name refers to the name of the application that appears for the users in the Software Center. Add more details on Specify the Software Center entry and press Next.
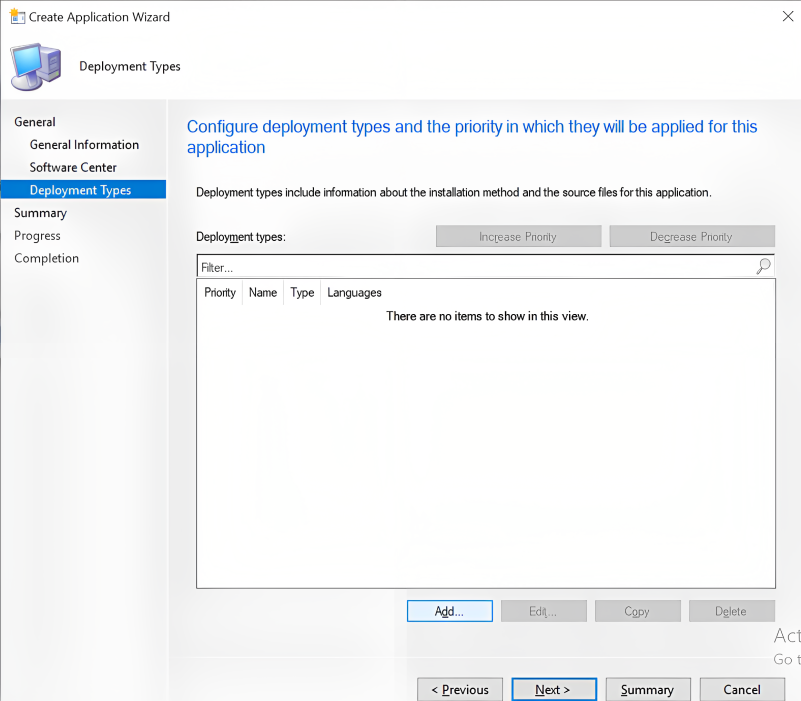
6. The previous step will take you to the Configure deployment types and the priority in which they will be applied for this application window. Once there, click Add... on Deployment Types.
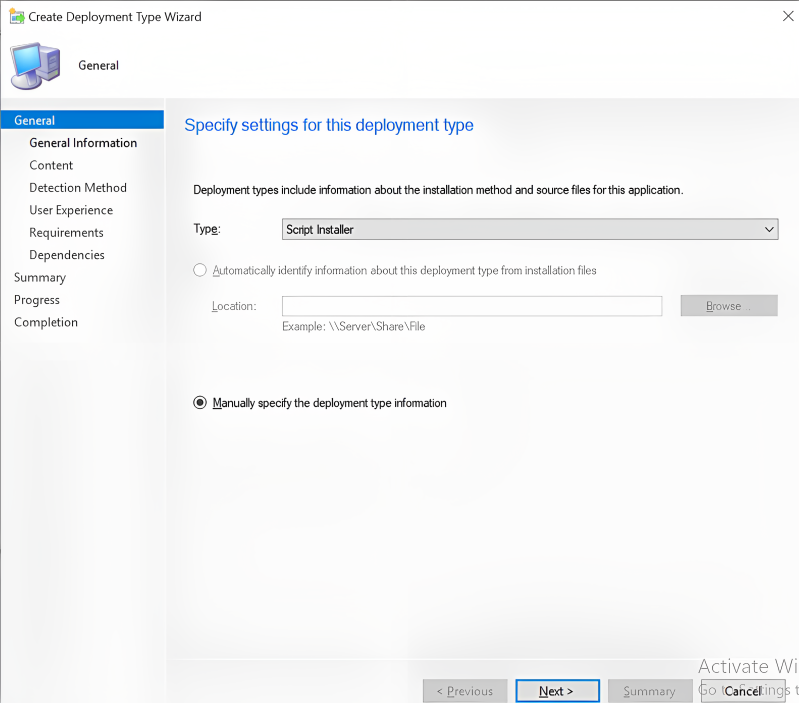
7. On the Specify settings for this deployment type window, head to Type and select Script Installer from the dropdown list. Then, click Next.
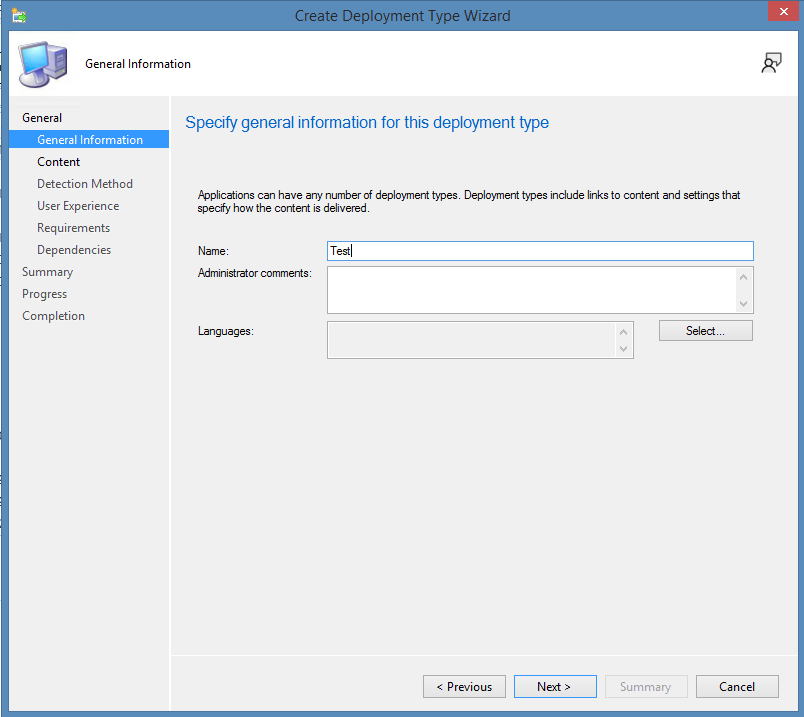
8. Following up, write a name for the deployment - in this case we used "Test", then click on Next.
9. Now, you will reach the Specify information about the content to be delivered to target devices window. Once there, for Content Location click the Browse button to get the source location of the installer package, which should be a UNC path.
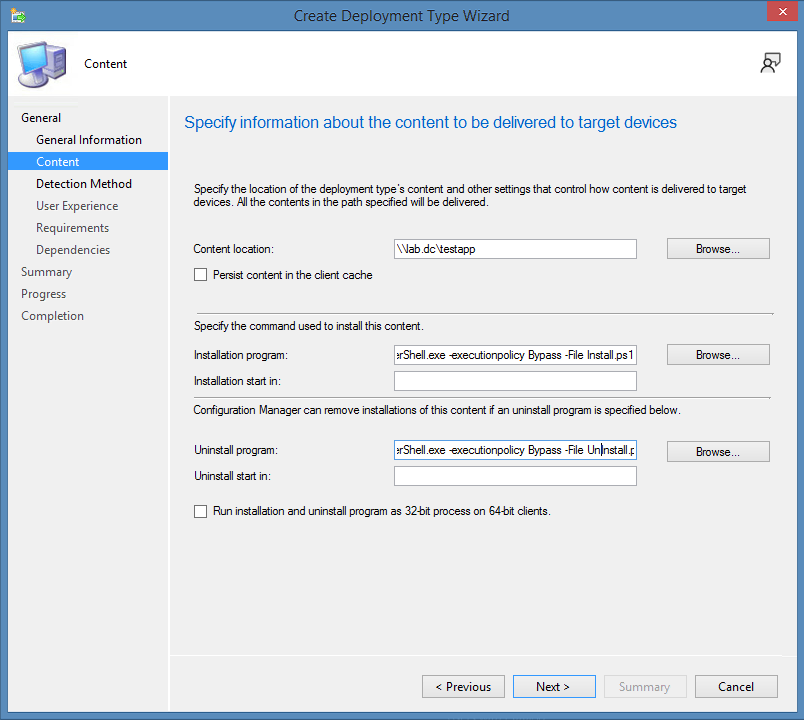
For Installation program type the following command:
Powershell.exe -file “Install.ps1”
For Uninstall program type the following command:
Powershell.exe -file “Uninstall.ps1”
If the execution policy is restricted in your infrastructure, you have to add -executionpolicy bypass to the command lines.
10. After you click Next, go to Specify how this deployment type is detected, and click Add Clause.
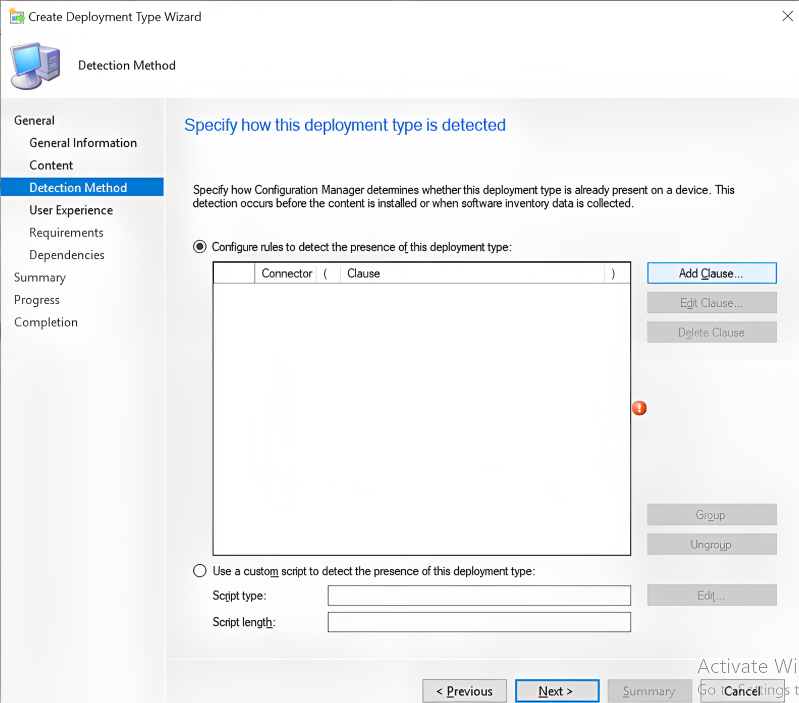
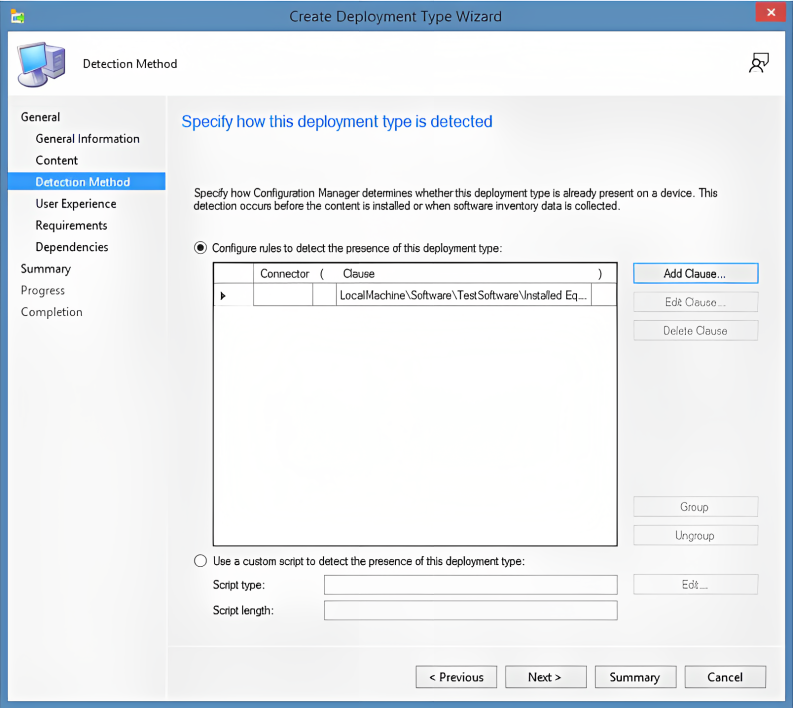
11. On Detection Method, we added a registry created by our script. Once you include your detection method, click Next.
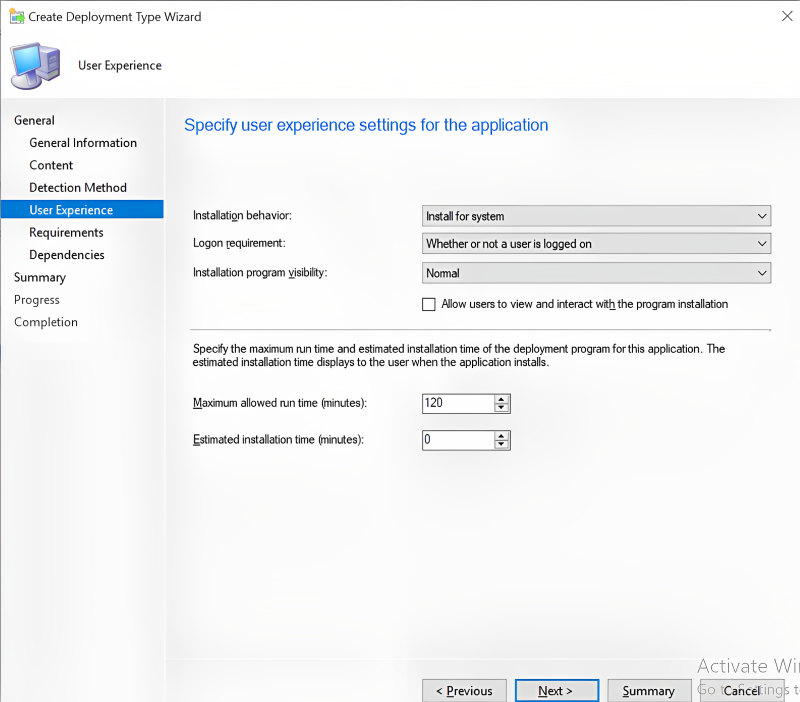
12. Now, in Specify user experience settings for the application, select Install for system from the Installation behavior dropdown, and Logon requirement must be set to Whether or not a user is logged on.
13. Click Next until completion, then click Finish.
14. Then, click Next on the upcoming windows until you reach the end of the wizard.
Now, your application is ready to be distributed and deployed to the clients in the infrastructure.
How to deploy PowerShell scripts using the Package Model?
Unlike the Application model, the Package model doesn’t require any extra detection methods, which makes the PowerShell script integration even easier.
However, the Packaging model requires two programs to be created:
- one for installation, and
- one for uninstallation (when you want to run two different commands/scripts).
Follow these steps in SCCM to create a package and a program:
1. Navigate to the Software Library workspace > Application Management > Packages right-click Packages and select Create Package.
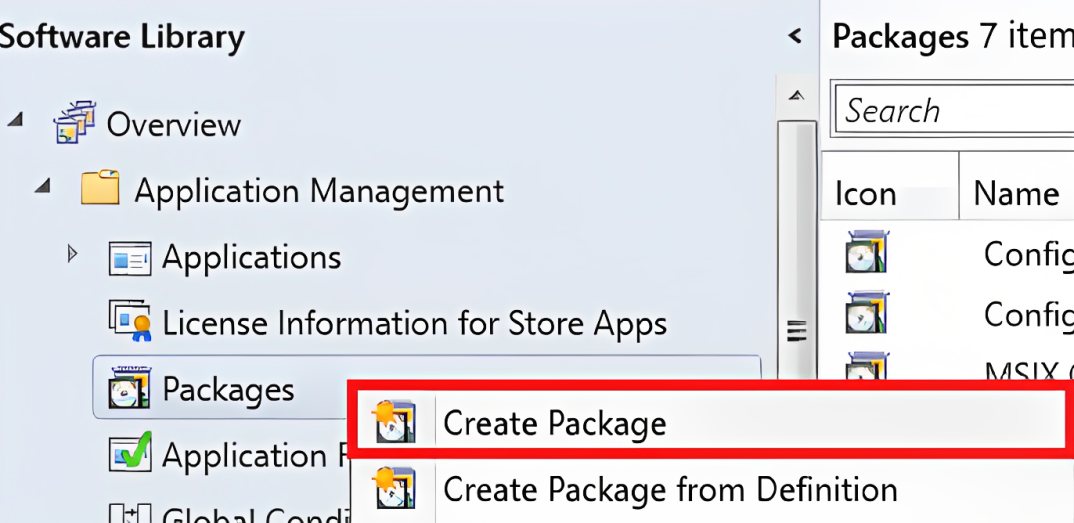
2. In the Create Package and Program Wizard, type the Name of the package, Description, Manufacturer, Version and Language.
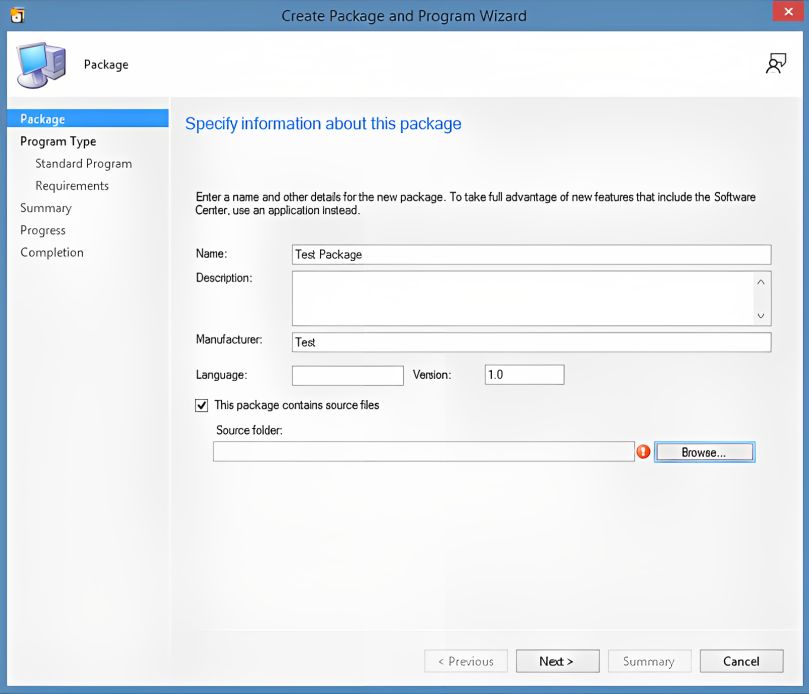
3. Check This package contains source files and click Browse. In the window popup, Browse to the location of the MSIX package.
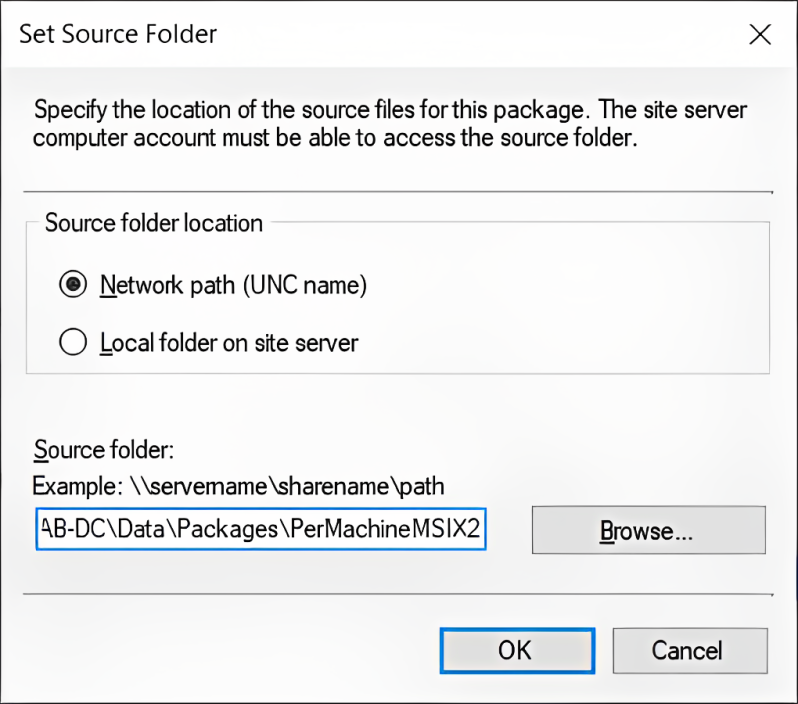
4. Click OK and Next.
5. Select Standard Program and click Next.
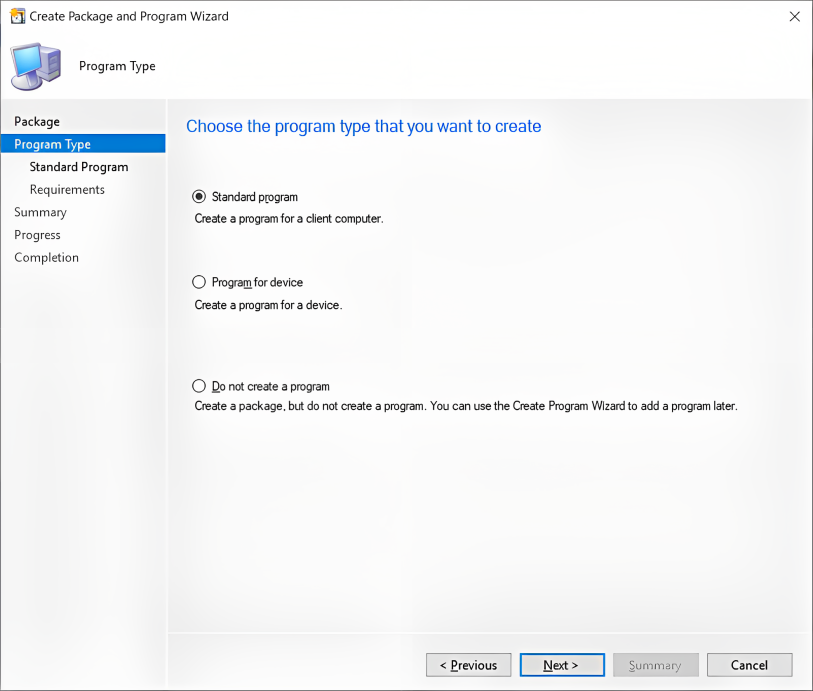
At this step, you'll set up the program details for deployment. I suggest you consider adding a keyword like "Installation" to the name, to help users find and recognize it easier.
6. Next, type the following command line:
Powershell.exe -executionpolicy bypass -file “Install.ps1”
7. Configure Run as Normal, set the option Program can run to Whether or not a user is logged in, and set Run mode to Run with administrative rights.
8. Leave everything else as it is and click Next.
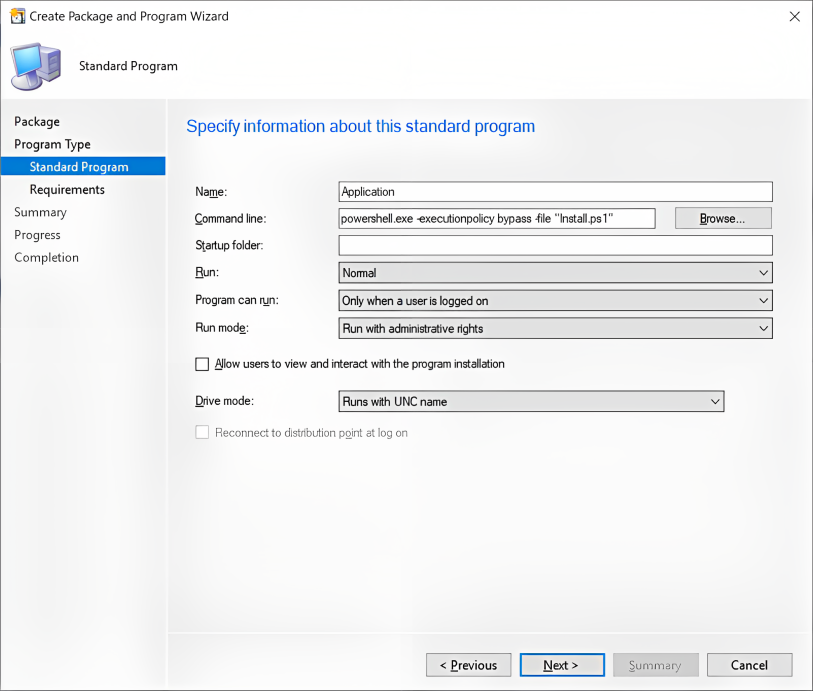
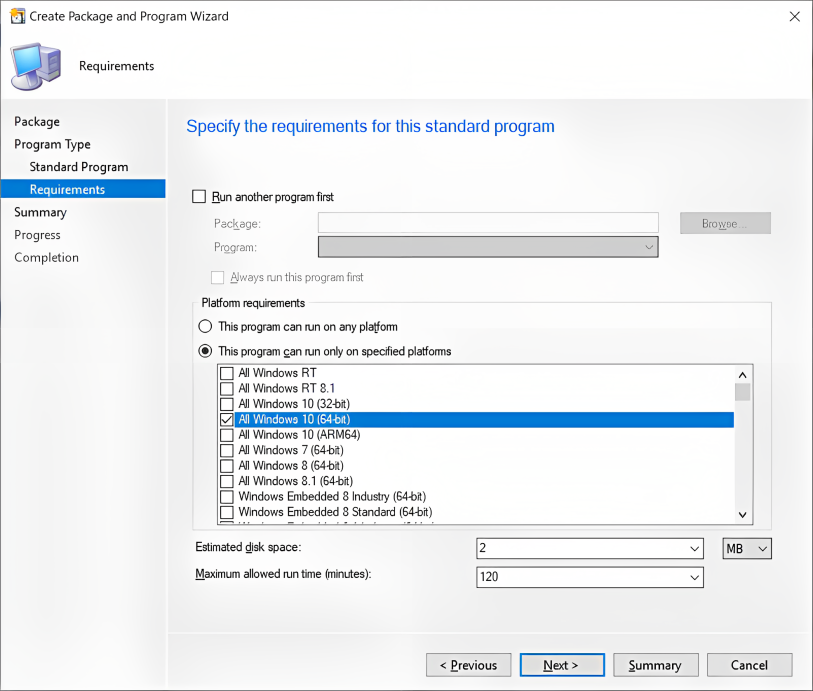
9. Check This program can only run on specified platforms and select Windows 10 only.
If you know what kind of MSIX package this is, you can configure it to run only on Windows 10 (64-bit) clients like presented below.
10. Click Next, and then Close.
Once the package and program have been created, you can distribute the content to the distribution points and deploy the package to the clients.
How to run PowerShell scripts via Scripts in SCCM?
System Center Configuration Manager (SCCM) has an integrated feature for running PowerShell scripts, which was introduced in SCCM version 1802.
This method allows you to run PowerShell scripts without having to create any additional Applications or Packages in SCCM. However, it requires some prerequisites, such as:
- The client device must be running PowerShell version 3.0 or later,
- The client device must be running with SCCM 1706 client version or later.
To add a script to SCCM, go through the following steps:
1. In the SCCM console, click Software Library.
2. In the Software Library workspace, click Scripts.
3. On the Home tab, in the Create group, click Create Script.
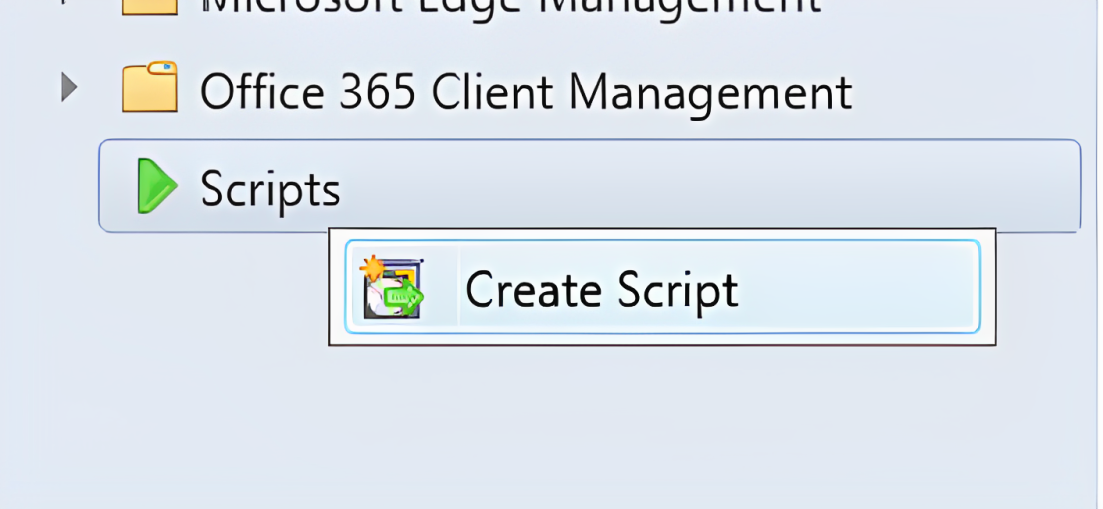
4. On the Script page of the Create Script wizard, enter the Script name and PS Script and click Next
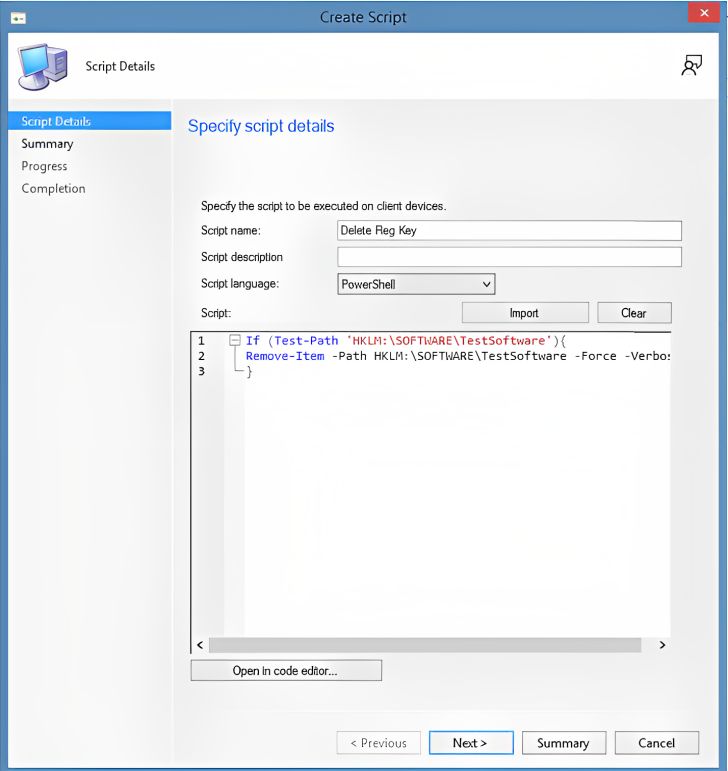
5. Now that the script has been created, it must be approved into SCCM. If you have the required rights, you can complete this task with just a click:

Once the script has been approved, you can deploy it on any machine or user collection, as you would do with Applications or Packages.
Conclusion
SCCM offers various options to deploy PowerShell scripts, including the Application model and the Package model.
The Application model requires a detection method and involves setting a deployment type. On the other hand, the Package model doesn't require a detection method and involves creating a package and two programs for installation and uninstallation.
Both models have their unique characteristics and offer different levels of flexibility for deploying PowerShell scripts.
Did you find this article helpful? Let us know in the comments.
