Prerequisite install detection criteria - How to create one
You often need to install additional components (known as prerequisites or runtimes) to your software product so it runs successfully on a machine. You must include the necessary prerequisites in the installer package for the application, ensuring that they are automatically installed on the machine when needed.
Advanced Installer provides a wide range of predefined prerequisites you can add to your package, including .NET Framework, Visual C++ Redistributable and others.
But sometimes, you may need to include custom prerequisites. In those cases, you'll have to detect if they're already installed on the target machine.
This article will show you how to create detection criteria for a custom prerequisite. Let’s discuss first what detection criteria is and how your package will use it.
What is the detection criteria?
Beyond deploying the main application, one of the installer’s roles is to ensure the prerequisites are properly set up prior to running the application. Detection criteria refer to the unique conditions that determine whether a prerequisite should be installed.
What action does the installer take if a prerequisite installation fails?
In Advanced Installer each prerequisite comes with the option “Continue with the main installation even if the prerequisite is not installed”. This option can be found on Your prerequisite → Installation tab.
There are two scenarios to consider based on the option you choose for handling prerequisite installation failures:
- Option Checked: If the prerequisite fails, the main installation continues.
- Option Unchecked: The main installation won't proceed unless the prerequisite is installed. In this scenario, the main product installation won’t be allowed until the prerequisite is installed.
How to detect if an app is installed on a machine?
A common method to detect prerequisites is the registry search. That’s because almost every setup package writes information in the registry, such as the installed version or the installation path.
What if we created a setup package that needs to install Notepad++ as a prerequisite. Let's explore the steps to check if Notepad++ is installed:
- Manual Installation: Install Notepad++ on a clean machine (e.g., Virtual Machine).
- Registry Editor: Look for a key related to Notepad++ in the registry. For our 64-bit machine and 32-bit version of Notepad++ we search for HKEY_LOCAL_MACHINE\SOFTWARE\WOW6432Node.
Below, you'll find a key related to Notepad++, which includes the installation folder's information.
- This key is unique to Notepad++ and will only be present on the machine if the product is installed.
- If Notepad++ is uninstalled, the key will disappear.

When looking for a registry key in the registry editor, pay attention to where you are looking. Depending on the configuration of the main setup and the prerequisite (32-bit/64-bit), you might need to consider the registry redirection.
But what does this specifically refer to? Let’s find out.
What is registry redirection?
Registry redirection is a technique used to ensure compatibility between 32-bit applications and 64-bit operating systems.
Here's how it works:
- In a 64-bit Windows system, any requests from 32-bit applications are sent to a special location called the WOW6432Node.
- 64-bit applications don't use this special location; they access the standard 64-bit registry.
When you're creating detection criteria for software prerequisites, you need to be aware of this:
- If you're working with a 32-bit setup package on a 64-bit machine, the registry search will look in the WOW6432Node.
- If you're adding a 64-bit prerequisite to a 32-bit package, you have to make sure to bypass this redirection, as the 64-bit part won't be writing its settings in the WOW6432Node.
- So everything is looked up in the right place, go to the Prerequisites page → Conditions tab.
- Check the option ‘Use 64-bit location when evaluating condition on a 64-bit machine’.
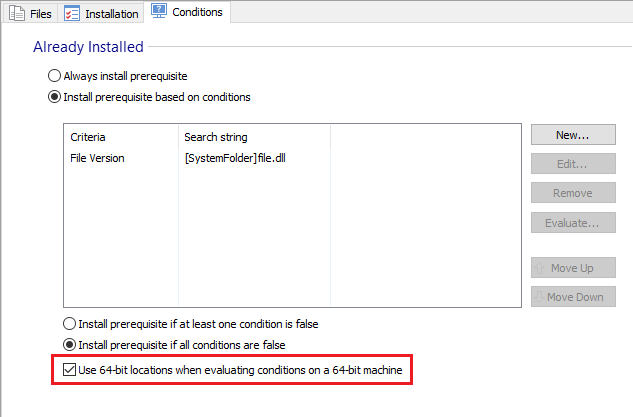
Add detection criteria for a prerequisite in Advanced Installer
Before we add our detection criteria you need to install Notepad++ on your machine. This will help you later when you use the picker to select the key while creating the detection criteria.
Let’s say you create a new project in Advanced Installer and want to add Notepad++ as a prerequisite to your package.
Here’s a step-by-step guide to adding Notepad++ as a prerequisite:
1. Navigate to the Prerequisites page.
2. Use the New Executable Package button from the toolbar.
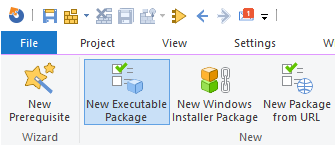
3. In the opened dialog, select the Notepad++ setup.
Once the prerequisite is created, let’s add the detection criteria:
1. Select the prerequisite and navigate to the Conditions tab.
2. Select the Install prerequisites based on conditions option.
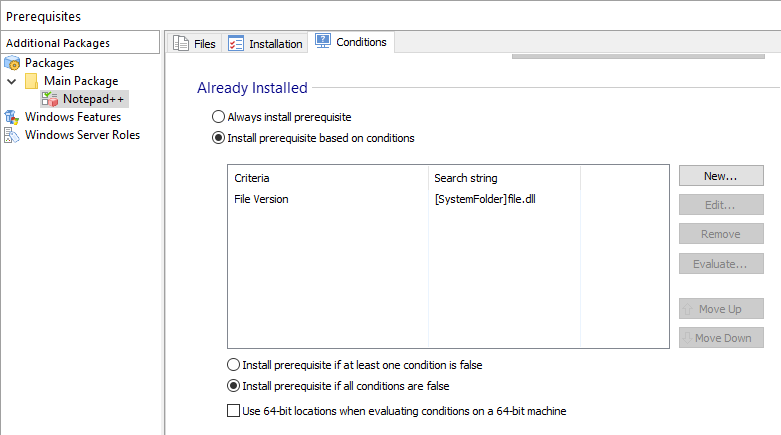
3. Click the ‘New…’ button to open the ‘New search’ dialog.
4. Expand the Criteria drop-down menu and select the Registry key exists criteria (as our requirement is for the registry key to exist).
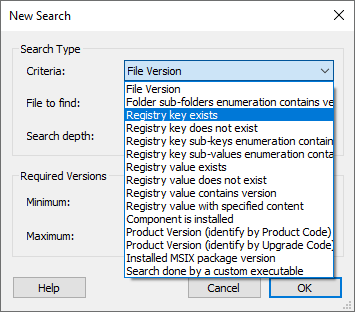
5. In the ‘Registry key’ field, click on the ‘…’ button. Since Notepad++ has been installed, we can now use the picker to select the key.
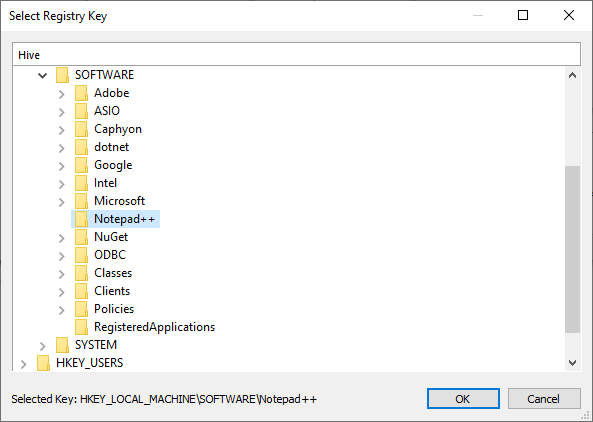
Remember, if you are working with a 32-bit main setup and a 64-bit prerequisite, it’s important to check the ‘Use 64-bit location when evaluating condition on a 64-bit machine’ option. However, this is not applicable in our scenario as we have a 32-bit main setup and the 32-bit version of the prerequisite.
6. After selecting the registry key, click OK.
7. Remove the default condition (i.e. the File Version) by selecting it and pressing Remove.
Ready to streamline your installation process? Try Advanced Installer's 30-day free trial today, and experience effortless creation and management of prerequisites for your applications.
Test the application
It's now time to test the setup package. Here's what you'll need to do:
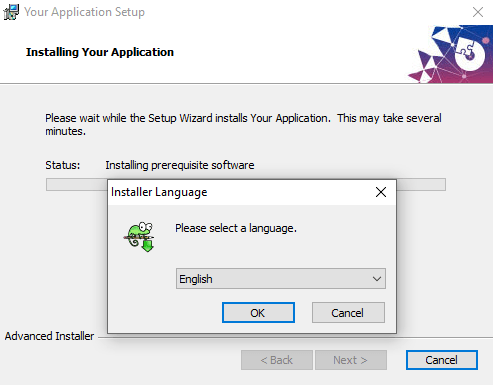
1. Build the Project and Run the Installer: If Notepad++ is already installed on your computer, the installer will recognize it and won't attempt to install it again. It knows that the prerequisite (Notepad++) is already there, so there's no need to install it a second time.
2. Uninstall Notepad++ and the Application:
- Open the Control Panel on your computer.
- Find and uninstall both Notepad++ and the application.
3. Run the Setup Again: After uninstalling, run the setup once more.
- Since Notepad++ was uninstalled, the registry key that indicates its presence will be gone.
- The installer will now see that the prerequisite (Notepad++) is missing and will prompt you to install it.
By following these steps, you'll be able to see how the installer behaves both when the prerequisite is already present and when it's missing.
Conclusions
Creating detection criteria for custom prerequisites with Advanced Installer is a valuable skill for any IT professional or developer in the application packaging industry. Follow the above guidelines to ensure your prerequisites are properly set up and meet your specific needs.
The methods and concepts discussed here provide a strong foundation for more complex packaging scenarios, enhancing your overall proficiency in application deployment.
I hope this article has helped you now understand how to create detection criteria for custom prerequisites with Advanced Installer.
