How to configure digital signing in Advanced Installer Azure DevOps Task
Digital signing is an important stage of an application packaging cycle and can be achieved by code signing your own software’s certificates. By digitally signing your software, you prove your application’s authenticity and integrity upon installation and guarantee that the software you developed hasn’t been compromised or corrupted.
In today’s world, users are becoming more cautious about the source of the applications they are installing in their devices, as they are more informed about security issues. As a way to overcome this, the technical industry is making digital signing a mandatory step.
In this article, you will see how to automate the digital signing process by storing your certificates in the cloud and later accessing them to sign your installers.
We’ll be exploring two methods using Azure DevOps pipelines and Advanced Installer, to reach the same results, heightening security and increasing your users’ confidence in your application:
1. By adding the certificate file as a pipeline resource
2. By loading the certificate from Azure Key Vault
Let's get started.
1. Adding the certificate file as a pipeline resource
There are two main questions that arise when using a certificate in the cloud:
- How can I store it in a secure location?
Azure DevOps offers a Secure Files library where you can upload your secrets. - How can I securely reference the
certificate?
Azure DevOps provides a predefined task tailored for this purpose.
1.1 Configure digital signing with the Secure Files library and Advanced Installer Build task
As we mentioned above, the Secure Files library helps us manage secrets or any confidential information that we will later use during the build process by referencing them from the Advanced Installer Build predefined task.
The Advanced Installer Build Task allows you to create an Azure
DevOps custom task to build an Advanced Installer project. More details
here.
That being said, let’s go through every step and see how everything works together.
1.2 Preparing the project
1. Launch Advanced Installer and load your AIP file.
2. Go to the Digital Signature page.
3. In the Software Publisher Certificate group, choose Use file from disk and select your certificate when prompted.
4. Save and push the project file in the DevOps repository.

If you don't already know, Advanced Installer offers free
licenses for Open Source projects.
More details here.
Also, if you are part of the
Open Source community, do not hesitate to share the above information
with other members.
1.3 Uploading the certificate to Secure Files library
To store the certificate in a secure location, we have to use the Secure Files library.
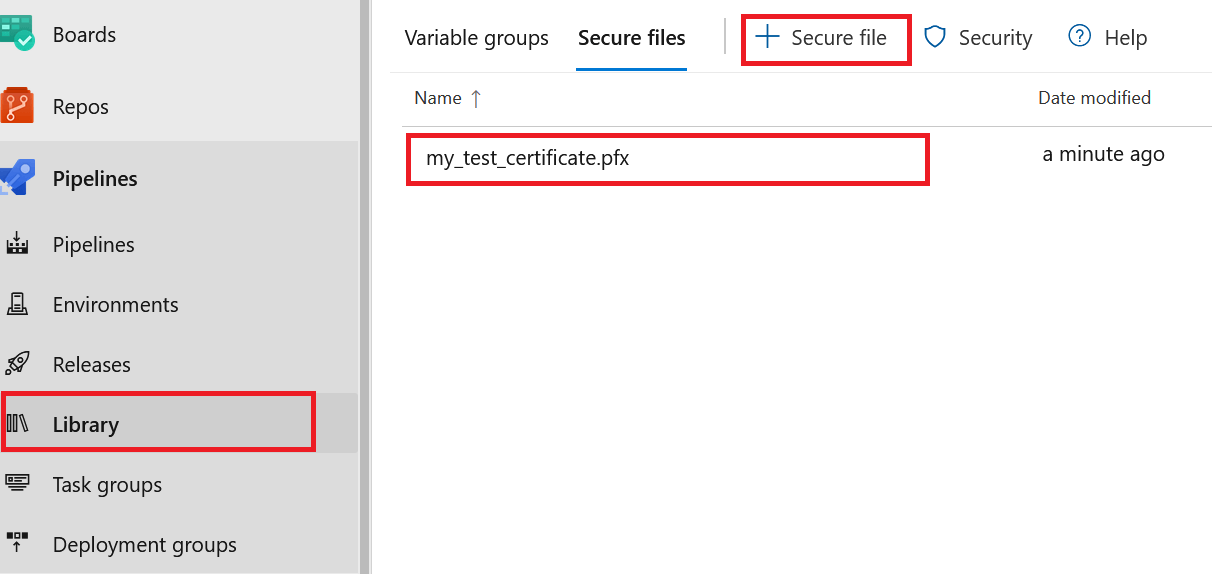
- In your DevOps project, go to the Pipelines section and choose Library.
- In the Library page, switch to the Secure Files tab.
- Upload the certificate using +Secure file .

1.4 Configuring the pipeline
We have arrived at the essential part of this tutorial - this is where everything comes together. Advanced Installer's automation interface is fully compliant with CI/CD pipelines, which makes this process fairly easy.
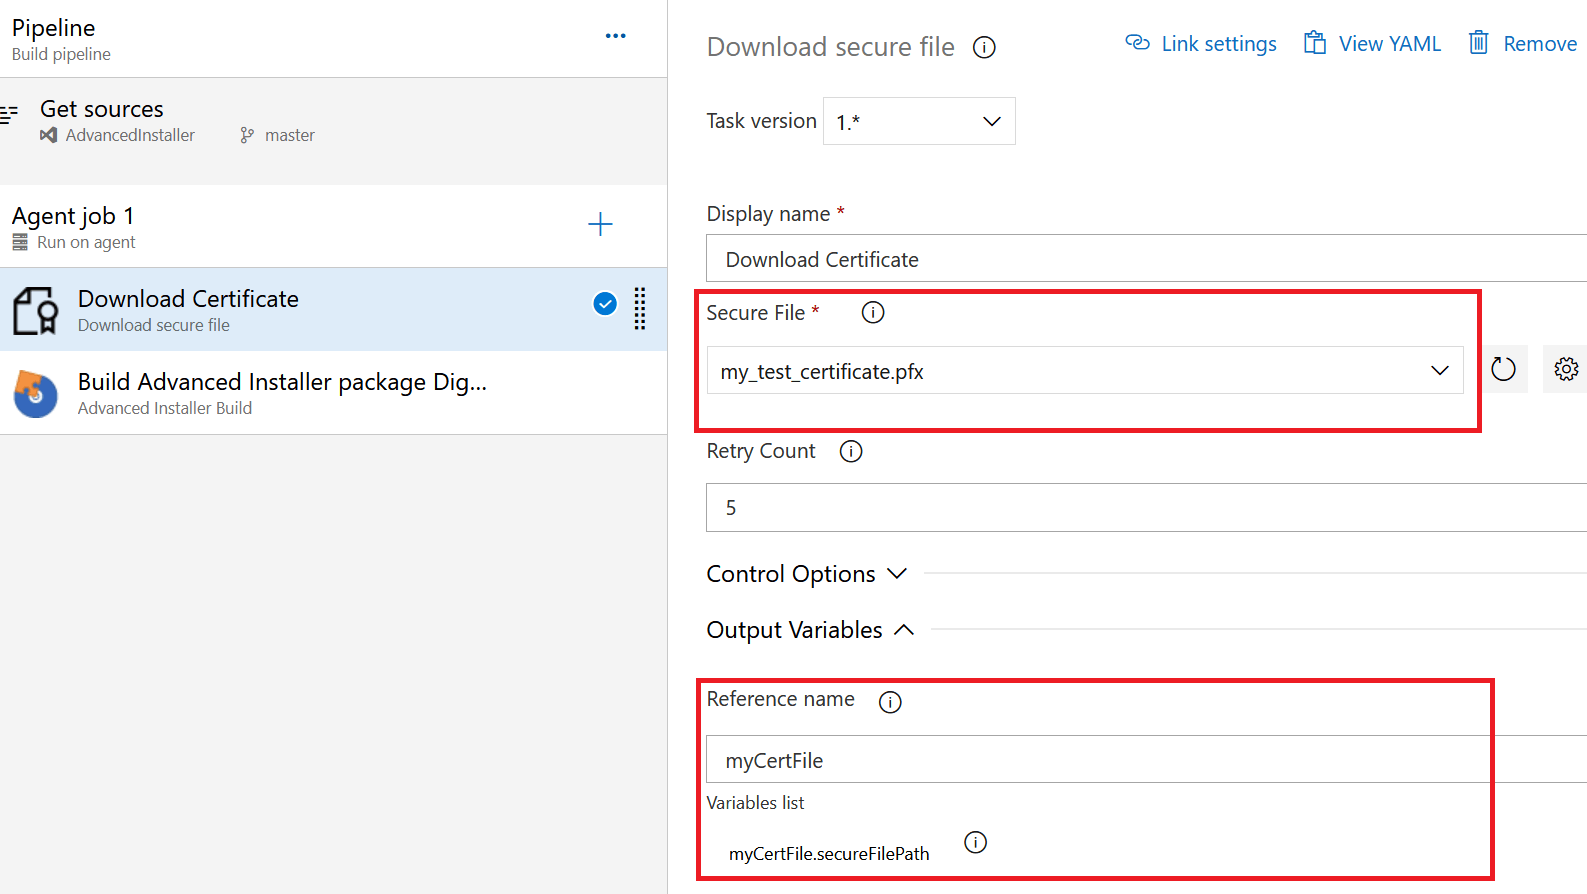
To use the certificate, we need to download it first on the build agent. So, you need to add the Download Secure File task to your pipeline.
There are two main settings you need to configure:
- In the Secure File field, choose the certificate you uploaded earlier.
- In the reference name file, you must specify a name for your certificate. You will use this name later in the pipeline to access the file with the following format: yourFileName.secureFilePath.

For those who prefer to have the code, here's YAML (Yet Another Markup Language):
   steps:
   - task: DownloadSecureFile@1
     displayName: 'Download Certificate'
     name: myCertFile
     inputs:
        secureFile: 'my_test_certificate.pfx'
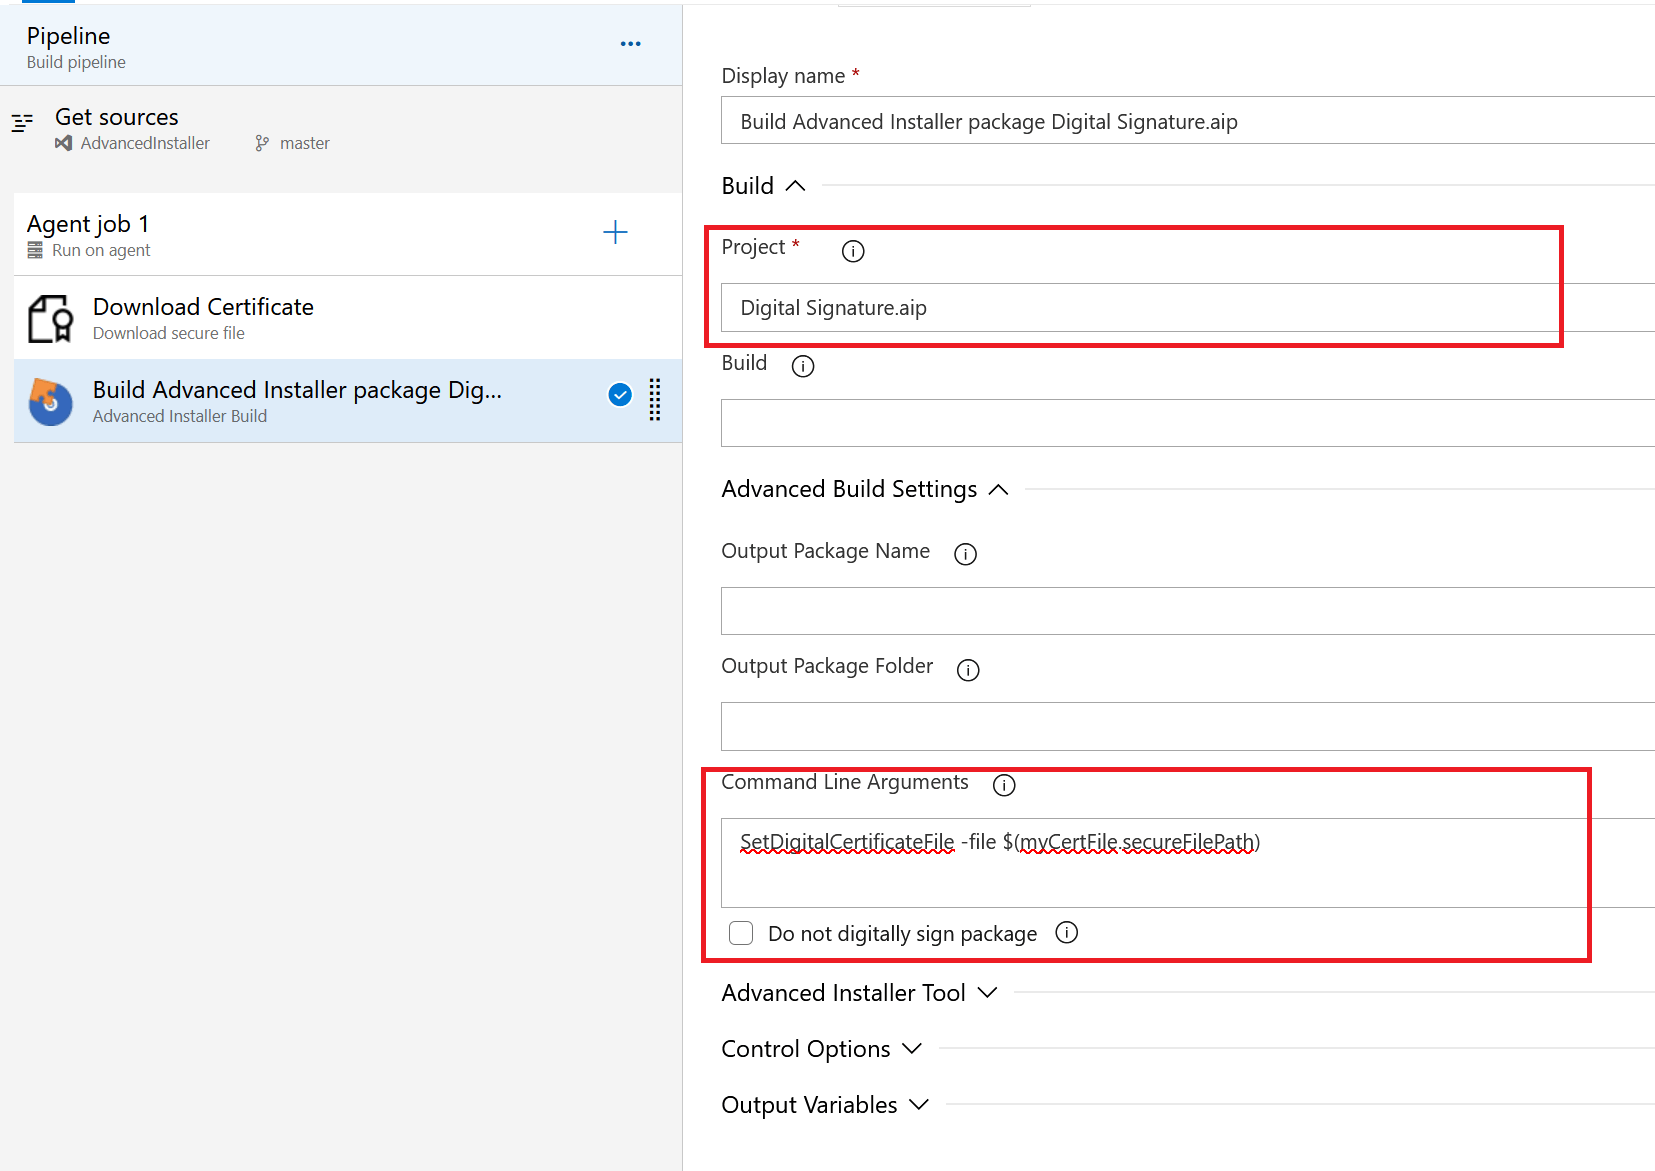
Now, it's time to configure the digital signature in the Advanced Installer Build task. If it is not already present in the pipeline, add it, and schedule it after the download task.
- In the Project field choose the AIP file.
- The Command Line Arguments field accepts any Advanced Installer command that can be executed from a commands file. In our case, we specify the certificate file:
In this example, I have used a test certificate file with no
password. If your certificate requires one, you need to add an extra
command to specify it.
SetDigitalCertificateFile -file $(myCertFile.secureFilePath)
SetDigitalCertificatePassword -password <certificate_password>

For those who prefer to have the code, here's YAML:
steps:
- task: caphyon.AdvancedInstaller-BuildTask.Caphyon.AdvancedInstaller.BuildTask.AdvancedInstaller@2
  displayName: 'Build Advanced Installer package Digital Signature.aip'
  inputs:
	advinstLicense: '$(advancedinstaller.license)'
	aipPath: 'Digital Signature.aip'
	aipExtraCommands: 'SetDigitalCertificateFile -file $(myCertFile.secureFilePath)'
2. Loading the certificate from Azure Key Vault
In the first part of this article, we used a certificate file uploaded in the Secure Files library. Now, let’s see how we can reference a certificate that is managed by Azure Key Vault.
Before completing this tutorial, you need to have a configured
Key Vault under your Azure account.
You need Windows 10 to
perform the signing process with Advanced Installer, so make sure your
Azure DevOps build agent fulfills this requirement
Check this video to see how you can sign an application package directly from the Advanced Installer’s GUI.
Let’s begin!
2.1 Preparing the AIP project
1.Launch Advanced Installer and load the AIP file.
2. Switch to the Digital Signature page.
3. In the Software Publisher Certificate group, choose Use from Azure Key Vault and input the required information.
Here, you need the following:
- Tenant ID
- App ID
- Vault Name
- Certificate Name and Version
These settings will be stored in the AIP project file
During the signing process, Advanced Installer requires the
Azure Key Vault Secret. Since this is sensitive
information, we do not store it in the project file but will configure
it later in the pipeline.
4. Save and push the project file in the DevOps repository

2.2 Configuring the pipeline
As I mentioned earlier, we need to provide Advanced Installer with the Key Vault Secret. A secret must be kept securely - so, to keep the build logs from prying eyes, we use a pipeline variable.
Now let's go back and configure the build task
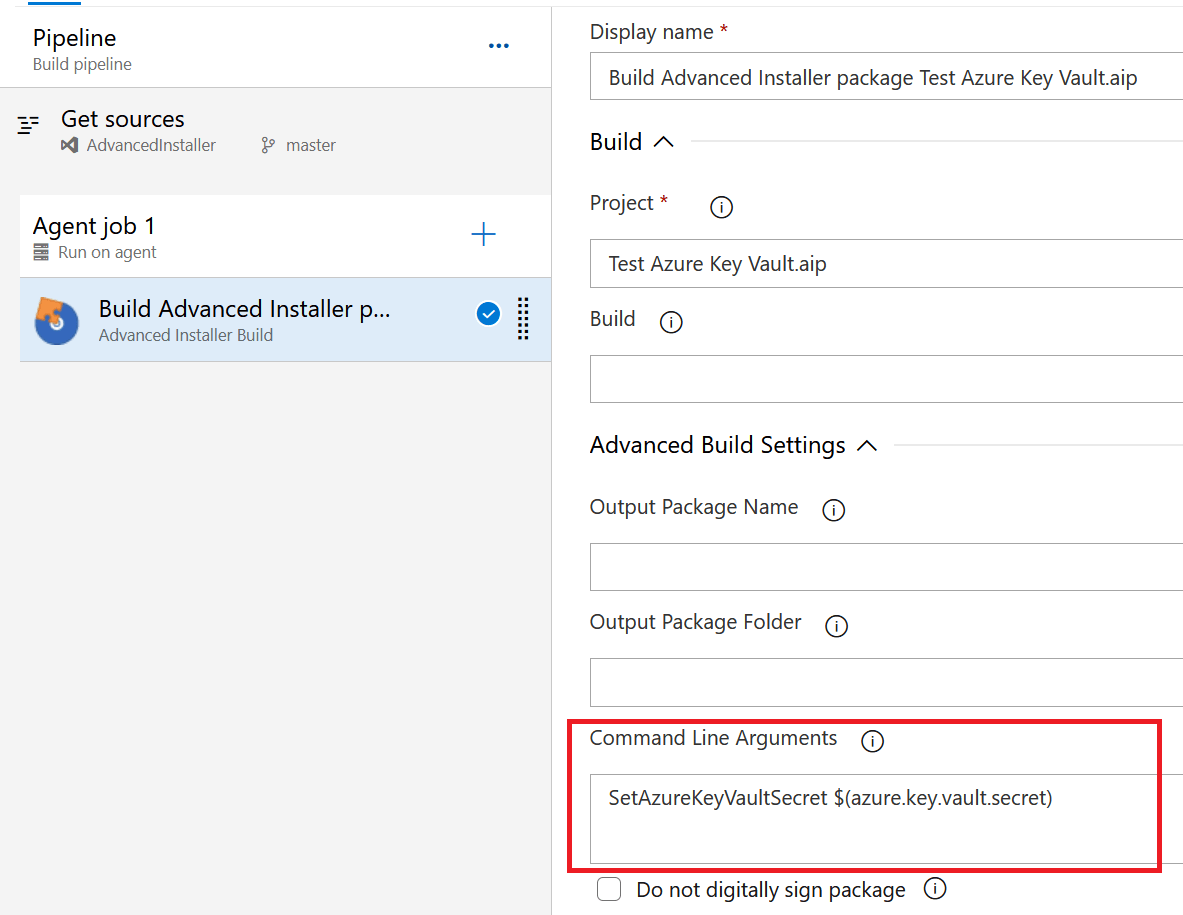
- Add the Advanced Installer Build task to the pipeline, if it is not already present there.
- In the Project field, choose the AIP file.
- In the Command Line Arguments field, add the command for specifying the Azure Key Vault Secret:
SetAzureKeyVaultSecret $(azure.key.vault.secret)
For those who prefer to have the code, here's YAML:
steps:
- task: caphyon.AdvancedInstaller-BuildTask.Caphyon.AdvancedInstaller.BuildTask.AdvancedInstaller@2
  displayName: 'Build Advanced Installer package Test Azure Key Vault.aip'
  inputs:
	advinstLicense: '$(advancedinstaller.license)'
	aipPath: 'Test Azure Key Vault.aip'
	aipExtraCommands: 'SetAzureKeyVaultSecret $(azure.key.vault.secret)'
That’s it. This concludes the second method of creating digital signatures and making sure Azure DevOps runs smoothly.
These steps also work when running Azure DevOps in house - just make
sure your build agents meet the required prerequisites.
We hope you found this useful - Happy coding!
