How to Add a File to an MSI Installer with Embedded CAB
Cabinet files, also known as CAB files, are files that store compressed files in a file library. When it comes to Windows Installers, cabinet files can be located either inside or outside the MSI file.
Within an enterprise environment, there are scenarios when you may need to modify a file within the MSI or even add a new file to an MSI installer.
Let’s suppose we’ve got an MSI installer with an embedded CAB file (CAB inside), and we want to add an extra file to that MSI installer. In this article, we'll go through how.
How to add a file to an MSI installer using Orca
The quickest and simplest way to do this is to add the File as “Noncompressed”.
To do that, you need to:
1. Create a new entry in the Component table.

Component – specify the name of the new Component
ComponentId – specify the GUID of the component; it must be unique
Directory – specify the primary key of the entry in the Directory table corresponding to the Directory where the files needs to be copied to
Attributes – specify the correct Attribute
Condition – specify conditional statement, if any; otherwise, leave blank
KeyPath – specify the keypath of the Component
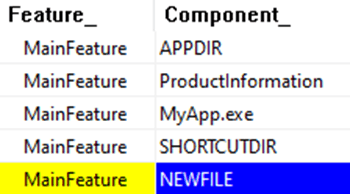
2. Create a new entry in the FeatureComponent table.

Feature_ - specify the primary key of the feature that includes the component created at step 1
Component_ - specify the primary key of the new component created at step 1
3. Create a new entry in the File table.

File | |
|---|---|
Component_ | specify the primary key of the new component created at step 1 |
FileName | |
FileSize | specify the size of the file in bytes |
Version | for a versioned file, specify the version of the file; otherwise, leave blank |
Language | specify the language ID |
Attributes | set the value to 8192 which means the file’s source type is uncompressed. |
Sequence | set the value to the highest existing sequence + 1 (in our case, 2=1+1) |
4. Create a new entry in the Media table.

DiskId – set the value to the highest existing DiskId + 1 (in our case, 2=1+1)
LastSequence – set the value same as for FileSequence set at step 3
And that’s it. Now you can save the MSI and install it.
The new file added must be placed in the same directory as the MSI installer.
How to compress files into internal CAB using WiMakCAb.vbs?
WiMakCab.vbs is a utility script that can be used to generate CAB files and embed them into the MSI installer.
1. Perform an administrative install

2. Open the MSI within administrative installation folder
3. Go to File table and set the Attribute value of the new file added earlier from 8192 to 0

4. Go to Media table and delete the entry added earlier

5. Run the following command:

And you're done. Now, the MSI is recompiled with embedded CAB.
If you open the new MSI file, you can see that the entry in the Media table was updated accordingly.
How to add a file to an MSI installer using Advanced Installer?
Advance Installer offers you the capability to add new files and control the CAB options straight from its GUI.
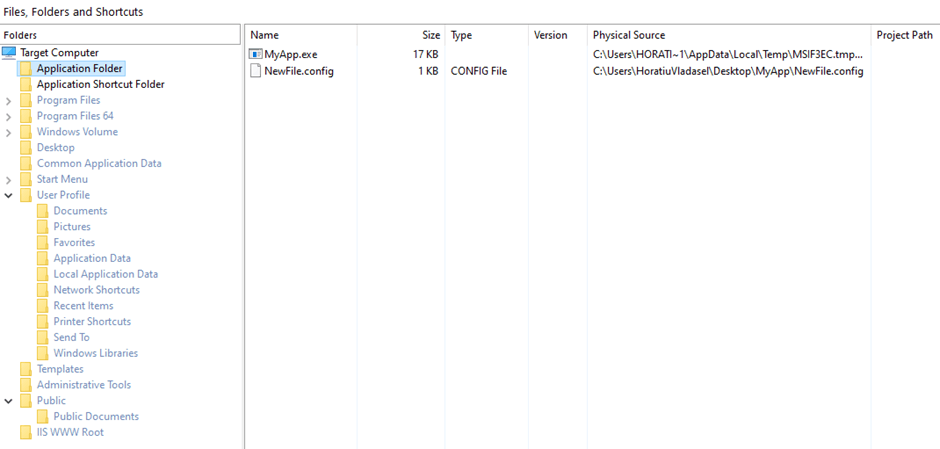
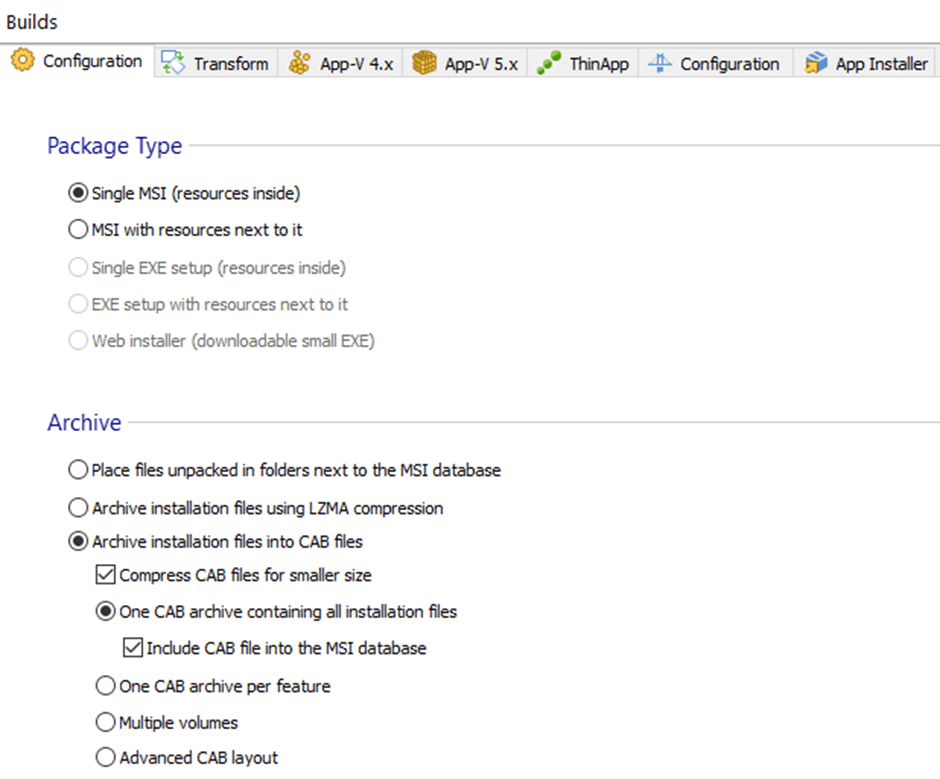
As you can see below, you can add a file and rebuild the MSI with embedded CAB in just 2 steps.
1. Go to the Files and Folders page and add the new file.

2. Go to the Builds page, select “One CAB archive containing all installation files” and also check the “Include CAB file into the MSI database” box.

Now all you have to do is Save the MSI. When saved, Advanced Installer rebuilds the MSI as per the new customization selected.
Conclusion
This is how you can add a file to an embedded MSI CAB. We hope you find this tutorial useful. To make things even easier, Advanced Installer provides an excellent end-user experience due to its powerful and easy-to-use GUI.
